1. 비동기 작업을 위한 셋팅이 필요했다.
모든 request엔 오면 반드시 response가 와야하는법.
하지만,
이런 경우는 어떨까
유저 2000명에게 이메일 혹은 카카오 알림톡을 보내야 한다.
해당 작업이 오래 지속된다면,
서버는 그 작업을 처리하느라
다른 작업을 처리하지 못하게 된다.
즉, 단체 이메일을 보내는 동안
유저는 작업을 할 수가 없게 된다는 말이다.
그래서 비동기 방식의 작업처리의 구현은 필수적이다.
용어정리
-
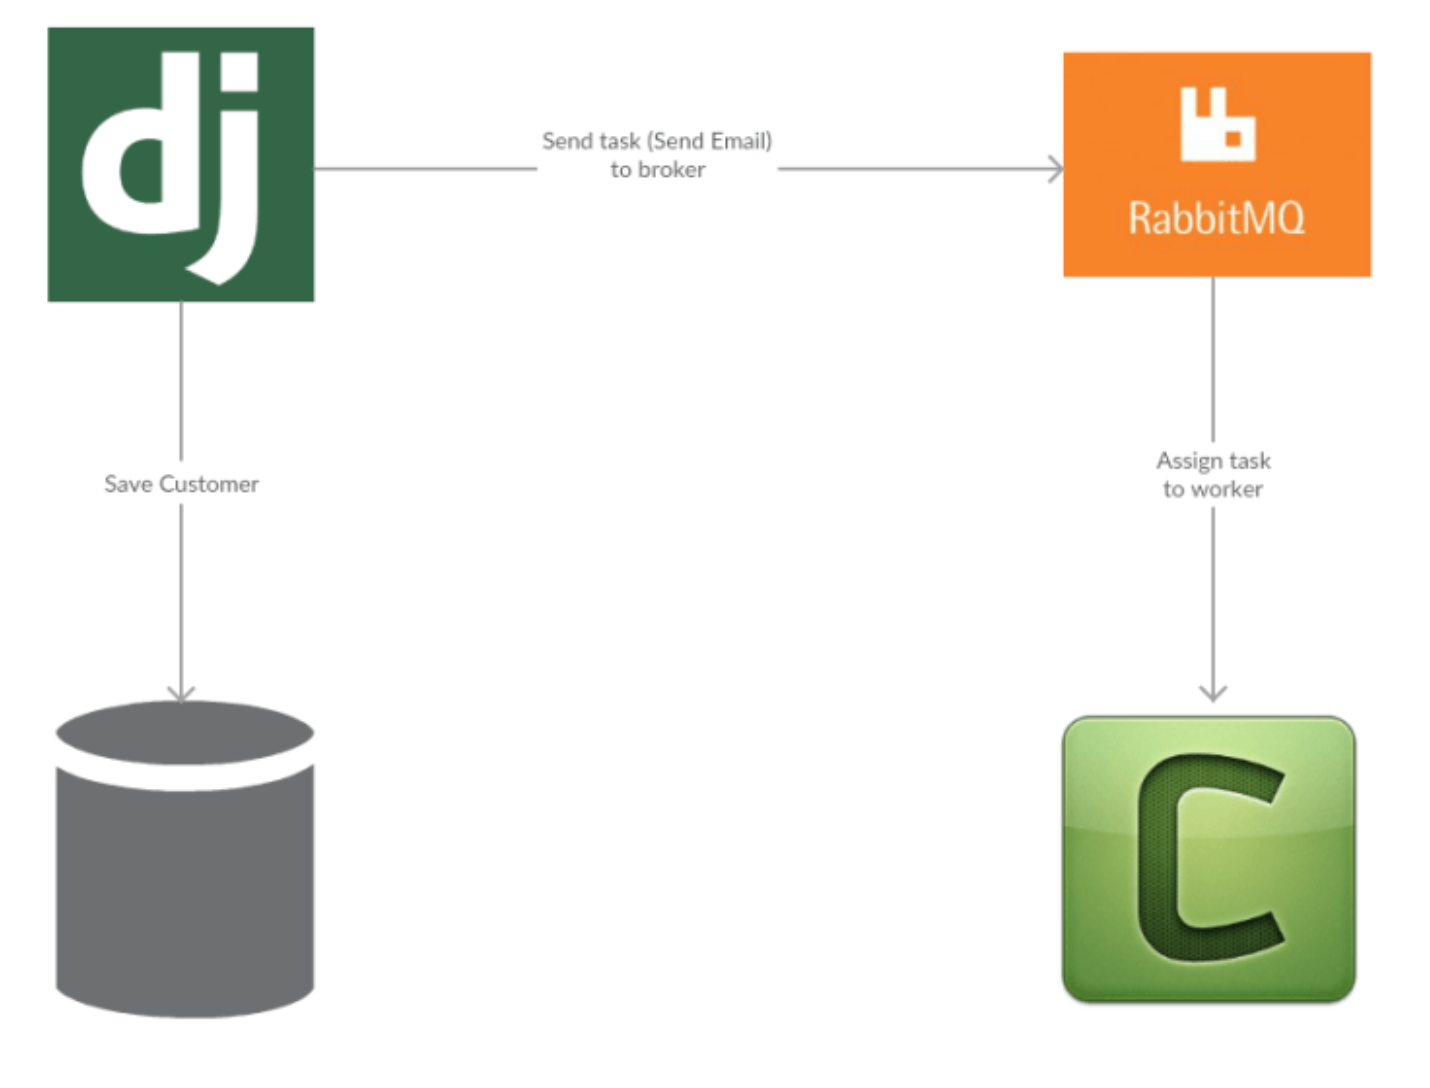
브로커(broker): 비동기 task(작업)들이 적재될 장소.
장고에서는 RabbitMQ 와 Redis 가 주로 사용된다.
-
프로듀서(producer): 비동기 task들을 큐에 넣는 코드.
-
워커(worker): 브로커에서 task들을 가져와 실행하는 코드.
각 워커는 데몬 형태로 실행/관리된다.
2. 설치 모듈
1) requirements.txt
Django>=3.1
djangorestframework>=3.11.1
psycopg2>=2.8.5
requests>=2.24.0
Pillow>=5.4.0
flake8>=3.8.3
djangorestframework-simplejwt
django-cors-headers>=3.5.0

celery>=4.4.7, <4.5
위와 같이 celery 모듈을 requirements.txt에 입력했다.
2) docker-compose.yml
version: "3"
services:
    app:
        build:
            context: .
        ports:
            - "8000:8000"
        volumes:
            - ./app:/app
        command: >
            sh -c "python manage.py wait_for_db &&
                   python manage.py migrate &&
                   python manage.py runserver 0.0.0.0:8000"
        environment:
            - DB_HOST=db
            - DB_NAME=app
            - DB_USER=postgres
            - DB_PASS=supersecretpassword
        depends_on:
            - db
            - rabbitmq
    db:
        image: postgres:10-alpine
        environment:
            - POSTGRES_DB=app
            - POSTGRES_USER=postgres
            - POSTGRES_PASSWORD=supersecretpassword

    # rabbitmq message queue
    rabbitmq:
        image: rabbitmq:3.7-alpine

    # celery worker service
    celery:
        build: .
        command: celery -A app worker  --loglevel=info
        #ports: []
        depends_on:
            - rabbitmq
            - db
이제 빌드 및 런 서버를 하자.
docker-compose builddocker-compose up이제 rabbitmq 서버를 열자.
docker-compose run --rm app celery -A app worker --loglevel=info3) 테스트를 위한 뷰 생성
class WelcomingEmail(APIView):
    '''Send email to all user'''
    def post(self, request):
        post_signup_welcome_email.delay()
        return Response(status=status.HTTP_200_OK)
뷰 하나를 직접 생성했다.
4) celery.py 생성
from __future__ import absolute_import, unicode_literals

import os

from celery import Celery

# set the default Django settings module for the 'celery' program.
os.environ.setdefault('DJANGO_SETTINGS_MODULE', 'app.settings')

app = Celery('app')

# Using a string here means the worker doesn't have to serialize
# the configuration object to child processes.
# - namespace='CELERY' means all celery-related configuration keys
#   should have a `CELERY_` prefix.
app.config_from_object('django.conf:settings', namespace='CELERY')

# Load task modules from all registered Django app configs.
app.autodiscover_tasks()


@app.task(bind=True)
def debug_task(self):
    print('Request: {0!r}'.format(self.request))
비동기 작업이 필요한 함수를 celery.py에 넣었다.
(celery.py가 있는 위치는 settings.py가 있는 위치이며,
(마찬가지로 settings.py가 위치한 __init__.py 역시 수정해야 한다.)
5) init.py 생성
<__init__.py>
from __future__ import absolute_import, unicode_literals

# This will make sure the app is always imported when
# Django starts so that shared_task will use this app.
from .celery import app as celery_app

__all__ = ('celery_app',)
해당 task 함수에 @shared_task 데코레이터를 입력해야 한다.
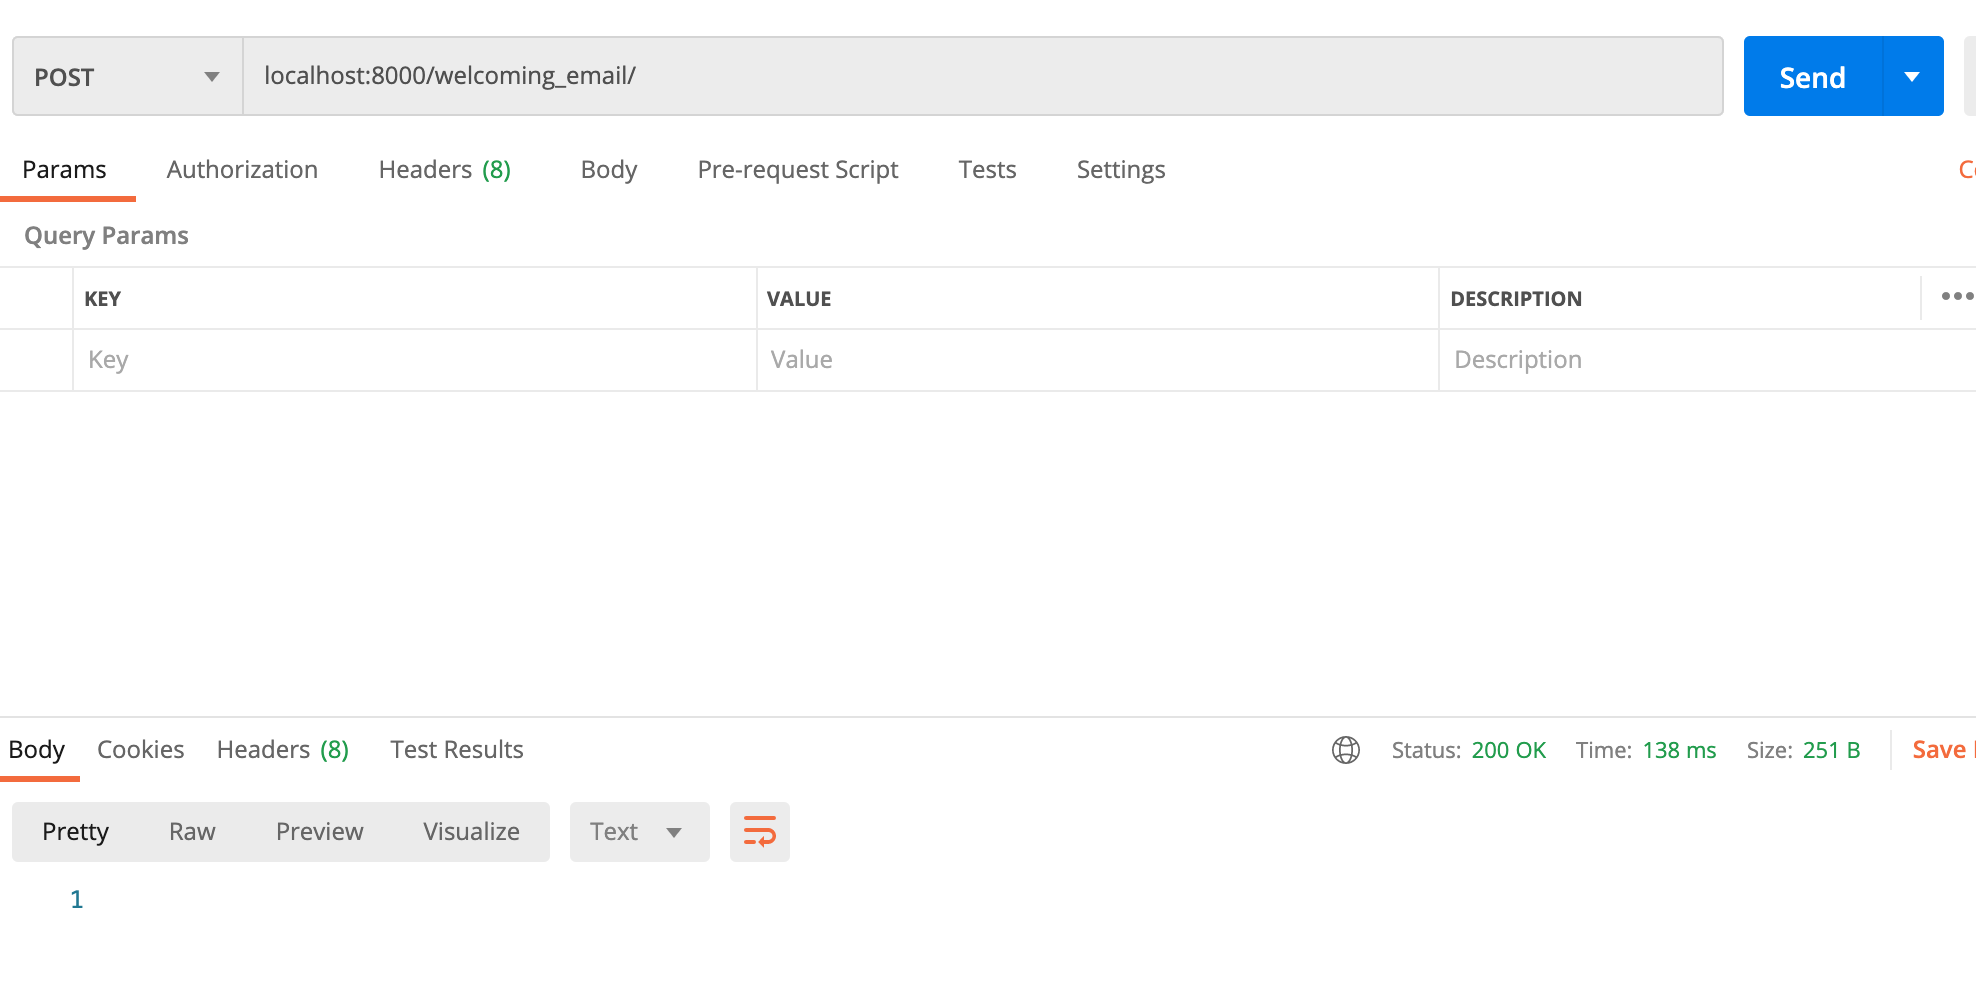
6) postman으로 요청
postman으로 post메소드 요청을 보낸다.
task 함수명은 post_singup_welcom_email이고,
.delay() 메소드를 통해 비동기 작업 큐에 해당 요청을 넣는 프로세스다.
7) 실행결과
docker-compose run --rm app celery -A app worker --loglevel=info
참조한 영상은 https://www.youtube.com/watch?v=9RQpUv9QRJY&t=207s
위와 같으며, 많은 도움이 됐다.
추가로 진행해야 하는 사항(의문점..)은
-
비동기 큐에 request가 전송되고 실행된다는 점은 알겠다.
하지만, 10분 이내에 실행되게 하려면? -
해당 작업이 실행되지 못했을때, 서버는 어떻게 될지...500에러가 발생하면 안되는데....!
-
비동기 큐의 작업들의 결과가 서버에 누적되면, 이것 역시 부하로 인한 속도 저하가 발생한다고 하는데, 로깅으로 서버 관리자만 확인하게 하는 방법