오늘 스터디에서 진행할 LeetCode문제를 슬쩍 봤는데 연결 리스트와 관련이 있어서 후다닥 읽고 정리해본다.
연결 리스트와 배열과의 차이점
-
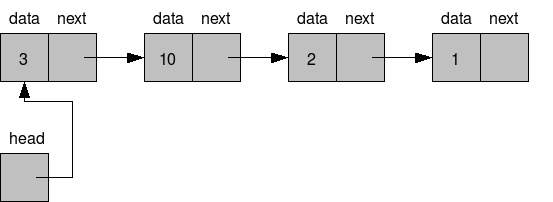
연결 리스트는 일련의 원소를 배열처럼 차례대로 저장하지만, 원소들이 메모리상에 연속적으로 위치하지 않는다는 점이 다르다.
-
연결 리스트는 원소 추가/삭제 시 다른 원소들을 이동하지 않아도 된다는 점에서 배열보다 낫다. (이는 이전 포스팅 배열(Array)에서 shift메소드가 작동하는 방식을 통해서 설명했다.)
단방향 연결리스트 직접 구현
function LinkedList() {
  var Node = function (element) { // 1
    this.element = element; // 2
    this.next = null; // 3
  };

  var length = 0;
  var head = null; //

  this.append = function (element) {};
  this.insert = function (element) {};
  this.removeAt = function (element) {};
  this.remove = function (element) {};
  this.indexOf = function (element) {};
  this.isEmpty = function (element) {};
  this.size = function (element) {};
  this.toString = function (element) {};

  // 배열의 형태로 쉽게 확인할 수 있도록 하기 위함.
  this.print = function (element) {};
}
-
기본 구조를 먼저 만들었다. Node(1)라는 클래스는 연결 리스트에 추가되는 원소를 의미한다.
-
element(2)가 바로 원소에 해당되며, next(3) 프로퍼티는 다음 노드를 가리키는 포인터다. (화살표: -> 라고 생각하면 편할수도
append()
-
리스트의 끝에 원소를 추가하는 메소드다.
-
append()를 구현할 때는 빈 연결 리스트인지 여부에 따라 두 가지 경우를 각각 고려해야 한다.
  this.append = function (element) {
    var node = new Node(element);
    var current;

    // Linked List가 비어있는 경우
    if (head === null) head = node;
    // 비어 있지 않은 경우
    else {
      current = head;

      // 마지막 원소를 발견할 때까지 계속 루프 순환한다.
      while (current.next) current = current.next;

      // 마지막 원소를 링크할 수 있게 다음 노드에 핟당한다.
      current.next = node;
    }
  };

var list = new LinkedList();
list.append(15);
list.append(10);
연결 리스트에서 마지막 node의 next는 항상 null 이다.
removeAt()
-
삭제하려는 원소가 연결리스트의 첫 번째 원소인지 아닌지에 따라 두 가지 경우를 생각해야 한다.
-
이 중 removeAt 메소드는 원소의 위치를 기준으로 삭제한다.
 this.removeAt = function (element) {
    // 원소의 위치를 기준으로 삭제하는 메소드

    if (position > -1 && position < length) {
      let current = head; // 삭제할 원소
      let previous; // 삭제할 원소의 이전 원소
      let index = 0;

      // ex) 1 -> 2 -> 3

      // 첫 번째 원소 삭제
      if (position === 0) head = current.next;
      // 1 -> 2 -> 3 => 2 -> 3
      // General Case
      else {
        while (index++ < position) {
          // 해당 인덱스를 찾을 때까지

          previous = current; // previous = 1
          current = current.next; // current = 2

          // 계속 값을 업데이트 시켜준다.
        }
        previous.next = current.next; // 1 -> 3(current.next = 3)
      }
      length--;

      return current.element;
    } else {
      return null;
    }
  };
insert()
- 임의의 위치에 원소르 삽입하는 insert 메소드를 살펴보자.
  this.insert = function (position, element) {
    if (position >= 0 && position <= length) {
      // 삭제할 원소가 범위 외 값인지 체크

      let node = new Node(element); // 추가할 원소
      let current = head; // head
      let previous; // 삭제할 원소
      let index = 0; // 자리 체크용 인덱스

      // ex) 추가할 원소: 5
      // ex) LinkdedList: 1 -> 2 -> 3

      // 첫 번째 위치에 원소 추가
      if (position === 0) {
        node.next = current; // 5 -> 1 -> 2...
        head = node; // update head
      }

      // general case
      else {
        while (index++ < position) {
          // traverse
          previous = current;
          current = current.next;
        }
        node.next = current;
        previous.next = node;
      }
      length++;
      return true;
    } else {
      return false;
    }
};-
원소를 마지막 위치에 삽입하는 경우, loop이 끝나면 previous는 list의 마지막 원소를 가리키게 될 것이다.
-
current는 null이 될 것이다.
-
node.next는 current를, previous.next는 node를 바라보게 한다면
toArray()
- LinkedList 객체를 배열로 반환한다.
  this.toArray = function (element) {
   let current = head;
    let array = [];

    while (current) {
      array.push(current.element);
      current = current.next; // current를 다음 값으로 계속 업데이트해주기
    }
    return array;
  };
indexOf()
- 원소 값을 인자로 받아 리스트에서 해당 원소의 인덱스를 반환한다. 없는 원소라면 -1을 반환한다.
 this.indexOf = function (element) {
    let current = head;
    let index = -1;

    while (current) {
      if (element === current.element) return index;
      index++;
      current = current.next; // update current
    }
    return -1;
  };
Doubly Linked List는 추후에 업로드 하도록 하겠다.