1. Compound Components Pattern
- 이 패턴을 사용하면 불필요한
prop driling없이 표현적이고 선언적인 Component를 만들 수 있다. - 관심사 분리와 이해하기 쉬운 API로 Component를 더욱 커스터마이징하려면 이 패턴을 사용하는 것을 고려
Usage.jsx
import React from 'react';
import { Counter } from './Counter';
function Usage() {
const handleChangeCounter = (count) => {
console.log(`count, ${count}`);
}
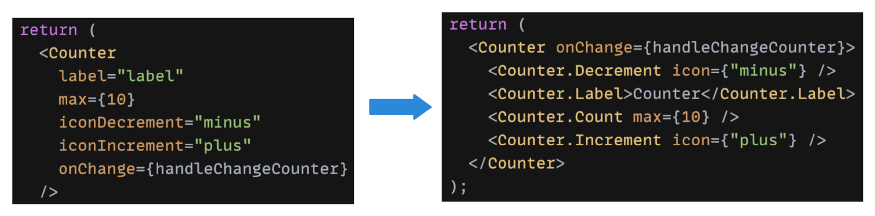
return (
<Counter onChange={handleChangeCounter}>
<Counter.Decrement icon="minus" />
<Counter.Label>Counter</Counter.Label>
<Counter.Counter max={10} />
<Counter.Increment icon="plus" />
</Counter>
)
}Counter.jsx
import React, { useRef, useEffect } from "react";
import styled from "styled-components";
import { CounterProvider } from "./useCounterContext";
import { Count, Label, Decrement, Increment } from "./components";

function Counter({ children, value: count, onChange }) {
  const firstMounded = useRef(true);
  useEffect(() => {
    if (!firstMounded.current) {
      onChange && onChange(count);
    }
    firstMounded.current = false;
  }, [count, onChange]);
  /* count가 업데이트될 때만 onChange() 함수를 호출하는 것입니다.
  ref / 조건이 없으면 마운트 시 onChange()도 호출됩니다
  (React useEffect 후크가 초기 렌더링에서 실행되지 않도록 설정 참조).
  */
  return (
    <CounterProvider value={{ count }}>
      <StyledCounter>{children}</StyledCounter>
    </CounterProvider>
  );
}

const StyledCounter = styled.div`
  display: inline-flex;
  border: 1px solid #17a2b8;
  line-height: 1.5;
  border-radius: 0.25rem;
  overflow: hidden;
`;

Counter.Count = Count;
Counter.Label = Label;
Counter.Increment = Increment;
Counter.Decrement = Decrement;

export { Counter };
useCounterContext.js
import React from "react";

const CounterContext = React.createContext(undefined);

function CounterProvider({ children, value }) {
  return (
    <CounterContext.Provider value={value}>{children}</CounterContext.Provider>
  );
}

function useCounterContext() {
  const context = React.useContext(CounterContext);
  if (context === undefined) {
    throw new Error("useCounterContext must be used within a CounterProvider");
  }
  return context;
}

export { CounterProvider, useCounterContext };
장점
API 복잡성 감소
하나의 거대한 상위 컴포넌트에서 모든 props를 관리하고 하위 UI 컴포넌트로 내려주는 대신 각 props는 가장 의미가 있는 서브컴포넌트에 연결이 된다.
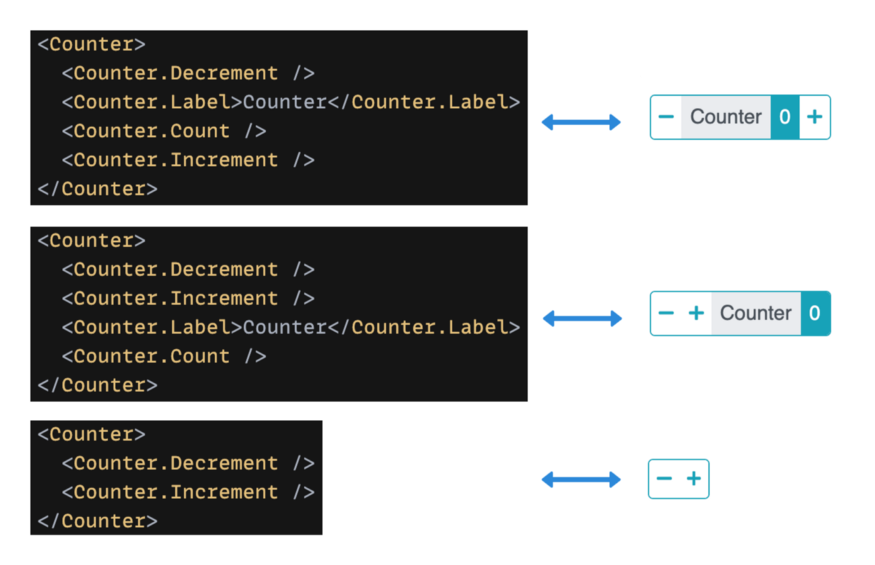
유연한 마크업 구조
컴포넌트는 UI 유연성이 뛰어나 단일 컴포넌트에서 다양한 케이스를 생성할 수 있습니다.
예를 들어 사용자는 하위 컴포넌트의 순서를 변경하거나 표시할 하위 컴포넌트를 정의할 수 있습니다.
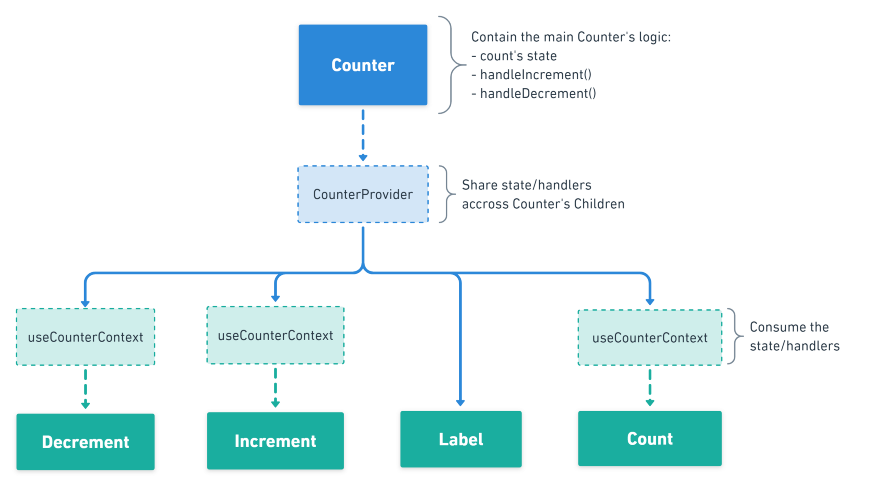
우려사항 분리
대부분의 논리는 기본 Count 컴포넌트에 포함되어 있다.
React.Context는 모든 자식간의 state 와 handler를 공유하는데 사용된다.
명확하게 책임을 분리한다.
단점
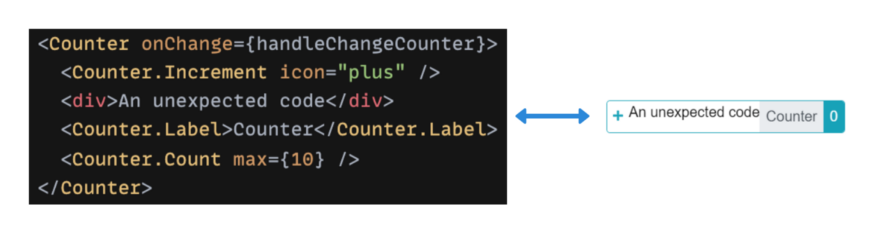
너무 많은 UI 유연성
유연성을 갖는 것은 예기치 않은 동작을 유발할 가능성과 함께 제공됩니다
(원하지 않는 컴포넌트의 자식 배치, 컴포넌트의 자식 순서를 바꾸거나 필수 자식 포함을 잊음).
사용자가 컴포넌트를 어떻게 사용하기를 원하는지에 따라 그렇게 많은 유연성을 허용하지 않을 수 있습니다.
더 무거운 JSX
이 패턴을 적용하면 특히 EsLint와 같은 린터나 Prettier와 같은 코드 포맷터를 사용하는 경우 JSX 행 수가 증가합니다.
단일 컴포넌트 규모에서는 큰 문제가 아닌 것처럼 보이지만 큰 그림을 보면 확실히 큰 차이를 만들 수 있습니다.

Criteria
- Inversion of control: 1/4
- Implementation complexity: 1/4
Public libraries using this pattern
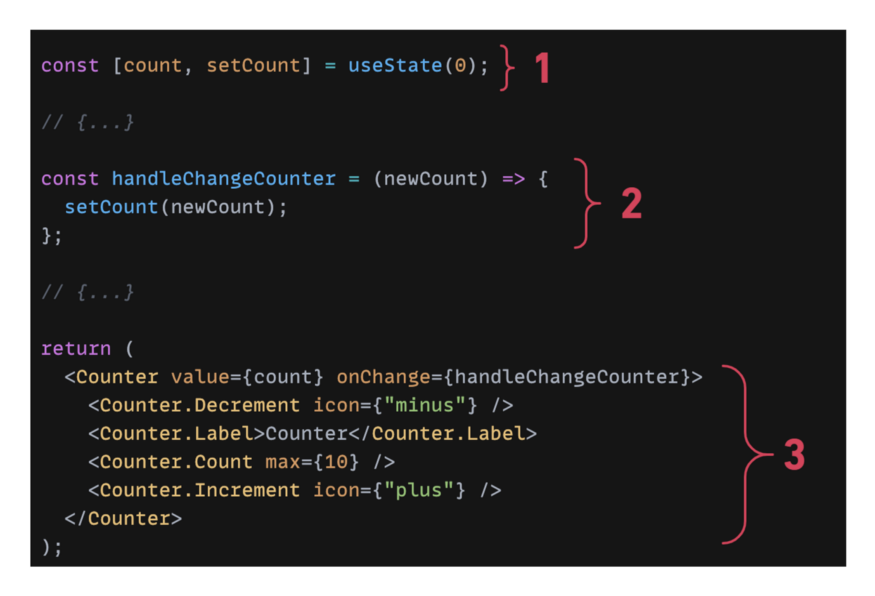
2. Control Props Pttern
- 이 패턴은 컴포넌트를 제어 컴포넌트로 변환한다.
- 외부 상태는 사용자가 기본 컴포넌트 동작을 수정하는 사용자 지정 논리를 삽입할 수 있도록 하는 "단일 정보 소스"로 사용됩니다.
import React, { useReact } from 'react';
import { Counter } from "./Counter";

function Usage() {
  const [count, setCount] = useState(0);

  const handleChangeCounter = newCount => {
    setCount(newCount);
  };

  return (
    <Counter value={count} onChange={handleChangeCounter}>
      <Counter.Decrement icon={"minus"} />
      <Counter.Label>Counter</Counter.Label>
      <Counter.Count max={10} />
      <Counter.Increment icon={"plus"} />
    </Counter>
  )
}
장점
더 많은 제어권한 부여
기본 상태는 컴포넌트 외부에 노출되므로 사용자가 이를 제어하므로 컴포넌트에 직접적인 영향을 줄 수 있습니다.
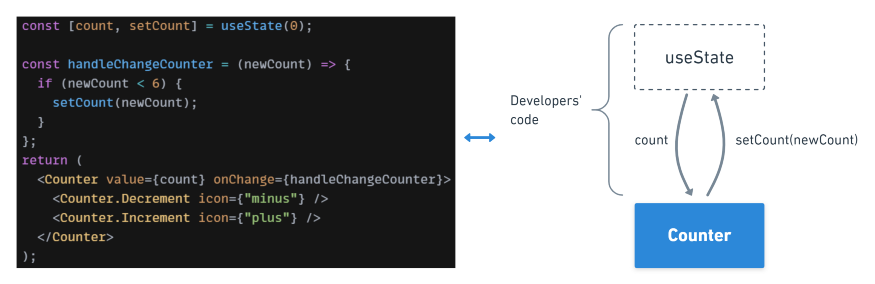
단점
구현 복잡성
이전에는 단일 위치(JSX)에서 하나의 통합으로 컴포넌트가 작동하기에 충분했다.
이제 3개의 다른 위치(JSX/useState/handleChange)에 퍼집니다.
Criteria
- Inversion of control: 2/4
- Implementation complexity: 1/4
Public libraries using this pattern
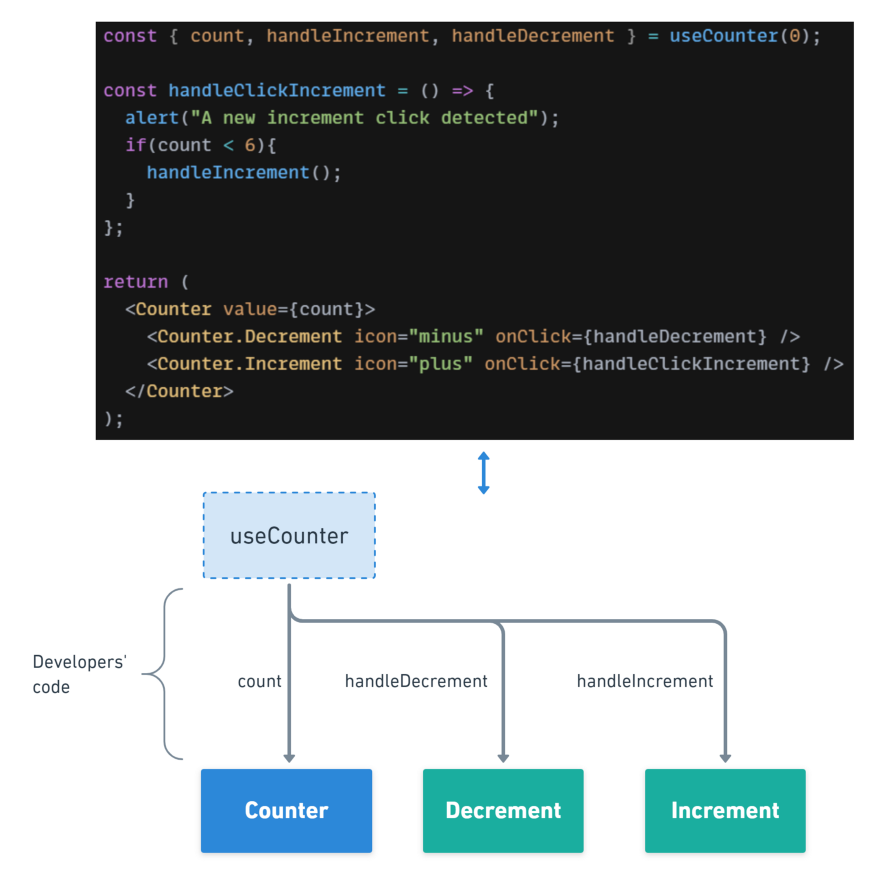
3. Custom Hook Pattern
- "제어의 역전"에 더 나아가 보자: 이제 메인 로직이
custom hook으로 옮겨갔다. hook은 사용자가 액세스할 수 있으며 여러 내부 논리(상태, 처리기)를 노출하여 컴포넌트를 더 잘 제어할 수 있도록 합니다.
import React from 'react';
import { Counter } from './Counter';
import { useCounter } from './useCounter';

function Usage() {
  const { count, handleIncrement, handleDecrement } = useCounter(0);
  const MAX_COUNT = 10;

  const handleClickIncrement = () => {
    // Put your custom logic
    if (count < MAX_COUNT) {
      handleIncrement();
    }
  };

  return (
    <>
      <Counter value={count}>
        <Counter.Decrement
          icon={"minus"}
          onClick={handleDecrement}
          disabled={count === 0}
        />
        <Counter.Label>Counter</Counter.Label>
        <Counter.Count />
        <Counter.Increment
          icon={"plus"}
          onClick={handleClickIncrement}
          disabled={count === MAX_COUNT}
        />
      </Counter>
      <button onClick={handleClickIncrement} disabled={count === MAX_COUNT}>
        Custom increment btn 1
      </button>
    </>
  );
}

export { Usage };
장점
더 많은 제어를 제공
개발자는 hook와 JSX 요소 사이에 자신의 논리를 삽입하여 기본 컴포넌트 동작을 수정할 수 있습니다.
단점
구현 복잡성
논리 부분은 렌더링 부분과 분리되어 있으므로 둘 다 연결해야 하는 것은 개발자입니다
컴포넌트를 올바르게 구현하려면 컴포넌트가 어떻게 작동하는지 잘 이해해야 합니다.

Criteria
- Inversion of control: 2/4
- Implementation complexity: 2/4
Public libraries using this pattern
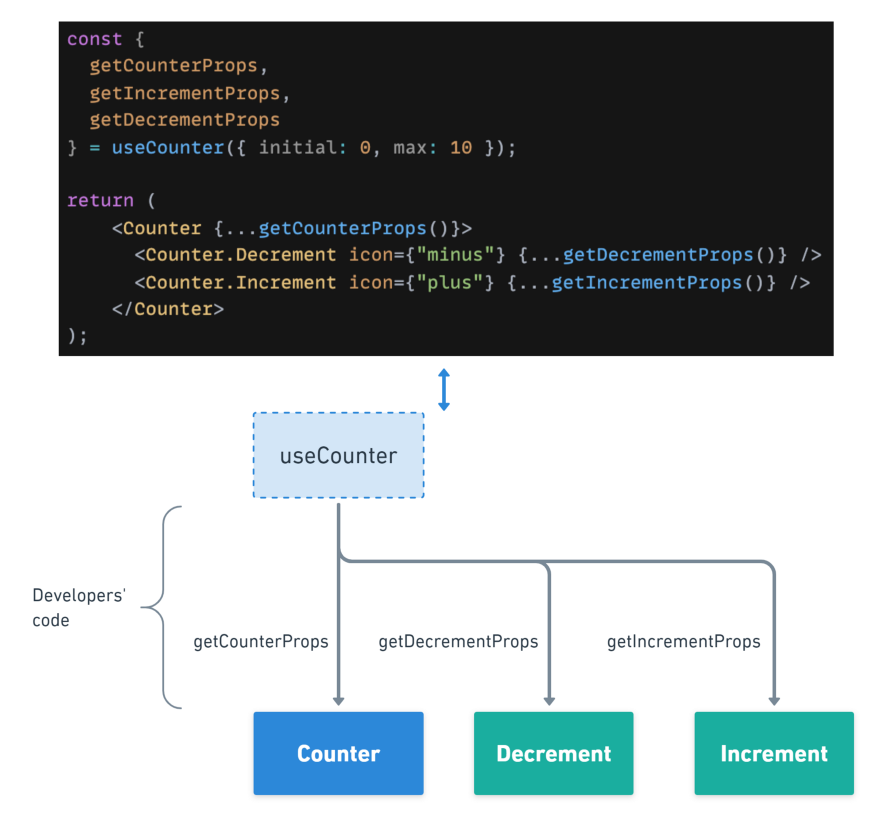
4. Props Getters Pattern
Custom hook pattern은 훌륭한 제어를 제공하지만 개발자가 많은native hook’s props을 처리하고 자신의 논리를 다시 만들어야 하기 때문에 컴포넌트를 통합하기 더 어렵게 만듭니다.Props Getters Pattern은 이러한 복잡성을 숨기려고 시도합니다.native props를 노출하는 대신props getter의 후보 목록을 제공한다.getter는 많은 props를 반환하는 함수이며 개발자가 자연스럽게 올바른 JSX 요소에 연결할 수 있도록 하는 의미 있는 이름을 가지고 있습니다.
import React from "react";
import { Counter } from "./Counter";
import { useCounter } from "./useCounter";

const MAX_COUNT = 10;

function Usage() {
  const {
    count,
    getCounterProps,
    getIncrementProps,
    getDecrementProps
  } = useCounter({
    initial: 0,
    max: MAX_COUNT
  });

  const handleBtn1Clicked = () => {
    console.log("btn 1 clicked");
  };

  return (
    <>
      <Counter {...getCounterProps()}>
        <Counter.Decrement icon={"minus"} {...getDecrementProps()} />
        <Counter.Label>Counter</Counter.Label>
        <Counter.Count />
        <Counter.Increment icon={"plus"} {...getIncrementProps()} />
      </Counter>
      <button {...getIncrementProps({ onClick: handleBtn1Clicked })}>
        Custom increment btn 1
      </button>
      <button {...getIncrementProps({ disabled: count > MAX_COUNT - 2 })}>
        Custom increment btn 2
      </button>
    </>
  );
}

export { Usage };
import { useState } from "react";
//Function which concat all functions together
const callFnsInSequence = (...fns) => (...args) =>
fns.forEach((fn) => fn && fn(...args));
function useCounter({ initial, max }) {
const [count, setCount] = useState(initial);
const handleIncrement = () => {
setCount((prevCount) => Math.min(prevCount + 1, max));
};
const handleDecrement = () => {
setCount((prevCount) => Math.max(0, prevCount - 1));
};
//props getter for 'Counter'
const getCounterProps = ({ ...otherProps } = {}) => ({
value: count,
"aria-valuemax": max,
"aria-valuemin": 0,
"aria-valuenow": count,
...otherProps
});
//props getter for 'Decrement'
const getDecrementProps = ({ onClick, ...otherProps } = {}) => ({
onClick: callFnsInSequence(handleDecrement, onClick),
disabled: count === 0,
...otherProps
});
//props getter for 'Increment'
const getIncrementProps = ({ onClick, ...otherProps } = {}) => ({
onClick: callFnsInSequence(handleIncrement, onClick),
disabled: count === max,
...otherProps
});
return {
count,
handleIncrement,
handleDecrement,
getCounterProps,
getDecrementProps,
getIncrementProps
};
}
export { useCounter };장점
사용의 용이성
컴포넌트를 통합하는 쉬운 방법을 제공하면 복잡성이 숨겨져 있으며 사용자는 올바른 getter를 올바른 JSX 요소에 연결하기만 하면 됩니다.
유연성
개발자는 여전히 특정 경우에 적응하기 위해 getter에 포함된 props를 오버로드할 가능성이 있습니다.

단점
가시성 부족
getter가 가져온 추상화로 인해 컴포넌트를 더 쉽게 통합할 수 있지만 더 불투명하고 "magic" 합니다.
Criteria
- Inversion of control: 3/4
- Integration complexity: 3/4
Public libraries using this pattern
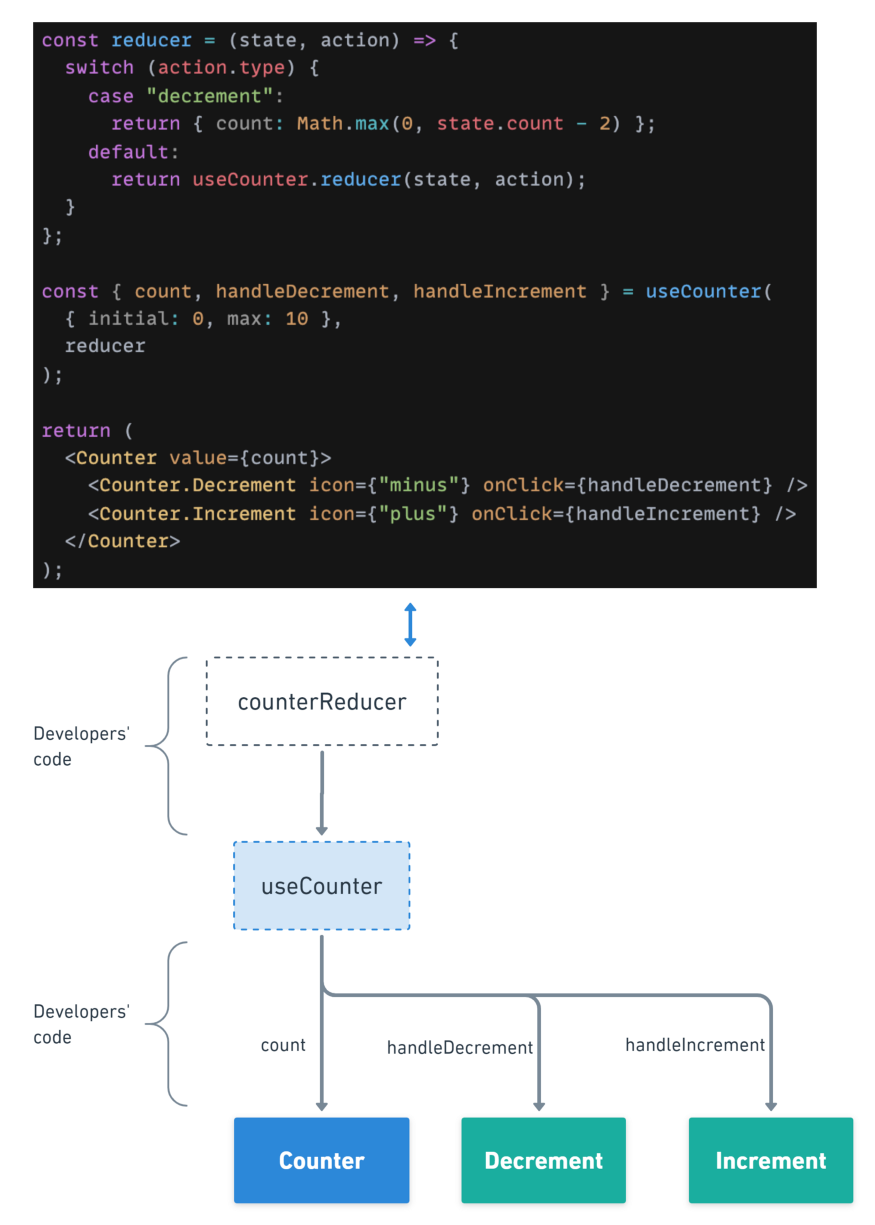
5. State reducer pattern
- 제어 역전 측면에서 가장 진보된 패턴입니다.
- 개발자가 컴포넌트가 내부적으로 작동하는 방식을 변경할 수 있는 고급 방법을 제공합니다.
- 코드는
Custom Hook Pattern과 유사하지만 사용자가 hook에 전달되는reducer를 정의합니다. reducer는 컴포넌트 내부 작업에overload한다.
import React from "react";
import { Counter } from "./Counter";
import { useCounter } from "./useCounter";

const MAX_COUNT = 10;
function Usage() {
  const reducer = (state, action) => {
    switch (action.type) {
      case "decrement":
        return {
          count: Math.max(0, state.count - 2) //The decrement delta was changed for 2 (Default is 1)
        };
      default:
        return useCounter.reducer(state, action);
    }
  };

  const { count, handleDecrement, handleIncrement } = useCounter(
    { initial: 0, max: 10 },
    reducer
  );

  return (
    <>
      <Counter value={count}>
        <Counter.Decrement icon={"minus"} onClick={handleDecrement} />
        <Counter.Label>Counter</Counter.Label>
        <Counter.Count />
        <Counter.Increment icon={"plus"} onClick={handleIncrement} />
      </Counter>
      <button onClick={handleIncrement} disabled={count === MAX_COUNT}>
        Custom increment btn 1
      </button>
    </>
  );
}

export { Usage };
이 예제에서 우리는 State 리듀서 패턴과 커스텀 후크 패턴을 연결했지만, 복합 컴포넌트 패턴과 함께 사용하고 리듀서를 메인 컴포넌트 카운터에 직접 전달할 수도 있습니다.
import { useReducer } from "react";

const internalReducer = ({ count }, { type, payload }) => {
  switch (type) {
    case "increment":
      return {
        count: Math.min(count + 1, payload.max)
      };
    case "decrement":
      return {
        count: Math.max(0, count - 1)
      };
    default:
      throw new Error(`Unhandled action type: ${type}`);
  }
};

function useCounter({ initial, max }, reducer = internalReducer) {
  const [{ count }, dispatch] = useReducer(reducer, { count: initial });

  const handleIncrement = () => {
    dispatch({ type: "increment", payload: { max } });
  };

  const handleDecrement = () => {
    dispatch({ type: "decrement" });
  };

  return {
    count,
    handleIncrement,
    handleDecrement
  };
}

useCounter.reducer = internalReducer;
useCounter.types = {
  increment: "increment",
  decrement: "decrement"
};

export { useCounter };
장점
더 많은 제어를 제공
가장 복잡한 경우 state reducers를 사용하는 것이 제어를 개발자에게 맡기는 가장 좋은 방법입니다.
모든 내부 컴포넌트의 작업은 이제 외부에서 액세스할 수 있으며 재정의할 수 있습니다.
단점
구현 복잡성
이 패턴은 확실히 당신과 사용자 모두에게 구현하기 가장 복잡합니다.
가시성 부족
어떤 reducer의 동작도 변경될 수 있으므로 Component의 내부 로직에 대한 충분한 이해가 필요합니다.
Criteria
- Inversion of control: 4/4
- Integration complexity: 4/4
Public libraries using this pattern
Conclusion
이 5가지 고급 React 패턴을 통해 "inversion of control" 개념을 활용하는 다양한 방법을 보았습니다. 유연하고 적응 가능한 구성 요소를 만드는 강력한 방법을 제공합니다.
그러나 우리 모두는 "큰 힘에는 큰 책임이 따른다"라는 유명한 속담을 알고 있으며 사용자에게 제어 권한을 더 많이 넘길수록 구성 요소가 "플러그 앤 플레이" 사고 방식에서 멀어집니다.
올바른 요구 사항에 해당하는 올바른 패턴을 선택하는 것은 개발자로서의 귀하의 역할입니다
이 작업을 돕기 위해 다음 다이어그램은 "통합 복잡성" 및 "제어 역전"이라는 두 가지 요소에 따라 이러한 모든 패턴을 분류합니다.
플러그 앤 플레이(Legacy Plug and Play) 또는 줄여서 PnP는 꽂으면 실행된다는 뜻으로, 컴퓨터 실행 중에 주변 장치를 부착해도 별다른 설정 없이 작동함을 뜻한다.


ㅋㅋㅋ패턴찾다가 태웅이를보네