Postman 으로는 Stomp 기반인 WebSocket 을 테스트하기 어렵다고 한다.
그래서 인텔리제이에서 Websocket Client Plugin 을 설치했다.
그랬더니 내 WebSocketConfig 가 SocketJS 기반으로 작동하게끔 세팅해놨기 때문에 에러가 난다고 한다..
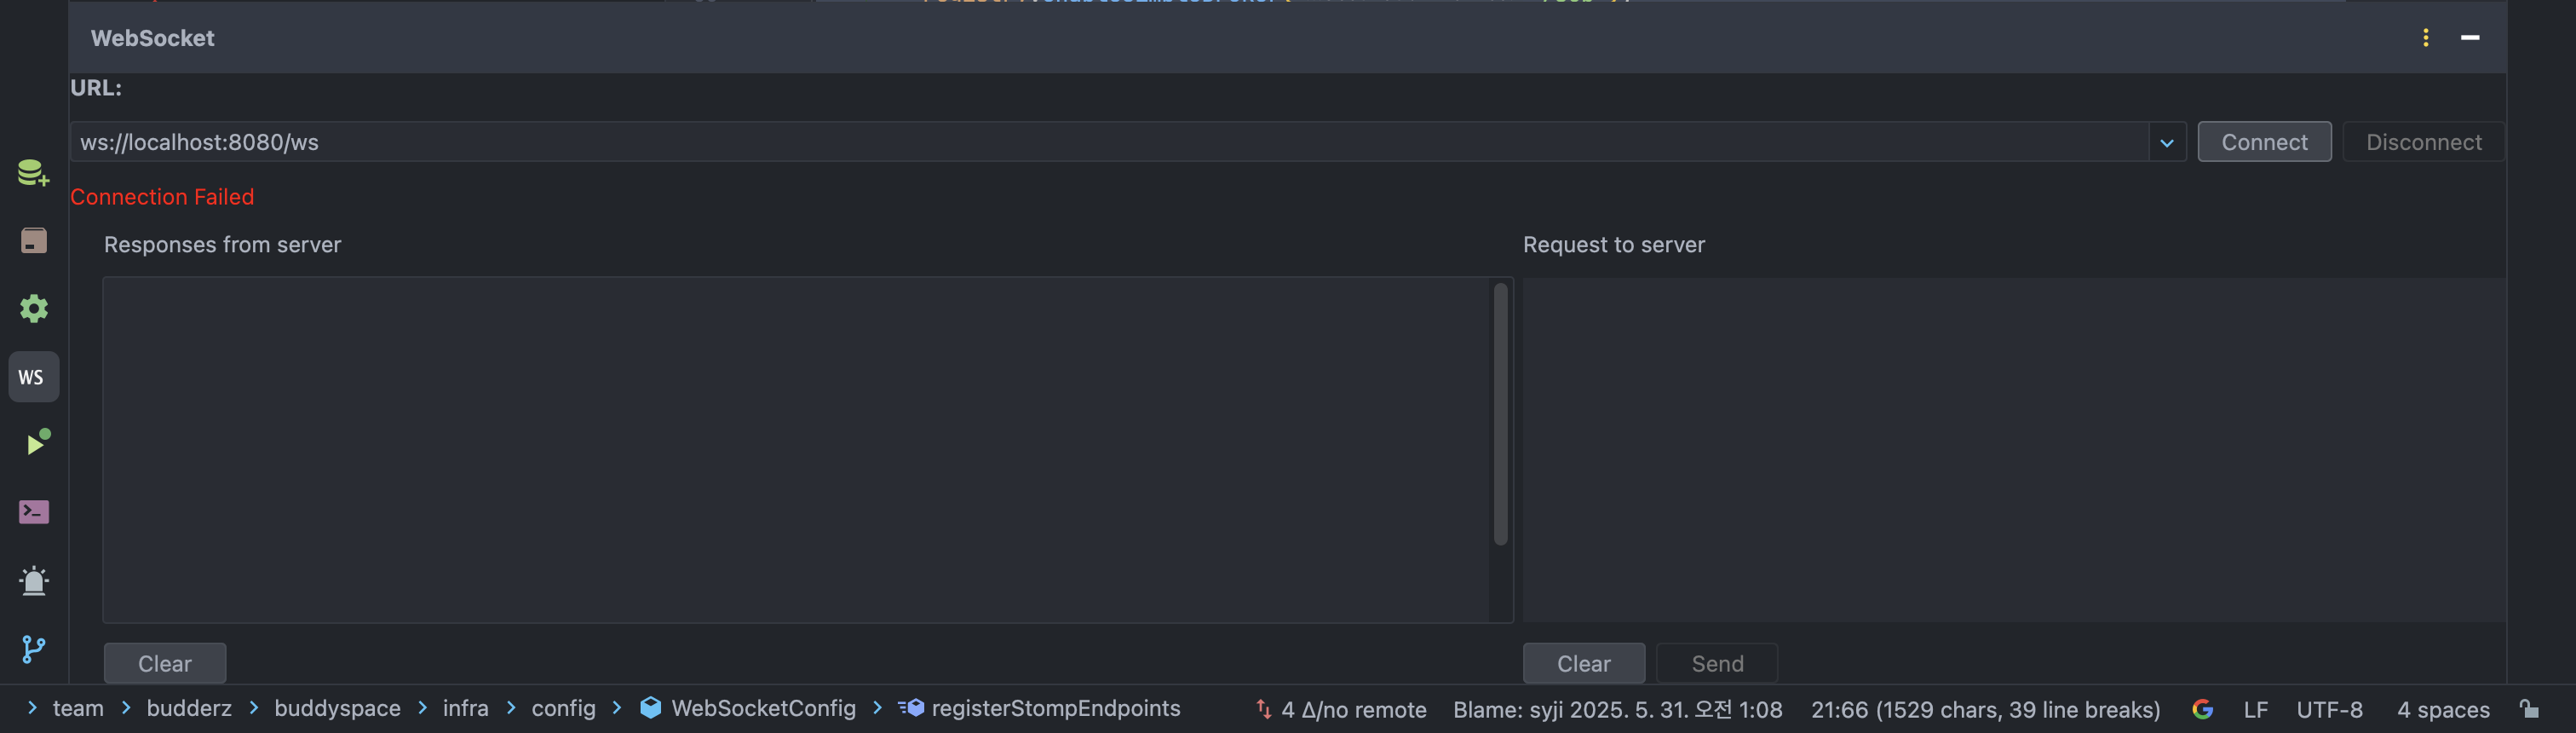
WebSocket Client 로 확인한 에러
📍 현재 나의 WebSocketConfig
registry.addEndpoint("/ws")
    .addInterceptors(new JwtHandshakeInterceptor(jwtUtil))
    .setAllowedOrigins("*")
    .withSockJS();
→ 여기서 중요한 점:
- 지금
/wsendpoint 는 SockJS 기반 endpoint 입니다
→ 즉, 웹소켓 native ws:// 직접 연결이 아님 - 현재
.withSockJS()를 쓰고 있기 때문에, 실제로는 SockJS client 를 사용해야 handshake 가 성립합니다.
🚨 문제 원인
지금 IntelliJ WebSocket Client (네이티브 ws:// 클라이언트) 는
→ SockJS 를 지원하지 않습니다.
→ 그래서 ws://localhost:8080/ws 로 직접 연결 시 Handshake 실패 → Connection Failed 발생.
왜? → .withSockJS() 때문
.withSockJS() 를 사용하면 fallback 프로토콜이 활성화되어서:
- 클라이언트가 SockJS client 로 연결해야 정상 handshake 됨
- ws:// 직접 연결은 막힙니다 (서버에서 SockJS handshake 형식을 기대함 → 실패)
🚩 SockJS 란?
- SockJS 는 웹소켓이 안 되는 환경(브라우저 등)을 위해 fallback 지원
- 클라이언트는 "SockJS 프로토콜"로 접속
→ 초기 요청은 HTTP 기반 handshake → 업그레이드
→ WebSocket or XHR 등으로 전환됨
🚀 그럼 어떻게 테스트하면 되나?
1️⃣ 방법 1 → SockJS 클라이언트가 내장된 STOMP 웹 클라이언트 사용
✅ 가장 대표적인 → [WebSocket King Client (Chrome 확장)]
✅ 또는 → websocket.org 에서 직접 STOMP + SockJS 는 안 됨 → 직접 JS 클라이언트 사용
2️⃣ 방법 2 → 브라우저에서 직접 SockJS 클라이언트로 연결(SockJS + Stomp.js 사용)
<script src="https://cdn.jsdelivr.net/npm/sockjs-client@1/dist/sockjs.min.js"></script>
<script src="https://cdn.jsdelivr.net/npm/stompjs@2.3.3/lib/stomp.min.js"></script>

<script>
    const socket = new SockJS('http://localhost:8080/ws');
    const stompClient = Stomp.over(socket);

    stompClient.connect({}, function (frame) {
        console.log('Connected: ' + frame);

        stompClient.subscribe('/topic/chat/room/1', function (message) {
            console.log('Received:', message.body);
        });

        // Send message
        stompClient.send("/app/chat.send", {}, JSON.stringify({
            content: "Hello!",
            sender: "User1"
        }));
    });
</script>
→ 이렇게 HTML 로 띄워서 테스트하면 정상 handshake + 구독 + 발행 다 됩니다.
참고로 프론트엔드 (React 등) → SockJS client + Stomp client 로 연결 (이게 실서비스용 정석)
- HTML(브라우저)에서 테스트하는 것과 React 에서 사용하는 방식은 "SockJS + Stomp Client" 사용이라는 점에서 똑같음
- 둘 다 프로토콜 레벨은 동일 → 연결/구독/발행 흐름이 동일
차이가 나는 부분 ?
| 항목 | HTML 테스트 예시 (1번) | React 연동 (2번) |
|---|---|---|
| 코드 위치 | HTML script 태그에서 직접 사용 | React 컴포넌트 / hook / service 에서 사용 |
| 사용 라이브러리 | <script> 로 CDN | npm install sockjs-client stompjs 해서 사용 |
| 기능 차이 | 없음 (기능 동일) | 없음 (기능 동일) |
✅ 즉 → 테스트할 때는 HTML 예시로 해도 충분히 정상 테스트 가능
→ React 에 연동해도 코드는 거의 비슷 (import 차이만 있음)
🚩 요약 정리
| 상황 | 설명 |
|---|---|
지금은 .withSockJS() 사용 중 | → SockJS 프로토콜 사용해야 정상 접속됨 |
| Postman / 일반 WebSocket Client | → SockJS 미지원 → handshake 실패 정상 |
| 테스트 방법 | |
| 방법 1️⃣ | 웹에서 SockJS + Stomp client 로 테스트 (HTML 예시 제공 가능) |
| 방법 2️⃣ | .withSockJS() 제거하고 WebSocket 로 테스트 (단, 실제 서비스와 다를 수 있음) |
HTML 테스트 코드
<!-- test-websocket.html -->
<!-- src/main/resources/static/test-websocket.html -->

<!DOCTYPE html>
<html lang="en">
<head>
    <meta charset="UTF-8" />
    <title>WebSocket STOMP SockJS 테스트</title>
    <script src="https://cdn.jsdelivr.net/npm/sockjs-client@1/dist/sockjs.min.js"></script>
    <script src="https://cdn.jsdelivr.net/npm/stompjs@2.3.3/lib/stomp.min.js"></script>
</head>
<body>
    <h1>WebSocket STOMP 테스트</h1>

    <button onclick="connect()">Connect</button>
    <button onclick="disconnect()">Disconnect</button>

    <br><br>

    <input type="text" id="message" placeholder="메시지 입력" />
    <button onclick="sendMessage()">Send</button>

    <ul id="messages"></ul>

    <script>
        let stompClient = null;

        function connect() {
            const socket = new SockJS('http://localhost:8080/ws');  // WebSocketConfig에서 .addEndpoint("/ws") 확인
            stompClient = Stomp.over(socket);

            stompClient.connect({}, function (frame) {
                console.log('Connected: ' + frame);
                stompClient.subscribe('/topic/chat/room/1', function (message) {
                    console.log('Received: ', message.body);
                    showMessage(message.body);
                });
            });
        }

        function disconnect() {
            if (stompClient !== null) {
                stompClient.disconnect();
            }
            console.log("Disconnected");
        }

        function sendMessage() {
            const messageContent = document.getElementById("message").value;
            stompClient.send("/app/chat.send", {}, JSON.stringify({
                content: messageContent,
                sender: "TestUser"
            }));
        }

        function showMessage(message) {
            const messages = document.getElementById("messages");
            const li = document.createElement("li");
            li.appendChild(document.createTextNode(message));
            messages.appendChild(li);
        }
    </script>
</body>
</html>
✅ 접속 방법
http://localhost:8080/test-websocket.html→ 접속하면 브라우저에서 테스트 가능!! 🚀
🚩 왜 static 에 넣나?
- 스프링 부트는
src/main/resources/static에 있는 파일은 정적 리소스로 그대로 서비스합니다. - 별도 컨트롤러 필요 없이
/test-websocket.html경로로 바로 접속 가능.
요약
| 단계 | 설명 |
|---|---|
| HTML 테스트 예시 | 위 코드 사용 |
| 파일 위치 | src/main/resources/static/test-websocket.html |
| 접속 URL | http://localhost:8080/test-websocket.html |
| 테스트 흐름 | Connect → Send → /topic/chat/room/1 구독 확인 |