딥러닝 기초(2)
다층 퍼셉트론 오차 역전파 계산
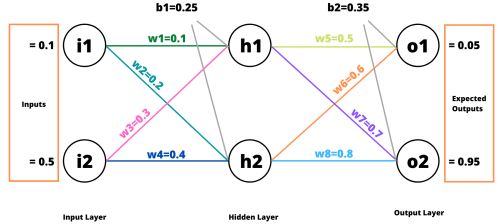
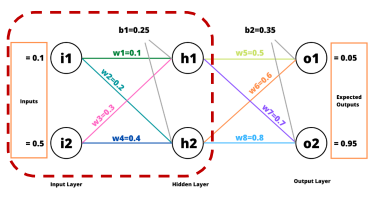
순전파 (Forward Pass)

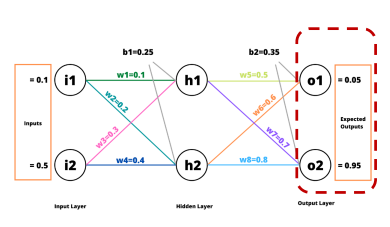
역전파 (Back Propagation)
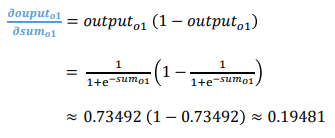
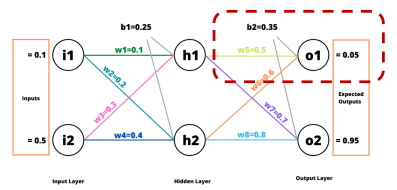
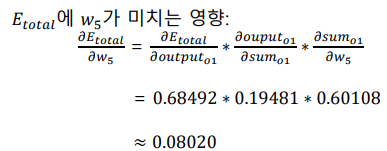
에 가 미치는 영향


참고
,
sigmoid 함수의 경우, 미분하면 f(x)(1-f(x))로 계산할 수 있다.

가 미치는 영향
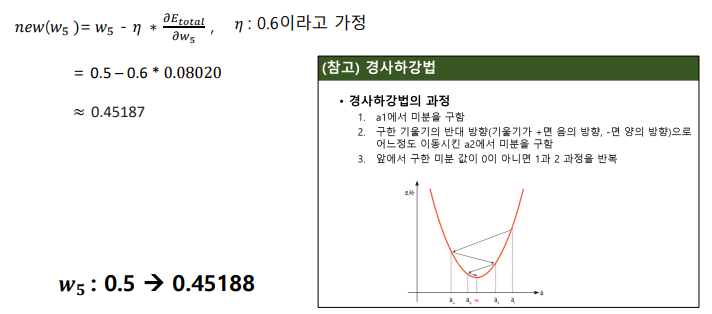
경사하강법을 사용하여 오차 그레디언트를 이용해서 네트워크 가중치 수정
딥러닝 학습하기
딥러닝 학습을 위한 용어
파라미터
- 학습 중에 학습되어 모델의 내부 구조를 정의하는 변수
- 가중치
하이퍼 파라미터
- 학습 전에 설정되어 학습 프로세스 자체의 동작을 정의하는 변수
- 하이퍼파라미터에 따라 모델 성능이 변화
Epoch
- 모델을 학습시키는 동안 전체 데이터셋을 몇번 학습할 것인지 정의하는 하이퍼파라미터
Batch Size
- 내부 모델 파라미터를 업데이트하기 전에 학습할 샘플 수를 의미하는 하이퍼파라미터
Iteration
- 1 epoch를 진행하기 위해 몇번의 파라미터 업데이트가 되는지 의미하는 숫자 (자동으로 설정)
- ex. 데이터 샘플 수가 100이고, 배치 사이즈가 10이면 iteration: 10
Optimizer
- 최적화 알고리즘 (ex. 경사하강법)
- 속도/효율이 개선된 다른 방법들이 존재함
- Momentum, SGD, AdaGard, RMSProp, Adam 등
- RMSProp & AdaGard를 함께 사용한 Adam Optimizer을 많이 사용
Activation Functions
- 활성화 함수
- 시그모이드 or 소프트맥스 외에도 다양한 함수들이 존재함
- Tanh, ReLU, GELU 등
- GPT는 GELU 활성화 함수로 사용
딥러닝의 필수요소
- Optimizer: 어떤 최적화 알고리즘을 사용할지
- Activation Function: 어떤 활성화 함수를 사용할지
- Hidden Size: 각 은닉층에 몇개의 은닉 뉴런을 사용할지
- Number of Hidden Layer: 은닉층을 몇 층으로 만들 것인지
- Learning Rate: 학습률을 얼마로 할지
- Epoch Number: 전체 데이터를 몇번 학습할지
- Batch Number: 한번 가중치를 업데이트할때 몇개의 샘플을 볼지
- Loss Function: 어떤 손실함수를 사용할지
딥러닝 학습하기 (실습)
- Optimizer: Adam
- Activation Function: GeLU
- Hidden Size: 1F - 100 / 2F - 50
- Nvm of Hidden Layers: 2
- Learning Rate: 0.00001
- Epoch Number: 10
- Batch Number: 128
- Loss Function: Cross Entropy
데이터 다운로드
!pip install datasets   # Package install

from datasets import load_dataset   # Huggingface 데이터셋 패키지 import
data = load_dataset("sepidmnorozy/Korean_sentiment")    # 데이터 다운로드
코드 상단에서 KoNLPy, Mecab 설치 명령어 실행
# connect google drive
from google.colab import drive
drive.mount('/content/drive')

# Download konlpy
%cd ./drive/MyDrive/Colab\ Notebooks/
! git clone https://github.com/SOMJANG/Mecab-ko-for-Google-Colab.git
%cd ./Mecab-ko-for-Google-Colab
!bash install_mecab-ko_on_colab_light_220429.sh
테스트 세트 만들기
train_data = data['train']
dev_data = data['validation']
test_data = data['test']

# mecab 형태소 분석기 사용
from konlpy.tag import Mecab  # KoNLPy를 통해 Mecab 패키지 import
mecab = Mecab()

# 형태소 단위로 Tokenization 된 텍스트를 {train/dev/test}_data에 저장
train_data = train_data.map(lambda example: {'label': example['label'], 'text': ' '.join(mecab.morphs(example['text']))})
dev_data = dev_data.map(lambda example: {'label': example['label'], 'text': ' '.join(mecab.morphs(example['text']))})
test_data = test_data.map(lambda example: {'label': example['label'], 'text': ' '.join(mecab.morphs(example['text']))})
텍스트와 범주형 특성 다루기 (BoW 방식으로 벡터화 하는 법 구현)
from sklearn.feature_extraction.text import CountVectorizer       # CountVectorizer: Bag of words 벡터화 구현을 하기 위한 클래스

vectorizer = CountVectorizer(strip_accents='unicode', token_pattern=r"(?u)\b\w\w+\b|'\w+")      # 데이터를 벡터화 해주는 모델
vectorizer.fit(train_data['text'])  # 텍스트 문서 모음을 토큰 수의 행렬로 변환

print(vectorizer.vocabulary_)       # 텍스트 문서에 나타난 어휘의 집합을 출력
print(len(vectorizer.vocabulary_))  # 텍스트 문서에 나타난 어휘 집합의 길이를 출력

train_vectors = vectorizer.transform(train_data['text'])    # 학습 데이터를 숫자로 변환
dev_vectors = vectorizer.transform(dev_data['text'])        # 검증 데이터를 숫자로 변환
test_vectors = vectorizer.transform(test_data['text'])      # 테스트 데이터를 숫자로 변환
훈련세트에서 훈련하고 평가하기
import torch
import torch.nn as nn
import torch.optim as optim

# MLP 모델 정의
class MLP(nn.Module):
  def __init__(self, input_size, hidden_size, output_size):
    super(MLP, self).__init__()
    #Todo --> layer 정의, 모델 정의
    self.layer1 = nn.Linear(input_size, hidden_size)
    self.layer2 = nn.Linear(hidden_size, int(0.5*hidden_size))
    self.layer3 = nn.Linear(int(0.5*hidden_size), output_size)
    self.gelu = nn.GELU()
    self.softmax = nn.Softmax(dim=1)

  def forward(self, x):
    #Todo --> 모델을 실행
    out1 = self.layer1(x)
    out2 = self.gelu(out1)
    out3 = self.layer2(out2)
    out4 = self.gelu(out3)
    out5 = self.layer3(out4)
    out6 = self.softmax(out5)

    return out6

# 하이퍼파라미터 셋팅
input_size = len(vectorizer.vocabulary_) # input size
hidden_size = 100 # hidden size
output_size = 2 # output size is 2 (positive/negative)
learning_rate = 0.00001
batch_size = 128
num_epochs = 10

# 모델 정의 (초기화)
model = MLP(input_size, hidden_size, output_size)
device = torch.device("cuda") # use GPU
model = model.to(device)

# optimizer, loss function 정의
optimizer = optim.Adam(model.parameters(), lr=learning_rate)
loss_function = nn.CrossEntropyLoss()

# dev_vectors와 dev_data['label']을 텐서 자료형으로 변환 --> 딥러닝 코드 학습하고, 계산하기 위해서
dev_tensors = torch.cuda.FloatTensor(dev_vectors.toarray(), device=device)
dev_labels = torch.tensor(dev_data['label'], dtype=torch.long, device=device)

# 학습 시작 (총 num_epochs 만큼)
for epoch in range(num_epochs):
  # model을 학습하겠다
  model.train()

  # 출력용
  epoch_loss = 0
  best_accuracy = 0

  # train_vectors를 텐서 자료형으로 변환
  train_tensors = torch.cuda.FloatTensor(train_vectors.toarray(), device=device)

  # batch size 단위로 학습 진행 --> batch size에 대해서 한번 파라미터 업데이트
  for i in range(0, len(train_tensors), batch_size):
    # batch 단위 데이터 생성
    batch_data = train_tensors[i:i+batch_size]
    batch_labels = torch.tensor(train_data['label'][i:i+batch_size], device=device)

    # 1. 순전파
    outputs = model(batch_data)
    # 2. 오차 계산
    loss = loss_function(outputs, batch_labels)
    # 3. 역전파
    optimizer.zero_grad()
    loss.backward()
    # 4. 가중치 업데이트
    optimizer.step()
    # loss 저장 for 출력
    epoch_loss += loss.item()

  # 매 epoch마다 dev 성능 측정
  # 모델을 평가용으로 셋팅
  model.eval()

  with torch.no_grad():
    dev_outputs = model(dev_tensors)
    dev_preds = torch.argmax(dev_outputs, axis=1)
    dev_accuracy = torch.sum(dev_preds == dev_labels).item() / len(dev_labels)

  # save best model on dev data
  if dev_accuracy > best_accuracy:
    best_model = model
    best_accuracy = dev_accuracy

  print(f"Epoch {epoch+1}, Accuracy: {dev_accuracy} , loss: {epoch_loss/len(train_tensors)}")
테스트 세트로 시스템 평가하기
from sklearn.metrics import accuracy_score    # Accuracy 측정 함수 import

final_model = best_model # dev에서 성능이 제일 좋았던 모델

test_tensors = torch.cuda.FloatTensor(test_vectors.toarray(),device=device)
pred_results = final_model(test_tensors)    # 최종 모델로 test 데이터 예측
pred_labels = torch.argmax(pred_results, axis=1)

accuracy = accuracy_score(test_data['label'], pred_labels.tolist())   # 정확도 측정

print("Accuracy: {:.2f}%".format(accuracy*100)) # 정확도 출력 
Student Dev - Language Tech & Machine Learning