jQuery
jQuery는 일종의 자바스크립트 라이브러리
- jQuery 특징 : 배우기 쉽고, 자바 스크립트 프로그래밍의 양을 상당히 줄일 수 있다.
속성
(selector).action();
ex)
<head>
<script>
	$("#hi")
	document.getElementById("hi");	//기존 자바스크립트
</script>
</head>
<body>
<p id="hi">안녕하세요</p>
</body>
jQuery 사용방법
- jQuery파일을 다운로드해서 사용(js폴더에 다운받은 jquery-3.6.3.js를 넣은 상태)
<script type="text/javascript" src="js/jquery-3.6.3.js">- 파일을 다운로드 받지않고 코드를 통해 사용할 수 도 있다.
(https://jquery.com/download/ , jquery 사이트에 방문하면 링크가 올라와 있음)
<head>
	<script src="https://code.jquery.com/jquery-3.6.3.min.js"></script>
</head>
- jQuery 다운로드시 compressed uncompressed 차이점
compressed : 압축된 버전, 공백이 제거된 버전이고
uncompresse : 압축이 안된 버전, 공백이 유지되어 있는버전이다.
jQuery 선택자
- 타입 선택자
								jQuery
<p></p>							$("p").hide();

- .class선택자
								jQuery
<p class="menu">1. 구입</p>		$("menu").slideup();

- #id 선택자
								jQuery
<p id="check">문단입니다.</p>		$("#check").show();
jQuery의 일반적인 구조
항상 jquery 먼저 선언하고
<script></script>태그 안을 작성해야함. 아니면 $가 뭔지 인식을 못함. 대부분은 body태그에 작성하면 자바스크립트가 동작하지만 head에 위치한 자바스크립트먼저 읽히고 body에 위치한 것들을 읽지못할수도 있어서 가끔 body안에 스크립트를 작성했던 것.
자바스크립트를 쓰기위해서는 DOM이 다 읽혀야함.
$(document).ready(function(){
	//DOM이 로딩되어서 준비가 되면 작업을 시작한다.
	//구체적으로 jQuery 메서드를 호출한다.
});
-> 문서가 완전히 로드되기전에 jQuery 코드가 실행하는 것을 방지하기 위해서 위와같이 사용
jquery event 의 사용
<!DOCTYPE html>
<html>
<head>
<meta charset="UTF-8">
<title>Insert title here</title>
<!-- jquery 선언 -->
<script type="text/javascript" src="https://code.jquery.com/jquery-3.6.3.min.js"></script>
<script>
$(document).ready(function(){
	// "눌러보세요" 라는 버튼을 클릭하면,
// 	$("#button1").on("click",function(){	//기본적인 이벤트 핸들링
	$("#button1").click(function(){			//위 기본적인 이벤트 핸들링 변형시킨 것
// 		alert("연결됨.");
		$("#box").show();
	})

});

</script>
<style type="text/css">
	#box{
		width:100px;
		height:100px;
		background-color:red;
		display:none;
	}
</style>
</head>
<body>
	<input type="button" value="눌러보세요!" id="button1">
	<div id="box"></div>
</body>
</html>
첫 화면
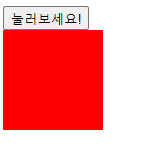
클릭하면 박스가 나타남
마우스 이벤트 jquery mouseEvent
mouse down : 마우스 눌렀을때 이벤트 발생
mouse up : 마우스를 떼었을때 이벤트 발생
mouse over : 요소에 올렸을때 이벤트 발생
mouseenter : 요소 안으로 마우스가 진입하면 이벤트 발생
mouseleave : 요소를 빠져나가면 mouseleave 이벤트 발생
ex)
<!DOCTYPE html>
<html>
<head>
<meta charset="UTF-8">
<title>Insert title here</title>
<script type="text/javascript" src="https://code.jquery.com/jquery-3.6.3.min.js"></script>
<script>
$(document).ready(function(){
	// class명이 out인 div에 마우스 올렸을 때(mouse over) 이벤트 적용
		var i = 0;
	$("div.out").mouseover(function(){
		//document.getElementsTagName("p")[0].innerHTML="mouse over"; //자바스크립트였다면
		$("p:first").text("mouse over");//p:first -> 첫번째 p라는 뜻
		$("p:last").text(++i);
	})
});
</script>
<style>
	div.out{
		width:200px;
		height:60px;
		background-color:yellow;
	}
</style>
</head>
<body>
	<div class="out">
		<p>마우스를 여기로 움직이세요</p>
		<p>0</p>
	</div>
</body>
</html>
첫 화면
첫 화면
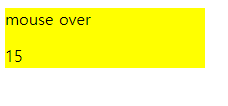 마우스를 올렸을때 count가 올라가는 예제
on메소드와 off메소드
on() 메소드 : 특정 요소에 이벤트 바인딩(event binding)하기 위해 .on() 메소드를 사용한다.
jQuery 1.7부터 소개된 .on() 메소드는 다음과 같은 특징을 가진다.
1. 선택한 요소에 어떤 타입의 이벤트라도 연결할 수 있다.
2. 하나의 이벤트 핸들러에 여러 개의 이벤트를 동시에 연결할 수 있다.
3. 선택한 요소에 여러 개의 이벤트 핸들러와 여러 개의 이벤트를 같이 연결할 수 있다.
4. 사용자 지정 이벤트(custom event)를 위해 이벤트 핸들러로 데이터를 넘길 수 있다.
5. 차후에 다루게 될 요소를 이벤트에 바인딩할 수 있다.
off() 메소드 : 더 이상 사용하지 않는 이벤트와의 바인딩(binding)을 제거한다.
focus와 blur 이벤트
focus
키보드 포커스(텍스트창에 클릭하면 깜빡거리는거)를 얻으면 발생
blur
키보드 포커스를 잃으면 blur 이벤트가 발생한다.
ex)
<!DOCTYPE html>
<html>
<head>
<meta charset="UTF-8">
<title>Insert title here</title>
<script type="text/javascript" src="https://code.jquery.com/jquery-3.6.3.min.js
"></script>
<script>
	$(document).ready(function(){
		// input 태그의 커서(포커스)를 얻으면 input태그의 배경색을 노란색으로 변경.
// 		$("input").on('focus'(function(){
		$("input").focus(function(){	// input태그의 커서를 얻으면,
			//input태그의 배경색을 노란색으로 변경.
			$("input").css("background-color", "yellow")
		});
		// input 태그의 커서(포커스)를 잃으면 배경색을 흰색으로 변경.
		$("input").blur(function(){	// input태그의 커서를 얻으면,
			//input태그의 배경색을 흰색으로 변경.
			$(this).css("background-color", "white")
			//this는 위에있는 같은 선택자이면 선택가능 // 이때 ("this")는 큰따옴표 빼야함
		});
	});
</script>
</head>
<body>
	아이디 : <input type="text" name="name">
</body>
</html>

순서대로 textbox 클릭 전 - textbox 클릭 후
이벤트 처리기 함수 안에서 사용 가능한 정보
pageX, pageY - 이벤트가 발생했을 당시의 마우스 위치
type - 이벤트의 종류(예를 들어 "click")
which - 눌려진 마우스 버튼이나 키
ex)
<!DOCTYPE html>
<html>
<head>
<meta charset="UTF-8">
<title>Insert title here</title>
<script type="text/javascript" src="https://code.jquery.com/jquery-3.6.3.min.js
"></script>
<script type="text/javascript">
$(document).mousemove(function(e){
$("#log").text("e.pageX : " + e.pageX + " e.pageY : " + e.pageY);
});
</script>
<style type="text/css">
body{background-color: #eef;}
div {padding:20px;}
</style>
</head>
<body>
<div id="log"></div>
</body>
</html>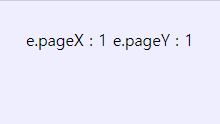 마우스를 움직일때마다 좌표값이 바뀜.
jQuery를 이용한 애니메이션 효과
show() 와 hide()
$(selector).show(duration, complete);
duration : slow, fast또는 밀리초 단위로 지정할 수 있다.
속성
slow : 천천히 나타남(대신 밀리초 단위로 지정가능)
fast : 빠르게 나타남(대신 밀리초 단위로 지정가능)
complete : complete는 콜백함수로서 show() 메서드가 완료된 후에 호출되는 메서드를 지정한다.(후속조치가 필요할때)
ex)
<!DOCTYPE html>
<html>
<head>
<meta charset="UTF-8">
<title>Insert title here</title>
<script type="text/javascript" src="https://code.jquery.com/jquery-3.6.3.min.js
"></script>
<style type="text/css">
img{
width:120;
height:100;
display:none;
}
</style>
<script>
$(document).ready(function(){
// show버튼을 클릭하면
$("#show").click(function(){
$("#coffee").show("fast",function(){alert("이미지가 나타난 후에 알림창을 띄우세요.")});
//#(선택자).show(duration, complete)
});
// hide버튼을 클릭하면
$("#hide").click(function(){
$("#coffee").hide("fast",function(){alert("이미지가 사라진 후에 알림창을 띄우세요.")});
})
});
</script>
</head>
<body>
<button id="show">Show it</button> <button id="hide">Hide it</button>
<img src="image/coffee.jpg" id="coffee">
</body>
</html>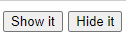 show it을 누르면 아래와 같이 사진이 나타남

 complete 작성부분에 함수를 주어서 알림을 뜨게 함.
toggle()
요소가 감추어져 있으면 표시하고 표시되어 있으면 감춘다.
<!DOCTYPE html>
<html>
<head>
<meta charset="UTF-8">
<title>Insert title here</title>
<script type="text/javascript" src="https://code.jquery.com/jquery-3.6.3.min.js
"></script>
<style type="text/css">
	img{
		width:120;
		height:100;
		display:none;
	}
</style>
	<script type="text/javascript">
		$(document).ready(function(){
			$("#toggle").click(function(){
				$("#coffee").toggle("fast",function(){alert("하나의 버튼으로 나타나고 사라짐")});
			})
		})
	</script>
</script>
</head>
<body>
	<button id="toggle">Toggle</button>
	<img src="image/coffee.jpg" id="coffee">
</body>
</html>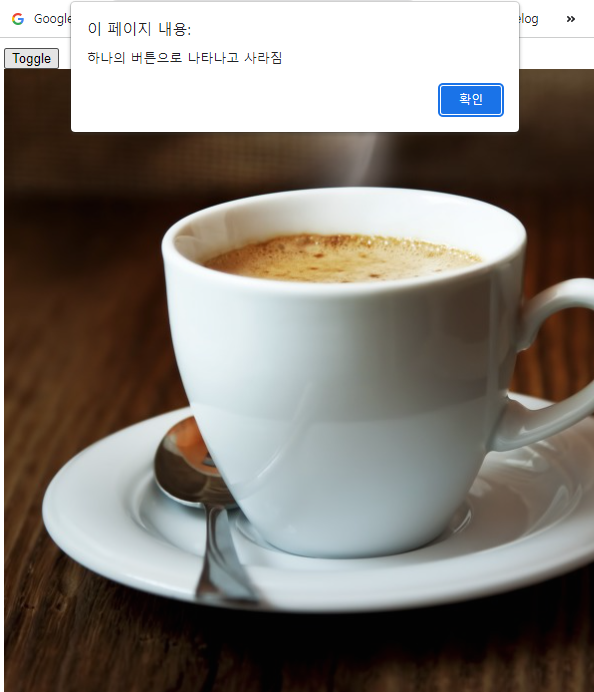
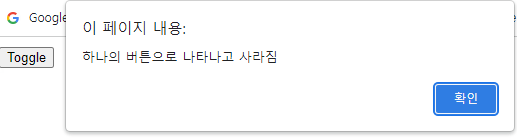
토글을 이용하면 하나의 버튼으로 나타나고 사라지게 만들 수 있음
fadeIn() fadeOut()
요소를 표시할때, 영화처럼 천천히 등장하게 하거나 빠르게 등장하게 할수 있다.
fadeIn() : 나타날때 사용
fadeOut() : 사라질때 사용
slideUp() slideDown()
slideUp() : 요소를 위로 넣어서 사라지게함
slideDown() : 요소를 밑으로 꺼내서 나타나게함
ex)	//ch12_jQuery_animate
<!DOCTYPE html>
<html>
<head>
<meta charset="UTF-8">
<title>Insert title here</title>
<script type="text/javascript" src="https://code.jquery.com/jquery-3.6.3.min.js
"></script>
<style type="text/css">
	img{
		width:120;
		height:100;
		display:none;
	}
</style>
<script>
	$(document).ready(function(){
		$("#fade_in").click(function(){
			$("#coffee").fadeIn("fast",function(){alert("이미지가 나타난 후에 알림창을 띄우세요.")});
			//#(선택자).show(duration, complete)
		});
		$("#fade_out").click(function(){
			$("#coffee").fadeOut("fast",function(){alert("이미지가 사라진 후에 알림창을 띄우세요.")});
		})
		$("#slide_up").click(function(){
			$("#coffee").slideUp("fast",function(){alert("이미지가 나타난 후에 알림창을 띄우세요.")});

		});
		$("#slide_down").click(function(){
			$("#coffee").slideDown("fast",function(){alert("이미지가 사라진 후에 알림창을 띄우세요.")});
		})
	});
</script>
</head>
<body>
	<button id="fade_in">fade In</button> <button id="fade_out">fade Out</button>
	<button id="slide_up">slideUp</button> <button id="slide_down">slideDown</button>
	<img src="image/coffee.jpg" id="coffee">
</body>
</html>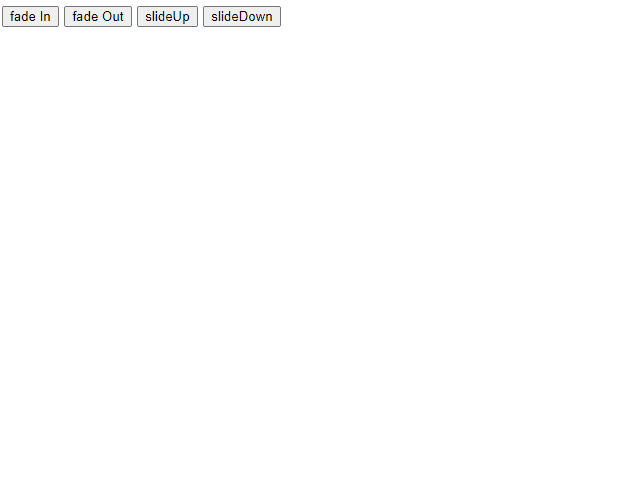
animate()
$("선택자").animate(properties, duration, easing, complete)
- properties: 애니메이트될 css 속성, 목표값을 여기에 적는다
- duration : slow,fast or 밀리초 단위 지정
- easing : 움직이는 효과를 주기위해 사용
- complete : 끝나고나서 어떻게 할건지(후속조치)
ex)
<!DOCTYPE html>
<html>
<head>
<meta charset="UTF-8">
<title>Insert title here</title>

<style type="text/css">
	img{
		width:120px;
		height:100px;
		position: relative;
	}
</style>
<script type="text/javascript" src="https://code.jquery.com/jquery-3.6.3.min.js
"></script>
<script type="text/javascript">
	$(document).ready(function(){
		$("animate").click(function(){
			$("#hong").animate({
				left:"200px",
				opacity: "0.5",
				width: "150px"
				})
		}) //# animate 끝
		$("#stop").click(function(){
			$("#hong").stop();
		});
	});
</script>
</head>
<body>
<img src="image/americano.jpg" id="hong"><br>
<button id="animate">animate()</button> <button id="stop">stop()</button>
</body>
</html>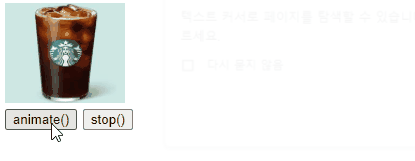
animate를 누르면 작동하고 작동도중 stop을 누르면 멈추는 모습을 볼 수 있다.
메서드 체이닝
동일한 요소에 대한 여러개의 메서드를 하나로 연결해서 실행할때 사용한다.
ex)
<!DOCTYPE html>
<html>
<head>
<meta charset="UTF-8">
<title>Insert title here</title>
<style type="text/css">
	#coffee{
		width:120px;
		height:100px;
		display:none;
	}
</style>
<script type="text/javascript" src="https://code.jquery.com/jquery-3.6.3.min.js"></script>
<script>
$(document).ready(function(){
	$("button").click(function(){
		$("#coffee").show().fadeOut("slow").slideDown("slow");
	})
})
</script>
</head>
<body>
<button>메소드 체이닝 시작</button><br>
<img src="image/americano.jpg" id="coffee">
</body>
</html>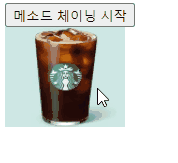
jQuery #2 에 이어서..