1. HTML5의 문서 구조화
- 웹 문서 구조를 표현하는 태그가 없는 등의 기존 HTML의 한계가 있고 현대의 웹 문서는 검색 엔진 친화적(쉬운 탐색 등)인 웹 페이지의 필요성이 대두되었다.
- 웹 페이지를 시맨틱 태그로 분할하여 작성한다.
2_1. 시맨틱 태그
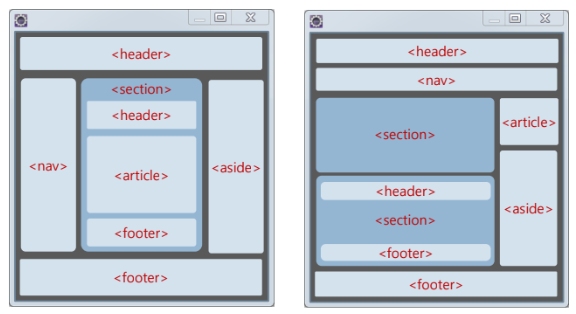
<header>
페이지나 섹션이 머리말, 페이지를 간단히 설명하는 섹션이다.<nav>
페이지 내 목차를 만들고 하이퍼링크들을 모아 놓은 섹션이다.<section>
문서의 장(chapter, section) 혹은 절을 구성하며 웹 페이지에 여러 section을 생성 가능하다.
헤딩 태그(<h1>~<h6>)로 절 또는 섹션 주제를 나타낸다.<article>
본문과 연관 있지만 독리적인 컨텐츠를 담는 영역으로 블로그 포스트, 댓글 등 기타 독립된 내용을 담고 있다.
여러<section>생성 가능하다.<aside>
본문에서 약간 벗어난 노트나 팁이나 신문, 잡지에서 보조 기사나 삽입된 논평 등을 담고 있다.
페이지에서 오른쪽이나 왼쪽에 주로 배치된다.<footer>
꼬리말 영역으로 주로 저자나 저작권 정보를 담고 있다.
2_2. 시맨틱 태그 종류
1) figure
입력된 정보들을 하나의 그림으로 블록화하기 위해 사용한다.
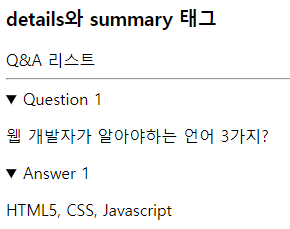
2) details와 summary
핸들(▶)로 항목을 숨기거나 보이게 할때 사용한다.
<!DOCTYPE html>
<html>
<head>
<meta charset="UTF-8">
</head>
<body>
<h3>details와 summary 태그</h3>
Q&A 리스트
<hr>
<details>
<summary>Question 1</summary>
<p>웹 개발자가 알아야하는 언어 3가지?</p>
</details>
<details>
<summary>Answer 1</summary>
<p>HTML5, CSS, Javascript</p>
</details>
</body>
</html>3) 시맨틱 인라인 태그
<!DOCTYPE html>
<html>
<head>
<meta charset="UTF-8">
</head>
<body>
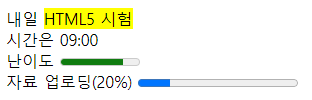
<p>
내일
<mark>HTML5 시험</mark>
<br> 시간은
<time>09:00</time>
<br> 난이도
<meter value="0.8" max="1.0">80%</meter>
<br> 자료 업로딩(20%)
<progress value="2" max="10"></progress>
<br>
</p>
</body>
</html>4) 로그인 폼 만들기
5) HTML5에서 제거된 태그
<big>, <center>, <dir>, <font>, <tt>, <u>, <xmp>, <acronym>, <applet>, <basefont>, <frame>, <frameset>, <noframes>, <strike>는 시맨틱 구조를 저해한다는 이유로 제거되었으므로 사용하지 말아야한다.
2_1. 웹 폼
- 웹 페이지에서 사용자의 입력을 받는 폼(로그인, 등록, 검색 예약 등)이다.
- 폼 요소(Form element)로는
<input>: type을 지정하여 다양한 입력을 받을 수 있다.<select>: 드롭다운 목록이 있는 콤보 박스<textarea>: 텍스트 입력 창<button>: 버튼 입력<output>: 스크립트 실행 후의 결과물<datalish>: 옵션 목록을 지정할 수 있는 텍스트 창
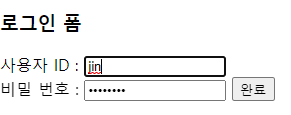
간단한 로그인 폼 만들기
<!DOCTYPE html>
<html>
<head>
<meta charset="UTF-8">
</head>
<body>
	<h3>로그인 폼</h3>
	<form name="fo" method="get">
		사용자 ID : <input type="text" size="15" value=""><br>
		비밀 번호	: <input type="password" size="15" value="">
		        <input type="submit" value="완료">
	</form>
</body>
</html>
2_2. 폼 태그
name: 폼의 이름 지정action: 폼 데이터를 처리할 웹 서버 응용프로그래 이름 URLenctype: 폼 데이터를 웹 서버로 전송할 때 암호화 방식 지정method: 폼 데이터를 웹 서버로 전송하는 방식target: 웹 서버 응용 프로그램으로부터 전송받은 데이터를 출력할 윈도우 이름
1) input type, textarea
텍스트 입력
<!DOCTYPE html>
<html>
<head>
<meta charset="UTF-8">
</head>
<body>
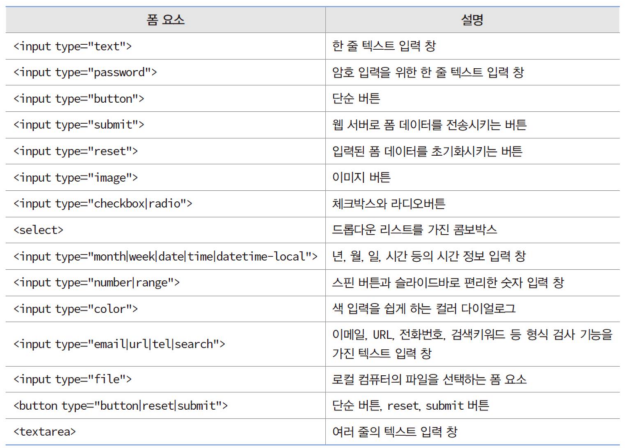
<h1>자기 소개서 작성</h1>
<hr>
<form name="fo" method="get">
이름 : <input type="text" size="15" value=""><br> 암호 : <input
type="password" size="15" value=""><br> 자소서 : <input
type="text" size="20" style="height: 200px">
</form>
</body>
</html>2) datalist
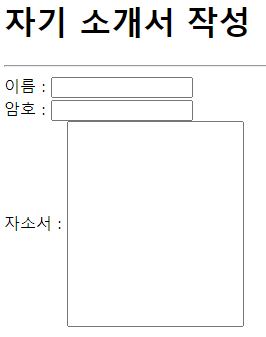
- 데이터 목록을 가진 텍스트 입력창
<option>태그로 항목 하나 표현한다.- 사용자가 입력창에 타이핑을 하면 option 목록에서 일치하는 값을 찾아서 자동완성 기능을 제공한다.
☆ option 목록에 없는 값도 사용자의 입력으로 받을 수 있다.
<!DOCTYPE html>
<html>
<head>
<meta charset="UTF-8">
</head>
<body>
<h3>가보고 싶은 곳</h3>
<hr>
<form>
나라 : <input type="text" list="countries"><br>
<datalist id="countries">
<option value="가나">
<option value="스위스">
<option value="브라질">
</datalist>
</form>
</body>
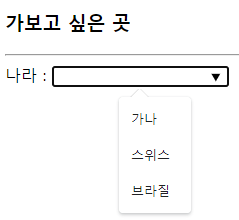
</html>3) 텍스트/이미지 버튼 만들기
input, button 뒤에
type : button, rest, submit, image
name : 버튼 이름
value : 문자열, 버튼에 출력되는 문자열
src : 이미지 URL
<!DOCTYPE html>
<html>
<head>
<meta charset="UTF-8">
</head>
<body>
	<h3>버튼을 만들자</h3>
	<form>
		검색: <input type="text" size="10" value="">
		<input type="button" value="Q1">
		<button type="button">Q2</button><br>

		submit 버튼 : <input type="submit" value="전송1">
		<button type="submit">전송2</button><br>

		reset 버튼 : <input type="reset" value="리셋1">
		<button type="reset">리셋2</button><br>

		이미지버튼 : <input type="image" src="../images/button.png"
			alt="이미지 버튼">
		<button type="button">
			<img src="../images/button.png" alt="이미지 버튼">
		</button>
	</form>
</body>
</html>
4) 체크박스와 라디오 버튼
- 체크박스에서의 value는 name의 값과 함께 서버로 제출된다.

<!DOCTYPE html>
<html>
<head>
<meta charset="UTF-8">
</head>
<body>
<form>
짜장면 <input type="checkbox" value="1">
짬뽕 <input type="checkbox" value="2" checked>
</form>
</body>
</html>
5) select
- 콤보박스 만들기

☆ select는 사용자가 선택할 수 있는 선택 항목을 제공하고 그 범위내에서만 선택 가능하다.
<!DOCTYPE html>
<html>
<head>
<meta charset="UTF-8">
</head>
<body>
	<form>
		<select name="china">
			<option value="1">짜장면</option>
			<option value="2" selected>짬뽕</option>
			<option value="3">탕수육</option>
	</form>
</body>
</html>
6) label
label 태그로 캡션과 폼 요소를 한 단위로 묶음

<!DOCTYPE html>
<html>
<head>
<meta charset="UTF-8">
</head>
<body>
	<form>
		<form name="fo" method="get">
			<label>사용자 ID : <input type="text" size="15" value=""></label>
			<lavel for="pass">비밀 번호 : </lavel>
			<input id="pass" type="password" size="15" value="">
			<input type="submit" value="완료">
		</form>
</body>
</html>
7) 색 입력
<input type="color" value="#00ff00">8) 시간 정보 입력
<input type="month|week|date|time|datatime-local" value="값">9) 스핀버튼과 슬라이드 숫자 입력
<input type="number" min="0.0" max="10.0" step="0.5">10) 입력 정보 힌트
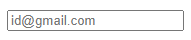
<input type="email" placeholder="id@gmail.com">11) 형식을 가진 텍스트 입력
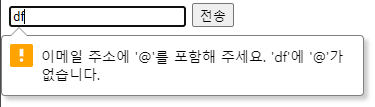
<input type="email" placeholder="id@gmail.com">
<input type="submit" value="전송">
12) 폼 요소의 그룹핑
13) 자동 포커스 이동 만들기
14) disabled, readonly 속성
질문
- html에서의 속성(attribute)는 불변이 아닌가?
<input type="button" value="Q1"> / <button type="button">Q2</button><br>
재사용성이 누가 좋은가? 아님 재사용성을 위해 구분되어 있는가?

Let's smile for future 🤩