1. 전체적인 구상
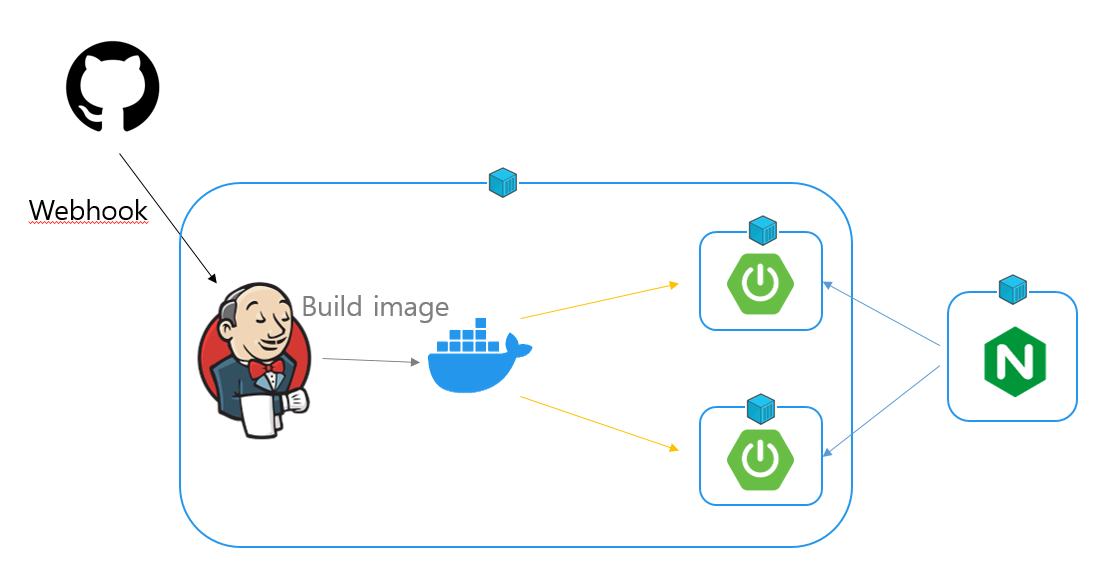
- webhook이 발생한다.
- Jenkins가 프로젝트를 build하고 image로 Dockerhub에 push한다.
- Jenkins안에 있는 2개의 프로젝트 컨테이너를 1개씩 업데이트 한다.
- 업데이트 하는 동안 Nginx container에서 로드 한쪽으로 트래픽을 몰아주며 무중단 배포를 한다.
2. DID (Docker in Docker)
맨 처음 시도할 때는 ubuntu서버에 Jenkins container를 실행하고 그 안에서 ubuntu에 docker를 설치하는 명령어를 사용했었다.
The repository 'https://download.docker.com/linux/ubuntu bullseye Release' does not have a Release file.
위의 에러를 보고, GPT한테 물어보니 OS가 적절하지 않을 수 있다는 가능성을 보고,
Jenkins container의 os 정보를 확인해보니
root@4bb7d43bf090:/# cat /etc/os-release
PRETTY_NAME="Debian GNU/Linux 11 (bullseye)"
NAME="Debian GNU/Linux"
VERSION_ID="11"
VERSION="11 (bullseye)"
VERSION_CODENAME=bullseye
ID=debian
HOME_URL="https://www.debian.org/"
SUPPORT_URL="https://www.debian.org/support"
BUG_REPORT_URL="https://bugs.debian.org/"
OS가 'Debian GNU/Linux'였다.
이번에는 ubuntu가 아닌 Debian에 설치하는 명령어를 실행해보자.
참고 : https://docs.docker.com/engine/install/debian/
이하 내용을 진행하기 전에
깔끔하게 새로운 EC2에 Docker를 다시 설치하고
아래 명령어를 실행하여 Jenkins image를 다운받고 container를 실행한다.
docker run -d -p 8080:8080 -p 50000:50000 -v /home/jenkins:/var/jenkins_home -v /var/run/docker.sock:/var/run/docker.sock -u root --name jenkins jenkins/jenkins
① Jenkins 안에 Docker 설치
아래 두 단계에서 앞에 sudo가 붙는 명령어들은 Docker 공식 페이지에 있던 것을 가지고 온 것이고, 앞에서 root 사용자로 container를 실행하였기 때문에, sudo를 때고 명령어를 실행한다.
Set up the repository
sudo apt-get update

sudo apt-get install \
    ca-certificates \
    curl \
    gnupg

sudo install -m 0755 -d /etc/apt/keyrings

curl -fsSL https://download.docker.com/linux/debian/gpg | sudo gpg --dearmor -o /etc/apt/keyrings/docker.gpg

sudo chmod a+r /etc/apt/keyrings/docker.gpg

echo \
"deb [arch="$(dpkg --print-architecture)" signed-by=/etc/apt/keyrings/docker.gpg] https://download.docker.com/linux/debian \
"$(. /etc/os-release && echo "$VERSION_CODENAME")" stable" | \
sudo tee /etc/apt/sources.list.d/docker.list > /dev/null
Install Docker Engine
sudo apt-get update

sudo apt-get install docker-ce docker-ce-cli containerd.io docker-buildx-plugin docker-compose-plugin
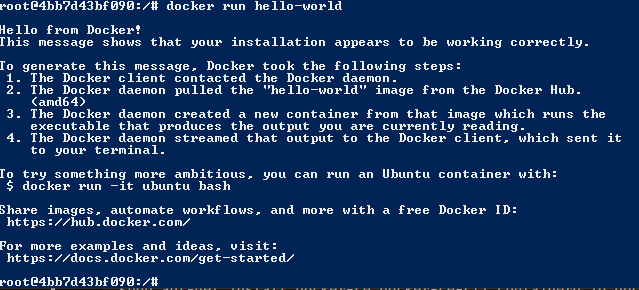
sudo docker run hello-world- 됐다!!
- Git도 잘 깔려있나 확인해보자.

② Jenkins setting
다시 1부에서 했던 Jenkins setting을 진행해준다.
setting을 하고 build를 하니 자동으로 clone이 되었다.
하지만, git pull 에서부터 다시 정지되었다.
직접 shell에 git pull을 해보니 이런 문구가 나왔다.
hint: Pulling without specifying how to reconcile divergent branches is
hint: discouraged. You can squelch this message by running one of the following
hint: commands sometime before your next pull:
hint:
hint:   git config pull.rebase false  # merge (the default strategy)
hint:   git config pull.rebase true   # rebase
hint:   git config pull.ff only       # fast-forward only
hint:
hint: You can replace "git config" with "git config --global" to set a default
hint: preference for all repositories. You can also pass --rebase, --no-rebase,
hint: or --ff-only on the command line to override the configured default per
hint: invocation.
pull의 rebase기본 속성을 정하라는 것 같아서 rebase true로 설정해주었다.
git config pull.rebase true
하는 김에 로그인도 해주고 username, email도 등록해주었다.
그래도 안 된다....
보아하니 sh 명령어를 아예 실행하지 못하고 있다.
shell을 다운받아보자.
apt-get update
apt-get install -y bash
이것도 원래 있었다...이번엔 jenkins를 sudo 그룹에 추가한다.
usermod -aG sudo jenkins
실패...
문제는 environment에 지정해둔 path 변수 때문이었다,
path는 Jenkins에서 환경변수로 사용하기 때문에 함부로 사용하면 안 되는 변수명이었다...
실행
수동으로 배포를 한 번 해주고 다음 script로 CI/CD를 완성했다.
pipeline {

    environment {
        dockerRepo = "jihoonydev/cicdtest"
        dockerTag = "0.0.1"
        githubRepo = "https://github.com/Jihoon-An/total.study.git"
    }

    agent any

    stages {
        stage("Build stage") {
            steps {
                catchError{
                    dir("test-project/"){
                        echo "----------build gradle------------"
                        sh "chmod 555 ./gradlew"
                        sh "./gradlew clean build -Dfile.encoding=UTF-8"

                        echo "----------delete image------------"
                        sh "docker rmi ${dockerRepo}:${dockerTag}"

                        echo "-----------build image------------"
                        sh "docker build -t ${dockerRepo}:${dockerTag} ."

                        echo "-----------push image-------------"
                        sh "docker push ${dockerRepo}:${dockerTag}"
                    }
                }
            }
        }
        stage("Update spring1 stage") {
            steps{
                echo "-----------stop spring1--------------"
                sh "docker stop spring1"
                echo "-----------rm spring1--------------"
                sh "docker rm spring1"
                echo "-----------run spring1--------------"
                sh "docker run -d -p 9001:9000 --name spring1 ${dockerRepo}:${dockerTag}"
            }
        }
        stage("Update spring2 stage"){
            steps{
                echo "-----------check spring1 status--------------"
                script {
                    def retryCount = 0
                    def responseCode = sh(script: "curl -s -o /dev/null -w '%{http_code}' http://localhost:9001/actuator/health", returnStdout: true).trim()
                    while (responseCode != "200" && retryCount < 30) {
                        sleep 10
                        responseCode = sh(script: "curl -s -o /dev/null -w '%{http_code}' http://localhost:9001/actuator/health", returnStdout: true).trim()
                        retryCount++
                    }
                }

                echo "-----------stop spring2--------------"
                sh "docker stop spring2"

                echo "-----------rm spring2--------------"
                sh "docker rm spring2"

                echo "-----------run spring2--------------"
                sh "docker run -d -p 9002:9000 --name spring2 ${dockerRepo}:${dockerTag}"
            }
        }
    }
}
sh 때문에 흐름도 많이 끊기고 시간도 많이 낭비했다..