[Bouncing Ball] clip()으로 도형에 이미지 넣고 애니메이션 적용
animate()animationcanvasclipclippingcontextctxdrawImageimageimgmaskshadowshadowBlur매스크애니메이션이미지캔버스컨텍스트클리핑클립
Canvas Animation
목록 보기
3/4
이번 글에서 다룰 내용
- clip 사용하기
- 캔버스에 이미지 그리기
- 공에 이미지 넣기
- clip된 그림에 애니메이션 적용
- 반복 및 랜덤 함수를 통해 공 여러개 생성
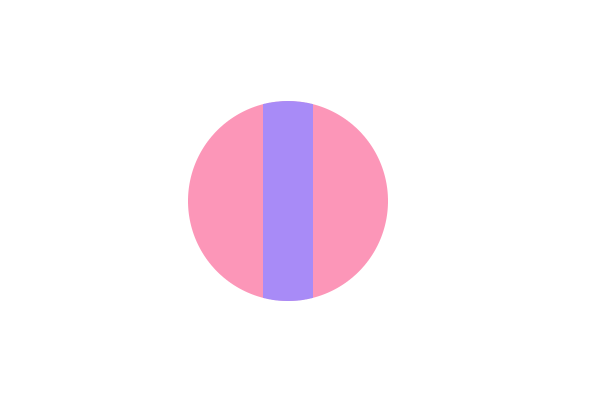
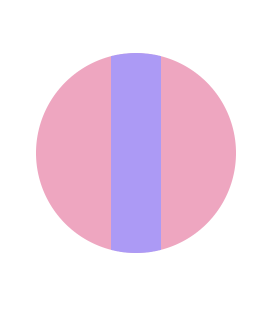
clip 사용하기
보라색 상자와 핑크색 공
//app.js
class App{
  constructor() {
    ...
	this.createBall();
    this.animate();
  }

  createBall() {
    this.ball = new Ball();
  }

  animate() {
	this.ball.draw(this.ctx);
  }
}
//ball.js
export default class Ball {
draw(ctx) {
// 핑크색 공
ctx.beginPath();
ctx.arc(400, 400, 100, 0, 2 * Math.PI);
ctx.fillStyle = '#faa2c1';
ctx.fill();
ctx.closePath();
// 보라색 상자
ctx.beginPath();
ctx.rect(375, 250, 50, 300);
ctx.fillStyle = '#b197fc';
ctx.fill();
}
}
핑크색 공에 보라색 상자 넣기
- clip() 기능을 사용해 핑크색 공 안에 보라색 상자를 넣을 수 있다
//ball.js

//핑크색 공
this.ctx.clip()
//보라색 상자- 즉, 핑크색 공은 보라색 상자 내부에만 존재
캔버스에 이미지 그리기
//app.js
...
createBall() {
  this.ball = new Ball('image path');
}

animate() {
  this.ball.draw(this.ctx);
}
이미지 그리는 방법
- new Image()로 이미지를 생성
- 이미지가 로드되면 drawImage로 그리기 (추가 공부가 필요. 언제 로드되는지를 몰라서 어떻게 하면 되고 어떻게 하면 안됨)
- 이미지 소스 지정
//ball.js
export default class Ball {
  constructor(src) {
    this.img = new Image();
    this.src = src;
  }

  draw(ctx) {
    this.img.onload = () => {
      ctx.drawImage(this.img, 200, 200, 60, 60);
    };

    this.img.src = this.src;
  }
}- img.onload는 이벤트리스너로 작성해도 됨
img.addEventListener('load', () => {
  ctx.drawImage(img, x, y, width, height);
})- 이미지 출력

공에 이미지 넣기
- 원 그리고 clip()한 다음에 이미지 넣기
- 원을 그리는 arc는 원의 중심 x,y좌표를 받는다
- 하지만 drawImage는 이미지를 그리기 시작하는 가장 좌측 상단의 좌표를 받는다
ctx.arc(center_x, center_y, radius, startAngle, endAngle);
ctx.drawImage(img, x, y, width, height);- 둘을 정렬시키고 싶다면 x, y부터 시작하는 곳에 drawImage로 이미지를 그린 후
x + width / 2,y + height / 2를 원의 중심 좌표로 설정 - 아래 이미지는 200, 200부터 그리기 시작하고 가로 세로가 60이므로 원 중심은 230, 230
- 원 크기는 이미지를 겨우 담을 수 있도록 반지름을 30으로 설정
- 배경은 흰색 적용
//ball.js
export default class Ball {
  constructor(src) {
    this.img = new Image();
    this.src = src;
  }

  draw(ctx) {
    //원(200 + 60/2, 200 + 60/2)
    ctx.beginPath();
    ctx.fillStyle = 'white';
    ctx.arc(230, 230, 30, 0, Math.PI * 2, true);
    ctx.fill();
    ctx.closePath();

    ctx.clip();

    this.img.addEventListener('load', () => {
      ctx.drawImage(this.img, 200, 200, 60, 60);
    });

    this.img.src = this.src;
  }
}
그림자
- 그림자 효과 추가
draw(ctx){
  ...
  ctx.shadowColor = '#dee2e6';
  ctx.shadowBlur = 10;
  ctx.shadowOffsetX = 5;
  ctx.shadowOffsetY = 3;
}
clip된 그림에 애니메이션 적용
좌표와 크기 변수로 받아 애니메이션 적용
- Ball클래스에서 stageWidth와 stageHeight받아 x, y 좌표를 랜덤으로 생성
- 원의 좌표가 브라우저 밖으로 나가지 않도록 계산
//ball.js
export default class Ball{
  constructor(stageWidth, stageHeight, radius, speed, src) {
    this.img = new Image();
    this.radius = radius;
    this.diameter = this.radius * 2;
    this.vx = speed;
    this.vy = speed;
    this.src = src;

    this.x = this.radius + Math.random() * (stageWidth - this.diameter);
    this.y = this.radius + Math.random() * (stageHeight - this.diameter);
  }
}- 좌표만 변수로 교체
- 속도와 bounceWindow()는 [Bouncing Ball] 윈도우 창에 부딪히는 공 애니메이션 참고
//ball.js
export default class Ball {
  ...
  draw(ctx, stageWidth, stageHeight) {
    this.x += this.vx;
    this.y += this.vy;

    this.bounceWindow(stageWidth, stageHeight);

    //원
    ctx.beginPath();
    ctx.fillStyle = 'white';
    ctx.shadowColor = '#dee2e6';
    ctx.shadowBlur = 10;
    ctx.shadowOffsetX = 5;
    ctx.shadowOffsetY = 3;
    ctx.arc(this.x, this.y, this.radius, 0, Math.PI * 2, true);
    ctx.fill();
    ctx.closePath();

    //클립
    ctx.clip();

    //이미지
    this.img.addEventListener('load', () => {
      ctx.drawImage(
        this.img,
        this.x - this.radius,
        this.y - this.radius,
        this.diameter,
        this.diameter
      );
    });
    this.img.src = this.src;
  }

  bounceWindow(stageWidth, stageHeight) {
    if (this.x <= this.radius || this.x >= stageWidth - this.radius) {
      this.vx *= -1;
      this.x += this.vx;
    }
    if (this.y <= this.radius || this.y >= stageHeight - this.radius) {
      this.vy *= -1;
      this.y += this.vy;
    }
  }
}- app.js에서 적절한 값 입력
- requestAnimation 호출 및 clearRect로 프레임 시작마다 캔버스 지우기
//app.js
...
createBall() {
  this.ball = new Ball(
    this.stageWidth,
    this.stageHeight,
    30,
    20,
    './srcs/js.png'
  );
}

animate() {
  window.requestAnimationFrame(this.animate.bind(this));
  this.ctx.clearRect(0, 0, this.stageWidth, this.stageHeight);
  this.ball.draw(this.ctx, this.stageWidth, this.stageHeight);
}
이미지 load EventListener
- 이미지를 하나만 그리는 경우에는 이미지에 load 이벤트를 달아주고 그렸어야 했다
//ball.js
draw() {
  ...
  this.img.addEventListener('load', () => {
    ctx.drawImage(
      this.img,
      this.x - this.radius,
      this.y - this.radius,
      this.diameter,
      this.diameter
    );
  });
}- 하지만 load 된 후에도 매 프레임 drawImage를 실행해줘야하므로 이벤트 밖에서도 drawImage 호출이 필요하다
//ball.js
draw() {
  ...
  this.img.addEventListener('load', () => {
    ctx.drawImage(
      this.img,
      this.x - this.radius,
      this.y - this.radius,
      this.diameter,
      this.diameter
    );
  });
  ctx.drawImage(
    this.img,
    this.x - this.radius,
    this.y - this.radius,
    this.diameter,
    this.diameter
  );
}- 하지만 이렇게 두 번 작성하면 하면 왜인지 무척 느려진다는 단점이 있다
- 따라서 eventListener는 지우기로 했다
- 지우면 애니메이션이 조금 늦게 시작할 것 같기도하지만 육안으로는 차이가 없어보인다
save()와 restore()
- 위처럼 애니메이션을 실행하면 클립된 영역은 고정된 채로 이미지만 움직이게 된다
- 원과 이미지의 크기를 매우 크게하고 speed를 느리게 해보면
//app.js
...
  createBall() {
    this.ball = new Ball(
      this.stageWidth,
      this.stageHeight,
      300,
      1,
      'image path'
);-
이미지만 혼자 움직이는 것을 확인할 수 있다

-
이를 해결하기 위해 save()와 restore()를 사용한다
-
save로 클립되기 전의 캔버스를 저장하고 그리기가 끝난 후 restore()를 이용해 저장했던 캔버스로 되돌려준다
//ball.js
...
draw(ctx, stageWidth, stageHeight) {
  ...
  ctx.save();
  //원그리기
  //클립
  //이미지 그리기
  //이미지 소스
  ctx.restore();
}- 그러면 움직이는 공 완성

반복 및 랜덤 함수를 통해 공 여러개 생성
반복
- 로고 이미지 파일들을 저장 후 이름들을 logos 배열에 넣어주었다
- 파일 이름이 c.png, csharp.png 와 같은 형식이며 모두 같은 폴더에 존재
//consts.js
export const logos = [
  'c',
  'csharp',
  'c++',
  'java',
  'js',
  'mongoDB',
  'MySQL',
  'oracle3',
  'php',
  'PostgreSQL',
  'python',
  'r',
  'SQLite',
  'SQLServer',
  'angular',
  'backbone',
  'django',
  'ember',
  'flask',
  'laravel',
  'node',
  'preact',
  'rails',
  'react',
  'spring',
  'svelte',
  'vue',
];- this.balls 배열을 생성
- 반복문을 통해 Ball 인스턴스를 생성하고 그려주기
//app.js
import {logos} from './consts.js';				//로고 이름들이 담긴 배열 logos

class App {
  constructor() {
  ...
  this.balls = [];
  }

  createBall() {
    //이미지 이름이 담긴 logos 배열
    for (let i = 0; i < logos.length; i++) {
      let radius = Math.ceil(Math.random() * 30) + 10;
      let speed = Math.ceil(Math.random() * 30) + 10;

      //logos의 이미지 이름으로
      //Ball 인스턴스 생성
      //this.balls에 담기
      this.balls.push(
        new Ball(
          this.stageWidth,
          this.stageHeight,
          radius,
          speed,
          `path/${logos[i]}.png`
        )
      );
    }
  }

  animate() {
    window.requestAnimationFrame(this.animate.bind(this));

    this.ctx.clearRect(0, 0, this.stageWidth, this.stageHeight);

    //this.balls 모든 공 그리기
    this.balls.forEach(ball => {
      ball.draw(this.ctx, this.stageWidth, this.stageHeight);
    });
  }
}
랜덤 속도와 방향
- 더욱 더 랜덤한 움직임을 위해 vx와 vy에 다른 값을, 그리고 vx와 vy에 다른 부호를 지정해줬다
- speedX와 speedY를 따로 생성해주고 각각의 부호는 속도가 짝수인지 홀수인지 여부로 결정해주었다
//app.js
createBall() {
  for (let i = 0; i < logos.length; i++) {
    let radius = Math.ceil(Math.random() * 30) + 10;
    let speedX = Math.ceil(Math.random() * 50) + 5;
    let speedY = Math.ceil(Math.random() * 50) + 5;
    let signX = speedX % 2 === 0 ? -1 : 1;
    let signY = speedY % 2 === 0 ? -1 : 1;

    this.balls.push(
      new Ball(
        this.stageWidth,
        this.stageHeight,
        radius,
        speedX * signX,
        speedY * signY,
        `./srcs/${logos[i]}.png`
      )
    );
  }
}- vx와 vy에 각기 다른 값 적용
//ball.js
constructor(stageWidth, stageHeight, radius, speedX, speedY, src) {
  ...
  this.vx = speedX;
  this.vy = speedY;
  ...
}
완성 코드
//app.js
import Ball from './velogballs.js';
import {logos} from './consts.js';

class App {
  constructor() {
    this.canvas = document.createElement('canvas');
    this.canvas.setAttribute('id', 'canvas');
    this.ctx = this.canvas.getContext('2d');

    document.body.appendChild(this.canvas);

    window.addEventListener('resize', this.resize.bind(this), false);
    this.resize();

    this.balls = [];
    this.createBall();
    this.animate();
  }

  resize() {
    this.stageWidth = document.body.clientWidth;
    this.stageHeight = document.body.clientHeight;

    this.canvas.width = this.stageWidth * 2;
    this.canvas.height = this.stageHeight * 2;

    this.ctx.scale(2, 2);
  }

  createBall() {
    for (let i = 0; i < logos.length; i++) {
      let radius = Math.ceil(Math.random() * 30) + 10;
      let speedX = Math.ceil(Math.random() * 50) + 5;
      let speedY = Math.ceil(Math.random() * 50) + 5;
      let signX = speedX % 2 === 0 ? -1 : 1;
      let signY = speedY % 2 === 0 ? -1 : 1;

      this.balls.push(
        new Ball(
          this.stageWidth,
          this.stageHeight,
          radius,
          speedX * signX,
          speedY * signY,
          `./srcs/${logos[i]}.png`
        )
      );
    }
  }

  animate() {
    window.requestAnimationFrame(this.animate.bind(this));
    this.ctx.clearRect(0, 0, this.stageWidth, this.stageHeight);

    this.balls.forEach(ball => {
      ball.draw(this.ctx, this.stageWidth, this.stageHeight);
    })
  }
}

new App();
//ball.js
export default class Ball {
constructor(stageWidth, stageHeight, radius, speedX, speedY, src) {
this.img = new Image();
this.radius = radius;
this.diameter = this.radius * 2;
this.vx = speedX;
this.vy = speedY;
this.src = src;
this.x = this.radius + Math.random() * (stageWidth - this.diameter);
this.y = this.radius + Math.random() * (stageHeight - this.diameter);
}
draw(ctx, stageWidth, stageHeight) {
this.x += this.vx;
this.y += this.vy;
this.bounceWindow(stageWidth, stageHeight);
ctx.save();
ctx.beginPath();
ctx.fillStyle = 'white';
ctx.shadowColor = '#dee2e6';
ctx.shadowBlur = 10;
ctx.shadowOffsetX = 5;
ctx.shadowOffsetY = 3;
ctx.arc(this.x, this.y, this.radius, 0, Math.PI * 2, true);
ctx.fill();
ctx.closePath();
ctx.clip();
ctx.drawImage(
this.img,
this.x - this.radius,
this.y - this.radius,
this.diameter,
this.diameter
);
this.img.src = this.src;
ctx.restore();
}
bounceWindow(stageWidth, stageHeight) {
if (this.x <= this.radius || this.x >= stageWidth - this.radius) {
this.vx *= -1;
this.x += this.vx;
}
if (this.y <= this.radius || this.y >= stageHeight - this.radius) {
this.vy *= -1;
this.y += this.vy;
}
}
}//consts.js
export const logos = [
'c',
'csharp',
'c++',
'java',
'js',
'mongoDB',
'MySQL',
'oracle3',
'php',
'PostgreSQL',
'python',
'r',
'SQLite',
'SQLServer',
'angular',
'backbone',
'django',
'ember',
'flask',
'laravel',
'node',
'preact',
'rails',
'react',
'spring',
'svelte',
'vue',
];/*
stylesheet.css
*/
html {
width: 100%;
height: 100%;
}
body {
width: 100%;
height: 100%;
}
canvas {
width: 100%;
height: 100%;
}
개발기록