도움 받은 글
깃북 : 나만의 웹 크롤러 만들기
이전 글과 마찬가지로 해당 깃북을 가이드 삼았다!
들어가며
✅ 데이터를 크롤링하기 위해
requests와bs4사용
👉 여러 페이지를 왔다갔다하는 작업을 자동화하기 위해selenium사용
⬜ 저장 된 데이터를django DB에 저장
+) 잘 마무리 될 시,postgreSQL에 저장하는 방법도 고안해보기
의존성 관리 도구로 poetry를 사용하였으며,
drf 프로젝트에 적용하였다.
3. selenium으로 크롤링 자동화
🔎 필요 library와 프로그램 설치
1) selenium 설치
poetry add selenium가상환경에 셀레니움을 설치해주자.
2-1) 크롬 드라이버 설치
셀레니움의 작업을 도와주는 크롬 드라이버 설치가 필요하다.
크롬 정보 탭에서 버전을 확인하고,
그것과 일치하는 드라이버를 설치해주면 된다!
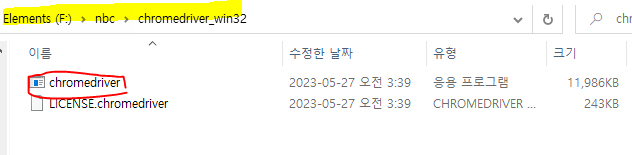
chromedriver가 위치해있는 폴더 위치를 기억해두자!
나중에 셀레니움 객체를 생성할 때 필요하다.
F/nbc/chromedriver_win32/chromedriver
2-2) PhantomJS webdriver 설치
만약 CLI 환경에서 작업한다면 사용하기 좋은 프로그램이다.
여기서 설치해주자.
PhantomJS을 사용한다면, 설정 위치가 좀 달라진다.
압축을 푼 폴더 경로/bin/phantomjs
🔎 selenium으로 자동으로 페이지 클릭해서 들어가게 하기
...
from selenium import webdriver
from selenium.webdriver.chrome.service import Service
from selenium.webdriver.common.by import By
from selenium.webdriver.support.ui import WebDriverWait
from selenium.webdriver.support import expected_conditions as EC

...

# chromedriver 실행 파일의 경로
chromedriver_path = "F/nbc/chromedriver_win32/chromedriver"

# Service 객체 생성
service = Service(chromedriver_path)

# Chrome 드라이버 생성 및 서비스 설정
driver = webdriver.Chrome(service=service)
driver.implicitly_wait(3)
driver.get(
    "https://wquiz.dict.naver.com/list.dict?service=krdic&dictType=koko&sort_type=3&group_id=1"
)

wait = WebDriverWait(driver, 10)
driver.find_element(By.XPATH, "//*[@id='content']/ul[2]/li[1]/a/p").click()
driver.find_element(By.XPATH, "//*[@id='answer_select_area']/a[1]").click()
element = wait.until(
    EC.visibility_of_element_located((By.XPATH, "//*[@id='quiz_answer']"))
)


# 현재 페이지의 HTML 가져오기
html = driver.page_source

...implicitly_wait: 페이지가 로드될 때 까지 대기wait = WebDriverWait(driver, 10): 대기할 것과 최대 대기 시간을 지정 후 객체 생성element = wait.until(조건) ): 특정 조건을 만족할 때 까지wait에 지정해준 대상이 초만큼 대기.
그 이상을 넘어가면TimeoutException발생
🔎 selenium 자동 크롤링 테스트
위의 과정이 잘 됐다면 페이지를 차근차근 들어가서 내가 원하는 값을 잘 가져올 수 있는지 확인해보자!
워낙 많은 값을 다루기 때문에, 일부분을 테스트 해보고 전체에 적용시키자!
👉 추가한 코드 전체
import pprint

...

current_tab_handle = driver.current_window_handle

for i in range(1, 5):
    new_link = driver.find_element(
        By.XPATH, f"//*[@id='content']/ul[2]/li[{i}]/a"
    ).get_attribute("href")
    driver.execute_script("window.open(arguments[0]);", new_link)

    for handle in driver.window_handles:
        if handle != current_tab_handle:
            driver.switch_to.window(handle)
            driver.find_element(By.XPATH, "//*[@id='answer_select_area']/a[1]").click()
            element = wait.until(
                EC.visibility_of_element_located((By.XPATH, "//*[@id='quiz_answer']"))
            )

            html = driver.page_source

            soup = BeautifulSoup(html, "html.parser")

            explain = soup.select_one("#quiz_answer > div.answer_area > div > p")
            correct_option = soup.select_one(
                "#quiz_answer > div.choice_result_area > ul > li.crct > span"
            )
            wrong_options = soup.select(
                "#quiz_answer > div.choice_result_area > ul > li.wrong > span"
            )

            problem = {
                "explain": explain.text.replace("\xa0", " "),
                "option": [
                    {"content": correct_option.text, "is_answer": 1},
                ],
            }

            for wrong in wrong_options:
                problem["option"].append(
                    {"content": wrong.text.replace("\xa0", " "), "is_answer": 0}
                )

            data[i] = problem
            driver.close()
    driver.switch_to.window(driver.window_handles[0])

pprint.pprint(data)
👉 세부 코드
하나씩 떼어서 살펴보자.
.
for i in range(1, 5):
    new_link = driver.find_element(
        By.XPATH, f"//*[@id='content']/ul[2]/li[{i}]/a"
    ).get_attribute("href")
    driver.execute_script("window.open(arguments[0]);", new_link)
테스트를 위해 4번째까지만 실행되게 for문을 세팅했다.
new_link라는 변수에 find_element와 get_attribute를 이용해서 html속의 href 링크를 찾고,
execute_script("window.open(arguments[0]);"를 이용해 새로운 탭에 해당 링크가 열리게 했다.
.
current_tab_handle = driver.current_window_handle

...

for handle in driver.window_handles:
        if handle != current_tab_handle:
            driver.switch_to.window(handle)
            driver.find_element(By.XPATH, "//*[@id='answer_select_area']/a[1]").click()
            element = wait.until(
                EC.visibility_of_element_located((By.XPATH, "//*[@id='quiz_answer']"))
            )
현재 열려있는 전체 탭인 window_handles를 for문으로 돌려서,
만약 현재 driver의 위치인 current_tab_handle과 다른 탭을 비교해서
일치하지 않는 경우, switch_to.window를 이용해 창을 전환했다.
아래는 이동한 탭에서 다음 페이지로 이동할 수 있게 작성해 둔 코드이다
.
그 밑부분은 기존의 크롤링 코드와 비슷한데,
새롭게 추가한 부분은 "explain": explain.text.replace("\xa0", " ") 정도이다.
가끔 크롤링을 해올 때 유니코드 문자인 \xa0가 섞여서 크롤링이 될 때가 있어서,
그걸 공백으로 바꿔주기 위해서 replace를 사용해서 한번 걸러줬다.
🔎 selenium으로 자동 클릭
크롤링 할 페이지는 더보기 버튼을 눌러서 html을 추가로 로딩해왔기 때문에, 더보기 버튼을 눌러주는 자동 코드가 필요했다.
while True:
    open_btn = driver.find_element(By.ID, "btn_quiz_more")
    if open_btn.text == "퀴즈 더보기 1746 / 1,746":
        break
open_btn.click()While문을 사용했으며, 특정 조건을 만족할 시 break하도록 했다.
🔎 selenium 크롤링 결과 json 값
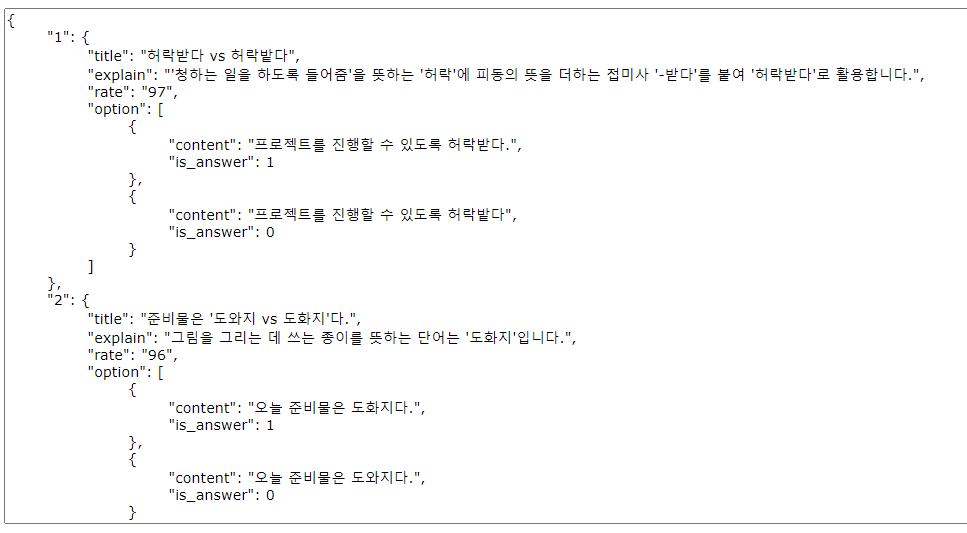
이런식으로 잘 데이터가 들어온다!
이제 저장만 하면 된다.