
안녕하세요, 단테입니다.
Next.js13 Master Course에 오신 것을 환영합니다.
오늘은 아래와 같은 내용을 다루겠습니다.
많은 것을 얻어가셨으면 좋겠습니다.

Route Handler
라우트 핸들러는 next.js12의 API Routes와 동일한 기능을 가집니다. app directory 내부에서만 동작하므로 정의에 유의해야 합니다.

Next.js 13의 Route Handler는 임의의 http 요청에 대해 리스너를 시행시키는 것을 이야기하며 이 리스너에서 next.js에서 정의된 Response 객체를 반환하게 됩니다.
Response 객체는 Fetch API의 인터페이스입니다.
convention
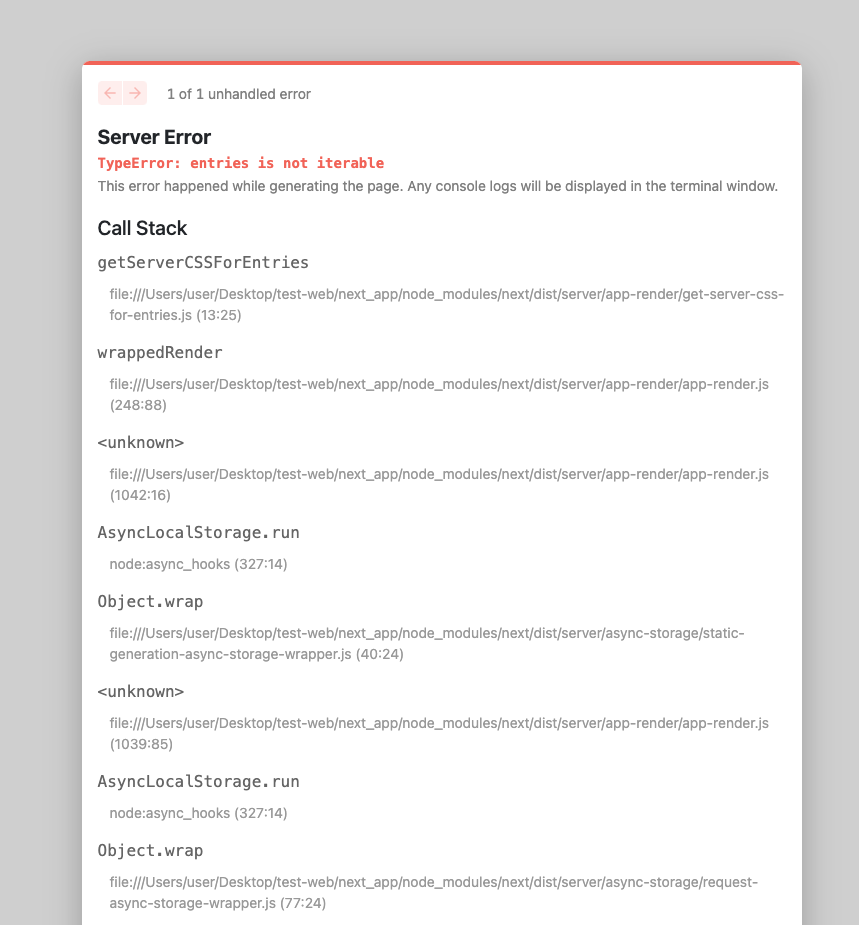
라우트 핸들러는 route.js 혹은 route.ts 파일명과 확장자로 app directory 아래에 생성되어야 합니다.
page.js, layout.js와 같이 중첩구조로 될 수 있습니다.
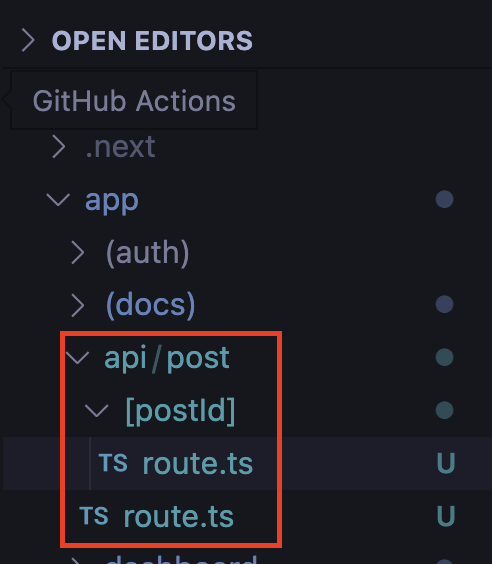
route.js 파일 확장자는 page.js와 동일한 세그먼트 레벨에 존재할 수 없습니다.
동일한 레벨에 route.js를 만들면 아래와 같이 서버 에러가 발생하게 됩니다.
함수 시그니처
export async function GET(request: Request) {}

export async function HEAD(request: Request) {}

export async function POST(request: Request) {}

export async function PUT(request: Request) {}

export async function DELETE(request: Request) {}

export async function PATCH(request: Request) {}

// If `OPTIONS` is not defined, Next.js will automatically implement `OPTIONS` and  set the appropriate Response `Allow` header depending on the other methods defined in the route handler.
export async function OPTIONS(request: Request) {}
NextRequest
이때 파라메터로 전달되는 request 객체 타입에 대해 알아보겠습니다.
인터페이스는 다른 객체와 소통을 나눌때 약속한 일종의 약속을 의미합니다.
request 파라메터 타입은 NextRequest이며 Request를 확장합니다. 13.4버전 기준 아래와 같이 정의되어 있습니다.
export declare class NextRequest extends Request {
    [INTERNALS]: {
        cookies: RequestCookies;
        geo: RequestData['geo'];
        ip?: string;
        url: string;
        nextUrl: NextURL;
    };
    constructor(input: URL | RequestInfo, init?: RequestInit);
    get cookies(): RequestCookies;
    get geo(): {
        city?: string | undefined;
        country?: string | undefined;
        region?: string | undefined;
        latitude?: string | undefined;
        longitude?: string | undefined;
    } | undefined;
    get ip(): string | undefined;
    get nextUrl(): NextURL;
    /**
     * @deprecated
     * `page` has been deprecated in favour of `URLPattern`.
     * Read more: https://nextjs.org/docs/messages/middleware-request-page
     */
    get page(): void;
    /**
     * @deprecated
     * `ua` has been removed in favour of \`userAgent\` function.
     * Read more: https://nextjs.org/docs/messages/middleware-parse-user-agent
     */
    get ua(): void;
    get url(): string;
}
여기서 주요한 사항들만 좀 더 알아보겠습니다.
cookies
리퀘스트에 붙여서 서버에 오는 Set-Cookie 헤더에 접근해 읽고 수정할 수 있습니다.
// request will have a `Set-Cookie:show-banner=false;path=/home` header
request.cookies.set('show-banner', 'false');- get(name)
쿠키 이름을 통해 헤더에 설정된 쿠키를 반환할 수 있습니다. 쿠키가 존재하지 않는다면 undefiend가 반환됩니다. 만약 동일한 이름의 쿠키가 여러 개라면, 첫번째 쿠키가 반환됩니다.
// Given incoming request /home
// { name: 'show-banner', value: 'false', Path: '/home' }
request.cookies.get('show-banner');-
getAll()
get(name)과 다르게 이름이 중복되는 모든 쿠키들을 반환합니다. 인자가 주어지지 않았으면 모든 쿠키를 반환합니다. -
delete(name)
요청에 포함된 쿠키 중 인자로 주어진 쿠키 이름을 삭제합니다.
// Returns true for deleted, false is nothing is deleted
request.cookies.delete('experiments');- has(name)
쿠키가 있는지에 대한 여부를 boolean 값으로 알려줍니다.
// Returns true if cookie exists, false if it does not
request.cookies.has('experiments');- clear()
요청의 Set-Cookie 헤더를 삭제합니다.
request.cookies.clear();
nextUrl
네이티브 URL 인터페이스를 확장한 것으로 다음과 같이 정의되어 있습니다.
// /home으로 요청이 들어왔으면 pathname은 /home이 됩니다.
request.nextUrl.pathname;
//  /home?name=lee 으로 요청이 들어왔으면, searchParams은 { 'name': 'lee' }이 됩니다.
request.nextUrl.searchParams;
이런 것들이 있구나 하고 한번 훑고 넘어가셨다가 필요하실 때 직접 타입 정의를 살펴보시는 것을 추천드립니다!
export declare class NextURL {
    private [Internal];
    constructor(input: string | URL, base?: string | URL, opts?: Options);
    constructor(input: string | URL, opts?: Options);
    private analyze;
    private formatPathname;
    private formatSearch;
    get buildId(): string | undefined;
    set buildId(buildId: string | undefined);
    get locale(): string;
    set locale(locale: string);
    get defaultLocale(): string | undefined;
    get domainLocale(): DomainLocale | undefined;
    get searchParams(): URLSearchParams;
    get host(): string;
    set host(value: string);
    get hostname(): string;
    set hostname(value: string);
    get port(): string;
    set port(value: string);
    get protocol(): string;
    set protocol(value: string);
    get href(): string;
    set href(url: string);
    get origin(): string;
    get pathname(): string;
    set pathname(value: string);
    get hash(): string;
    set hash(value: string);
    get search(): string;
    set search(value: string);
    get password(): string;
    set password(value: string);
    get username(): string;
    set username(value: string);
    get basePath(): string;
    set basePath(value: string);
    toString(): string;
    toJSON(): string;
    clone(): NextURL;
}
NextResponse
NextResponse는 web Response API를 확장한 것으로 아래와 같이 되어있습니다.
export declare class NextResponse extends Response {
    [INTERNALS]: {
        cookies: ResponseCookies;
        url?: NextURL;
    };
    constructor(body?: BodyInit | null, init?: ResponseInit);
    get cookies(): ResponseCookies;
    static json(body: any, init?: ResponseInit): NextResponse;
    static redirect(url: string | NextURL | URL, init?: number | ResponseInit): NextResponse;
    static rewrite(destination: string | NextURL | URL, init?: MiddlewareResponseInit): NextResponse;
    static next(init?: MiddlewareResponseInit): NextResponse;
}
cookies
리스폰스 객체의 Set-Cookie 헤더를 변경합니다. 나머지는 NextRequest와 동일하므로 생략하겠습니다.
json()
JSON body를 생성해 반환합니다.
import { NextResponse } from 'next/server';

export async function GET(request: Request) {
  return NextResponse.json({ error: 'Internal Server Error' }, { status: 500 });
}
redirect()
특정 URL로 리다이렉트 하는 응답을 만들어냅니다.
import { NextResponse } from 'next/server';

return NextResponse.redirect(new URL('/new', request.url));
URL은 NextResponse.redirect에 전달되기 전에 들어온 요청을 기반하여 변경하거나 값을 추가할 수 있습니다.
예를 들어 아래 예제는 request.nexturl 프로퍼티를 이용해 현재 요청 URL 값을 얻고 이를 다른 url로 변경할 수 있습니다.
import { NextResponse } from 'next/server';

// 요청 url을 기반으로 새로운 URL 객체를 만듭니다.
const loginUrl = new URL('/login', request.url);
// 쿼리 파라메터로 ?from=/incoming-url를 붙였습니다.
loginUrl.searchParams.set('from', request.nextUrl.pathname);
// And redirect to the new URL
return NextResponse.redirect(loginUrl);
rewrite()

요청 url을 기반으로 proxy를 만들어 낼 수 있습니다.
import { NextResponse } from 'next/server';

// Incoming request: /about, browser shows /about
// Rewritten request: /proxy, browser shows /about
return NextResponse.rewrite(new URL('/proxy', request.url));
간단히 설명하면 /about 링크로 요청이 들어왔을 때 브라우저에서는 /about 링크로 표기되지만 실제로 요청은 /proxy로 전달됩니다.
next()
next method는 미들웨어로 사용되며 요청이 전달되는 도중 다음 미들웨어로 넘어갈 때까지 기다리지 않고 바로 반환하거나 계속 하는등의 로직을 작성할 수 있습니다.
import { NextResponse } from 'next/server';

return NextResponse.next();
리스폰스를 생성할 때 header를 다음 미들웨어로 다루는 코드를 예시로 볼까요?
import { NextResponse } from 'next/server';

// Given an incoming request...
const newHeaders = new Headers(request.headers);
// Add a new header
newHeaders.set('x-version', '123');
// And produce a response with the new headers
return NextResponse.next({
  request: {
    // New request headers
    headers: newHeaders,
  },
});
요청에서 넘어오는 헤더에 x-version 키에 123 값을 담고 다음 헤더로 전달합니다.
데이터 패칭에 대해 본격적으로 알아보겠습니다.

주관적인 빈번함과 객관적인 빈번함
Data fetching에는 두가지 타입이 있습니다.
- Static
- Dynamic
데이터도 Static Data, Dynamic Data 두 타입이 있습니다.
어떤 차이가 있는지 먼저 살펴보겠습니다.
Static Data
자주 변하지 않은 데이터가 Static Data입니다.
Dynamic Data
자주 변하는 데이터입니다.
여기서 데이터 변경이 빈번한지에 대한 여부는 어떤 기준으로 정해지는 것일까요?
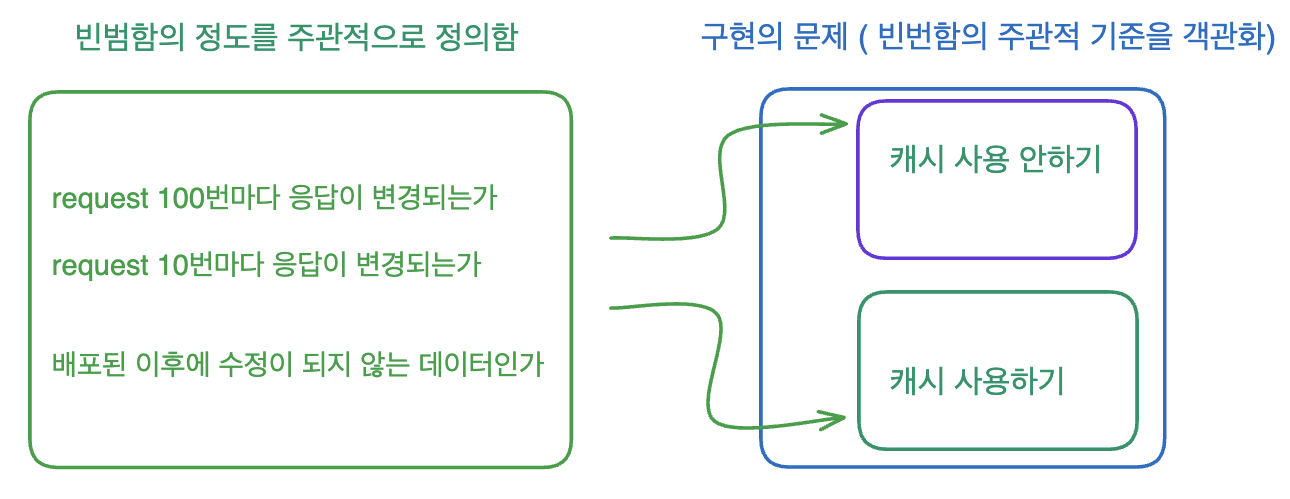
흔히 SSR을 사용하는 이유로 빈번하게 변경되는 데이터를 손꼽으며 그 예시로 쇼핑 카트와 같은 데이터를 이야기합니다. 그리고 자주 변경하지 않는 데이터로 페이지를 만들 때 SSG(Static Site Generation)을 사용하며 데이터의 예시로 블로그 포스트를 이야기합니다.
블로그 포스트 데이터에 자주 변경되는 댓글이나 트위터나 슬랙의 댓글 스레드와 같은 데이터가 합쳐져 있다면 블로그 포스트도 빈번하게 변경되는 데이터가 될 수 있습니다. 왜냐하면 트위터의 코멘트는 request 10번마다 응답이 변경되는 데이터이기 때문입니다.
여기서 10번은 제가 빈번한 데이터의 변경인지 아닌지를 정의하는 기준점입니다.
만약 한번 노출된 이후에 수정이 되지 않는 데이터의 경우 캐시를 사용하는 것이 옳고 그렇지 않으면 캐시를 사용할 필요가 없을 것입니다.
여기서 캐시는 구현의 문제이며 앞서 정한 빈번함의 기준을 객관화한 것으로
객관화했다는 것은 구현의 방법을 가지고 빈번하다는 기준을 정할 수 있다는 뜻으로 캐시를 사용하면 빈번한 데이터가 아니다 라는 판단이 가능하다는 것입니다.
static route handlers

Next.js default data fetch
Next.js는 기본적으로 static fetch를 사용합니다. static 하다는 말은 빌드 타임에 데이터가 호출되고 캐시된다는 뜻으로 요청이 들어올 때마다 캐시된 데이터를 사용한다는 뜻입니다.
import { NextResponse } from 'next/server';

export async function GET() {
  const res = await fetch('https://data.mongodb-api.com/...', {
    headers: {
      'Content-Type': 'application/json',
      'API-Key': process.env.DATA_API_KEY,
    },
  });
  const data = await res.json();

  return NextResponse.json({ data });
}
fetch를 사용해 GET 메소드를 사용하고 있습니다. 이제 아래에서 revalidate를 해서 캐시된 데이터를 갱신하는 예제 코드를 살펴보겠습니다.
import { NextResponse } from 'next/server';

export async function GET() {
  const res = await fetch('https://data.mongodb-api.com/...', {
    next: { revalidate: 60 }, // Revalidate every 60 seconds
  });
  const data = await res.json();

  return NextResponse.json(data);
}
next.revalidate 옵션을 통해 60초마다 데이터를 갱신하게 했습니다.
dynamic route handlers
만약 캐시를 전혀 사용하지 않는 dynamic한 데이터 패칭을 원한다면 아래와 같이 cache: 'no-store'을 설정합니다.
fetch('https://...', { cache: 'no-store' });Parallel Data Fetching
요청 하나에 대해 여러 데이터베이스를 순차적으로 탐색하거나 시간이 오래 걸리는 일이 발생하면 water fall이 길어지면 길어질 수록 클라이언트에서 컴포넌트가 그려지는 시간이 오래 걸릴 수 있기 때문에 비동기 호출을 병렬로 처리하는 것을 의미합니다.
import Albums from './albums';

async function getArtist(username: string) {
  const res = await fetch(`https://api.example.com/artist/${username}`);
  return res.json();
}

async function getArtistAlbums(username: string) {
  const res = await fetch(`https://api.example.com/artist/${username}/albums`);
  return res.json();
}

export default async function Page({
  params: { username },
}: {
  params: { username: string };
}) {
  // Initiate both requests in parallel
  const artistData = getArtist(username);
  const albumsData = getArtistAlbums(username);

  // Wait for the promises to resolve
  const [artist, albums] = await Promise.all([artistData, albumsData]);

  return (
    <>
      <h1>{artist.name}</h1>
      <Albums list={albums}></Albums>
    </>
  );
}
Promise.all을 사용해 여러 개의 비동기 호출을 병렬적으로 수행하고 있습니다.
const [artist, albums] = await Promise.all([artistData, albumsData]);특별한 API를 사용하는 것이 아닌 호출 방식이 달라 Parallel Data Fetching이라고 합니다.

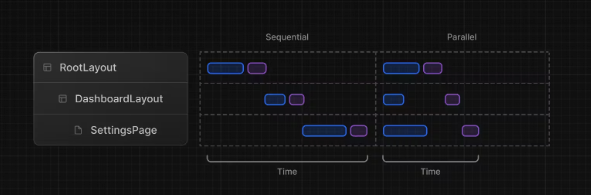
Sequential Data Fetching
세션 인증이 확인되지 않으면 특정 api를 호출하면 안된다던가 하는등 연속적으로 api 호출을 해야 하는 경우가 있습니다.
// ...

async function Playlists({ artistID }: { artistID: string }) {
  // Wait for the playlists
  const playlists = await getArtistPlaylists(artistID);

  return (
    <ul>
      {playlists.map((playlist) => (
        <li key={playlist.id}>{playlist.name}</li>
      ))}
    </ul>
  );
}

export default async function Page({
  params: { username },
}: {
  params: { username: string };
}) {
  // Wait for the artist
  const artist = await getArtist(username);

  return (
    <>
      <h1>{artist.name}</h1>
      <Suspense fallback={<div>Loading...</div>}>
        {/* @ts-expect-error Async Server Component */}
        <Playlists artistID={artist.id} />
      </Suspense>
    </>
  );
}
데이터 호출이 필요한 서버 컴포넌트 내부에서 async await 호출을 통해 각 데이터 호출간 순서를 정할 수 있습니다.
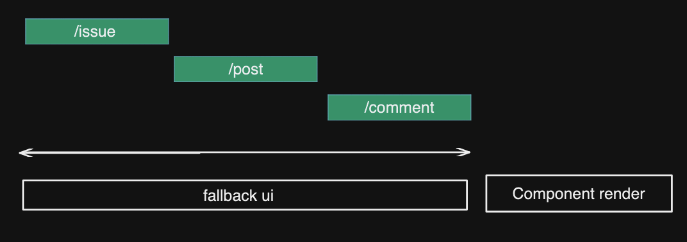
Automatic fetch Request Deduping 자동 호출 캐싱
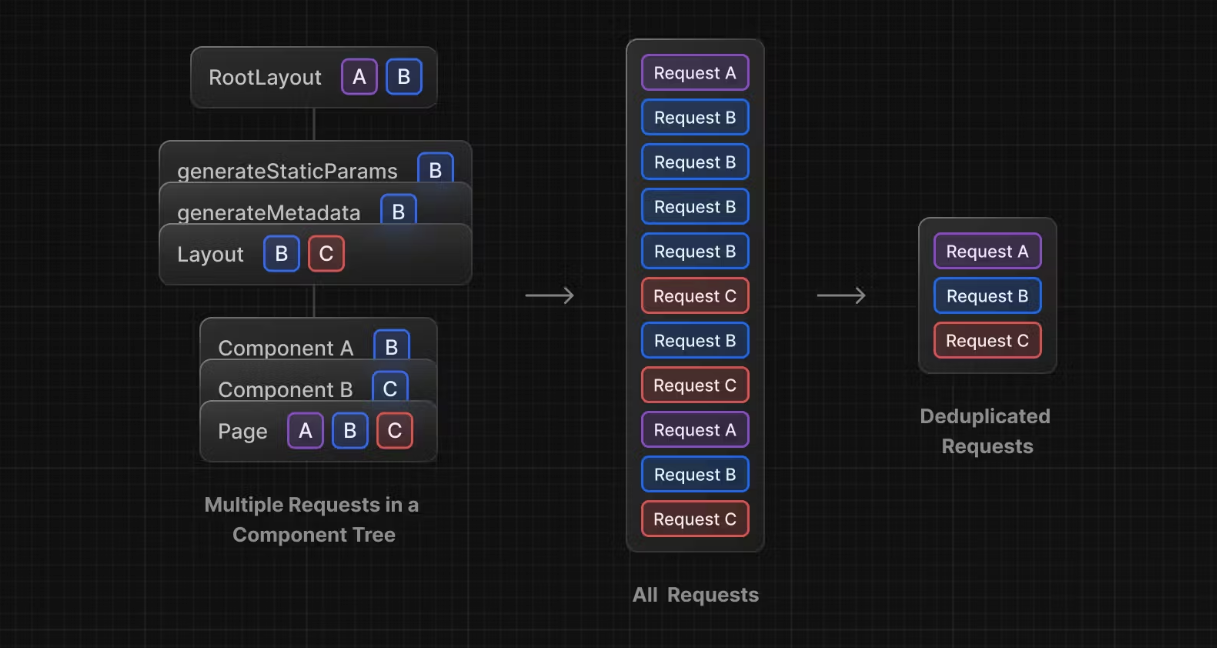
여러 컴포넌트에서 동일한 api를 호출할 때 위 그림 중 All Requests를 보면 컴포넌트 트리에서 호출하는 모든 리퀘스트들을 모두 모아뒀습니다.
async function getComments() {
  const res = await fetch('https://...'); // The result is cached
  return res.json();
}

// This function is called twice, but the result is only fetched once
const comments = await getComments(); // cache MISS

// The second call could be anywhere in your application
const comments = await getComments(); // cache HIT
fetch를 처음 사용했을 때는 cache가 miss 되지만 두번째 호출부터는 기존에 저장된 캐시를 사용하기 때문에 서로 다른 종류의 request a,b,c각 한번씩 총 세 번이 실제로 호출됩니다.
POST 요청은 캐싱되지 않습니다.
캐싱이 되지 않는 여러 상황이 있습니다
앞서 봤던 dynamic data fetch와 같이 revalidate: 0 혹은 cache: 'no-store' 설정
fetchCache를 사용할 경우 캐시가 되지 않습니다.
각 서버 컴포넌트에서 Route Segment Config를 설정할 수 있습니다. 이 설정은 아래처럼 보여지는데요, 자세한 이야기는 나중 챕터에서 자세히 이야기하겠지만 아래와 같이 일반 변수처럼 설정할 수 있습니다.
export const dynamic = 'auto';
export const dynamicParams = true;
export const revalidate = false;
export const fetchCache = 'auto';
// 'auto' | 'default-cache' | 'only-cache'
// 'force-cache' | 'force-no-store' | 'default-no-store' | 'only-no-store'
export const runtime = 'nodejs';
export const preferredRegion = 'auto';
POST 요청은 캐싱되지 않습니다.
예제 실습
이전 강좌 loading / error ui에는 아래와 같이 lib 폴더 아래에 get-posts.ts를 생성하고 더미 데이터를 호출했었습니다.
type Post = {
  id: number
  title: string
  content: string
  author: string
  date: string
  comments: Array<{ id: number; text: string; author: string }>
}

export const getPosts = async (): Promise<Post[]> => {
  return new Promise((resolve) => {
    setTimeout(() => {
      resolve([
        {
          id: 1,
          title: "First Post",
          content: "This is the first post.",
          author: "John Doe",
          date: "May 1, 2023",
          comments: [
            { id: 1, text: "Great post!", author: "Jane Smith" },
            { id: 2, text: "I totally agree.", author: "Mike Johnson" },
          ],
        },
        {
          id: 2,
          title: "Second Post",
          content: "This is the second post.",
          author: "Jane Smith",
          date: "May 5, 2023",
          comments: [
            { id: 1, text: "Thanks for sharing!", author: "John Doe" },
            { id: 2, text: "Looking forward to more.", author: "Mike Johnson" },
          ],
        },
        {
          id: 3,
          title: "Third Post",
          content: "This is the third post.",
          author: "Mike Johnson",
          date: "May 10, 2023",
          comments: [
            { id: 1, text: "Amazing content!", author: "Jane Smith" },
            { id: 2, text: "Keep up the good work.", author: "John Doe" },
          ],
        },
        // Add more posts as needed
      ])
    }, 500)
  })
}
router handler 에서 더미데이터 호출하기
router handler를 만들었으니 이제 더미 데이터 호출은 api/post/route.ts에서 담당하게 수정해보겠습니다.
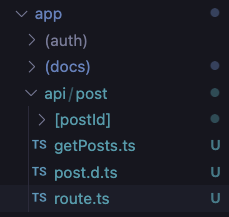
디렉토리 구조
먼저 생성할 디렉토리 구조는 아래와 같습니다.
getPosts.ts
import { getBaseUrl } from "~/app/lib/getBaseUrl"

export const getPosts = async () => {
  const response = await fetch(`${getBaseUrl()}/api/post`)

  if (!response.ok) {
    throw new Error("something went to wrong")
  }

  return (await response.json()) as Post[]
}
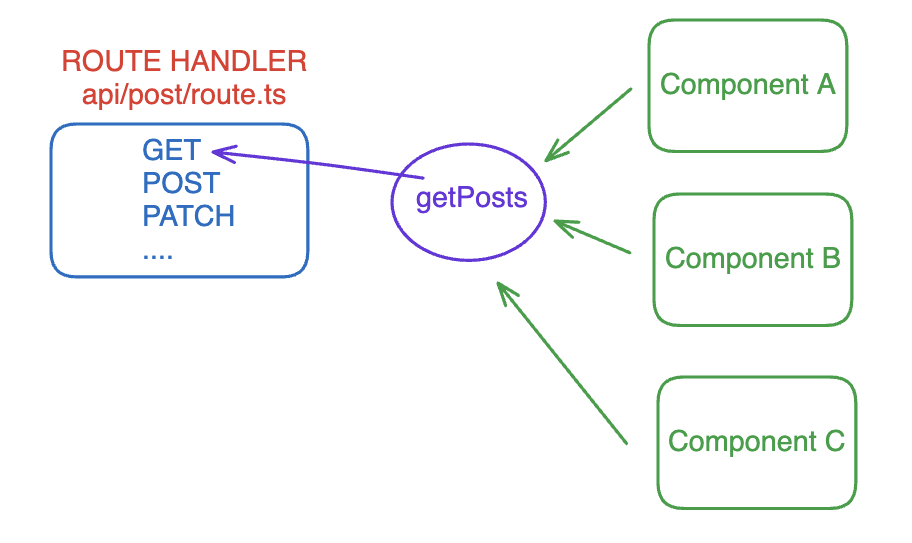
getPosts는 우리가 만든 route handler를 호출하기 위해 작성하는 함수입니다.
api 호출을 매번 fetch("localhost:3000/api/post")으로 사용하는 것은 매우 불편하기 때문에 posts를 요청하는 함수를 담당하고 api 응답 값이 필요한 곳에서는 이 getPosts를 호출하도록 만들 것입니다.
getPosts 내부에 선언된 fetch 함수 호출 시 인자로 전달된 엔드포인트를 보니 아래와 같이 선언되어 있습니다.
`${getBaseUrl()}/api/post`getBaseUrl.ts
우리가 개발용으로 배포하거나 프로덕션 용으로 배포할 때마다 환경에 따라 달라지는 엔드포인트 값은 환경변수를 이용해 참조하도록 하는 것이 좋습니다.
하지만 현재 실습용 서버는 항상 http://localhost 를 스킴으로 가질테니 lib 폴더 하위에 getBaseUrl를 만들어놓고 참조합니다.
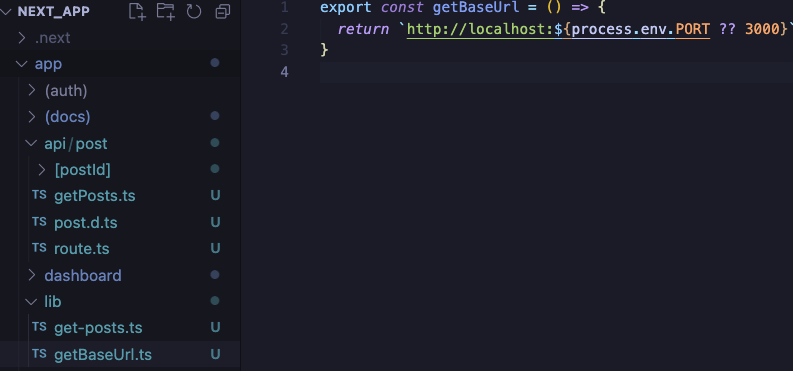
export const getBaseUrl = () => {
  return `http://localhost:${process.env.PORT ?? 3000}`
}
post.d.ts
getPosts 내부에 아래와 같이 코드가 작성되어 있습니다.
// ...
 if (!response.ok) {
    throw new Error("something went to wrong")
  }

  return (await response.json()) as Post[]
  // ... 이하 생략
response.json() 반환 타입을 Post[] 타입으로 캐스팅했습니다.
이렇게 type assertion을 사용해도 아무런 문제가 없습니다.
한 가지 신기한 점은 이 코드 어떤 곳에서도 Post 타입을 import 하는 곳이 없다는 것입니다.
그 이유는 우리가 동일 디렉토리에 post.d.ts 라고 하는 타입 정의 파일을 생성했기 때문입니다.
이렇게 각 Route Handler에서 담당하는 페이로드/리스폰스 타입을 *.d.ts에 작성하면 해당 타입을 사용하는 유틸함수가 별도로 타입을 임포트할 필요 없이 매우 편리하게 타입 정의를 사용할 수 있습니다.
post.d.ts
type Post = {
  id: number
  title: string
  content: string
  author: string
  date: string
  comments: Array<{ id: number; text: string; author: string }>
}
/api/post/route.ts
이제 getPosts에서 사용하는 엔드포인트인 /api/post에 해당하는 Route Handler를 작성합니다.
우리가 특정 데이터베이스를 참조하고 있지 않기 때문에 posts 라는 변수명으로 더미 데이터를 미리 선언해놓겠습니다. 이 데이터는 이전 강의에서 사용했던 데이터와 완전히 동일한 타입입니다.
import { NextRequest, NextResponse } from "next/server"

export async function GET(request: NextRequest) {
  try {
    return new Promise((resolve) => {
      setTimeout(() => {
        resolve(new NextResponse(JSON.stringify(posts), { status: 200 }))
      }, 500)
    })
  } catch (e) {
    return new NextResponse(null, { status: 500 })
  }
}

const posts = [
  {
    id: 1,
    title: "First Post",
    content: "This is the first post.",
    author: "John Doe",
    date: "May 1, 2023",
    comments: [
      { id: 1, text: "Great post!", author: "Jane Smith" },
      { id: 2, text: "I totally agree.", author: "Mike Johnson" },
    ],
  },
  {
    id: 2,
    title: "Second Post",
    content: "This is the second post.",
    author: "Jane Smith",
    date: "May 5, 2023",
    comments: [
      { id: 1, text: "Thanks for sharing!", author: "John Doe" },
      { id: 2, text: "Looking forward to more.", author: "Mike Johnson" },
    ],
  },
  {
    id: 3,
    title: "Third Post",
    content: "This is the third post.",
    author: "Mike Johnson",
    date: "May 10, 2023",
    comments: [
      { id: 1, text: "Amazing content!", author: "Jane Smith" },
      { id: 2, text: "Keep up the good work.", author: "John Doe" },
    ],
  },
  // Add more posts as needed
]
post/page.tsx
이제 이렇게 만들어진 라우트 핸들러를 실제 서버 컴포넌트 내부에서 사용해보아야 겠지요?
post/page.tsx
// import { getPosts } from "../lib/get-posts"
// 이전 강의에서 직접 호출해 사용했던 lib 하위의 get-posts.

import { getPosts } from "../api/post/getPosts"

export const Post = async () => {
  const posts = await getPosts()
  console.log("posts: ", posts)

  return (
    <div className="container mx-auto py-8">
      <h1 className="text-3xl font-bold mb-6">Posts</h1>
      {posts.map((post) => (
        <div key={post.id} className="bg-white p-4 rounded shadow mb-4">
          <h2 className="text-2xl font-bold mb-2">{post.title}</h2>
          <p className="text-gray-600 mb-2">
            By {post.author} | {post.date}
          </p>
          <p className="mb-4">{post.content}</p>
          <div className="bg-gray-100 p-2 rounded">
            {post.comments.map((comment, idx) => (
              <div
                key={comment.id}
                className="mb-2"
                // onClick={handleClick}
              >
                <p className="text-gray-600 mb-1">{comment.author}</p>
                <p>{comment.text}</p>
              </div>
            ))}
          </div>
        </div>
      ))}
    </div>
  )
}

export default Post
이전 강의와 동일한 구조입니다. 한 가지 다른 점은 getPosts를 api/post 하위에 정의한 함수로 사용했다는 것입니다.
위 코드를 적용하고 강력 새로고침을 통해 캐시를 초기화 하면 아래와 같이 동작합니다.

캐시 miss? 캐시 hit!
이전 강의에서 본 loading ui도 정상 동작함을 알 수 있지요?
우리가 서버 컴포넌트에서 api fetch를 수행했기 때문에 api 호출이 정상적으로 되었는지는 터미널 로그를 통해 확인해야 합니다.

강력 새로고침을 통해 페이지를 처음 방문했을 때 캐시 miss된 로그

헤더의 네비게이션 탭을 통해 페이지를 이동했을 때 캐시 hit되어 별도의 api 호출을 하지 않은 모습
수고하셨습니다.
수고 많으셨습니다. 이전 강의에서 들은
- catch all segments
- optional catch all segments
- loading / error ui
내용들 또한 api route handler에서 응용해서 사용할 수 있습니다.
다음 강의에서 뵙겠습니다!


우와 정말 잘 정리되어있네요! 곧 하트가 떡상할것같습니다