저번 시간에는 useState으로 상태 관리를 하여 month, year를 변경하는 기능을 구현해보았다.
이번 시간에는 전역 상태 관리 도구인 Redux를 사용하여 바꿔볼 것이다.
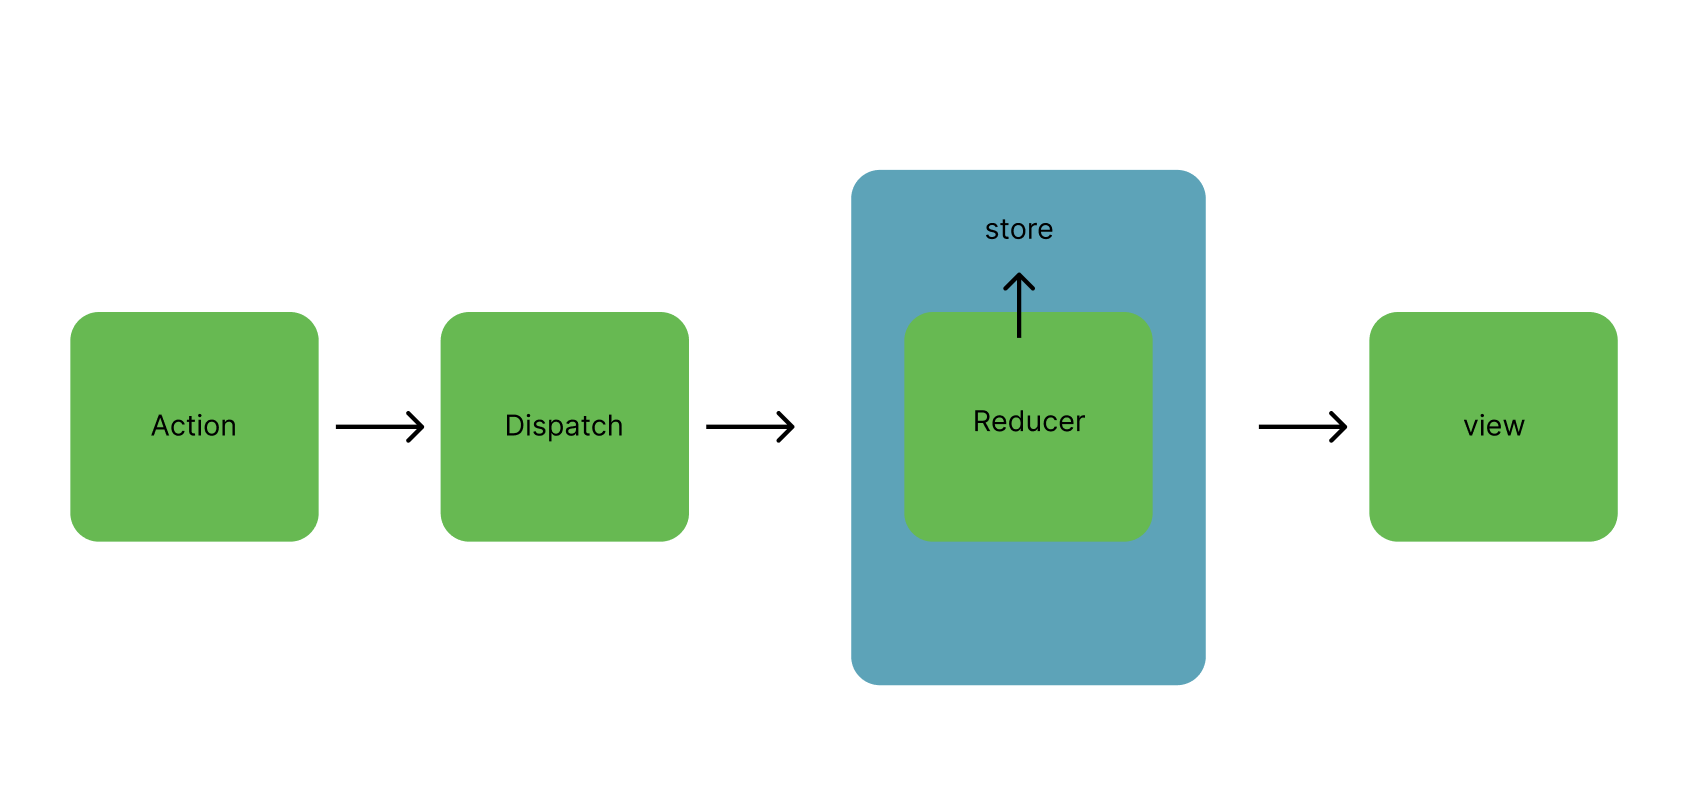
단방향 데이터 흐름을 가지는 상태관리 tool이라고 포스팅했었다.
Redux 단방향 데이터 흐름 포스팅
https://velog.io/@jasmine0714/Redux-Redux%EC%9D%98-%EB%8D%B0%EC%9D%B4%ED%84%B0-%ED%9D%90%EB%A6%84
단방향 데이터 흐름은 아래와 같았다. 피그마로 한땀 한땀 만들었던 나의 Redux 단방향 데이터 흐름. ㅋㅋㅋㅋ
우선 store.tsx에 Action, reducer, store를 정의해놓았다. 일단 목표하는 기능이 작동이 되면 관심사 분리를 위해 파일을 분리해보겠다.
일단 연도 변경은 month가 useState 썼을 때처럼 문제 없이 변경이 되면 추후 변경하려고 한다.
아래와 같이 코드를 바꿨는데 작동은 하지만, 일부 문제가 생겼다.
버그 수정 전
store.tsx
import { legacy_createStore as createStore } from "redux";

// Action.type 문자열을 변수에 담음.
const INCREASEMONTH = "INCREASEMONTH";
const DECREASEMONTH = "DECREASEMONTH";

// Action을 정의한 부분
export const increaseMonth = () => {
  return {
    type: INCREASEMONTH,
  };
};
export const decreaseMonth = () => {
  return {
    type: DECREASEMONTH,
  };
};

const date = new Date();
interface Props {
  month: number;
}
interface Action {
  type: string;
}

// reducer
export const reducer = (
  state: Props = { month: date.getMonth() },
  action: Action
) => {
  switch (action.type) {
    case INCREASEMONTH:
      return state.month === 11 ? { month: 0 } : { month: state.month + 1 };
    case DECREASEMONTH:
      return state.month === 0 ? { month: 11 } : { month: state.month - 1 };
    default:
      return state;
  }
};

// store
export const store = createStore(reducer);
이렇게 일단은 store.tsx에 관심사 분리 없이 몽땅 넣어놨다.
App.tsx (😈 버그 있음 주의)
import React, { useState } from "react";
import styled from "styled-components";
import Days from "./components/Days";
import Dates from "./components/Dates";
import { useDispatch, useSelector } from "react-redux";
import { increaseMonth, decreaseMonth } from "./store/store";

// styled-components 생략

interface Props {
  year: number;
  month: number;
}

function App() {
   // dispatch
  const dispatch = useDispatch();
   // useSelector로 상태를 받아옴.
  const state = useSelector((state: Props) => state);
  const date = new Date();
  const [year, setYear] = useState(date.getFullYear());
  const [month, setMonth] = useState(date.getMonth());
  const handleClickPrevYear = () => {
    setYear(year - 1);
  };
  const handleClickNextYear = () => {
    setYear(year + 1);
  };
  const handleClickPrevMonth = () => {
    // dispatch 이용하여 action 전달
    dispatch(decreaseMonth());
    setMonth(state.month);
  };
  const handleClickNextMonth = () => {
    // dispatch 이용하여 action 전달
    dispatch(increaseMonth());
    setMonth(state.month);
  };

  return (
    <Table>
      <YearWrapper>
        <Btn onClick={handleClickPrevYear}>◀️</Btn>
        <Year>{year}</Year>
        <Btn onClick={handleClickNextYear}>▶️</Btn>
      </YearWrapper>
      <MonthWrapper>
        <Btn onClick={handleClickPrevMonth}>◀️</Btn>
        <Month>{month + 1}월</Month>
        <Btn onClick={handleClickNextMonth}>▶️</Btn>
      </MonthWrapper>
      <Days />
      <Dates year={year} month={month} />
    </Table>
  );
}

export default App;
기본적인 세팅을 해놓고 버튼을 클릭해봤는데,
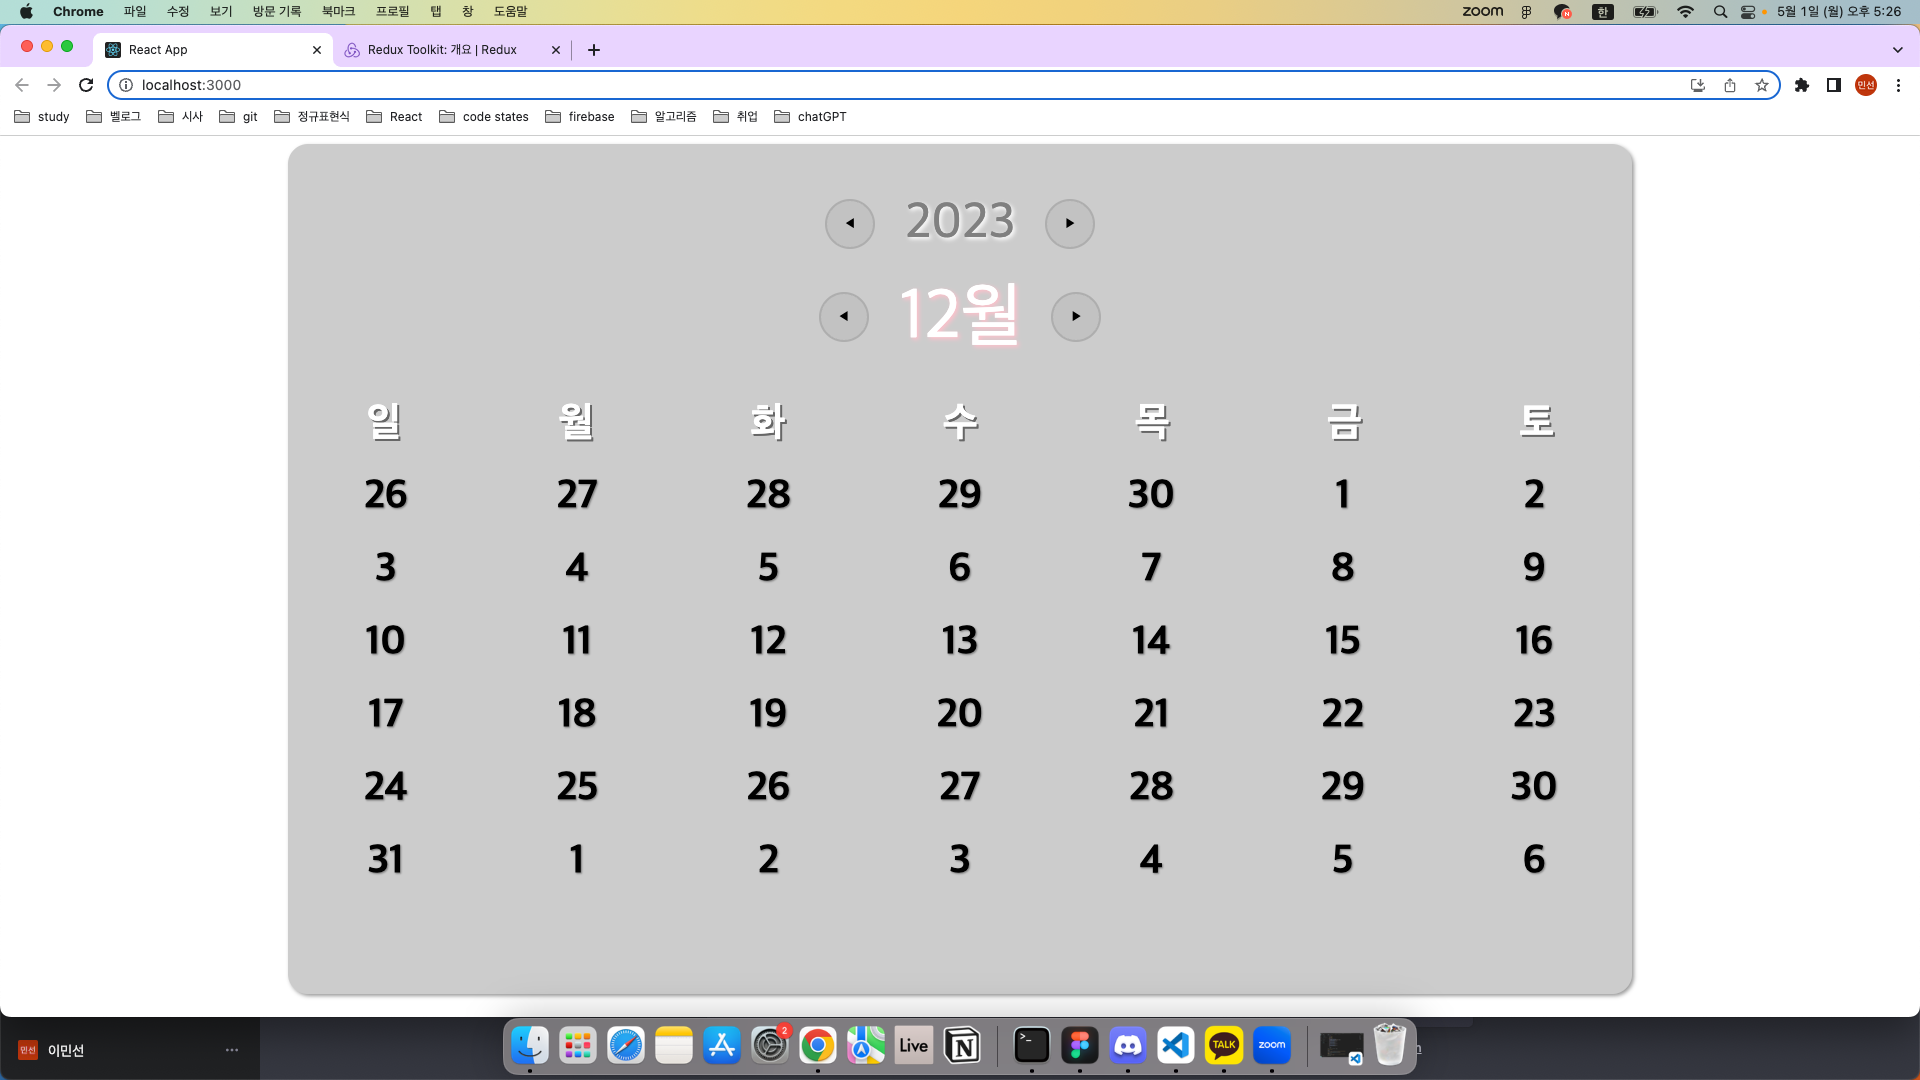
변경이 되긴 된다.
그런데 한박자씩 느리게 되는 것이었다.
- 만약 다음달로 가는 버튼을 맨 처음 누르면 아무 반응이 없다가 2번째 누를 때부터 변경이 되기 시작한다.
- 계속 다음달로 가는 버튼을 누르다가 갑자기 이전 달로 가는 버튼을 누르면 다음 달로 간다. 바로 직전에 다음달로 가는 버튼에 대한 반응이 한 박자 늦게 나오는 것이었다.
이거 왜이래??!!
문제를 해결해봐야겠다.
.
.
.
찾았다 찾았다!!
useState를 제대로 안 지운게 원인이었다.
왜 한 박자 씩 밀렸는지 주석으로 정리해보자면 아래와 같다.
  const handleClickPrevMonth = () => {
    dispatch(decreaseMonth()); // 내려라! Action 전달
    // setMonth(state.month); // 방금 전달한 Action 이전의 state.month로 useState의 month를 설정해줘.
  };
  const handleClickNextMonth = () => {
    dispatch(increaseMonth()); // 올려라! Action 전달
    // setMonth(state.month); // // 방금 전달한 Action 이전의 state.month로 useState의 month를 설정해줘.
  };
setMonth를 지웠어야 했다. 아니 그냥 useState를 통째로 지우고 봤어야 했다!
dispatch에 실컷 Action을 전달해놓고 아까 전달받은 state.month를 렌더링하고 있으니 한 박자씩 밀리는 것이었다. ㅋㅋㅋㅋㅋ
  const handleClickPrevMonth = () => {
    dispatch(decreaseMonth());
    console.log(state);
  };
  const handleClickNextMonth = () => {
    dispatch(increaseMonth());
    console.log(state);
  };
이렇게 useState의 흔적을 없애니까 버그가 사라졌다!!
이제 연도 변경도 Redux로 구현해보자.
버그 수정 && 연도 변경 기능 추가 후
store.tsx
import { legacy_createStore as createStore } from "redux";

// 연도 변경 Action 추가
const INCREASEYEAR = "INCREASEYEAR";
const DECREASEYEAR = "DECREASEYEAR";
const INCREASEMONTH = "INCREASEMONTH";
const DECREASEMONTH = "DECREASEMONTH";

export const increaseYear = () => {
  return {
    type: INCREASEYEAR,
  };
};
export const decreaseYear = () => {
  return {
    type: DECREASEYEAR,
  };
};
export const increaseMonth = () => {
  return {
    type: INCREASEMONTH,
  };
};
export const decreaseMonth = () => {
  return {
    type: DECREASEMONTH,
  };
};

const date = new Date();
interface Props {
  year: number;
  month: number;
}

interface Action {
  type: string;
}

// 갱신된 state은 이제 year/month 2개의 속성을 가지도록 했다.
export const reducer = (
  state: Props = { year: date.getFullYear(), month: date.getMonth() },
  action: Action
) => {
  switch (action.type) {
  // 연도 변경 case 추가
    case INCREASEYEAR:
      return { year: state.year + 1, month: state.month };
    case DECREASEYEAR:
      return { year: state.year - 1, month: state.month };
    case INCREASEMONTH:
      return state.month === 11
        ? { year: state.year + 1, month: 0 }
        : { year: state.year, month: state.month + 1 };
    case DECREASEMONTH:
      return state.month === 0
        ? { year: state.year - 1, month: 11 }
        : { year: state.year, month: state.month - 1 };
    default:
      return state;
  }
};

export const store = createStore(reducer);
App.tsx
function App() {
  const dispatch = useDispatch();
  const state = useSelector((state: Props) => state);
  const handleClickPrevYear = () => {
    dispatch(decreaseYear());
  };
  const handleClickNextYear = () => {
    dispatch(increaseYear());
  };
  const handleClickPrevMonth = () => {
    dispatch(decreaseMonth());
  };
  const handleClickNextMonth = () => {
    dispatch(increaseMonth());
  };
useState는 싹 날려버렸다!!
이제 useState 사용했을 때와 마찬가지로 작동이 아주 잘된다.
2023년 12월에서 다음 달 버튼을 누르면?
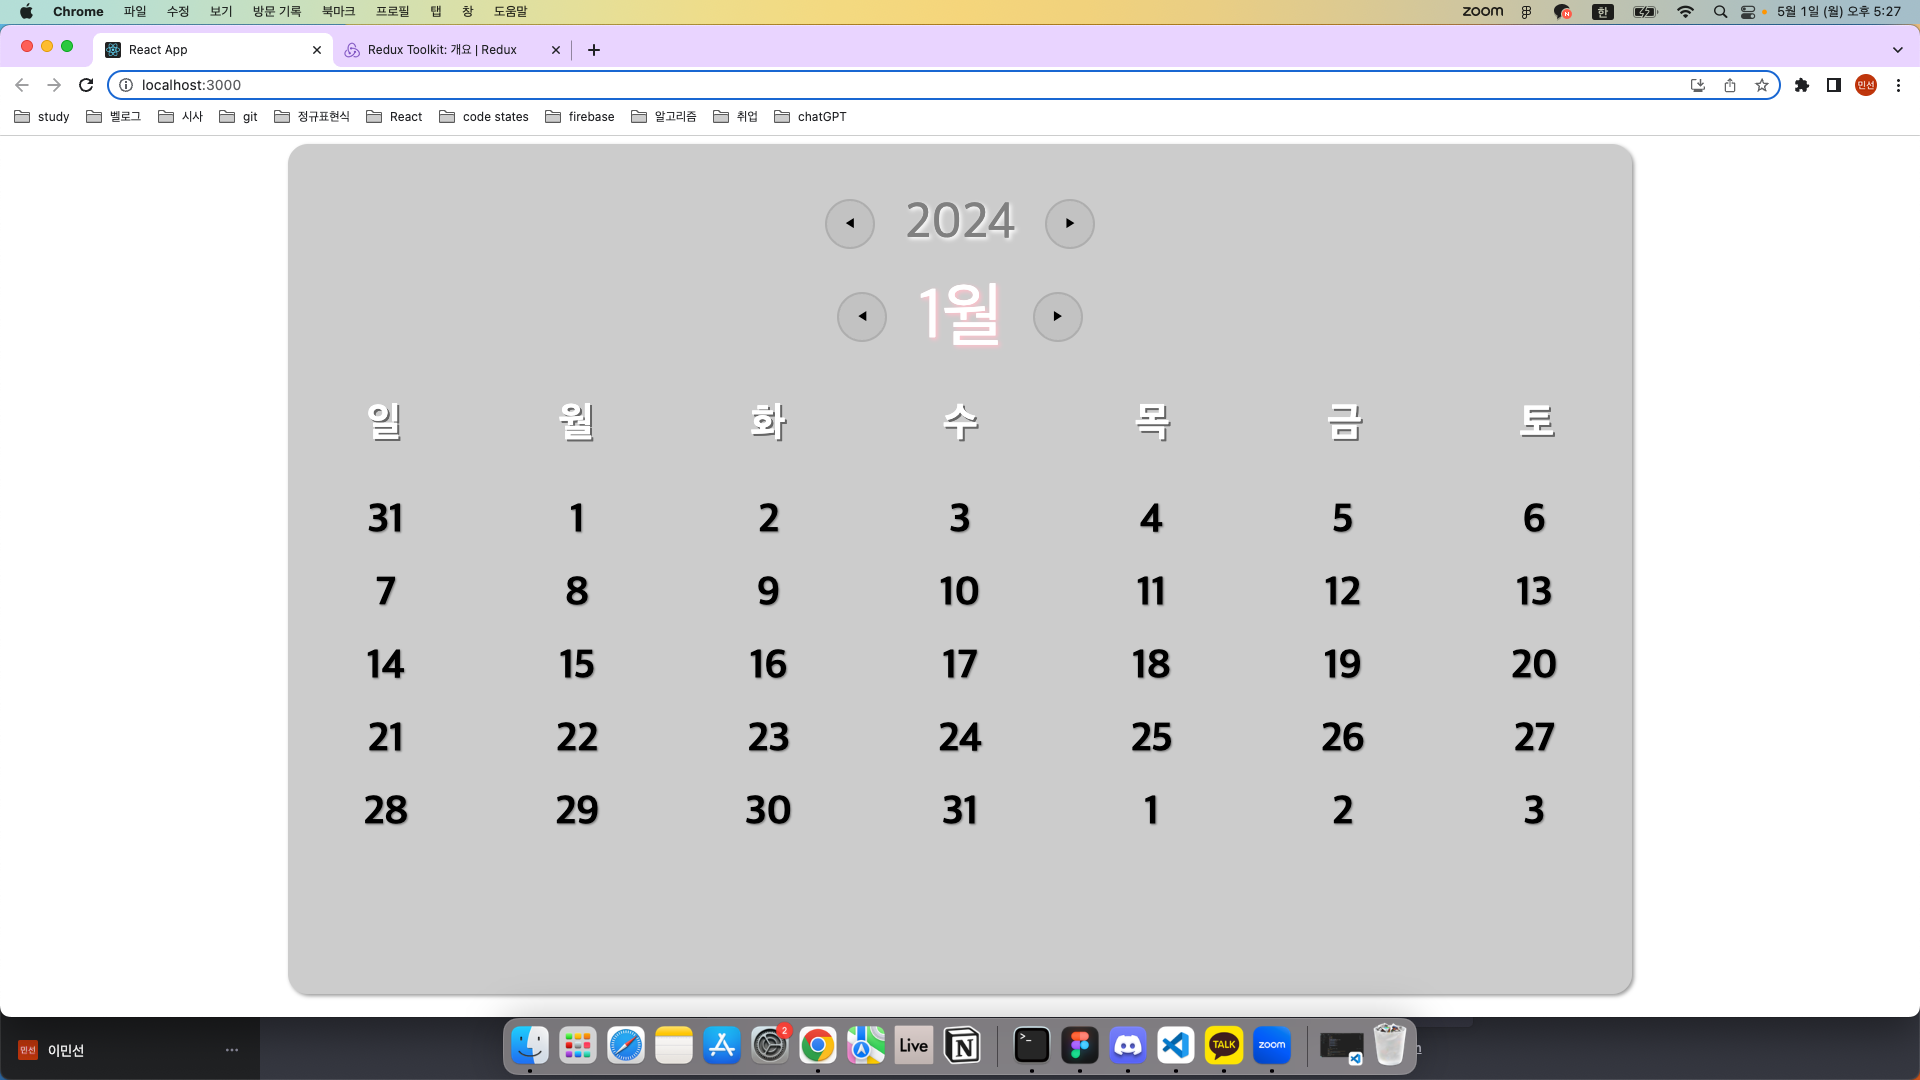
2024년 1월이 된다~~~ redux로 기능 구현 성공!!
그런데 역시나 redux를 사용하니 코드양이 진짜 엄청 많아지기는 했다. ㅋㅋㅋ
redux의 단점으로 손꼽히는 게 보일러 플레이트 코드(애플리케이션의 상태를 관리하기 위해 추가적인 코드 작성이 필요하여 코드 복잡성이 증가)라고 했다.
그래서 redux toolkit 사용이 적극 권장되고 있다. 나도 아직 redux toolkit을 익히고 있는 과정이지만, toolkit 쓸 때 확실히 코드의 양이 줄어드는 건 꽤 많이 체감이 된다.
다음 시간에는 redux toolkit을 사용해서 코드 양을 좀 줄여봐야겠다.
redux toolkit 공식 문서
https://ko.redux.js.org/redux-toolkit/overview/
기존 앱을 더 간단하게 만드려는 경험자?
여러분의 코드를 더 좋고 유지보수하기 쉽게 만들어줘?
영업 당해보려쓰~ 안 배울 이유가 없다!!
마지막으로 관심사 분리를 위해 파일 분리만 하고 마무리 하자 ㅎㅎㅎ
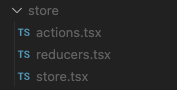
파일 하나에 몽땅 있던 상태 관리 관련 코드를 action.tsx, reducers.tsx, store.tsx로 분리하였다.
파일 분리
actions.tsx
export const INCREASEYEAR = "INCREASEYEAR";
export const DECREASEYEAR = "DECREASEYEAR";
export const INCREASEMONTH = "INCREASEMONTH";
export const DECREASEMONTH = "DECREASEMONTH";

export const increaseYear = () => {
  return {
    type: INCREASEYEAR,
  };
};
export const decreaseYear = () => {
  return {
    type: DECREASEYEAR,
  };
};
export const increaseMonth = () => {
  return {
    type: INCREASEMONTH,
  };
};
export const decreaseMonth = () => {
  return {
    type: DECREASEMONTH,
  };
};
reducers.tsx
import {
  INCREASEYEAR,
  DECREASEYEAR,
  INCREASEMONTH,
  DECREASEMONTH,
} from "./actions";

const date = new Date();
interface Props {
  year: number;
  month: number;
}

interface Action {
  type: string;
}

export const reducer = (
  state: Props = { year: date.getFullYear(), month: date.getMonth() },
  action: Action
) => {
  switch (action.type) {
    case INCREASEYEAR:
      return { year: state.year + 1, month: state.month };
    case DECREASEYEAR:
      return { year: state.year - 1, month: state.month };
    case INCREASEMONTH:
      return state.month === 11
        ? { year: state.year + 1, month: 0 }
        : { year: state.year, month: state.month + 1 };
    case DECREASEMONTH:
      return state.month === 0
        ? { year: state.year - 1, month: 11 }
        : { year: state.year, month: state.month - 1 };
    default:
      return state;
  }
};
store.tsx
import { legacy_createStore as createStore } from "redux";
import { reducer } from "./reducers";

export const store = createStore(reducer);
여기까지! Redux 사용하기 포스팅이었다 ㅎㅎㅎㅎ
다음 시간에는 toolkit 써서 코드를 고쳐보는 걸루~! 두근두근~~
