🖊️이론
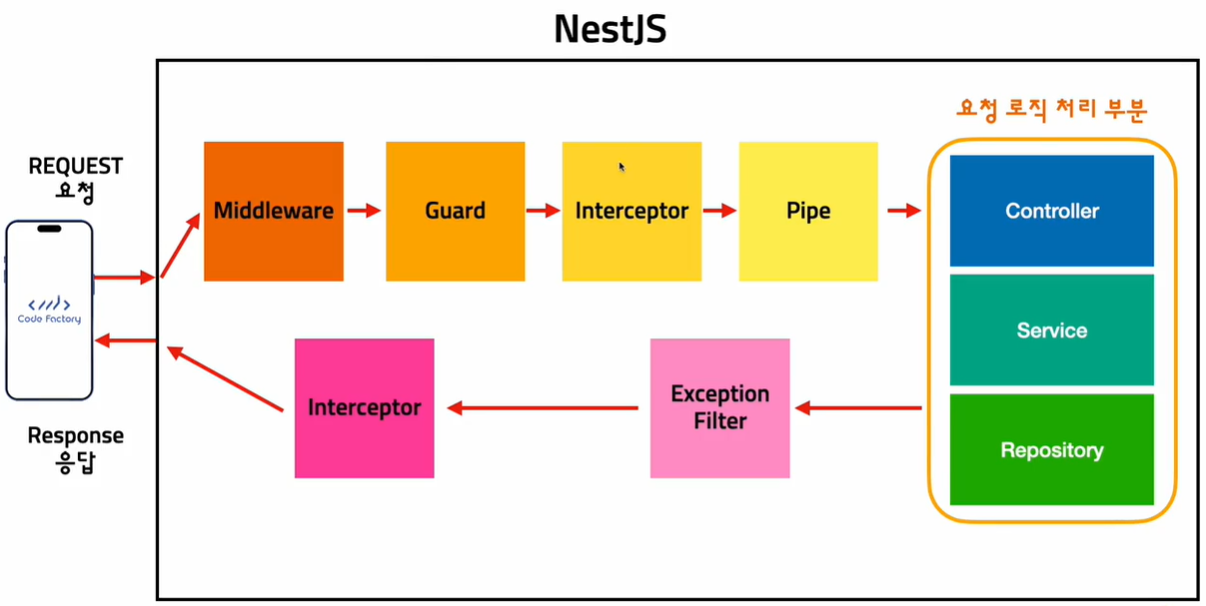
미들웨어는 가장 앞에서 먼저 요청을 받습니다.

Middleware functions can perform the following tasks:
- execute any code.(어떤 코드는 실행가능)
- make changes to the request and the response objects.(무엇인가 추가하거나 삭제하는 가능)
- end the request-response cycle.(가드같은 역할도 가능)
- call the next middleware function in the stack.(여러개의 미들웨어 적용 가능, 적용된 순서로 진행)
if the current middleware function does not end the request-response cycle, it must call next() to pass control to the next middleware function. Otherwise, the request will be left hanging.(미들웨어를 실행하고 내부에서 다음으로 넘어가려면 반드시 next()를 사용, 그렇지 않으면 그 위치에서 정지)
🖊️Middleware 생성 및 사용
Middleware를 구현하겠습니다. NestMiddleware를 implements를 하면 use라는 함수를 오버라이드 해야합니다.
- common/middleware/log.middleware.ts
import { Injectable, NestMiddleware } from "@nestjs/common";
import { NextFunction } from "express";

@Injectable()
export class LogMiddleware implements NestMiddleware {

    use(req: Request, res: Response, next: NextFunction) {

    }
}
NextFunction은 express에서 가져온 기능인것을 import를 통해서 알 수 있습니다.
NextFunction을 사용하지 않으면 요청이 멈춘다고 했습니다. 따라서 next()를 적용합니다.
import { Injectable, NestMiddleware } from "@nestjs/common";
import { NextFunction } from "express";

@Injectable()
export class LogMiddleware implements NestMiddleware {

    use(req: Request, res: Response, next: NextFunction) {
		console.log(`[REQ] ${req.method} ${req.url} ${new Date().toLocaleString('kr')}`);
        next(); // 적용
    }
}
이제 미들웨어를 적용하겠습니다. 다른 것들은 함수에 어노테이션을 적용을 합니다. 하지만 미들웨어는 모듈에다가 적용을 합니다.
- posts.module.ts
@Module({
    imports: [
        TypeOrmModule.forFeature([
            PostsModel,
            ImageModel,
        ]),
        AuthModule,
        UsersModule,
        CommonModule,
    ],
    controllers: [PostsController],
    providers: [PostsService, PostsImagesService,],
    exports: [PostsService]
})
export class PostsModule implements NestModule{

}
NestModule를 implements하면 configure 메소드로 미들웨어를 consumer 즉 소비해야합니다.
@Module({
    imports: [
        TypeOrmModule.forFeature([
            PostsModel,
            ImageModel,
        ]),
        AuthModule,
        UsersModule,
        CommonModule,
    ],
    controllers: [PostsController],
    providers: [PostsService, PostsImagesService,],
    exports: [PostsService]
})
export class PostsModule implements NestModule{
  configure(consumer: MiddlewareConsumer) { // 미들웨어를 소비(consumer)한다.
    consumer.apply(
      // 적용하고 싶은 미들웨어 넣기
      LogMiddleware,
    )
  }
}
포스트맨으로 GET 요청을 해보도록 하겠습니다. 현재는 @UseInterceptor가 없는 상태입니다. 만약에 @UseInterceptor를 추가한 상태로 요청을 보내면 미들웨어에서 로그를 만들지 않고 @UseInterceptor 내부에서 로그를 만들어 냅니다.
@Get()
getPosts(
  	@Query() query: PaginatePostDto,
) {
    //throw new BadRequestException('에러 테스트'); // HttpExceptionFilter 테스트
    return this.postsService.paginatePosts(query);
}

아무것도 나오지 않은 것을 알 수 있습니다. 왜냐하면 저희가 미들웨어를 적용하고 싶은 라우트를 지정하지 않았기 때문입니다. 라우트를 지정해주도록 하겠습니다.
export class PostsModule implements NestModule{

    configure(consumer: MiddlewareConsumer) {
        consumer.apply(
            LogMiddleware,
        ).forRoutes({
            path: 'posts', // posts에 해당하는 path에 적용할 것이다.
            method: RequestMethod.ALL, // 적용을 하고 싶은 메소드에 적용
        })
    }
}
path: 'posts'
path: 'posts*' // 모든 경로
.
.
method: RequestMethod.ALL
method: RequestMethod.GET
method: RequestMethod.POST
.
.
이번에는 path: 'paths'상태에서 특정 id에 해당하는 요청을 보내보도록 하겠습니다.


아무것도 찍히지 않는 것을 알 수 있습니다. 즉, 여기서 알 수 있는 점은 path경로가 정확히 posts인 경우에만 해당이 되는 것입니다.
만약 posts가 있는 모든 경로에 적용을 하고 싶은 경우 path*로 작성해야 합니다.
export class PostsModule implements NestModule{

    configure(consumer: MiddlewareConsumer) {
        consumer.apply(
            LogMiddleware,
        ).forRoutes({
            path: 'posts*',
            method: RequestMethod.GET,
        })
    }
}
동일하게 Get 요청을 보내보겠습니다.


이 의미는 PostsModule에 작성한 Middleware코드를 AppModule로 옮기고 path를 *로 하게되면 모든 곳에 적용이 가능하다는 것을 알 수 있습니다.
- posts/posts.module.ts
export class PostsModule implements NestModule{
	// implements NestModule
  	// 전부 app.module.ts로 옮기기!
}- app.module.ts
export class AppModule implements NestModule{

    configure(consumer: MiddlewareConsumer) {
        consumer.apply(
            LogMiddleware,
        ).forRoutes({
            path: '*', // 전체 적용
            method: RequestMethod.ALL,
        })
    }
}
따라서 로그인을 하게되어도 로그가 남는 것을 알 수 있습니다. 어떠한 요청에도 전부 로그가 남게 됩니다.


즉, Middleware의 특징은 가장 먼저 적용이 된다는 점입니다. 그리고 우리가 적용을 할 때, 패턴(path, methed 적용)을 가지고 적용할 수 있다는 큰 장점이 있습니다.
따라서 지금 처럼 로그를 콘솔에 단순하게 찍는 것이 아니라, 로그를 모니터링 할 수 있는 것과 연동을 시켜서 Middleware와 연결하면 유용합니다.
추가로 CORS 같은 보안적인 것도 Middleware로 구현이 되어있습니다. 따라섯 순서대로 보안을 적용하고 그 다음에 통과가 되면 Pipe로 이동을 하는 것입니다.