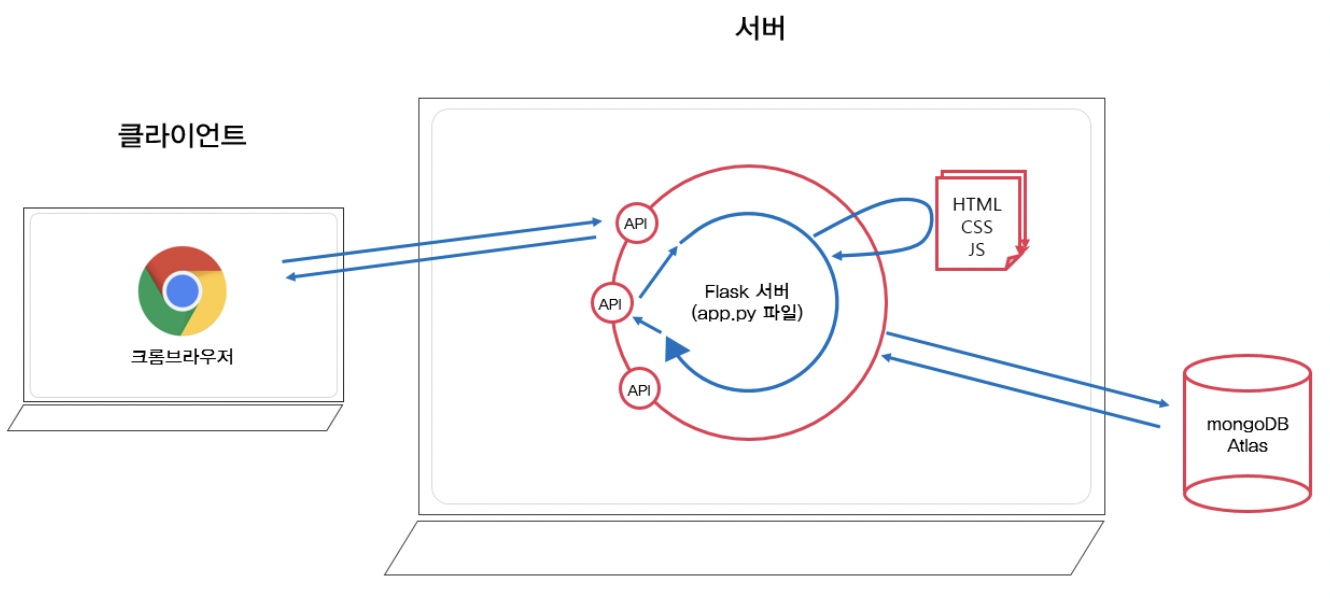

5주차에는 여태까지 배웠던 것을 한 번에 정리하고 배포하는 시간을 가진다!
Bucket List 만들기
POST (기록하기)
- 요청 정보 : URL= /bucket, 요청 방식 = POST
- 클라(ajax) → 서버(flask) : bucket
- 서버(flask) → 클라(ajax) : 메시지를 보냄 (기록 완료!)
- 버킷리스트를 한 개 만들 때마다 고유번호를 만들어서 함께 넣어주어야 한다!
1. 클라이언트와 서버 연결하기
-서버
@app.route("/bucket", methods=["POST"])
def bucket_post():
    sample_receive = request.form['sample_give']
    print(sample_receive)
    return jsonify({'msg': 'POST(기록) 연결 완료!'})
-클라이언트
function save_bucket(){
$.ajax({
type: "POST",
url: "/bucket",
data: {sameple_give:'데이터전송'},
success: function (response) {
alert(response["msg"])
}
});
}
<button onclick="save_bucket()" type="button" class="btn btn-outline-primary">기록하기</button>2. 서버 만들기
버킷 정보 받아오기 + 버킷마다 고유번호 만들기 + 완료 여부
@app.route("/bucket", methods=["POST"])
def bucket_post():
bucket_receive = request.form["bucket_give"]
# count = db.bucket.find({},{'_id':False}).count()
# num = count + 1
count = list(db.bucket.find({},{'_id':False}))
num = len(count) + 1
doc = {
'num':num,
'bucket': bucket_receive,
'done':0 #완료했다면 1, 아직 완료하지 않았다면 0을 넣어줄 것
}
db.bucket.insert_one(doc)
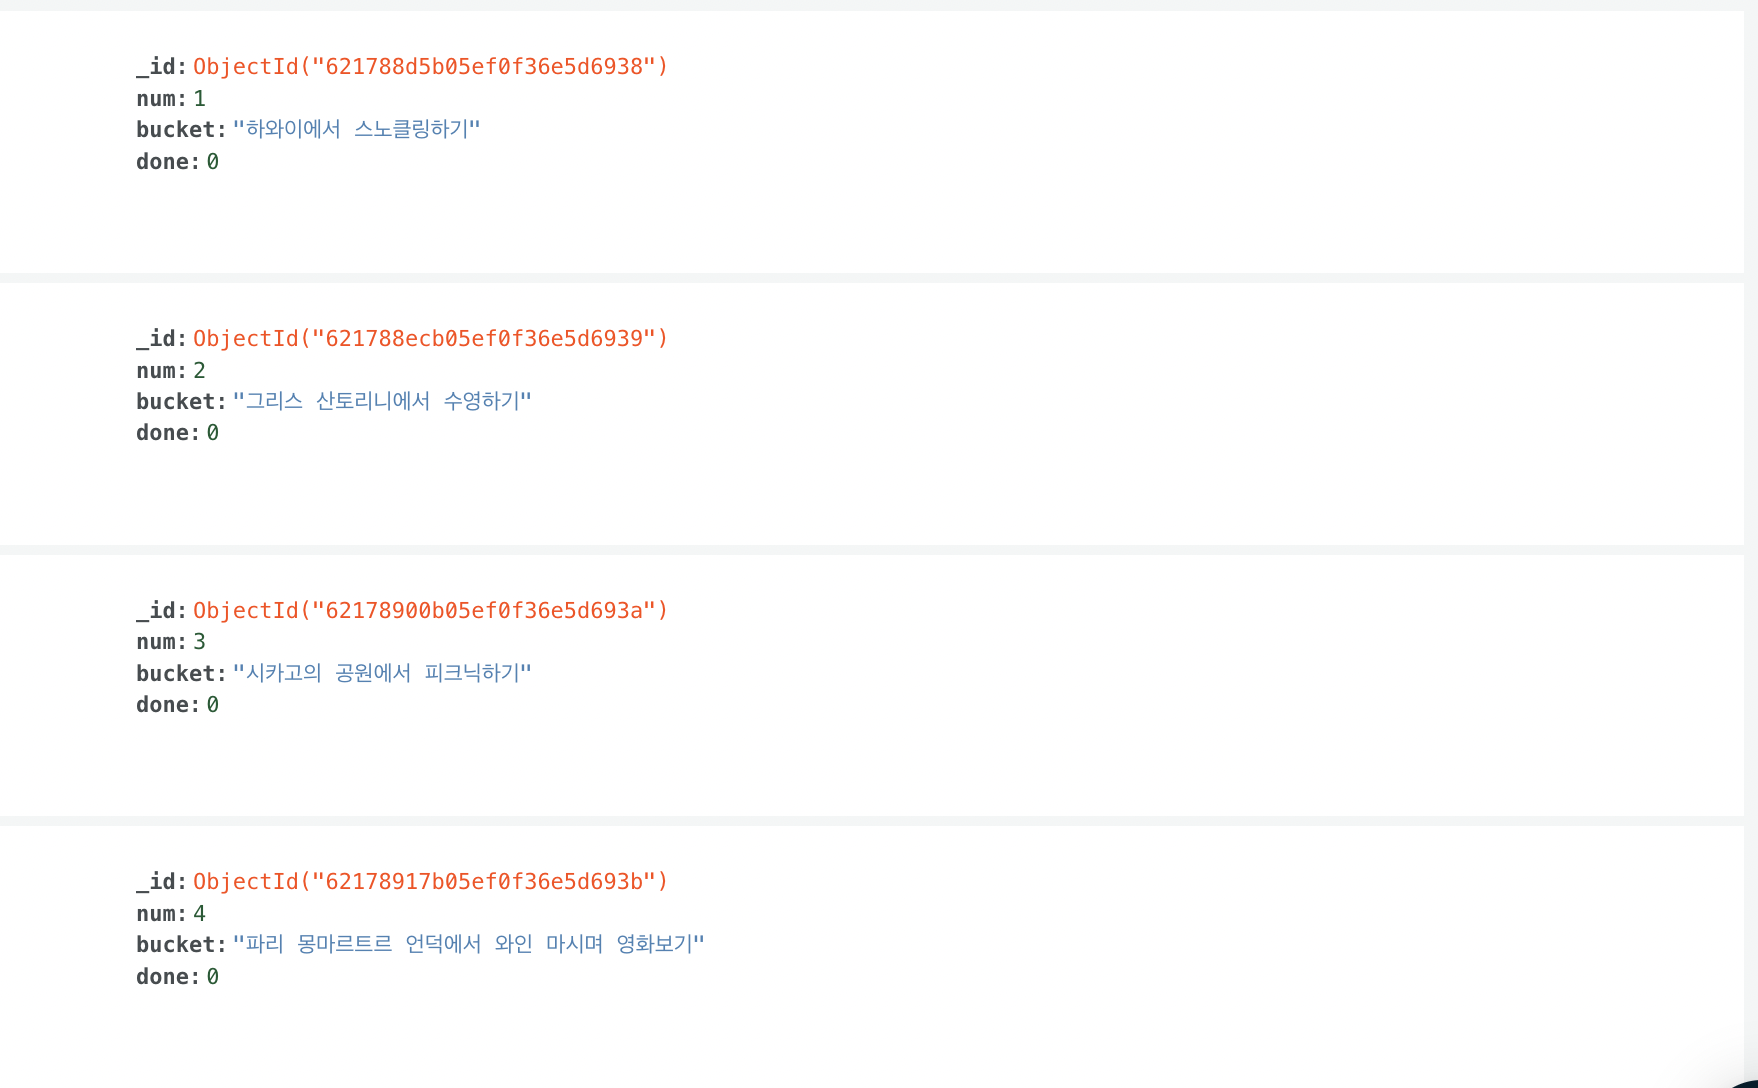
return jsonify({'msg':'등록 완료!'})3. 클라이언트 만들기
function save_bucket(){
    let bucket = $('#bucket').val()
    $.ajax({
        type: "POST",
        url: "/bucket",
        data: {bucket_give:bucket},
        success: function (response) {
            alert(response["msg"])
            window.location.reload()
        }
    });
}
MongoDB에도 잘 들어간 것을 확인할 수 있다.
GET (화면에 보여주기)
- 요청 정보 : URL= /bucket, 요청 방식 = GET
- 클라(ajax) → 서버(flask) : (없음)
- 서버(flask) → 클라(ajax) : 전체 버킷리스트를 보여주기
1. 클라이언트와 서버 연결하기
-서버
@app.route("/bucket", methods=["GET"])
def bucket_get():
    return jsonify({'msg': 'GET 연결 완료!'})
-클라이언트
$(document).ready(function () {
show_bucket();
});
function show_bucket(){
$.ajax({
type: "GET",
url: "/bucket",
data: {},
success: function (response) {
alert(response["msg"])
}
});
}2. 서버 만들기
데이터를 불러오기만 하면 된다.
@app.route("/bucket", methods=["GET"])
def bucket_get():
    buckets_list = list(db.bucket.find({},{'_id':False}))
    return jsonify({'buckets':buckets_list})
3. 클라이언트 만들기
function show_bucket(){
    $('#bucket-list').empty()
    $.ajax({
        type: "GET",
        url: "/bucket",
        data: {},
        success: function (response) {
            let rows = response['buckets']
            for (let i = 0; i < rows.length; i++) {
                let bucket = rows[i]['bucket']
                let num = rows[i]['num']
                let done = rows[i]['done']

                let temp_html = ``
                if (done == 0) {
                    temp_html = `<li>
                                    <h2>✅ ${bucket}</h2>
                                    <button onclick="done_bucket(${num})" type="button" class="btn btn-outline-primary">완료!</button>
                                </li>`
                } else {
                    temp_html = `<li>
                                    <h2 class="done">✅ ${bucket}</h2>
                                </li>`
                }
                $('#bucket-list').append(temp_html)
            }
        }
    });
}
POST 2 (완료하기)
API (Update → POST)
- 요청 정보 : URL= /bucket/done, 요청 방식 = POST
- 클라(ajax) → 서버(flask) : num (버킷 넘버)
- 서버(flask) → 클라(ajax) : 메시지를 보냄 (버킷 완료!)
- 클라이언트와 서버 연결하기
-서버
@app.route("/bucket/done", methods=["POST"])
def bucket_done():
    sample_receive = request.form['sample_give']
    print(sample_receive)
    return jsonify({'msg': 'POST(완료) 연결 완료!'})
-클라이언트
function done_bucket(num){
$.ajax({
type: "POST",
url: "/bucket/done",
data: {sameple_give:'데이터전송'},
success: function (response) {
alert(response["msg"])
}
});
}
<button onclick="done_bucket(5)" type="button" class="btn btn-outline-primary">완료!</button>- 서버 만들기
@app.route("/bucket/done", methods=["POST"])
def bucket_done():
    num_receive = request.form['num_give']
    db.bucket.update_one({'num': int(num_receive)}, {'$set': {'done': 1}})
    return jsonify({'msg': '버킷 완료!'})
update함수로 db에서 받은 num에 해당하는 버킷을 찾아 done여부를 0에서 1로 바꾸어준다!
참고로, 여기서 버킷 넘버가 String으로 들어오기 때문에 db에 저장된 다른 데이터들과 통일 및 구별하기 위해 int형으로 형변환을 해주어야한다.
- 클라이언트 만들기
<style>
.mybox > li > h2.done {
                text-decoration: line-through
            }
</style>
function done_bucket(num){
    $.ajax({
        type: "POST",
        url: "/bucket/done",
        data: {'num_give':num},
        success: function (response) {
            alert(response["msg"])
            window.location.reload()
        }
    });
}
버킷이 완성이 되면 이렇게 line-through 한 것을 볼 수 있다.

내 프로젝트를 배포하기
AWS EC2 서버 구매하기 + Keypair 생성하기
AWS EC2 접속하기
- Spotlight - terminal.app
- 받은 Keypair의 접근권한 바꿔주기
sudo chmod 400 키페어 - SSH로 접속하기
ssh -i 키페어 ubuntu@AWS에서 받은 내 아이피 주소
, 비밀번호 입력! - 아래처럼 질문이 나오면 YES라고 응답하기
This key is not known by any other names
Are you sure you want to continue connecting (yes/no/[fingerprint])? yes
간단한 terminal 리눅스 명령어 배우기
ls: 현 위치의 모든 파일을 보여줌
pwd: 현 위치(폴더 경로)를 알려줌
mkdir: 현 위치 아래에 폴더를 하나 만듦
cd [갈 곳]: 나를 [갈 곳]폴더로 이동시킴
cd ..: 상위 폴더로 이동시킴
cp -r [복사할 것][붙여넣기 할 것]: 복사 붙여넣기
rm -rf [지울 것]: 지우기
sudo [실행할 명령어]: 명령어를 관리자 권한으로 실행
sudo su: 관리자 권한으로 들어간다. 나올 때는 exit
서버 세팅하기
EC2세팅하기
 python3 -> python
sudo update-alternatives --install /usr/bin/python python /usr/bin/python3 10

# pip3 -> pip
sudo apt-get update
sudo apt-get install -y python3-pip
sudo update-alternatives --install /usr/bin/pip pip /usr/bin/pip3 1

# port forwarding
sudo iptables -t nat -A PREROUTING -i eth0 -p tcp --dport 80 -j REDIRECT --to-port 5000
여기에서는 포트넘버가 5000으로 되어있길래 나는 8000으로 바꿔줬다!
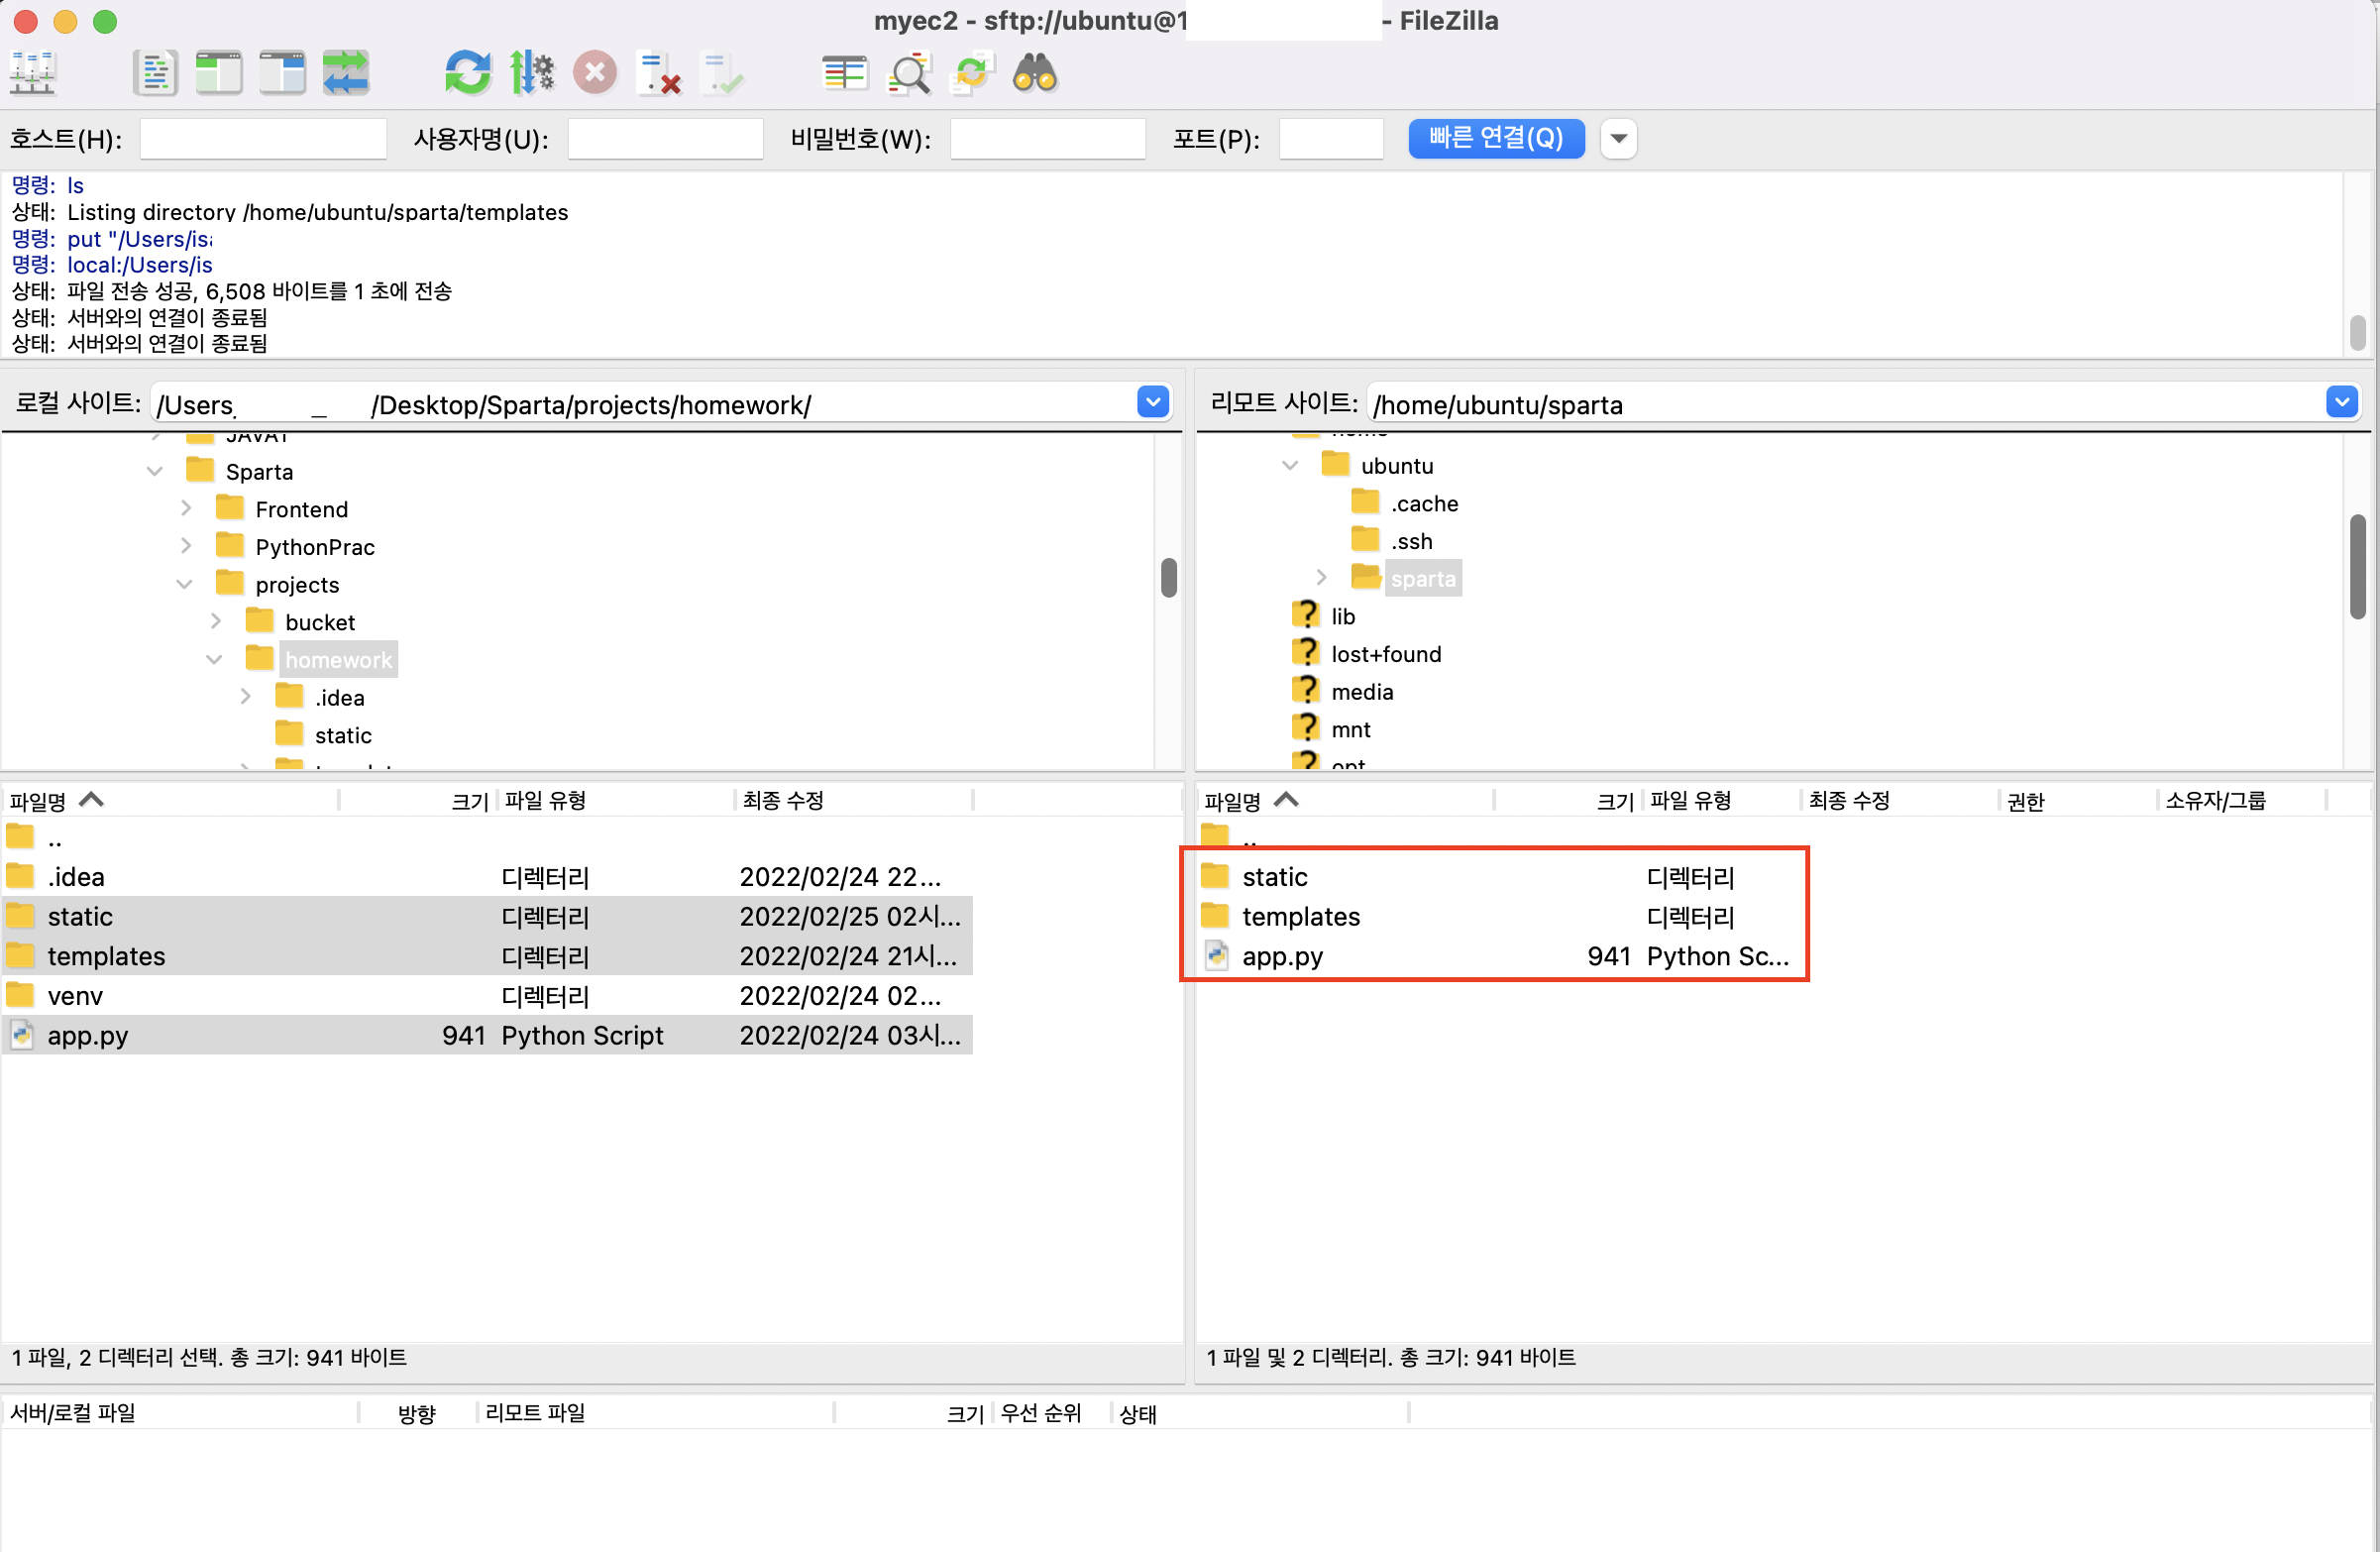
filezilla
filezilla라는 프로그램을 열면 오른쪽에는 내가 산 컴퓨터, 왼쪽에는 내 actual 컴퓨터가 들어가 있는 것을 확인할 수 있다.

서버 관리자를 열어서 내가 산 컴퓨터를 불러온다.
Protocol: SFTP
Host: 에는 내가 산 컴퓨터의 IP주소를 넣어준다.
Port: 22
Logon Type: Key File
User: Ubuntu

이제 새로 만든 컴퓨터에 내 방명록 파일을 옮겨줄 것이다.
ubuntu 내 컴퓨터에서 python 실행하기
실행하기 전에 python 인터프리터를 설치해주어야 한다.
#파이썬 인터프리터 설치
pip install pymongo
pip install dnspython
pip install flask
pip install certifi >>설치 완료!

# 파이썬 app.py 실행
python app.py
AWS에서 포트 8000번 열어주기
아래 보안그룹 - launch-wizard-1 클릭!
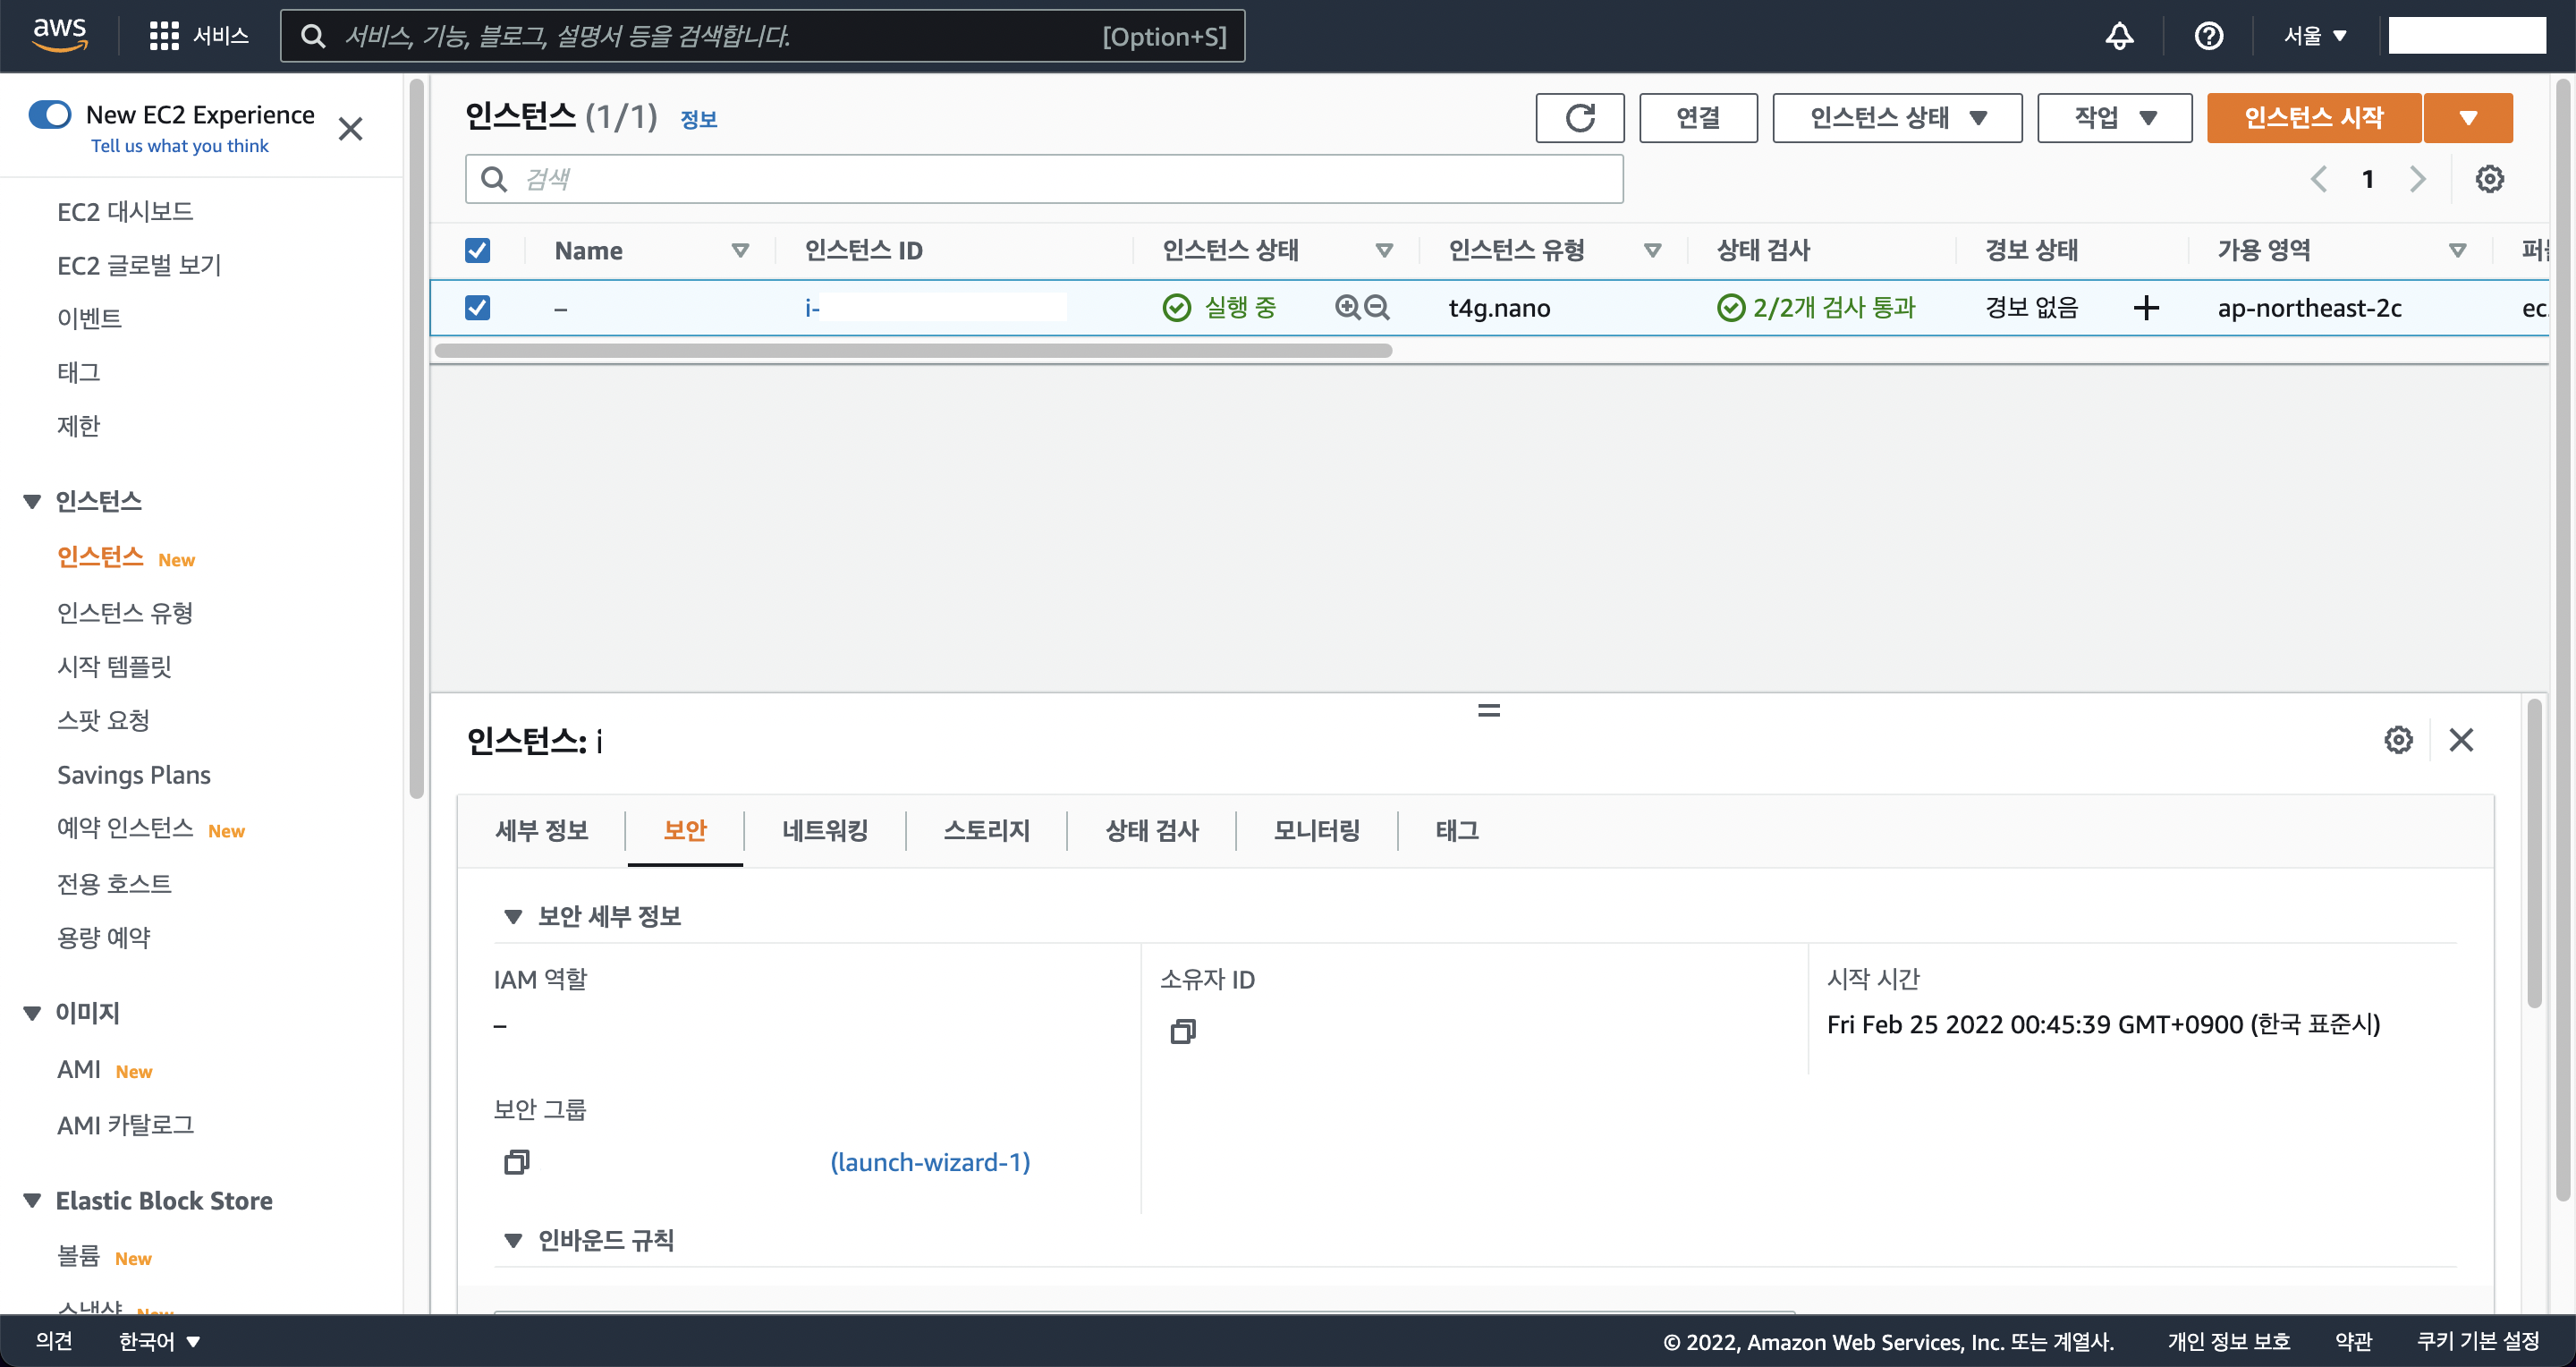
인바운드 규칙 편집 클릭!

규칙 추가 - 포트 8000, 80 추가 - Anywhere IPv4 - 규칙 저장
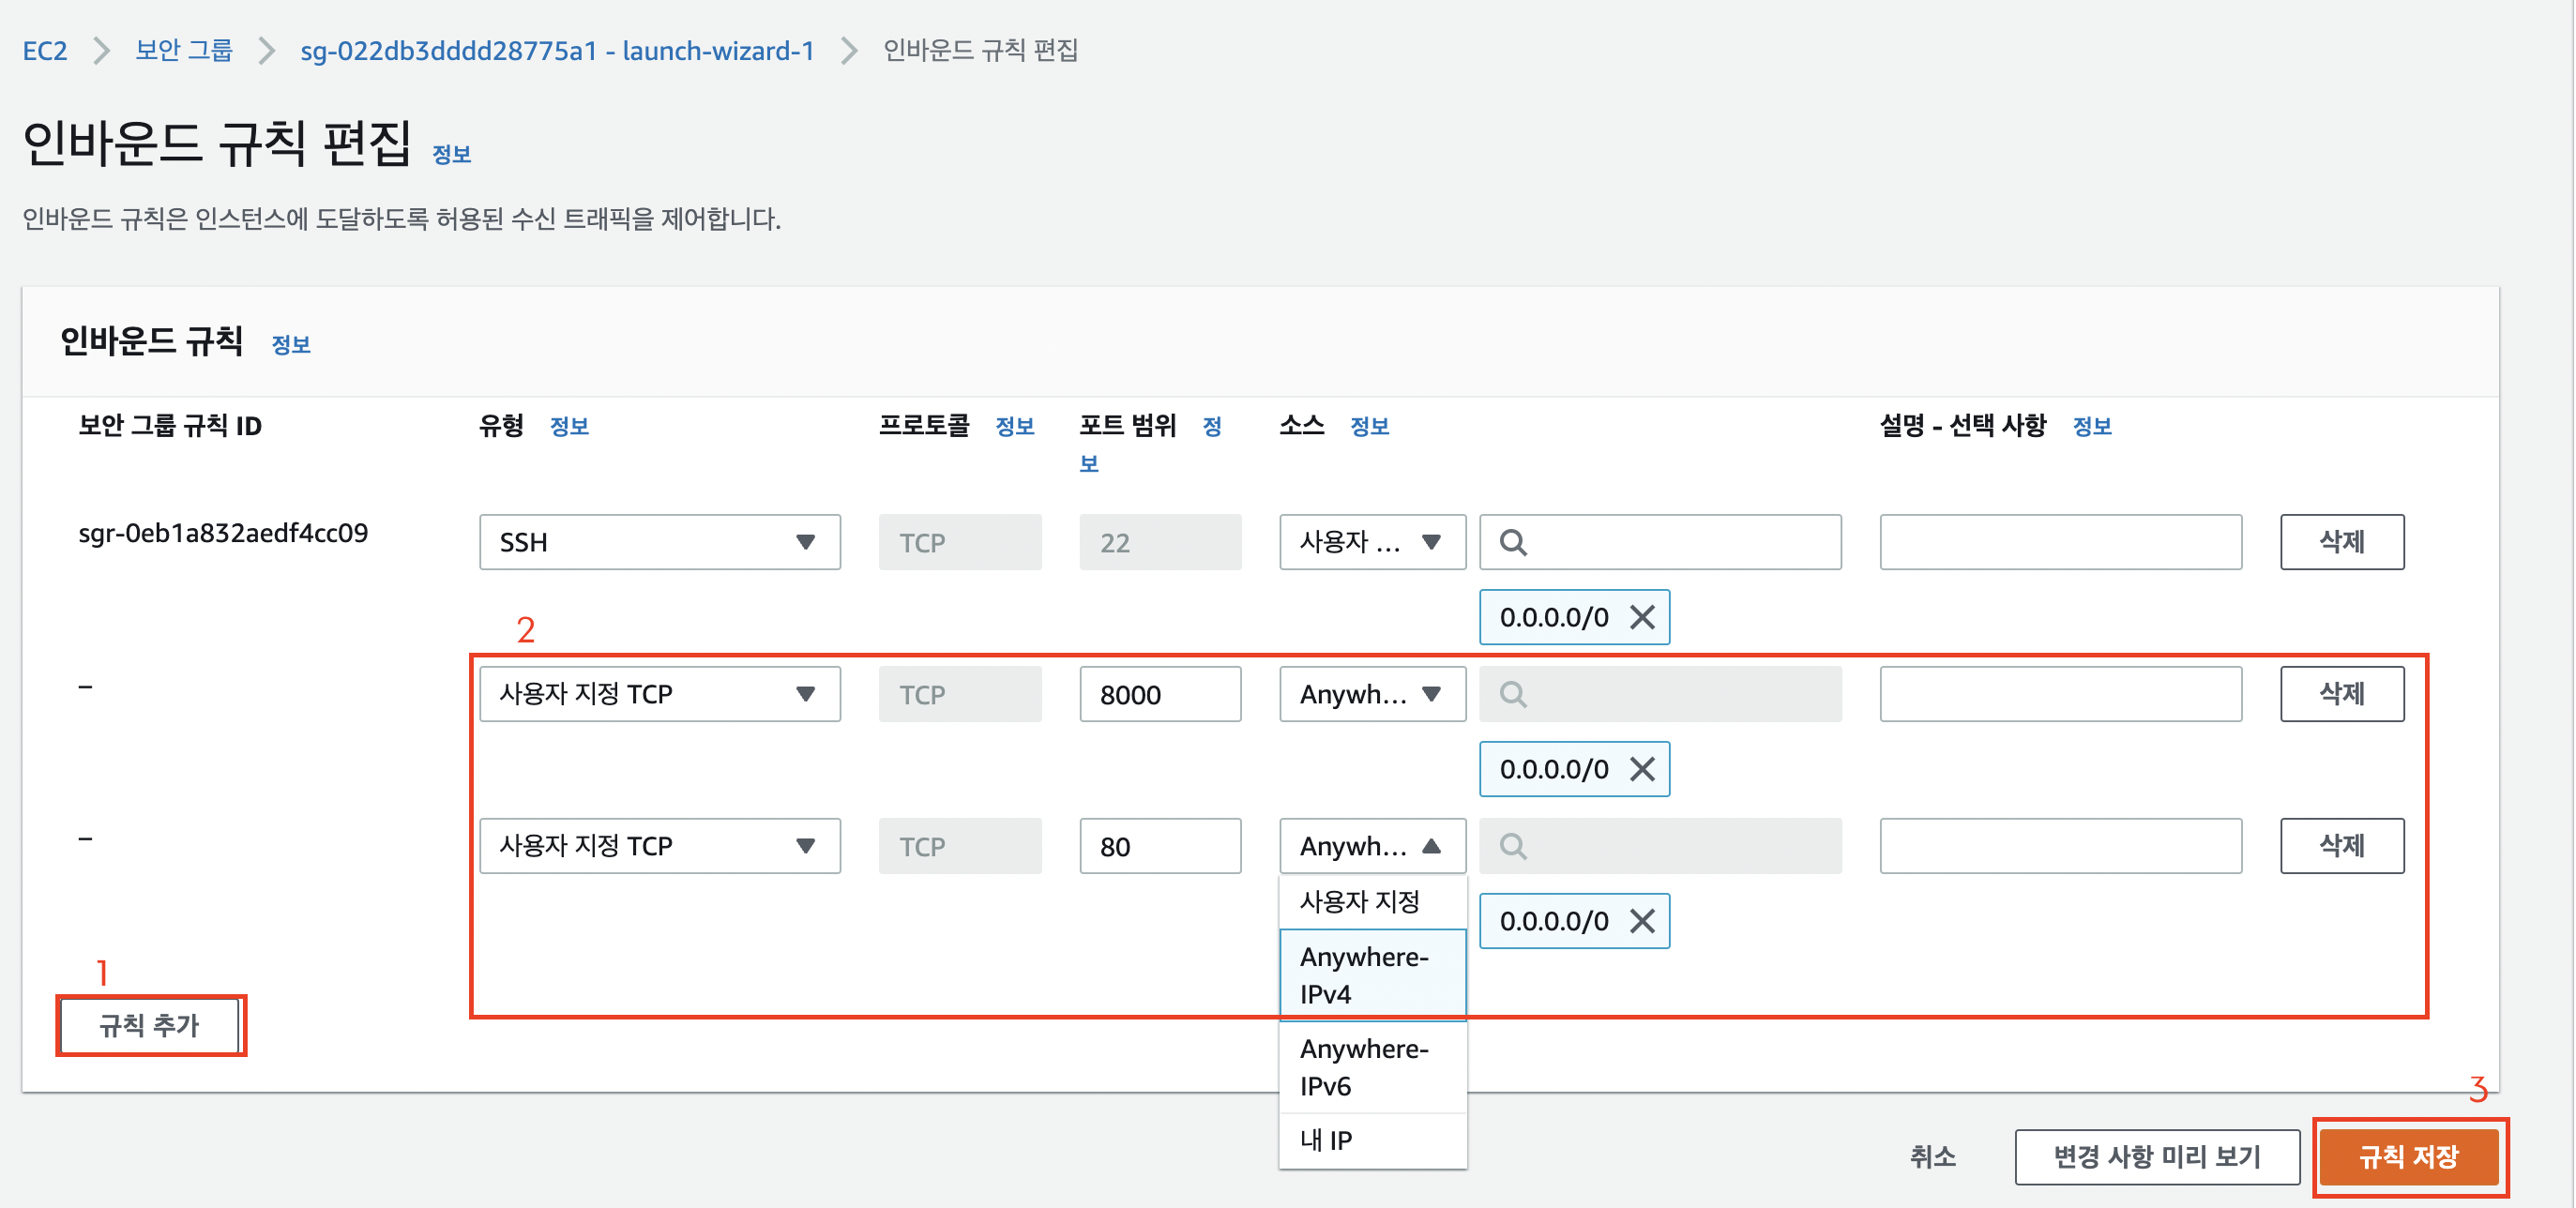
이제 내 ip 주소에:8000 을 입력하면 전세계에 배포가 된 것이다!
추가) :8000을 입력하지 않고도 ip주소만으로 내 웹 사이트에 접속할 수 있도록 포트 80을 8000으로 리다이렉팅 시키도록 한다.
sudo iptables -t nat -A PREROUTING -i eth0 -p tcp --dport 80 -j REDIRECT --to-port 8000며칠 째 여기서 멈춰있다 ㅠㅠ
redirecting이 안된다.. :8000으로 하면 페이지가 열리는데 (:80)으로 하면 열리지가 않는다...
해결함!!!
AWS에서 애초에 컴퓨터를 살 때 괜히 MAC m1칩이 arm이라고 해서 arm 컴퓨터로 샀던게 문제였다. 그냥 x86으로 샀더니 문제가 해결되었다.

원격으로 접속해도 꺼지지 않게 하기
nohup python app.py &강제종료하기
ps -ef | grep 'python app.py' | awk '{print $2}' | xargs kill도메인 연결하기
가비아 라는 우리나라 도메인 회사에서 도메인을 550원에 샀다.
로그인을 하면 이런 창이 뜬다.
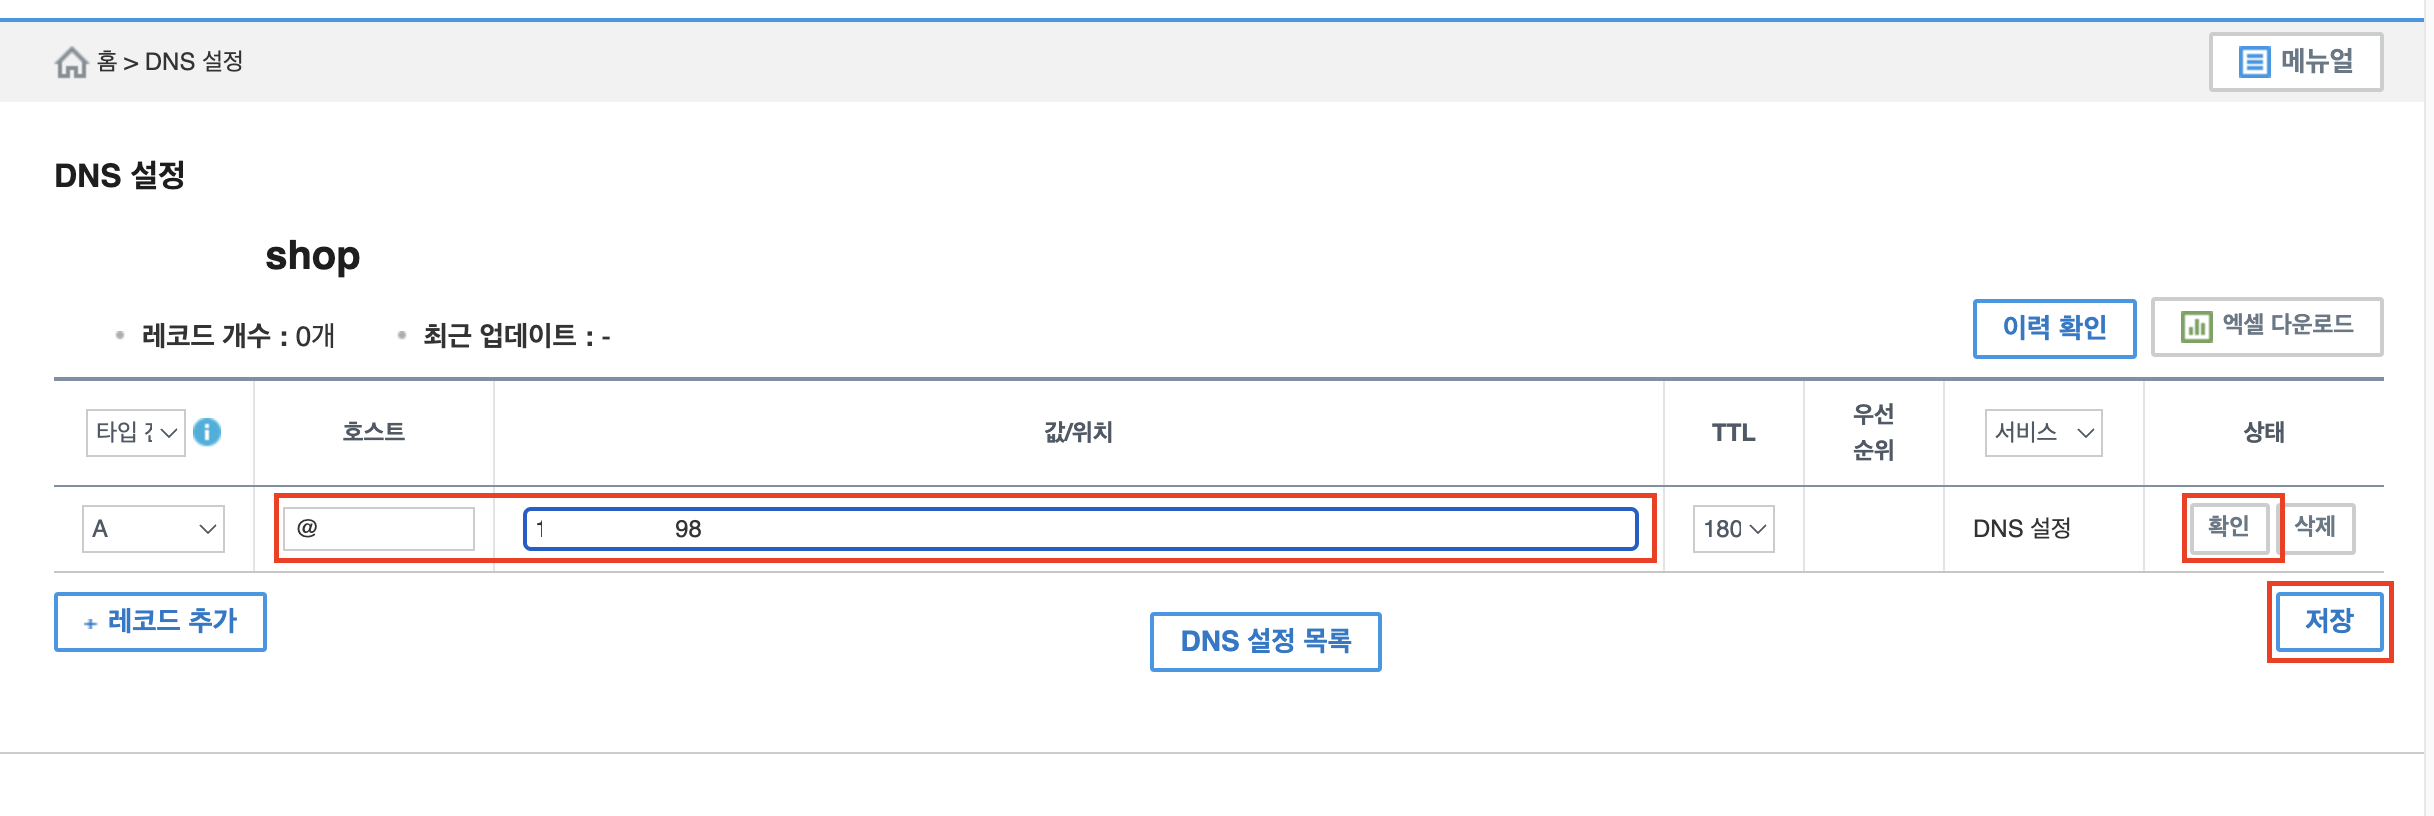
아래에서 DNS 설정을 클릭하자.

호스트: @, 값/위치: ip주소 를 넣고 확인, 저장을 누르면 끝!!
내가 산 도메인주소로 이제 내 첫 웹 페이지가 만들어진 것이다.
og태그
og태그를 html태그에 넣으면 아래 사진처럼 링크를 보낼 때 썸네일과 제목, 간단한 설명을 넣을 수 있다.

아래 내용의 태그를 html파일의 < head >~< /head >태그 사이에 넣는다.
<meta property="og:title" content="내 사이트의 제목" />
<meta property="og:description" content="보고 있는 페이지의 내용 요약" />
<meta property="og:image" content="이미지URL" />
태그를 바꿔서 넣었는데도 썸네일이 바뀌지 않는다면 아래 링크들을 들어가서 확인해보아라. 페이스북과 카카오톡은 한 번 링크를 보낼 때 이를 저장해놔서 내가 들어가서 초기화를 해주어야 할 수 있다.
- 페이스북 og 태그 초기화 하기: https://developers.facebook.com/tools/debug/
- 카카오톡 og 태그 초기화 하기: https://developers.kakao.com/tool/clear/og
이로써 5주차 강의를 모두 완강하였다!!
이제 이틀 뒤에 시험을 보면 진짜 항해가 시작된다!!
열심히해서 제발 7월 전에는 꼭 취업을 했으면 좋겠다.
화이팅!
