📌18주차 학습노트
컴퓨터 비전이란?
- 컴퓨터를 이용하여 정지 영상 또는 동영상으로부터 의미있는 정보를 추출하는 방법을 연구하는 학문
- 사람이 눈으로 사물을 보고 인지하는 작업을 컴퓨터가 수행하게 하는 학문
Computer Vision과 Image Processing
- Computer vision
- 컴퓨터로 이미지와 영상으로부터 정보를 추출하고 분석하는 분야
- Image Processing
- 컴퓨터 비전을 위해 영상을 입력받아 화질 개선 등의 전처리를 의미
컴퓨터 비전 응용 분야
- 영상의 화질 개선
- 내용 기반 영상 검색
- 얼굴 검출 및 인식
- 의료영상처리
- 광학 문자 인식
- 머신 비전
- 인공지능 서비스
영상데이터
-
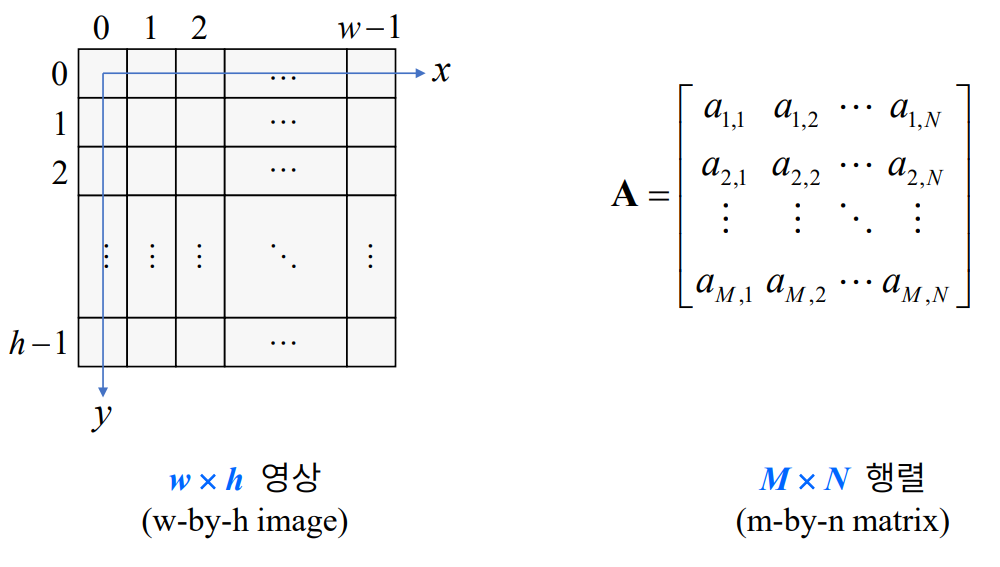
영상이란?
- 픽셀이 바둑판 모양의 격자에 나열되어 있는 형태(2차원 행렬)
- pixel : 영상 기본 단위

-
영상의 좌표계
- 이미지는 가로 x 세로로 표기
- 행렬은 세로 x 가로로 표기
- 헷갈릴 수 있으니 주의
-
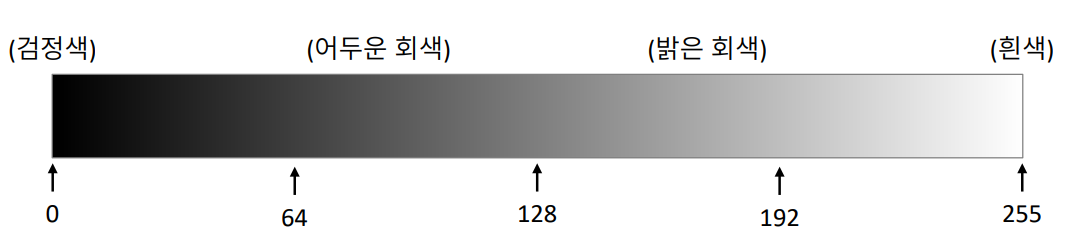
Grayscale Image
- 흑백사진, 색상 채널 1개
- 밝기 정보를 256단계로 표현
- 용량 : width x heigth [Bytes]
-
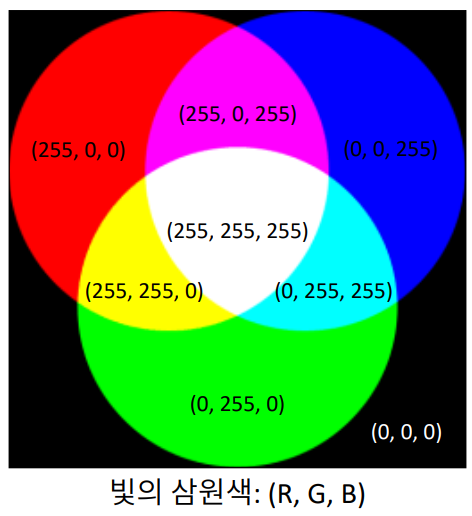
Truecolor Image
- 컬러사진, 색상채널 3개
- RGB 성분을 각각 256단계로 표현()
- 용량 : width x heigth x 3[Bytes]
-
하나의 픽셀이 3개의 요소를 갖는 경우(C++)
-
픽셀이 3차원 행렬로 구성되는 경우(Python)

기본 이미지 출력(python)
cv module
import cv2
import sys

img1 = cv2.imread("./data/cat.bmp")  # 데이터 읽기
img2 = cv2.imread("./data/cat.bmp", cv2.IMREAD_GRAYSCALE)  # 데이터 읽기
if img1 is None or img2 is None:
    print("Image load Failed!!")    # 이미지를 못 찾으면 출력
    sys.exit()

cv2.namedWindow("Truecolor", flags=cv2.WINDOW_NORMAL) # "Truecolor" 창 생성
cv2.imshow("Truecolor", img1)       # "Truecolor" 창에 img1 보여주기
cv2.namedWindow("Grayscale")        # "Grayscale" 창 생성
cv2.imshow("Grayscale", img2)       # "Grayscale" 창에 img2 보여주기

cv2.imwrite("cat_grayscale.png", img2) # "cat_grayscale.png"로 img2를 저장

while cv2.waitKey() == ord("q"):    # "q" 입력대기
    break

cv2.destroyAllWindows()             # 모든 창 종료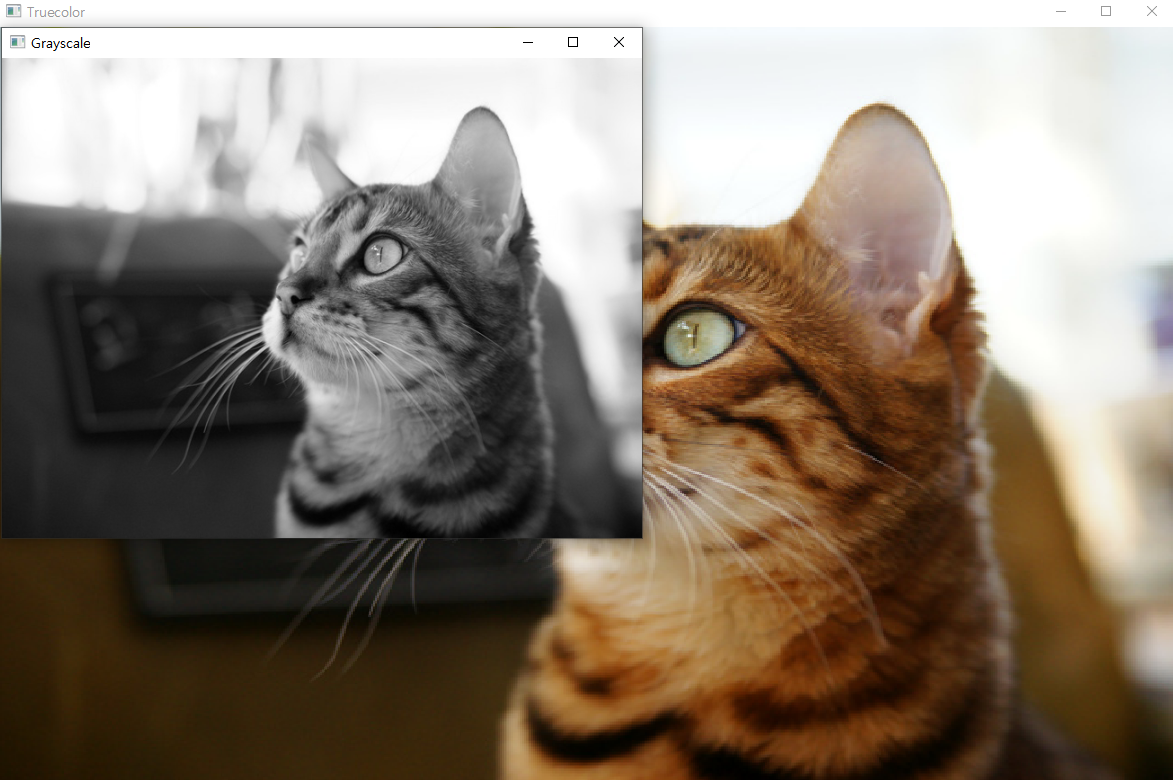
Matplotlib으로 출력하기
- 컬러 영상 출력하기
- OpenCV는 BGR순서
- plt는 RGB순서
-> cv2.cvtColor() 함수로 색상 순서 변경 필요
  import cv2
import matplotlib.pyplot as plt

imgBGR = cv2.imread('cat_truecolor.png')
imgRGB = cv2.cvtColor(imgBGR, cv2.COLOR_BGR2RGB)
imgGRAY = cv2.imread('cat_truecolor.png', cv2.IMREAD_GRAYSCALE)

plt.figure(figsize=(12, 3))

# BGR
plt.subplot(131)
plt.axis("off")
plt.imshow(imgBGR)
plt.title("imgBGR")

# RGB
plt.subplot(132)
plt.axis("off")
plt.imshow(imgRGB)
plt.title("imgRGB")

# GRAY
plt.subplot(133)
plt.axis("off")
plt.imshow(imgGRAY, cmap="gray")
plt.title("imgGRAY")

plt.show()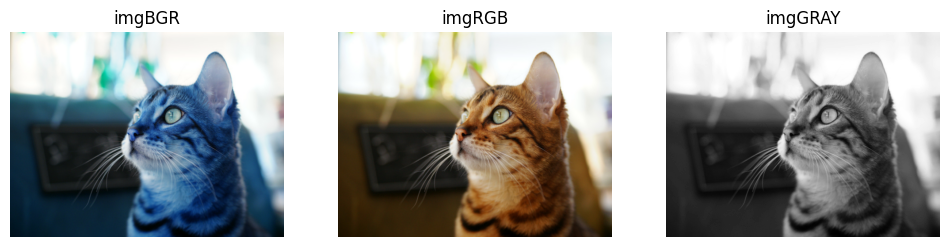
ROI와 마스크 연산
- 관심 영역(ROI)
- Region of Interest- 영상에서 특정 연산을 수행하고자 하는 영역
- 마스크 연산
- OpenCV에서는 이미지합성을 할 때, 마스크 영상의 0이 아닌 부분을 입력영상에서 추출해서 출력영상과 합성을 한다.
- 배경과 대상을 구분하는 마스크 영상을 활용
- 마스크 영상은
cv2.CV_8UC1타입이어야 한다 - 픽셀 값이 0이 아닌 위치에서만 연산이 수행됨
마스크 연산 함수
cv2.copyTo(src, mask, dst=None) -> dst- src : 입력영상,
cv2.CV_8UC3 - mask : 마스크 영상,
cv2.CV_8U- 0이 아닌 픽셀에 대해서만 복사연산 수행
- dst : 출력영상,
cv2.CV_8UC3 - 연산 수행 시 각 인자의 크기가 동일해야 함
- src : 입력영상,
마스크 영상을 이용한 영상 합성(Python)
import sys
import cv2


# 마스크 영상을 이용한 영상 합성
src = cv2.imread('./data/airplane.bmp', cv2.IMREAD_COLOR)
mask = cv2.imread('./data/mask_plane.bmp', cv2.IMREAD_GRAYSCALE)
dst = cv2.imread('./data/field.bmp', cv2.IMREAD_COLOR)

if src is None or mask is None or dst is None:
    print('Image load failed!')
    sys.exit()

# mask에서 값이 0이 아닌 부분을 src에서 복사해서 dst에 합성
# cv2.copyTo() 실행 시에 모든 요소의 크기가 같아야 함
cv2.copyTo(src, mask, dst)
# dst[mask > 0] = src[mask > 0]

cv2.imshow('src', src)
cv2.imshow('mask', mask)
cv2.imshow('dst', dst)
cv2.waitKey()
cv2.destroyAllWindows()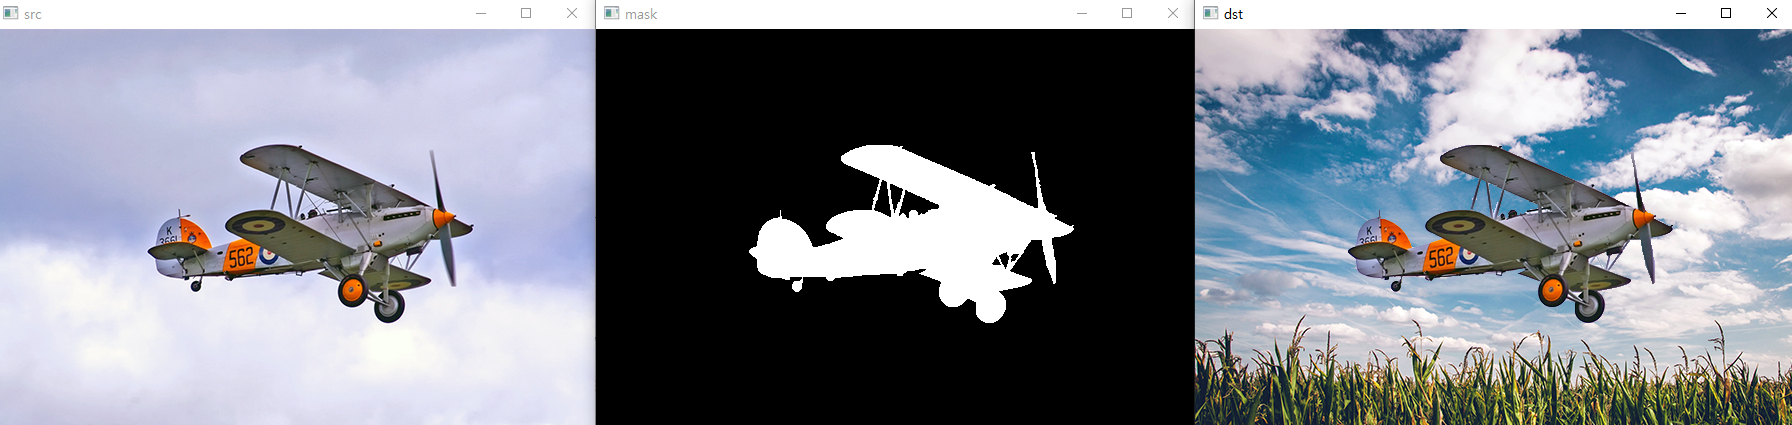
도형그리기
import numpy as np
import cv2

img = np.full((400, 400, 3), 255, np.uint8)
#img = cv2.imread('cat.bmp')

cv2.line(img, (50, 50), (200, 50), (0, 0, 255), 5)
cv2.line(img, (50, 60), (150, 160), (0, 0, 128))

cv2.rectangle(img, (50, 200, 150, 100), (0, 255, 0), 2)
cv2.rectangle(img, (70, 220), (180, 280), (0, 128, 0), -1)

cv2.circle(img, (300, 100), 30, (255, 255, 0), -1, cv2.LINE_AA)
cv2.circle(img, (300, 100), 60, (255, 0, 0), 3, cv2.LINE_AA)

pts = np.array([[250, 200], [300, 200], [350, 300], [250, 300]])
cv2.polylines(img, [pts], True, (255, 0, 255), 2)

text = 'Hello? OpenCV ' + cv2.__version__
cv2.putText(img, text, (50, 350), cv2.FONT_HERSHEY_SIMPLEX, 0.8,
            (0, 0, 255), 1, cv2.LINE_AA)

cv2.imshow("img", img)
cv2.waitKey()
cv2.destroyAllWindows()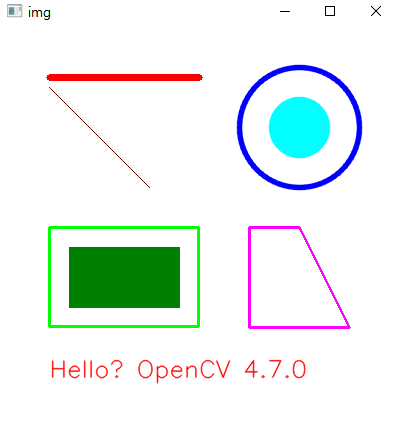
카메라 출력 및 영상저장
import sys
import cv2


cap = cv2.VideoCapture(0)

if not cap.isOpened():
    print("Camera open Failed!")
    sys.exit()

w = round(cap.get(cv2.CAP_PROP_FRAME_WIDTH))
h = round(cap.get(cv2.CAP_PROP_FRAME_HEIGHT))
fps = cap.get(cv2.CAP_PROP_FPS)

fourcc = cv2.VideoWriter_fourcc(*"DIVX") # *'DIVX' == 'D', 'I', 'V', 'X'
delay = round(1000 / fps)

out = cv2.VideoWriter('./data/output.avi', fourcc, fps, (w, h))	# 프레임 단위 영상저장

if not out.isOpened():
    print('File open Failed!')
    cap.release()
    sys.exit()

while True:
    ret, frame = cap.read()

    if not ret:
        break

    gray = cv2.cvtColor(frame, cv2.COLOR_BGR2GRAY)	# 흑백
    edge = cv2.Canny(gray, 100, 255)				# 외곽선
    gray_color = cv2.cvtColor(gray, cv2.COLOR_GRAY2BGR) # 저장을 위해 BGR로 변환

    out.write(gray_color)	# 흑백 저장

    cv2.imshow('frame', frame)
    cv2.imshow('gray', gray)
    cv2.imshow('gray_color', gray_color)
    cv2.imshow('edge', edge)

    if cv2.waitKey(delay) == 27:
        break

cap.release()
out.release()
cv2.destroyAllWindows()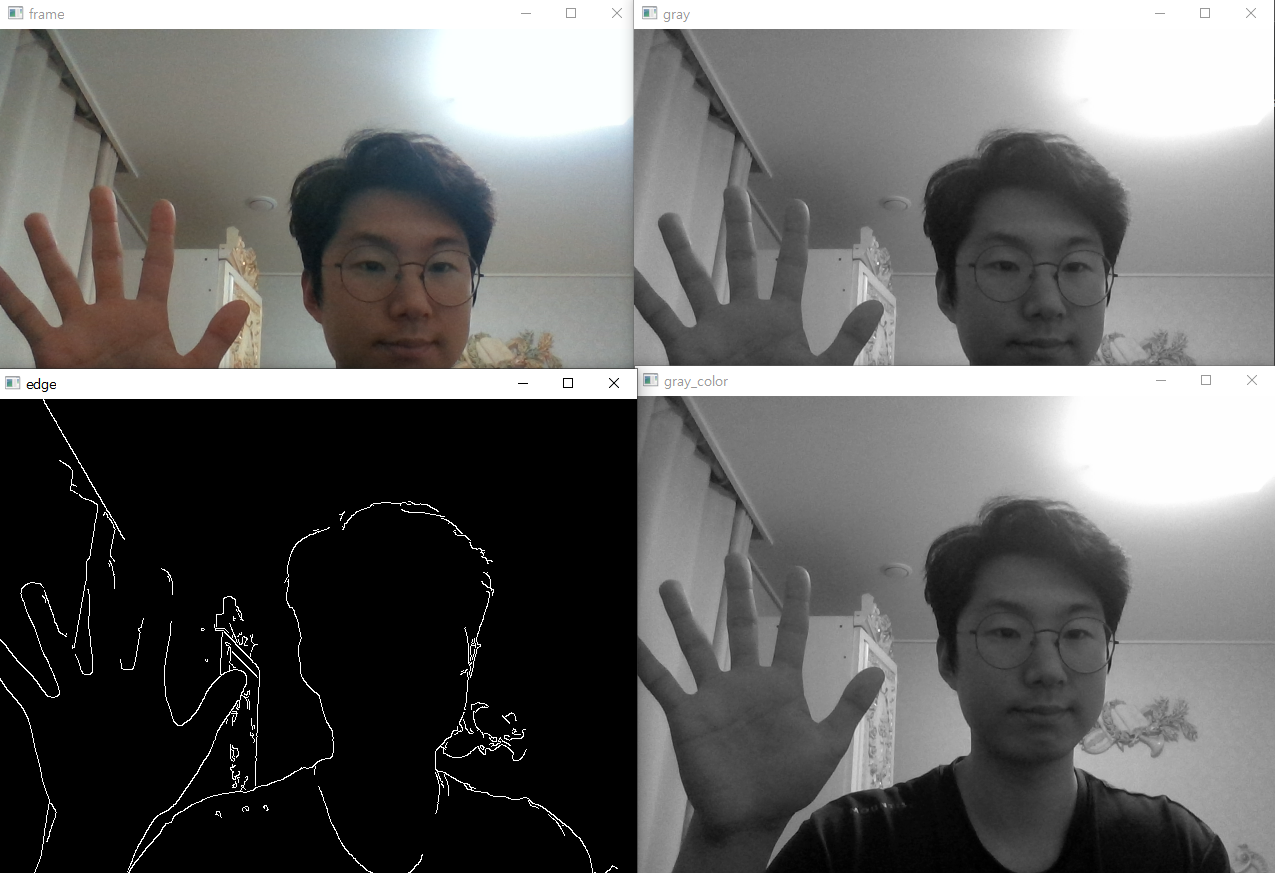
명함검출
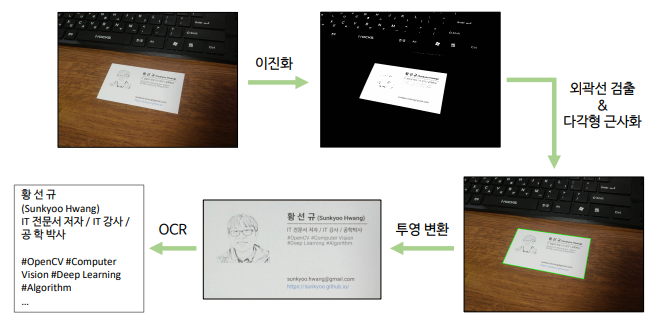
명함 검출(Python)
import sys
import cv2


# 영상 불러오기
src = cv2.imread('./data/namecard1.jpg')

if src is None:
    print('Image load failed!')
    sys.exit()

# 입력 영상을 그레이스케일 영상으로 변환
src_gray = cv2.cvtColor(src, cv2.COLOR_BGR2GRAY)

# 자동 이진화
_, src_bin = cv2.threshold(src_gray, 0, 255, cv2.THRESH_BINARY | cv2.THRESH_OTSU)

# 외곽선 검출 및 명함 검출
contours, _ = cv2.findContours(src_bin, cv2.RETR_EXTERNAL, cv2.CHAIN_APPROX_NONE)

for pts in contours:
    # 너무 작은 객체는 무시
    if cv2.contourArea(pts) < 1000:
        continue

    # 외곽선 근사화
    approx = cv2.approxPolyDP(pts, cv2.arcLength(pts, True)*0.02, True)

    # 사각형으로 근사화되면 외곽선 표시
    if len(approx) == 4:
        cv2.polylines(src, [approx], True, (0, 255, 0), 2, cv2.LINE_AA)

cv2.imshow('src', src)
cv2.waitKey()
cv2.destroyAllWindows()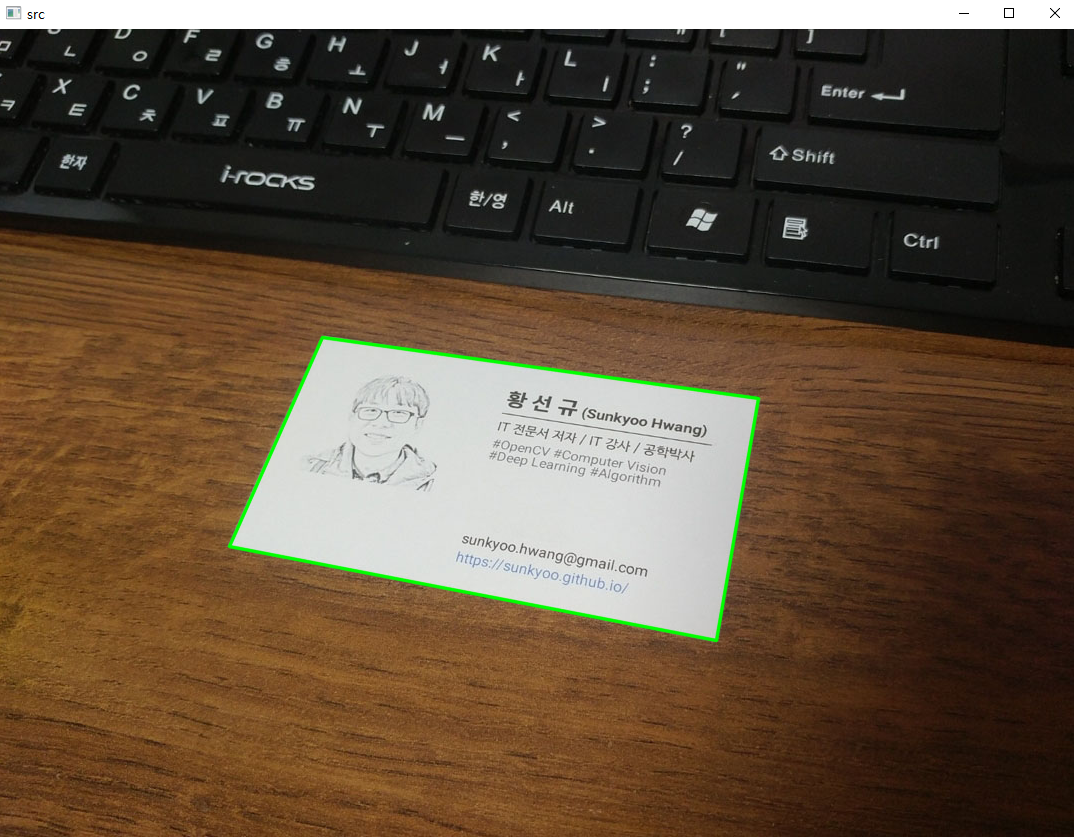
명함 똑바로 펴기
- 데이터 : 강사님의 명함
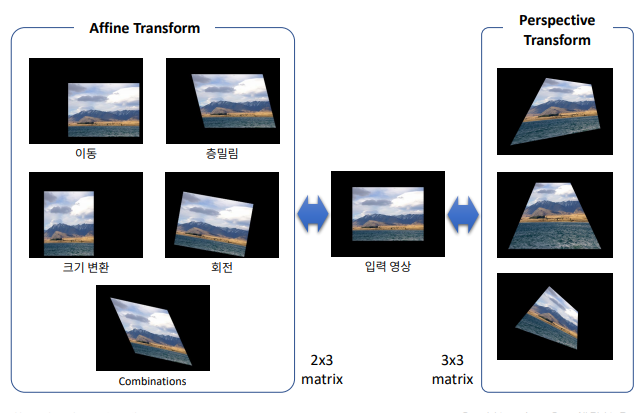
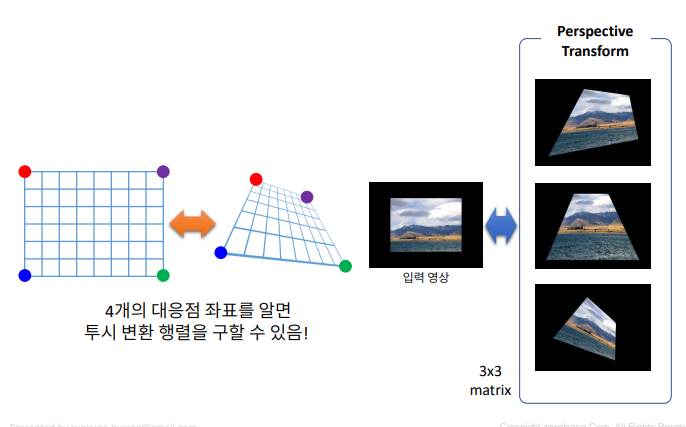
수동으로 펴기
import sys
import numpy as np
import cv2


# 영상 불러오기
src = cv2.imread('namecard1.jpg')

if src is None:
    print('Image load failed!')
    sys.exit()

# 출력 영상 설정
w, h = 720, 400
srcQuad = np.array([[324, 308], [760, 369], [718, 611], [231, 517]], np.float32)
dstQuad = np.array([[0, 0], [w-1, 0], [w-1, h-1], [0, h-1]], np.float32)
dst = np.zeros((h, w), np.uint8)

pers = cv2.getPerspectiveTransform(srcQuad, dstQuad)
dst = cv2.warpPerspective(src, pers, (w, h))

cv2.imshow('src', src)
cv2.imshow('dst', dst)
cv2.waitKey()
cv2.destroyAllWindows()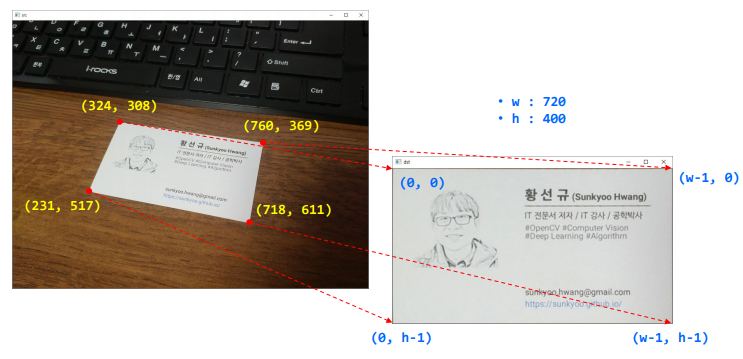
자동으로 펴기
import sys
import numpy as np
import cv2

# approx 좌표 순서 지정
def reorderPts(pts):
    idx = np.lexsort((pts[:, 1], pts[:, 0]))  # 칼럼0 -> 칼럼1 순으로 정렬한 인덱스를 반환
    pts = pts[idx]  # x좌표로 정렬

    if pts[0, 1] > pts[1, 1]:
        pts[[0, 1]] = pts[[1, 0]]

    if pts[2, 1] < pts[3, 1]:
        pts[[2, 3]] = pts[[3, 2]]

    return pts


# 영상 불러오기
src = cv2.imread('./data/namecard2.jpg')

if src is None:
    print('Image load failed!')
    sys.exit()

# 출력 영상 설정
w, h = 720, 400
srcQuad = np.array([[0, 0], [0, h], [w, h], [w, 0]], np.float32)
dstQuad = np.array([[0, 0], [0, h], [w, h], [w, 0]], np.float32)
dst = np.zeros((h, w), np.uint8)

# 입력 영상을 그레이스케일 영상으로 변환
src_gray = cv2.cvtColor(src, cv2.COLOR_BGR2GRAY)

# 자동 이진화
_, src_bin = cv2.threshold(src_gray, 0, 255, cv2.THRESH_BINARY | cv2.THRESH_OTSU)

# 외곽선 검출 및 명함 검출
contours, _ = cv2.findContours(src_bin, cv2.RETR_EXTERNAL, cv2.CHAIN_APPROX_NONE)

for pts in contours:
    # 너무 작은 객체는 무시
    if cv2.contourArea(pts) < 1000:
        continue

    # 외곽선 근사화
    approx = cv2.approxPolyDP(pts, cv2.arcLength(pts, True)*0.02, True)

    # 사각형으로 근사화되면 외곽선 표시
    if len(approx) == 4:
        #cv2.polylines(src, [approx], True, (0, 255, 0), 2, cv2.LINE_AA)
        corners = approx.reshape(4, 2).astype(np.float32)
        srcQuad = reorderPts(corners)


pers = cv2.getPerspectiveTransform(srcQuad, dstQuad)
dst = cv2.warpPerspective(src, pers, (w, h))

cv2.imshow('src', src)
cv2.imshow('dst', dst)
cv2.waitKey()
cv2.destroyAllWindows()
딥러닝모델을 활용한 얼굴검출
- 미리 학습된 딥러닝모델을 사용함
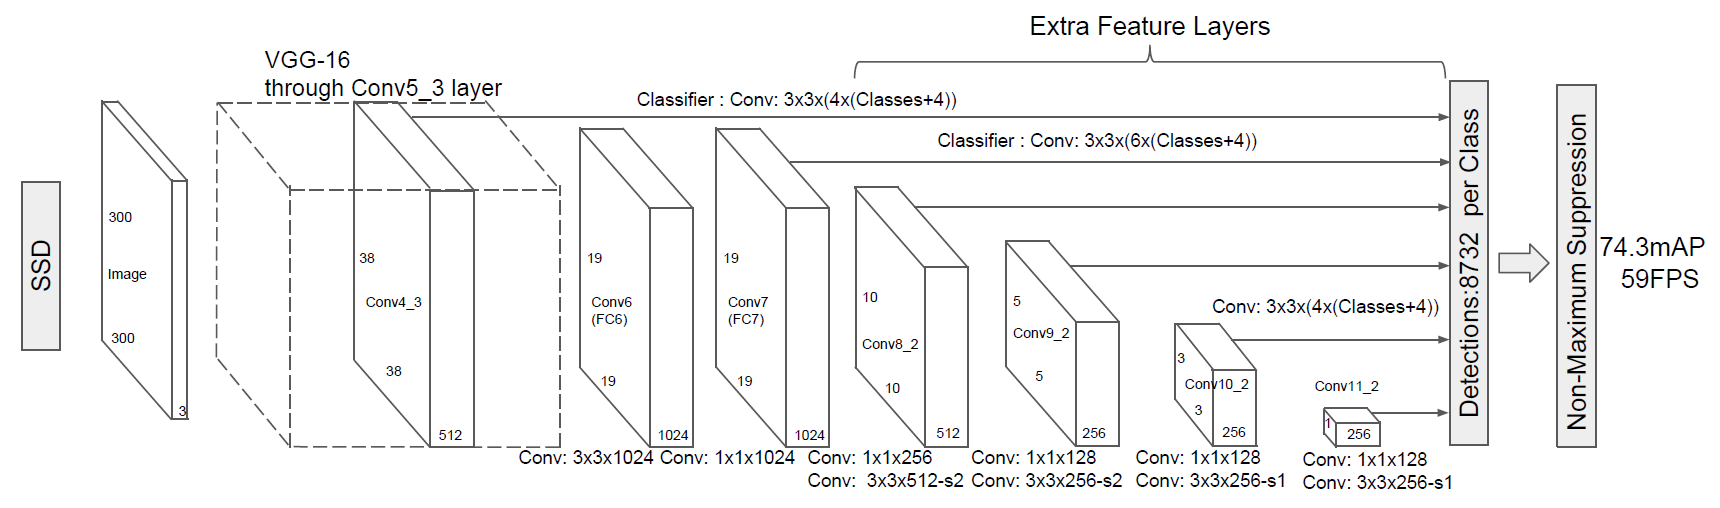
영상에서 얼굴 찾기
OpenCV DNN 얼굴 검출기 입력
- 입력 영상 크기: 300x300
- 픽셀 값 범위: 0 ~ 255
- 색상 채널 순서: BGR
- 평균 픽셀 값: (104, 177, 123)
OpenCV DNN 얼굴 검출기 출력
- shape=(1, 1, 200, 7), dtype=float32
- detect = out[0, 0, :, :]
import sys
import numpy as np
import cv2


model = './data/opencv_face_detector/res10_300x300_ssd_iter_140000_fp16.caffemodel'
config = './data/opencv_face_detector/deploy.prototxt'
#model = 'opencv_face_detector/opencv_face_detector_uint8.pb'
#config = 'opencv_face_detector/opencv_face_detector.pbtxt'

# 카메라 열기
cap = cv2.VideoCapture(0)

if not cap.isOpened():
    print('Camera open failed!')
    sys.exit()

# 모델 불러오기
net = cv2.dnn.readNet(model, config)

if net.empty():
    print('Net open failed!')
    sys.exit()

while True:
    # 카메라 읽기
    ret, frame = cap.read()

    # 이미지 좌우 반전
    frame = cv2.flip(frame, 1)

    if not ret:
        break

    # 2차원 -> 4차원 이미지 생성
    blob = cv2.dnn.blobFromImage(frame, 1, (300, 300), (104, 177, 123))

    # 모델에 이미지 입력
    net.setInput(blob)

    # 모델 실행
    out = net.forward()
    detect = out[0, 0, :, :]

    (h, w) = frame.shape[:2]

    for i in range(detect.shape[0]):
        confidence = detect[i, 2]
        if confidence < 0.5:    # 예측값이 0.5 이하면 무시
            break

        # 바운딩 박스의 좌표
        x1 = int(detect[i, 3] * w)
        y1 = int(detect[i, 4] * h)
        x2 = int(detect[i, 5] * w)
        y2 = int(detect[i, 6] * h)

        # 바운딩 박스 그리기
        cv2.rectangle(frame, (x1, y1), (x2, y2), (0, 255, 0))

        # 예측값 출력
        label = f'Face: {confidence:4.2f}'
        cv2.putText(frame, label, (x1, y1 - 1), cv2.FONT_HERSHEY_SIMPLEX, 0.8, (0, 255, 0), 1, cv2.LINE_AA)

    cv2.imshow('frame', frame)

    if cv2.waitKey(1) == 27:  # ESC누르면 종료
        break

cap.release()
cv2.destroyAllWindows()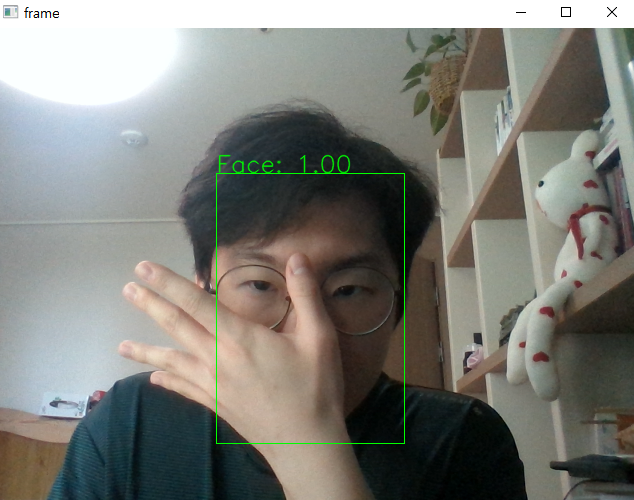
얼굴 모자이크처리
- 촬영을 하다보면 타인의 개인정보(얼굴, 자동차 번호판, 주민번호 등)을 습득하게 된다.
- 개인정보를 보호하기 위해 이를 모자이크 처리할 필요성이 있다
import sys
import numpy as np
import cv2

model = './data/opencv_face_detector/res10_300x300_ssd_iter_140000_fp16.caffemodel'
config = './data/opencv_face_detector/deploy.prototxt'
#model = 'opencv_face_detector/opencv_face_detector_uint8.pb'
#config = 'opencv_face_detector/opencv_face_detector.pbtxt'

# 카메라 열기
cap = cv2.VideoCapture(0)

if not cap.isOpened():
    print('Camera open failed!')
    sys.exit()

# 모델 불러오기
net = cv2.dnn.readNet(model, config)

if net.empty():
    print('Net open failed!')
    sys.exit()

while True:
    # 카메라 읽기
    ret, frame = cap.read()

    # 이미지 좌우 반전
    frame = cv2.flip(frame, 1)

    if not ret:
        break

    # 2차원 -> 4차원 이미지 생성
    blob = cv2.dnn.blobFromImage(frame, 1, (300, 300), (104, 177, 123))

    # 모델에 이미지 입력
    net.setInput(blob)

    # 모델 실행
    out = net.forward()
    detect = out[0, 0, :, :]

    (h, w) = frame.shape[:2]

    for i in range(detect.shape[0]):
        confidence = detect[i, 2]
        if confidence < 0.5:    # 예측값이 0.5 이하면 무시
            break

        # 바운딩 박스의 좌표
        x1 = int(detect[i, 3] * w)
        y1 = int(detect[i, 4] * h)
        x2 = int(detect[i, 5] * w)
        y2 = int(detect[i, 6] * h)

        face_img = frame[y1:y2, x1:x2]
        fh, fw = face_img.shape[:2]

        # 모자이크 처리
        face_img2 = cv2.resize(face_img, (0, 0), fx=1./16, fy=1./16)
        cv2.resize(face_img2, (fw, fh), dst=face_img, interpolation=cv2.INTER_NEAREST)
        #frame[y1:y2, x1:x2] = cv2.resize(face_img2, (fw, fh), interpolation=cv2.INTER_NEAREST)


        # 바운딩 박스 그리기
        cv2.rectangle(frame, (x1, y1), (x2, y2), (0, 255, 0))

        # # 예측값 출력
        label = f'Face: {confidence:4.2f}'
        cv2.putText(frame, label, (x1, y1 - 1), cv2.FONT_HERSHEY_SIMPLEX, 0.8, (0, 255, 0), 1, cv2.LINE_AA)

    cv2.imshow('frame', frame)

    if cv2.waitKey(1) == 27:  # ESC누르면 종료
        break

cap.release()
cv2.destroyAllWindows()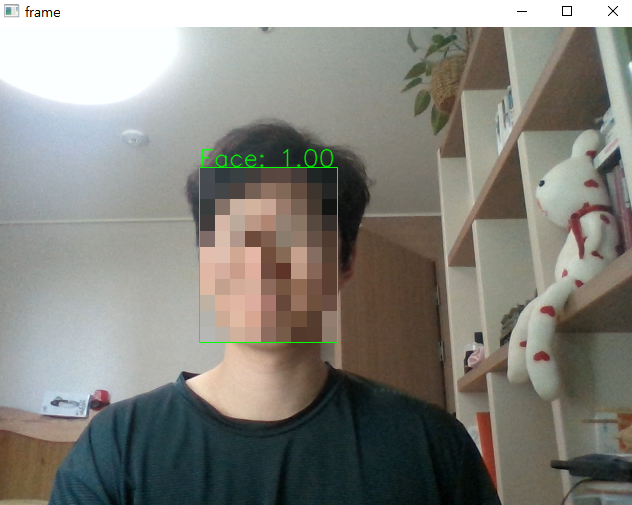
📌자연어 처리
Transformer
- Attention 기법을 활용하여 CNN, RNN을 사용하지 않는 자연어 처리 모델
- GPT : Transformer의 Decoder를 아키텍처를 활용
- BERT : Transformer의 Encoder를 아키텍처를 활용
자연어처리 task
- 감정 분석
- ex. 맛있는 사과를 먹었다
- 기계어번역
- ex. 나는 사과를 먹었다 -> I ate an apple
- QA
- ex. 지문을 읽고, 질문에 대답
- 마스크 필링
- ex. 나는 X를 먹었다 -> X에 들어갈 수 있는 단어 찾기
Transformer Architecture
Positional Encoding
- transformer는 병렬 처리이므로 성능이 향상되었으나 RNN에서 가능했던 순서처리가 불가능해짐
- 이를 해결하기 위해 positional encoding 사용
- 각 토큰의 입력 임베딩에 위치 인코딩을 추가함으로써 Transformer 모델은 병렬 처리 구조에도 불구하고 토큰의 순차적 순서를 유지할 수 있게 됨
Multi head attention
- Self-Attention 메커니즘을 이용한 자연어 처리 향상 모듈
- 입력벡터로 query, key, value 벡터를 받음
- 이를 활용하여 attention score를 계산하고 단어별 중요도를 결정할 수 있음
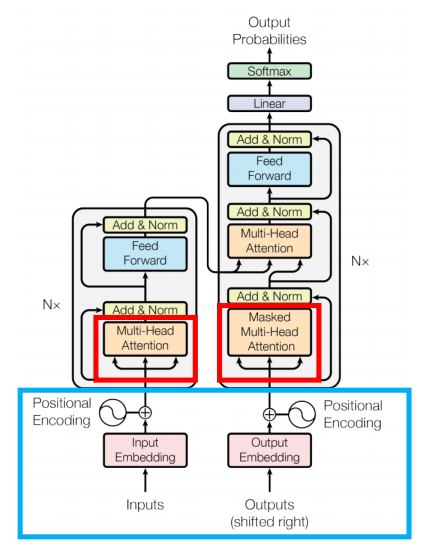
성능향상을 위한 기술
- Skip Connection
- 한 계층의 출력을 다른 계층의 출력에 직접 추가하는 연결
- Vanishing Gradient를 완화하기 위해 사용한 방법
- Layer Normalization
- 각 계층의 출력 정규화
- 입력 변동의 영향을 줄이고 네트워크의 전반적인 안정성과 성능 향상
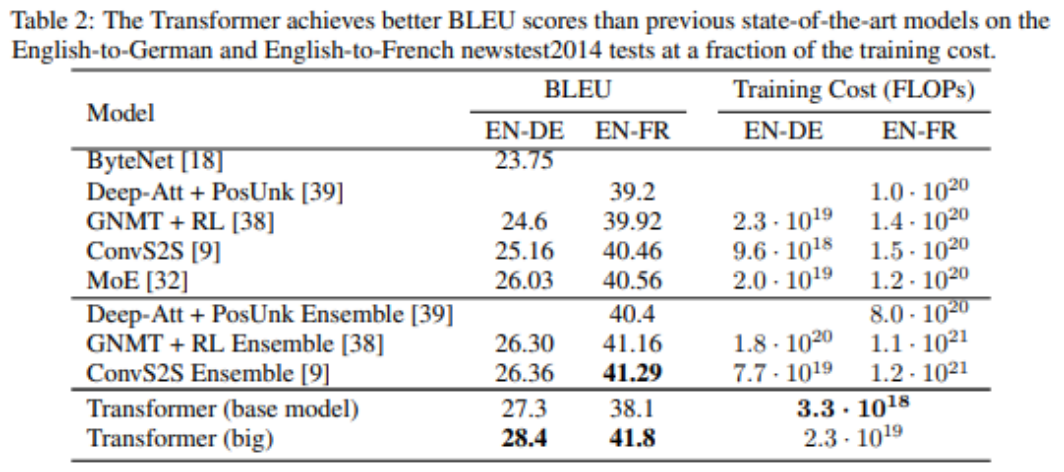
기존 모델과 성능비교
요약
- 기계번역 task에서 기존의 연구들 보다 성능적으로 우수
- 병렬적으로 처리가 가능한 모델 -> time complexity 감소
- 이후에 사용되는 Bert, GPT 모델에서 일반화에 강점이 있다는 것이 확인
Transformer Process
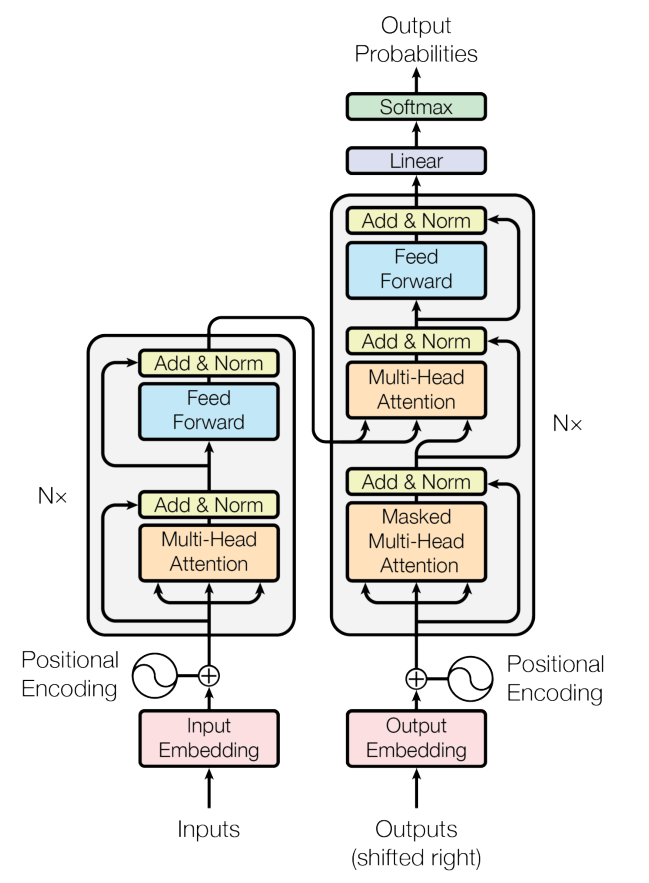
- input 임베딩 + Position Encoding (Encoder)
- Q, K, V 생성
- Multi-Head Attention 사용
- Skip-Connection + Layer Normalization
- Self-attention 반복수행
- Encoder의 출력값을 Decoder가 받아서 학습을 진행
- Linear모델과 softmax을 통해서 최종결과(확률)를 도출
Hugging Face
- https://github.com/huggingface/transformers
- NLP분야의 스타트업
- 다양한 트랜스포머 모델(transformer.models)과 학습 스크립트(transformer.Trainer)를 제공하는 모듈
- 개발자가 자연어 처리 애플리케이션과 서비스를 빠르고 효율적으로 구축하고 배포할 수 있도록 함
사용법
-
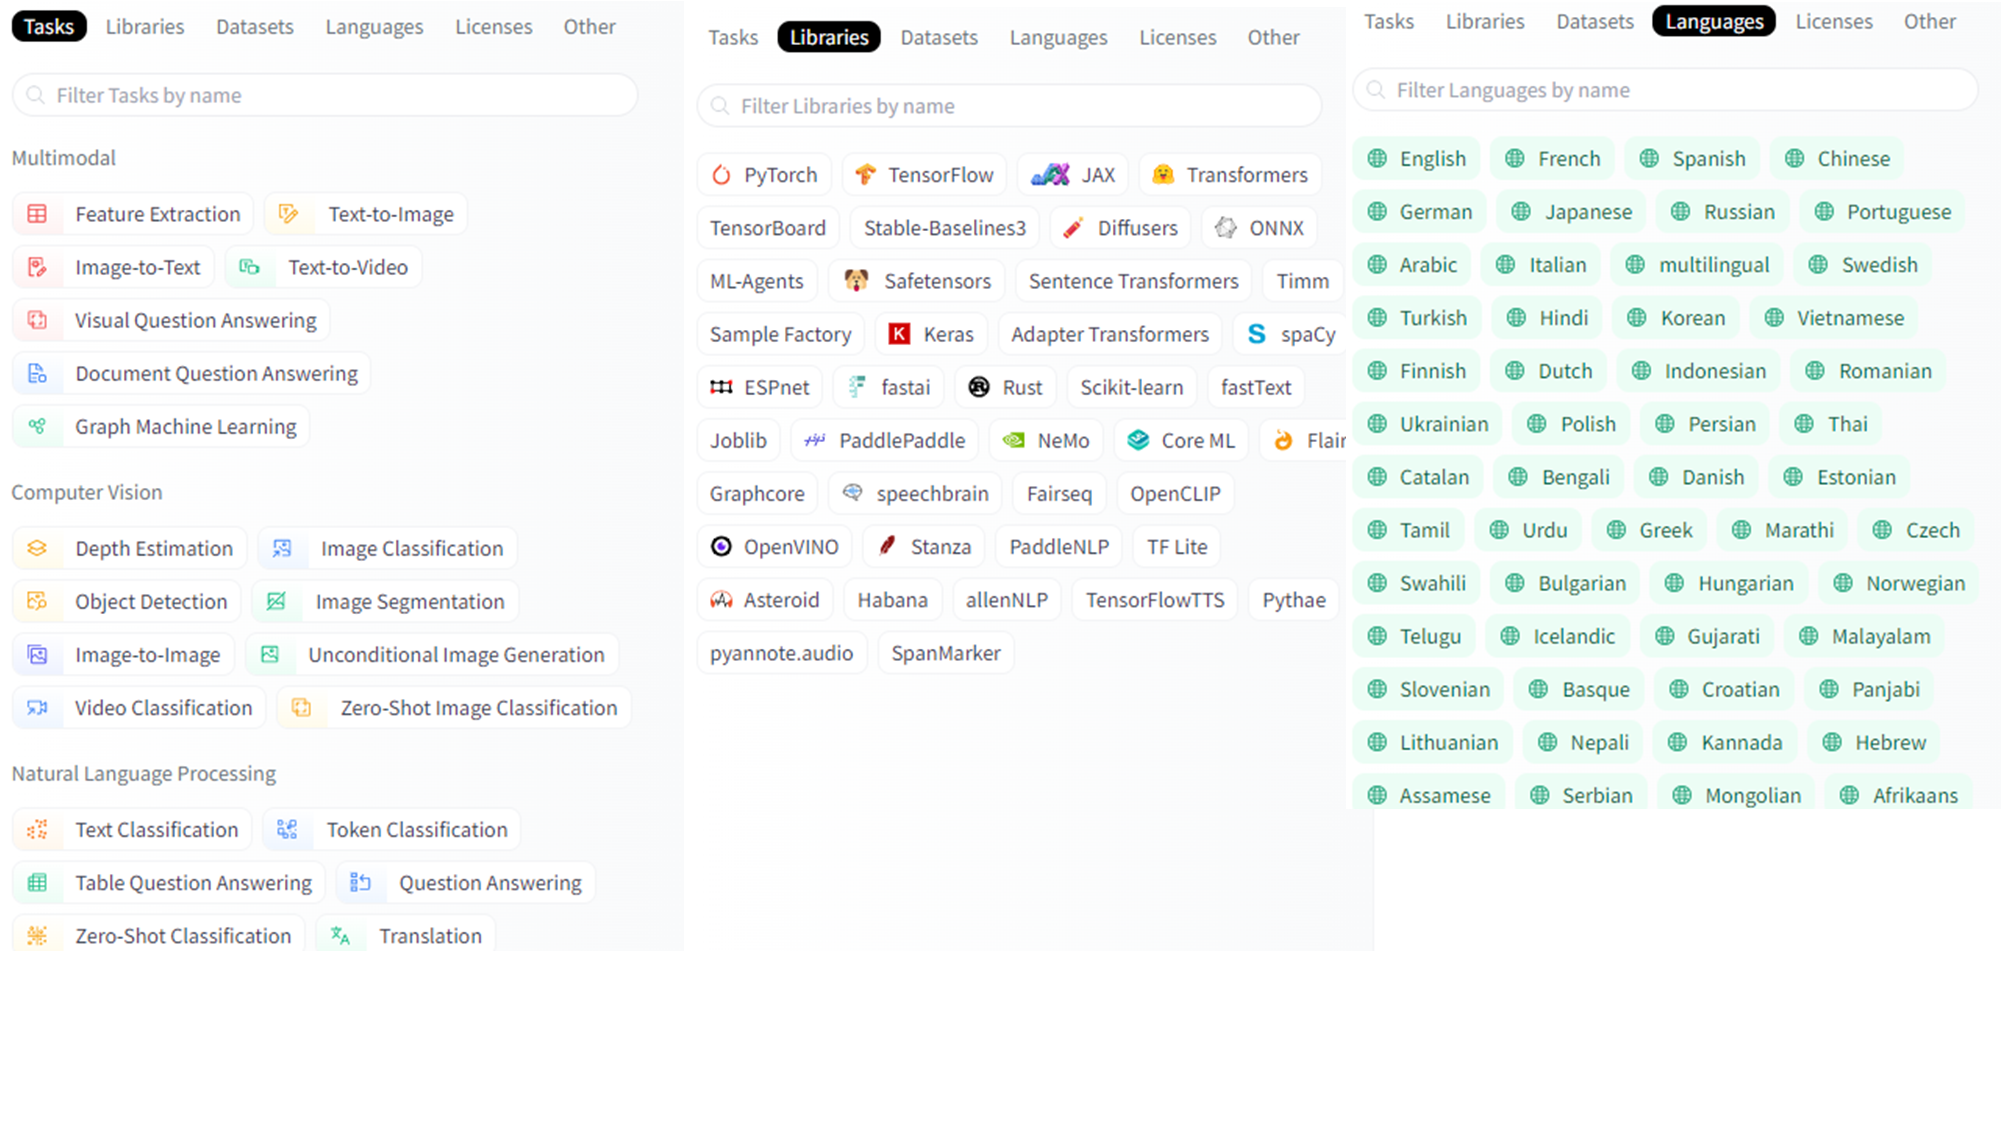
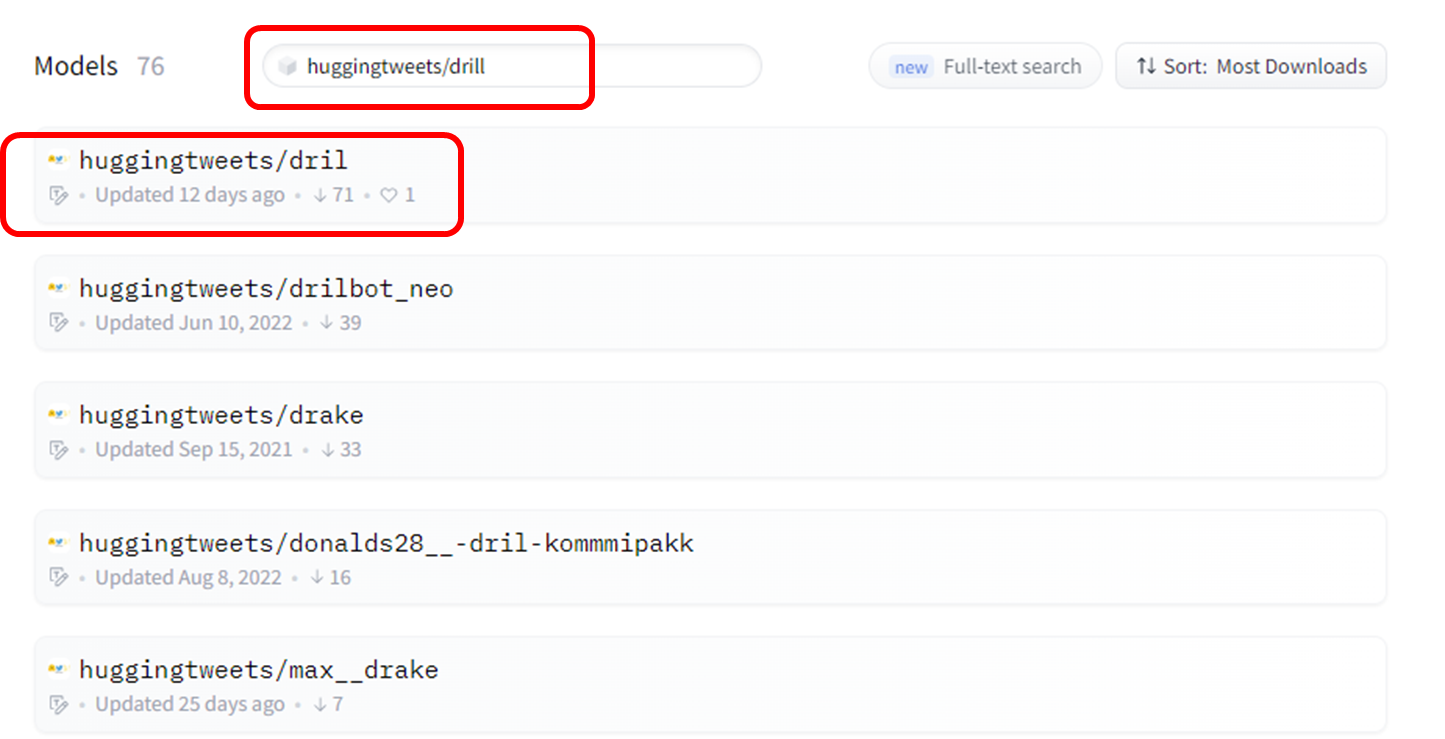
사용할 Task, Libraries 등 또는 Filter을 설정하고 원하는 모델을 찾기
-
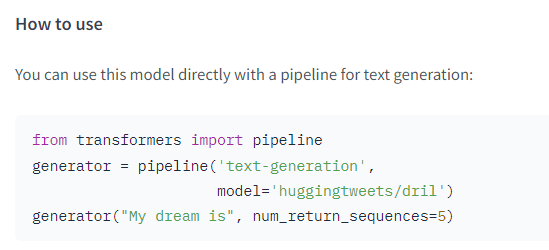
모델 포스팅 글에서 사용법 확인하고 적용하기
-
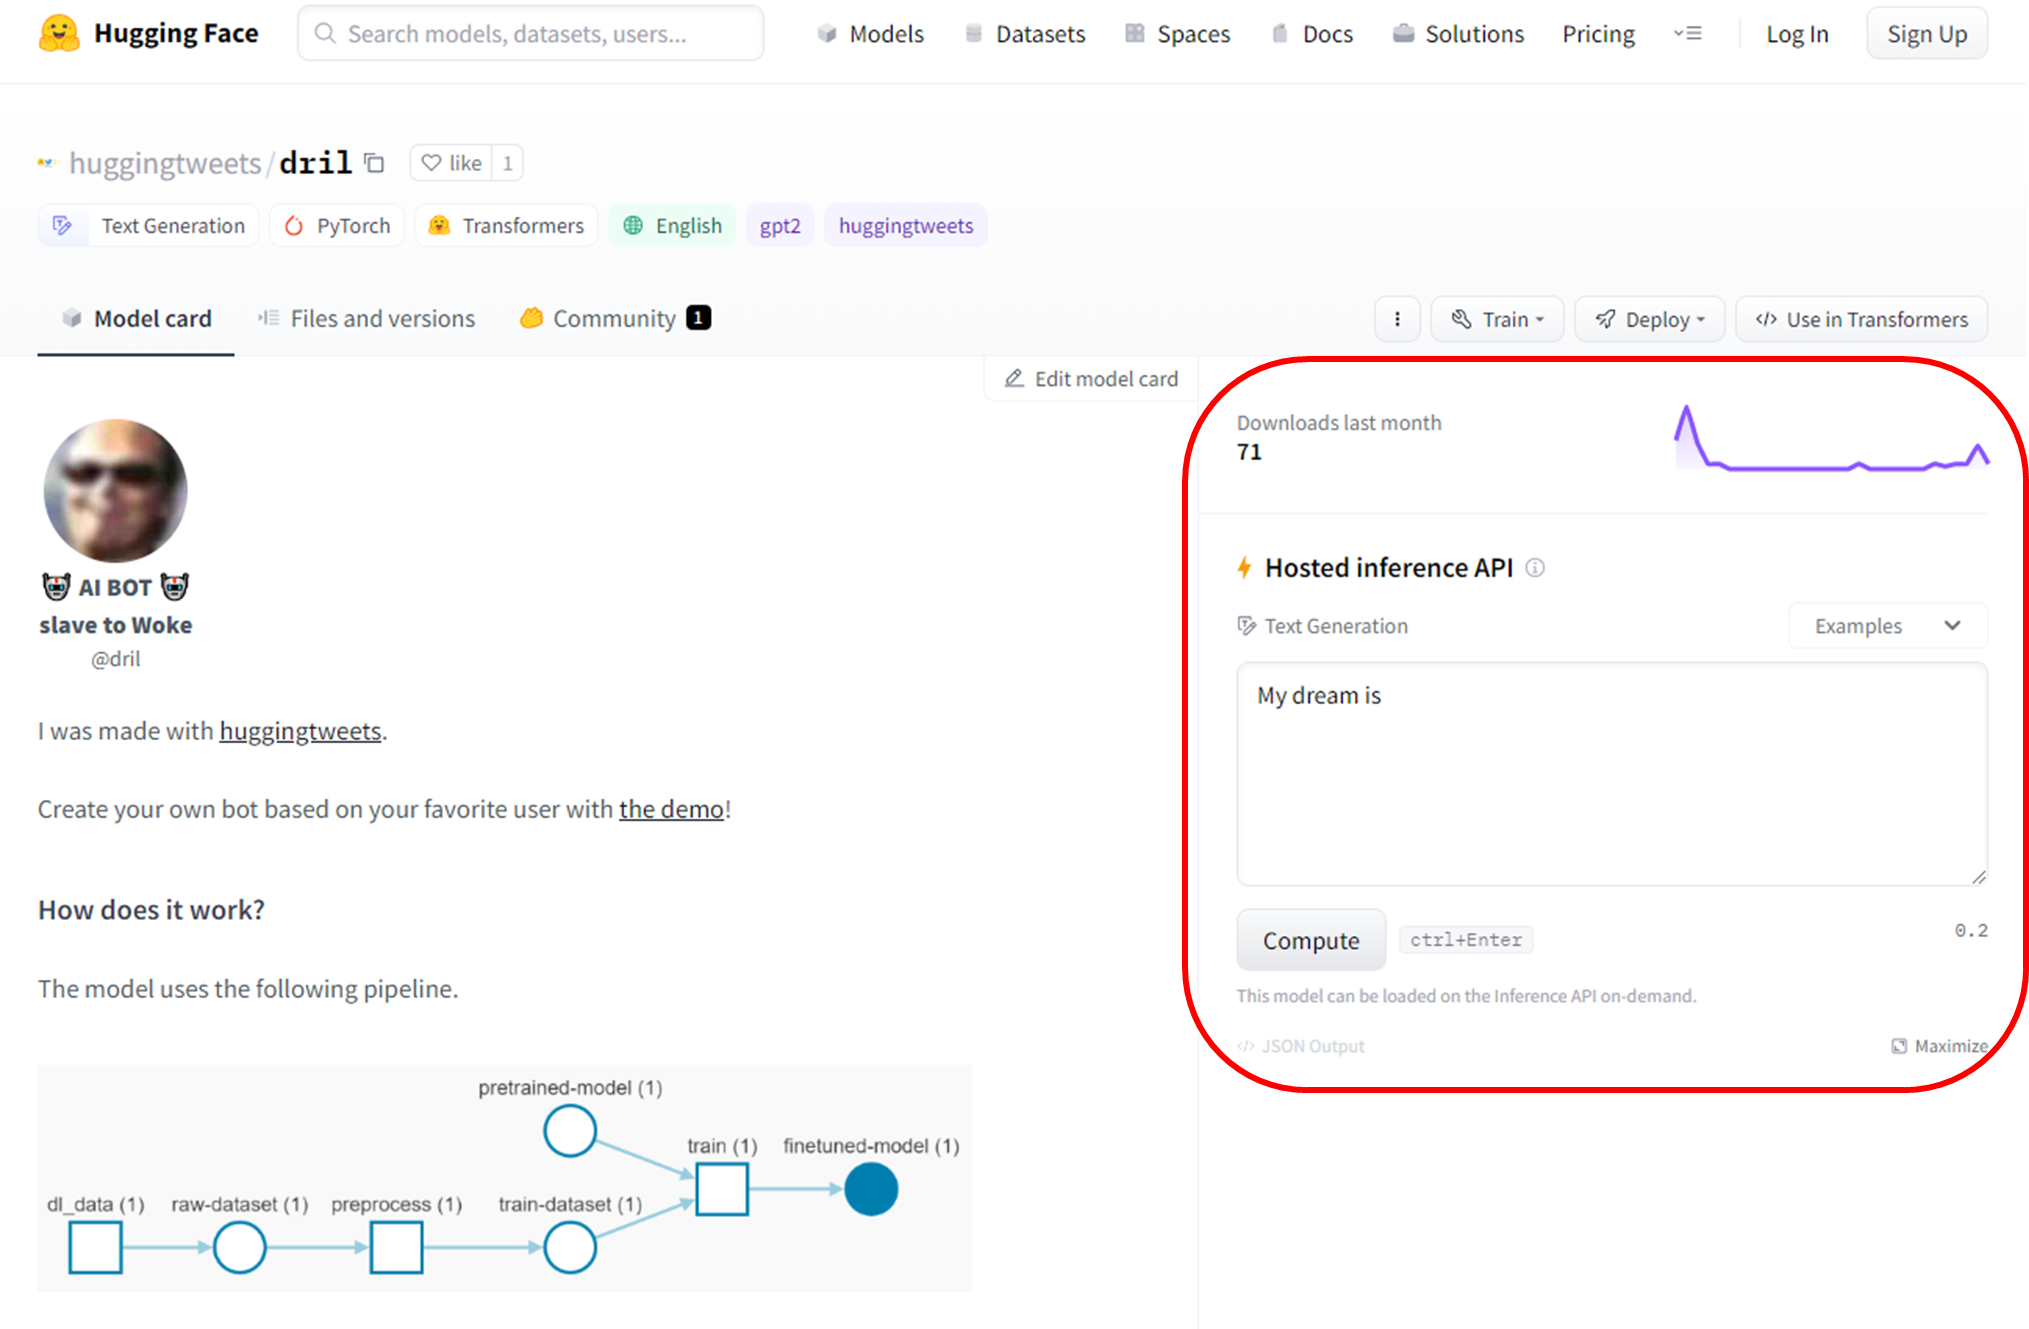
사이트에서도 간편실행가능
이번에 제로베이스 데이터 취업스쿨을 하려고 하는데 괜찮을까요?