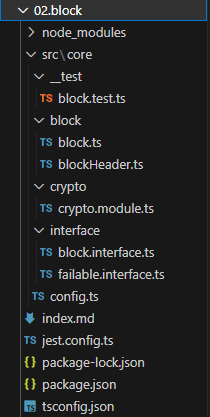
폴더, 파일 구성
프로젝트를 위한 설치 명령어 모음
npm init -y
npm i -D typescript ts-node
npm i -D @types/merkle merkle
npm i -D @types/crypto-js crypto-js
npm i -D tsc-alias tsconfig-paths
npx tsc --init
npm i -D ts-jest
npm i -D @types/jest jest
block.interface.ts
export interface IBlockHeader{

    version : string;
    height : number;
    timestamp : number;
    previousHash : string;

}
export interface IBlock extends IBlockHeader{

    merkleRoot : string;
    hash : string;
    nonce : number;
    difficulty : number;
    data : string[];
}
// ⭐⭐⭐⭐⭐⭐⭐
// IBlock 인터페이스는 IBlockHeader 를 상속받아 IBlockHeader의 속성을 갖고있다.
blockHeader.ts
import { IBlock, IBlockHeader} from "@core/interface/block.interface";

export class BlockHeader implements IBlockHeader{
    version: string;
    height: number;
    timestamp: number;
    previousHash: string;

    constructor(_previousBlock : IBlock){
        // 블록을 생성할때 이전 블록의 정보가 필요하다
        // 이전블록의 해시나 높이나
        this.version = BlockHeader.getVersion();
        this.timestamp = BlockHeader.getTimestamp();
        this.height = _previousBlock.height + 1;
        this.previousHash = _previousBlock.hash;
    }
	// ⭐⭐⭐⭐⭐⭐⭐
  	// static 함수는 클래스 자체에서 호출 가능.
    static getVersion(){
        return "1.0.0";
    }
    static getTimestamp(){
        return new Date().getTime();
    }
}
block.ts
import { SHA256 } from "crypto-js";
import merkle from "merkle";
import { BlockHeader } from "./blockHeader";
import { IBlock,IBlockHeader } from "@core/interface/block.interface";
import { Failable } from "@core/interface/failable.interface";
import CryptoModule from "@core/crypto/crypto.module";

// block 형태를 클래스로 정의
class Block extends BlockHeader implements IBlock{
    merkleRoot: string;
    hash: string;
    nonce: number;
    difficulty: number;
    data: string[];

    constructor(_previousBlock : Block, _data : string[]){
      	// ⭐⭐⭐⭐⭐⭐⭐
        // 부모 클래스 생성자 호출 super
      	// _previousBlock 의 값을 부모 클래스 생성자에 넣고 호출한다.
      	// 즉 _previousBlock 에 담긴 값으로 version,timestamp,height,previousHash 가 호출된다.
        super(_previousBlock);

        this.merkleRoot = Block.getMerkleRoot(_data);

        // 블록 본인의 데이터를 해시화한게 블록의 해시값
        this.hash = Block.createBlockHash(this);

        // 블록 채굴은 뒤에 추가
        // 지금은 0으로
        this.nonce = 0;

        // 지금은 난이도 3
        this.difficulty = 3;

        this.data = _data;
    }

    // 블록추가
    static generateBlock(_previousBlock : Block, _data:string[]) : Block{
        const generateBlock = new Block(_previousBlock, _data);

        // 마이닝을 통해서 블록의 생성 권한을 받은 블록을 받고 만들고
        const newBlock = Block.findBlock(generateBlock);
        return newBlock;
    }

    // 마이닝 작업 코드
    // 블록의 채굴
    // 연산을 통해서 난이도의 값에 따른 정답을 찾는 동작
    // findBlock = 동작의 이름은 마이닝 / 블록을 채굴하는 동작
    // POW : 작업 증명 블록의 난이도에 충족하는 값을 구하기 위해서 연산작업을 계속 진행해서 값을 조건에 충족하는
    // 값을 구하면 보상으로 블록의 생성 권한을 얻는다.

    static findBlock(generateBlock : Block){

        let hash : string;

        // nonce 변수는 블록의 채굴을 하는데 연산을 몇번 진행했는지 값을 여기에 담을것임.
        let nonce : number = 0;

        while(true){

            generateBlock.nonce = nonce;
            // nonce이 값을 증가시켜서 hash값을 계속 바꿔서
            nonce ++;
            // 블록 해시 구하는 구문 추가
            hash = Block.createBlockHash(generateBlock);

            // 16 진수 -> 2진수로 변환 해야하는데
            // 16 진수를 2진수로 변환해서 0의 갯수가 난이도의 갯수에 중족하는지 체크를 해서
            // 맞추면 블록 채굴의 권한을 받고
            // 블록을 생성할 수 있다.

            // 충족되었는지 확인하려면 binary 2진 값이 바뀌는 이유는
            console.log("hash : ",hash);
            const binary : string = CryptoModule.hashToBinary(hash);
            console.log("binary : ",binary);
            // 연산의 값이 난이도에 충족했는지 체크할 변수
            // startsWith : 문자열의 시작이 매개변수로 전달된 문자열로 시작하는지 체크
            // "000" = 이문자열로 시작하는지 결과가 true false 반환되고
            const result : boolean = binary.startsWith("0".repeat(generateBlock.difficulty))
            console.log("result : ",result);
            // 조건을 충족 했으면 채굴할 수 있는 권한을 얻었고 조건에 충족해서 나온 값을 반환

            // ⭐⭐⭐⭐⭐⭐⭐⭐
          	// result가 false 이면 while 문이 다시 실행되고, nonce 값이 바뀌어서
          	// hash  값이 달라지고 다시 hashToBinary()가 실행된다

            if(result){
                // 연산을 통해 완성된 hash 값과
                generateBlock.hash = hash;
                // 완성된 블록을 내보내 주자
                return generateBlock;
            }
        }
    }
    // 블록의 해시를 구하는 함수
    static createBlockHash(_block: Block) : string{
        //
        const {version, height, timestamp , previousHash, merkleRoot, nonce, difficulty } = _block;
        const value : string = `${version}${timestamp}${height}${merkleRoot}${previousHash}${difficulty}${nonce}`
        return SHA256(value).toString();
    }

    // 머클루트 구하는 함수
    static getMerkleRoot<T>(_data : T[]) : string{
        const merkleTree = merkle("sha256").sync(_data);
      // merkleTree.root() -> merkleTree의 해시값을 반환
        return merkleTree.root();
    }

    // 블록이 유효한지 정상적인 블록인 검사

  	//⭐⭐⭐⭐⭐⭐⭐
  	//failable의 type 을 참고하여 isError가 false이면 value 가 Block되고,
  	// isError 가 true 이면 value가 string 이 된다.

    static isValidNewBlock(_newBlock : Block, _previousBlock : Block): Failable<Block,string>{

        // 블록의 유효성 검사를 하는데

        // 블록의 높이가 정상적인지
        if(_previousBlock.height + 1 !==_newBlock.height)
            return {isError : true, value :"이전 높이 오류"};
        // 이전 블록의 해시 값이 새로운 블록의 이전 해시값과 동일한지

        if(_previousBlock.hash !== _newBlock.previousHash)
            return {isError : true, value : "이전 블록 해시 오류"};

        // 생성된 블록의 정보를 가지고 다시 해시해서 블록의 값이 변조되었는지 정상적인 블록인지 확인
        if(Block.createBlockHash(_newBlock)!== _newBlock.hash)
            return {isError : true, value : "블록 해시 오류"};

        // 블록이 유효성 검사를 통과 정상적인 블록이다.
        return {isError : false, value : _newBlock};
    }
}

export default Block;
crypto.module.ts
class CryptoModule {
    static hashToBinary(hash: string) : string {
        let binary : string = "";

        // 16진수를 ->2진수로 바꾸는 식
        // 해시 문자열을 2글자씩 가지고 와서 반복

        for (let i = 0; i < hash.length; i+=2) {
            // 반복문에서 i를 2씩 증가
            const hexByte = hash.substr(i,2);

            // 16진수의 바이트를 10진수로 변환
            const dec =parseInt(hexByte,16);

            // 10진수를 2진 문자열로 변환 8자리로 패딩
            const binaryByte = dec.toString(2).padStart(8,"0");

            // 현재의 2진 바이트를 최종 이진 문자열에 추가

            binary += binaryByte;
        }
        return binary;
    }
}

export default CryptoModule;
failable.interface.ts
export interface Result<R>{
    isError : false;
    value : R;
}

export interface Faillure<E>{
    isError : true;
    value : E;
}

//Failable  Result도 될수있고 Faillure도 될수 있는데
// Failable<string, number> = Result<string> | Faillure<number>
export type Failable<R,E> = Result<R> | Faillure<E>;
block.test.ts
import Block from "@core/block/block";

//⭐⭐⭐⭐⭐⭐⭐
// 최초의 블록을 하드코딩.
import { GENESIS } from "@core/config";

// describe : 테스트 코드의 그룹 단위
describe("block 검증 ", ()=>{
    let newBlock : Block;
    let newBlock2 : Block;

    // it 테스트할 코드의 최소 단위
    it("블록 추가", ()=>{
        const data =["Block 1"];
        newBlock = Block.generateBlock(GENESIS,data);
        // 블록의 난이도에 따른 마이닝을 동작해서
        // 조건에 맞을때까지 연산을 반복한뒤에 생성된 블록을 newBlock에 받아온다.
        // 이전 블록은 GENESIS(최초 블록)
        console.log(newBlock);

        const data2 = ["Block 2"];
        newBlock2 = Block.generateBlock(newBlock,data2);
        console.log(newBlock2);
    })

    it("블록 유효성 검증",()=>{
        const isValidBlock = Block.isValidNewBlock(newBlock, GENESIS);
        if(isValidBlock.isError){
            //expect : toBe : 값이 맞는 지 확인할 때
            // 성공한 결과가 맞는지 확인할 때 사용하는 코드
            // true false 비교해서 맞는지 확인
          //⭐⭐⭐⭐⭐⭐⭐⭐
          //expect() 안의 값과 , toBe()안의 값을 비교.
            return expect(true).toBe(false);
        }
        expect(isValidBlock.isError).toBe(false);
    })
})
jest.config.ts
-> jest로 테스트 코드를 실행할 때 옵션설정 파일.
import type { Config } from "@jest/types";

const config : Config.InitialOptions ={
    // 1 모듈 파일 확장자 설정 : typescript와 javascript  둘다 테스트파일로 지정
    moduleFileExtensions : ["ts","js"],

    // 2 테스트파일 매치 설정 : 파일의 이름의 패턴을 설정
    // 루트 경로에서 모든 폴더에 모든 파일 이름의 패턴이 test.js or test.ts

  	//⭐⭐⭐⭐⭐⭐⭐
	//rootDir 이란 루트 디렉토리 이고, 프로젝트의 최상위 디렉터리를 가르킨다.

  	testMatch : ['<rootDir>/**/*.test.(js|ts)'],

    // 3 모듈의 이름에 대한 별칭 설정 : @core
    // 별칭으로 지정된 @core를 어떻게 경로를 바꿔줄거냐
    // ^@core == @core/**/* 시작하는 별칭은 루트경로에 src/core의 경로까지
    moduleNameMapper : {
        "^@core/(.*)$" : "<rootDir>/src/core/$1"
    },

    // 4 테스트 환경 설정 : node 환경에서 실행시킬거임
    testEnvironment : "node",

    // 5 자세한 로그 설정 출력 : 터미널에 로그들을 더 자세히 출력할지 여부
    verbose : true,

    // 6 프리셋 설정 : typescript에서 사용할 jest / ts-jest 설정
    preset : "ts-jest",
}

export default config;
package.json
// ⭐⭐⭐⭐⭐⭐⭐
// script 아래와 같이 변경하고 npm run test으로 실행.
"scripts": {
    "test": "jest"
  },
tsconfig.json
// ⭐⭐⭐⭐⭐⭐⭐
// 노드 환경에서 실행할 때 별칭을 경로로 변환해서 실행시켜줌.
"ts-node": {
    "require": ["tsconfig-paths/register"]
  }
한걸음씩