Event 추가 , 제거
<style>
  .parent{
  	width:300px;
 	height:200px;
  	padding:20px;
  	border:10px solid;
  	background-color:red;
  	overflow:auto;
  }
  .child{
  	width:200px;
 	height:1000px;
  	border:10px solid;
  	background-color:orange;
  	font-size:40px;
  }
</style>
<body>
  <div class="parent">
    <div class="child">
      <a href="https://naver.com" target="_blank">naver</a>
    </div>
  </div>
  <input />
</body>
.addEventListener()
- 대상에 이벤트 청취(Listen)을 등록합니다.
- 대상에 지정한 이벤트가 발생했을때 지정한 함수(handler)가 호출됩니다.
const parentEl = document.querySelector('.parent')
const childEl = document.querySelector('.child')

parentEl.addEventListener('click',()=>{
	console.log('Parent')
})
childEl.addEventListener('click',()=>{
	console.log('Child')
})
.removeEventListener()
- 대상에 등록했던 이벤트 청취(Listen)를 제거합니다.
- 메모리 관리를 위해 등록한 이벤트를 제거하는 과정이 필요할수도 있습니다.
const parentEl = document.querySelector('.parent')
const childEl = document.querySelector('.child')

const handler = () => {
	console.log('Parent')
}

parentEl.addEventListener('click',handler)
childEl.addEventListener('click',()=>{
	parentEl.removeEventListener('click',handler)
})
이벤트객체
이벤트 객체는 대상에서 발생한 이벤트 정보를 담고 있습니다.
const parentEl = document.querySelector('.parent')

parentEl.addEventListener('click',event => {
	console.log(event.target , event.currentTarget);
    //클릭한 요소 , 이벤트가 등록된 요소
})
parentEl.addEventListener('wheel',event => {
	console.log(event);
})
const inputEl = document.querySelector('input')
inputEl.addEventListener('keydown',event => {
	console.log(event.key);
})
기본 동작 방지
.event.preventDefault()
마우스 휠의 스크롤 동작 방지!
const parentEl = document.querySelector('.parent')
parentEl.addEventListener('wheel',event => {
	event.preventDefault();
	console.log(event);
})
<a> 태그에서 페이지 이동 방지!
const anchorEl = document.querySelector('a')
anchorEl.addEventListener('click',event => {
	console.log(event);
    event.preventDefault();
})
버블링 과 캡쳐링
event.stopPropagation();
이벤트 전파(버블) 정지
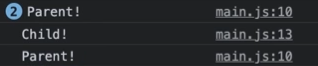
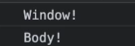
이벤트는 후손요소로 부터 상위요소로 전파되는 특성이 있다.
const parentEl = document.querySelector('.parent')
const childEl = document.querySelector('.child')
const anchorEl = document.querySelector('a')

window.addEventListener('click',event=>{
	console.log('Window!')
})
document.body.addEventListener('click',event=>{
	console.log('Body!')
})
parentEl.addEventListener('click',event=>{
	console.log('Parent!')
    event.stopPropagation(); //버블링 정지
})
childEl.addEventListener('click',event=>{
	console.log('Child!')
})
anchorEl.addEventListener('click',event=>{
	console.log('Anchor!')
})-
a태그를 선택하게 되면 후손요소에서 상위요소로 부터 전파되어 출력된다.

-
event.stopPropagation() 메서드를사용하게 되면 Parent 에서 부터 상위로 전파되는것을 막았기 때문에 Parent까지만 console에 표출된다.
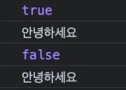
Event capture옵션
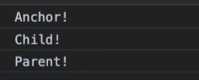
- 낮은단계의 요소에서 조상요소로 이벤트가 전파될때 그 중간에 이벤트가 먼저 동작하게 만들기 위해 capture 옵션을 제공한다.
const parentEl = document.querySelector('.parent')
const childEl = document.querySelector('.child')
const anchorEl = document.querySelector('a')

window.addEventListener('click',event=>{
	console.log('Window!')
})
document.body.addEventListener('click',event=>{
	console.log('Body!')
},{capture:true})
parentEl.addEventListener('click',event=>{
	console.log('Parent!')
})
childEl.addEventListener('click',event=>{
	console.log('Child!')
})
anchorEl.addEventListener('click',event=>{
	console.log('Anchor!')
})- child를 클릭하게 되면 capture 옵션이 작성되어 있는 요소가 먼저 동작한다.
const parentEl = document.querySelector('.parent')
const childEl = document.querySelector('.child')
const anchorEl = document.querySelector('a')
window.addEventListener('click',event=>{
console.log('Window!')
})
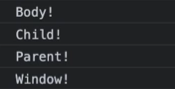
document.body.addEventListener('click',event=>{
console.log('Body!')
event.stopPropagation();
},{capture:true})
parentEl.addEventListener('click',event=>{
console.log('Parent!')
},{capture:true})
childEl.addEventListener('click',event=>{
console.log('Child!')
})
anchorEl.addEventListener('click',event=>{
console.log('Anchor!')
})
const parentEl = document.querySelector('.parent')
const childEl = document.querySelector('.child')
const anchorEl = document.querySelector('a')
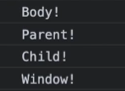
window.addEventListener('click',event=>{
console.log('Window!')
},{capture:true})
document.body.addEventListener('click',event=>{
console.log('Body!')
event.stopPropagation(); //이벤트 전파 정지
},{capture:true})
parentEl.addEventListener('click',event=>{
console.log('Parent!')
},{capture:true})
childEl.addEventListener('click',event=>{
console.log('Child!')
})
anchorEl.addEventListener('click',event=>{
console.log('Anchor!')
})- child를 클릭하게 되면 capture 옵션이 작성되어 있는 요소가 먼저 동작한다.
const parentEl = document.querySelector('.parent')
const handler = () => {
	console.log('Parent!')
}
parentEl.addEventListener('click',handler,{capture:true})
parentEl.removeEventListener('click',handler,{capture:true})- 캡쳐링 옵션이 들어간 경우 지울때도 옵션을 포함하여 코드를 작성해야한다.
만약 지우지 않는다면 click 이벤트는 제거되지 않는다.
이벤트옵션
once 옵션
- 핸들러 한번만 실행
const parentEl = document.querySelector('.parent')
const handler = () => {
	console.log('Parent!')
}
parentEl.addEventListener('click',()=>{
	console.log('Parent!')
},{
  once:true
})
passive 옵션
- 기본동작과 핸들러 실행 분리 하기 때문에 화면이 부드럽게 동작한다.
- 앱이 동작하는 성능과 상관없이 훨신 더 부드럽게 화면이 동작하는것을 볼수 있기때문에 그만큼 사용성이 좋아진다.
const parentEl = document.querySelector('.parent')
parentEl.addEventListener('wheel',()=>{
	for(let i=0;i<10000;i++){
    	console.log(i)
    }
},{
  passive:true
})
이벤트 위임(Delegation)
- 비슷한 패턴의 여러 요소에서 이벤트를 핸들링해야 하는 경우,
- 단일 조상 요소에서 제어하는 이벤트 위임 패턴을 사용할 수 있습니다.
<div class="parent">
	<div class="child">1</div>
    <div class="child">2</div>
    <div class="child">3</div>
    <div class="child">4</div>
</div>
const parentEl = document.querySelector('.parent')
const childEls = document.querySelectorAll('.child')//nodeList 반환
//모든 대상 요소에 이벤트 등록!
childEls.forEach(el => {
el.addEventListener('click',event => {
console.log(event.target.textCotent);
})
})
//조상 요소에 이벤트 위임
parentEl.addEventListener('click',event => {
const childEl = event.target.closest('.child')
if(childEl){
console.log(childEl.textCotent);
}
})
마우스와 포인터 이벤트
click : 클릭했을때
dblclick: 더블 클릭했을때
mousedown: 버튼을 누를때
mouseup: 버튼을 뗄 때
mouseenter: 포인터가 요소 위로 들어갈 때
mouseleave: 마우스를 요소 밖으로 나올 때
mousemove: 포인터가 움직일 때
contextmenu: 우클릭했을 때
wheel: 휠 버튼이 회전할 때
<style>
  .parent{
  	width:300px;
  	height:200px;
  	padding:20px;
  	border:10px solid;
  	background-color:red;
  	overflow:auto;
  }
  .child{
  	width:200px;
  	height:1000px;
  	border:10px solid;
  	background-color:orange;
  }
  .child.active{
  	background-color:yellowgreen;
  }
</style>
<body>
  <div class="parent">
    <div class="child"></div>
  </div>
</body>
const parentEl = document.querySelector('.parent')
const childEl = document.querySelector('.child')
childEl.addEventListener('mousedown',()=>{
childEl.classList.toggle('active')
})
childEl.addEventListener('mouseup',()=>{
childEl.classList.add('active')
})
childEl.addEventListener('mouseup',()=>{
childEl.classList.remove('active')
})키보드 이벤트
keydown : 키를 누를때
keyup : 키를 땔 때
<body>
	<input />
</body>
const inputEl = document.querySelector('input');
inputEl.addEventListener('keydown',event => {
if(event.key === 'Enter'){
console.log(event.isComposing)
console.log(event.target.value)
}
})
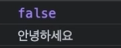
- CJK 문자 : 한국어 , 중국어 , 일본어 같은 경우는 브라우저에서 처리하는 과정이 한단계 더 필요하기 때문에 두번의 결과가 출력됩니다.
- event.isComposing : CJK 문자를 처리하는 과정인지를 boolean 데이터로 가지고 있는 속성이다.
const inputEl = document.querySelector('input');
inputEl.addEventListener('keydown',event => {
	if(event.key === 'Enter' && !event.isComposing){
    	console.log(event.isComposing)
    	console.log(event.target.value)
    }
})
Focus & Form Events
focus : 요소가 포커스를 얻었을때
blur : 요소가 포커스를 잃었을때
input : 값이 변경되었을때
change : 상태가 변경되었을때
submit : 제출 버튼을 선택했을때
reset : 리셋 버튼을 선택했을때
<style>
	form{
    	padding:10px;
        border:4px solid transparent;
        display:flex;
        flex-wrap:wrap;
        gap:6px;
    }
    form.active{
    	border-color:orange;
    }
</style>
<body>
  <form>
  	<input type="text" placeholder="ID" />
    <input type="password" placeholder="PW" />
    <button type="submit">제출</button>
   	<button type="reset">초기화</button>
  </form>
</body>
const formEl = document.querySelector('form')
const inputEls = document.querySelectorAll('input')
inputEls.forEach(el => {
el.addEventListener('focus',()=>{
formEl.classList.add('active')
})
el.addEventListener('blur',()=>{
formEl.classList.remove('active')
})
el.addEventListener('input',event=>{
console.log(event.target.value)
})
})
formEl.addEventListener('submit',event => {
event.preventDefault()
const data = {
id:event.target[0].value,
pw:event.target[1].value,
}
console.log('제출!',data)
})
formEl.addEventListener('reset',event => {
console.log('리셋')
})커스텀 이벤트 와 디스패치
.dispatchEvent(new Event())
- 강제로 이벤트 발생!
<div class="parent">
	<div class="child"></div>
    <div class="child"></div>
<div>
const child1 = document.querySelector('.child:nth-child(1)')
const child2 = document.querySelector('.child:nth-child(2)')
child1.addEventListener('click',event => {
child2.dispatchEvent(new Event('click'));
child2.dispatchEvent(new Event('wheel'));
child2.dispatchEvent(new Event('keydown'));
})
child2.addEventListener('click', event => {
console.log('Child2 Click')
})
child2.addEventListener('wheel', event => {
console.log('Child2 Wheel')
})
child2.addEventListener('keydown', event => {
console.log('Child2 Keydown')
})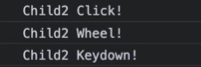
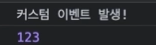
자바스크립트에 존재하지 않는 커스텀한 이벤트의 내용을 강제로 dispatchEvent 라는 메서드를 통해서 실행할수 있다.
const child1 = document.querySelector('.child:nth-child(1)')
const child2 = document.querySelector('.child:nth-child(2)')

child1.addEventListener('hello-world',event => {
	console.log('커스텀 이벤트 발생!')
    console.log(event.detail)
})
child2.addEventListener('click', event => {
	child1.dispatchEvent(new Event('hello-world'));
})
커스텀 한 이벤트에 데이터를 전달하고 싶은 경우
- CustomEvent 생성자를 사용하여 데이터를 전달할수 있다.
const child1 = document.querySelector('.child:nth-child(1)')
const child2 = document.querySelector('.child:nth-child(2)')

child1.addEventListener('hello-world',event => {
	console.log('커스텀 이벤트 발생!')
    console.log(event.detail)
})
child2.addEventListener('click', event => {
	child1.dispatchEvent(new CustomEvent('hello-world',{
    	detail:123
    }));
})

개발자가 되고 싶어요