
파일 압축하기
CSS 압축
CssMinimizerWebpackPlugin
참고 사이트: https://webpack.kr/plugins/css-minimizer-webpack-plugin/
cssnano를 사용하여 CSS를 압축해줌
패키지 설치
yarn add --dev css-minimizer-webpack-pluginconfig.build.js
const CssMinimizerPlugin = require('css-minimizer-webpack-plugin');


// config에 추가
optimization: {
  minimizer: [new CssMinimizerPlugin()],
},
JS 압축
TerserWebpackPlugin
참고 사이트: https://webpack.kr/plugins/terser-webpack-plugin/
패키지 설치
yarn add --dev terser-webpack-pluginconfig.build.js
const TerserPlugin = require('terser-webpack-plugin');

...

new TerserPlugin() // minimizer 부분에 추가하여 사용
Output 설정
참고 사이트: https://webpack.kr/configuration/output/
config.dev.js
const path = require('path'); // nodejs 기본 제공 path
const __root = process.cwd(); // 현재 루트 디렉토리

...

output: {
  path: path.resolve(__root, 'dist'), // 반드시 절대 경로!!
  filename: 'js/[name].js', // src 파일명과 같도록 출력
},
React Testing Library
jest 사이트: https://jestjs.io/
testing-library 사이트: https://testing-library.com/
npm react testing-library 사이트: https://www.npmjs.com/package/@testing-library/react
yarn add --dev jest

yarn add --dev @testing-library/{react,jest-dom}
jest와 testing-library react, jest-dom 설치
jest 기본 설정파일 생성
npx jest --init
jest.config.js
module.exports = {
  // clearMocks: true,
  collectCoverage: true, // 테스트 결과를 coverage라는 폴더에 저장
  coverageDirectory: 'coverage',
  roots: ['<rootDir>/src'],
  setupFilesAfterEnv: ['<rootDir>/setupTest.js'],
  testEnvironment: 'jsdom',
  testPathIgnorePatterns: ['/node_modules/', '/dist/'],
};
setUpTest.js 파일 생성
import '@testing-library/jest-dom/extend-expect';extend-expect --> jest 에서 DOM 관련 matcher 를 사용할 수 있게 해줌 (추가 메서드들을 사용할 수 있게 해주는 것)
jest와 함께 eslint 사용하기
yarn add --dev eslint-plugin-jest.eslintrc.js
module.exports = {
  env: {
    ...
    'jest/globals': true,
  },
  extends: [
    ...
    'plugin:jest/recommended',
  ],
  plugins: ['react', 'jsx-a11y', 'prettier', 'jest'],
  ...
};
jest 설정 추가
component test
virtual dom을 테스트할 것이기 때문에 render 메서드를 빼와야함
import { render } from '@testing-library/react';참고 사이트
https://testing-library.com/docs/ecosystem-jest-dom/
https://github.com/testing-library/jest-dom

RandomCountup.js
...
  return (
    <div className="randomCountUp" data-testid="container">
      <output style={completeStyle}>{count}</output>
    </div>
  );
data-testid로 container를 설정
RandomCountup.test.js
// 테스트 할 React 컴포넌트 로드
import React from 'react';
import { render } from '@testing-library/react';
import { RandomCountUp } from './RandomCountUp';

describe('RandomCountUp 컴포넌트', () => {
  test('RandomCountUp 앱은 문서에 존재합니다.', () => {
    // 컴포넌트 props
    let count = 101;
    let isComplete = true;

    // 컴포넌트 render
    const { getByTestId } = render(
      <RandomCountUp count={count} isComplete={isComplete} />
    );

    // 테스트
    expect(getByTestId('container')).toBeInTheDocument();
  });
});
testing시 data-testid가 존재하는 컴포넌트를 getByTestId로 가져와서 테스트 해볼 수 있음
test(`RandomCountUp 컴포넌트가 출력하는 카운트 값은 ${count}입니다.`, () => {
  // 컴포넌트 render
  const { getByText } = render(
    <RandomCountUp count={count} isComplete={true} />
  );

  const countNode = getByText(count);

  // 테스트
  expect(countNode).toHaveTextContent(count.toString());
  expect(countNode).toHaveStyle('animation-name: none');
});
getByText로도 노드를 가져와서 사용할 수 도 있음
컴포넌트에서 CSS 불러오기
그러나 이와 같은 오류 발생
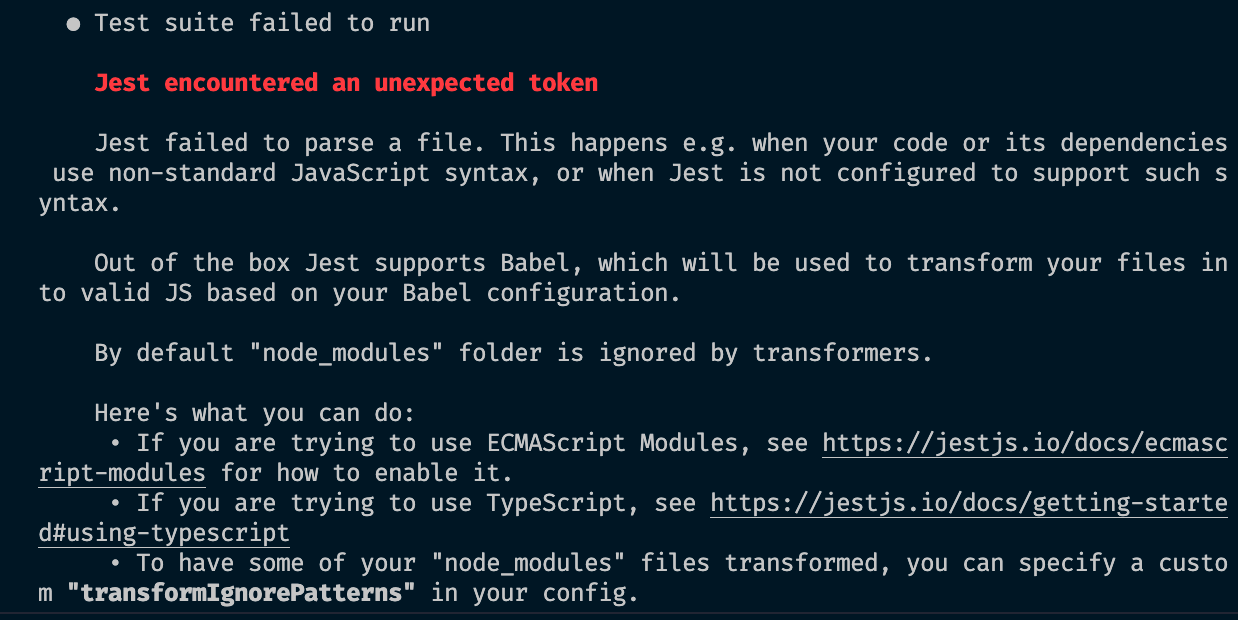
컴포넌트가 css를 불러오게 되면 jest가 컴포넌트에 입힌 스타일링을 테스트할 수 없음. 따라서 import된 css를 가짜 객체로 만들어 줌
--> proxy 사용
참고 자료: https://www.npmjs.com/package/identity-obj-proxy
yarn add --dev identity-obj-proxyjest.config.js
  ...
  moduleNameMapper: {
    '\\.css$': 'identity-obj-proxy',
  },
참고자료: https://github.com/facebook/jest/issues/3094#issuecomment-385164816
jest로 테스트한 data-testid를 제거해주기 위해 다음과 같은 패키지가 필요함
참고 사이트: https://www.npmjs.com/package/babel-plugin-jsx-remove-data-test-id
패키지 설치
yarn add --dev babel-plugin-jsx-remove-data-test-id이후 .babelrc.js에서
const plugins = [];

// yarn run build -- config webpack/config.build.js (.babelrc.js)
console.log(process.env.NODE_ENV);

if (process.env.NODE_ENV === 'production') {
  plugins.push('babel-plugin-jsx-remove-data-test-id');
}

module.exports = {
  presets: ['@babel/preset-env', '@babel/preset-react'],
  plugins,
};
실행하면 undefined 가 나옴 --> NODE_ENV를 설정할 수 있는 옵션을 찾아야함
npx webpack --help
위 명령어를 사용하여 확인해보면 --node-env를 사용하여 NODE_ENV를 설정할 수 있음을 알 수 있음
package.json
"build": "webpack build --node-env production --config webpack/config.build.js",이렇게 하면 data-testid 를 build 시에 없앨 수 있음
웹 컴포넌트와 리액트 컴포넌트
클래스 컴포넌트 실습
RandomCountUp.js
import './RandomCountUp.css';
import React from 'react';

// React 컴포넌트 타입
// 1. 함수: this 사용 X
// 2. 클래스 (웹 표준 컴포넌트 기술 사양과 흡사) this 사용

// 클래스 컴포넌트
export class RandomCountUpClass extends React.Component {
  constructor(props) {
    super(props);
  }

  getCompleteStyle() {
    return !this.props.isComplete
      ? null
      : {
          animationName: 'none',
        };
  }

  render() {
    return (
      <div className="randomCountUp">
        <output style={this.getCompleteStyle()}>{this.props.count}</output>
      </div>
    );
  }
}
class 컴포넌트는 React.Component를 확장해서 만들어야 함
presentational 컴포넌트
React가 제공하는 컴포넌트 타입은 함수, 클래스 2가지.
그 중 함수 컴포넌트는 프레젠테이셔널 컴포넌트 역할로 활용된다.
Presentational 컴포넌트란?
시각적으로 표시하는 데 중점을 둔 컴포넌트로 스타일 정보만을 가지며 UI화면을 렌더링 하는데 집중한다. 이 컴포넌트는 시각적 표시를 중점으로 하기에 복잡한 비즈니스 로직 및 상태를 가질 필요가 없다. --> 함수 컴포넌트로 많이 구현한다.
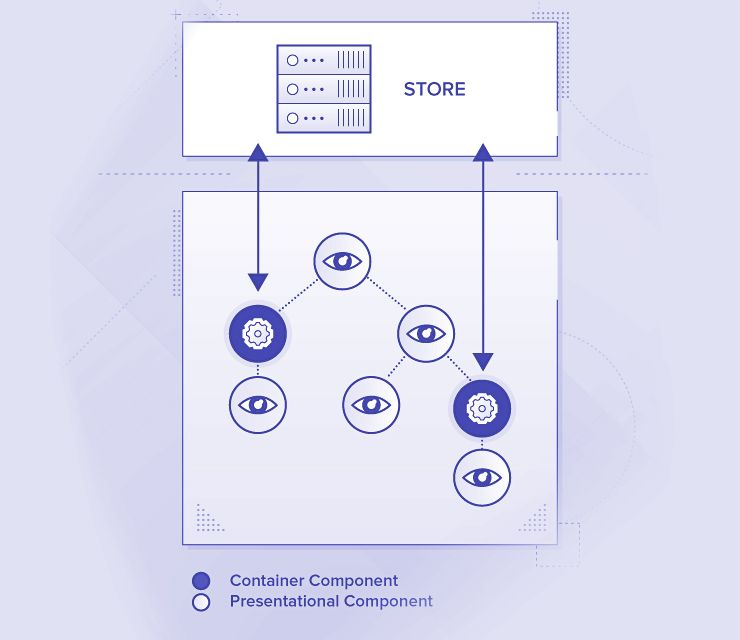
참고자료: https://medium.com/@dan_abramov/smart-and-dumb-components-7ca2f9a7c7d0
새로운 환경에서 presentational 실습
새로운 폴더에
npx degit -f yamoo9/cre . 로 환경 구성하기
index.js
import React, { StrictMode } from 'react';
import { render } from 'react-dom';
import { App } from './components';

render(
  <StrictMode>
    <App greetingMessage={'Presentational Component'} />
  </StrictMode>,
  document.getElementById('root')
);
시험삼아 yarn start 하면 정상적으로 작동되는 것을 볼 수 있음
Emoji 리액트 컴포넌트 (프레젠테이셔널)
테스팅 메서드중 beforeAll 메서드
https://jestjs.io/docs/api#beforeallfn-timeout
테스트마다 변수를 여러번 작성하지 않고 글로벌한 변수를 공유할 수 있게 만들 수 있다.
Emoji.test.js
import React from 'react';
import { render, screen } from '@testing-library/react';
import { Emoji } from './Emoji';
let wrapperNode = null;
let imageNode = null;
let props = {};
beforeAll(() => {
props.source = '/assets/emoji/oops.png';
props.label = '웁스!!';
// emoji라는 리액트 컴포넌트에 객체 형태로 전달하면 편함
const { getByTestId } = render(<Emoji {...props} />);
wrapperNode = getByTestId('wrapper');
imageNode = wrapperNode.querySelector('img');
});
describe('Emoji 컴포넌트', () => {
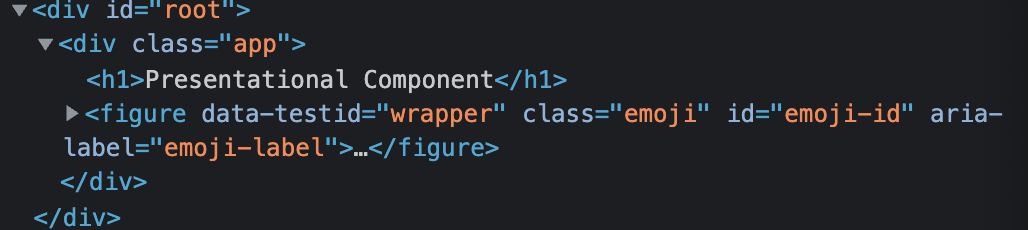
test('래퍼 요소는 figure이고, 내부에서는 img 요소가 포함되어 있다.', () => {
expect(wrapperNode.nodeName.toLowerCase()).toBe('figure');
expect(wrapperNode).toContainElement(imageNode);
});
test('figure 요소는 "emoji" 클래스 이름을 포함한다.', () => {
expect(wrapperNode).toHaveClass('emoji');
});
test('img 요소는 src, alt 속성 값을 가지며, src 속성 값은 "/assets/emoji/oops.png" 입니다.', () => {
expect(imageNode).toHaveAttribute('src', props.source);
expect(imageNode).toHaveAttribute('alt', props.label);
});
test('img 요소의 alt, title 값은 동일해야 한다.', () => {
expect(imageNode.getAttribute('alt')).toBe(imageNode.getAttribute('title'));
});
test('figure, img 요소 모두 화면에 표시되어야 한다', () => {
// beforeAll 메서드를 사용하면 작동되지 않음
screen.debug();
expect(wrapperNode).toBeVisible();
expect(imageNode).toBeVisible();
});
test('컴포넌트에 alpha, beta, gamma, zeta 클래스 prop을 설정하면 모두 반영된다.', () => {
let classNames = 'alpha beta gamma zeta';
const { getByTestId } = render(<Emoji {...props} className={classNames} />);
const figureNode = getByTestId('wrapper');
expect(figureNode.className).toBe(`emoji ${classNames}`);
});
});
위 테스트 코드에서 beforeAll 메서드로 초기 노드들을 만들게 되면 4번째 테스트의 toBeVisible() 이 부분이 작동하지 않는 오류가 존재한다.
classNames 유틸리티
npm 패키지에서 이와 관련한 라이브러리가 존재
참고: https://www.npmjs.com/package/classnames
클래스 이름을 손쉽게 병합하는 유틸리티 함수를 작성해보기
유틸리티 검사
- classNames('a', 'b', 'c') → 'a b c' 이다.
- classNames('a', { 'b': true, 'c': false }, 'd') → 'a b d' 이다.
- classNames({ a: true, b: false, c: true }) → 'a c' 이다.
src/utils/classNames.test.js
import { classNames } from './classNames';

describe('classNames 유틸리티', () => {
  test(`classNames('a', 'b', 'c')  →  'a b c' 이다.`, () => {
    expect(classNames('a', 'b', 'c')).toBe('a b c');
  });

  test(`classNames('a', { 'b': true, 'c': false }, 'd')  →  'a b d' 이다.`, () => {
    expect(classNames('a', { b: true, c: false }, 'd')).toBe('a b d');
  });

  test(`classNames({ a: true, b: false, c: true })  →  'a c' 이다.`, () => {
    expect(classNames({ a: true, b: false, c: true })).toBe('a c');
  });
});
src/utils/classNames.js
import { isObject } from './typeIs';

// rest 파라미터를 사용하여 가변 인수 받음
export const classNames = (...classNames) => {
  return classNames
    .map((className) => {
      if (isObject(className)) {
        const valueIsTrueList = Object.entries(className).filter(
          ([, value]) => value
        ); // [['b', true]]
        // fromEntries 메서드를 사용하여 키값 쌍의 목록을 객체로 바꿈
        return Object.keys(Object.fromEntries(valueIsTrueList)).join(' ');
      }
      return className;
    })
    .join(' ')
    .trim();
};
Object.fromEntries() 라는 메서드로 키값 쌍의 목록을 객체로 다시 바꿀 수 있다.
props가 여러개 들어왔을 때, 리액트에서 가변적으로 받기
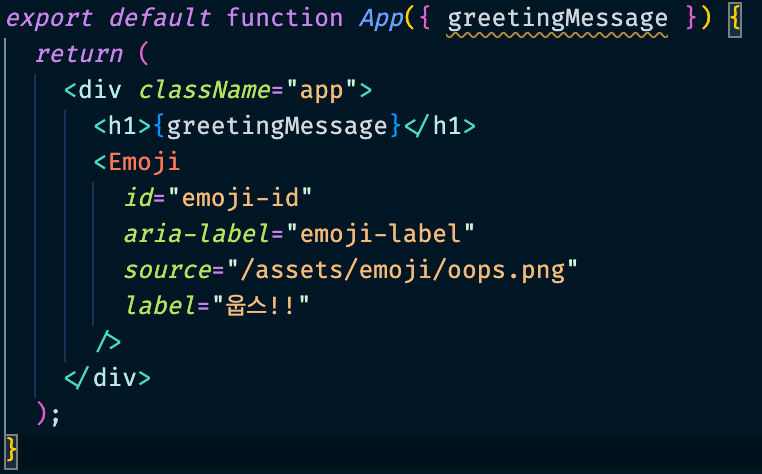
위 사진과 같이 id, aria-label과 같은 인수가 주어졌다고 가정해보자. source와 label의 경우 이미 컴포넌트에서 props로 받아서 관리하고 있지만, 나머지는 그렇지 않았다. 이럴때 rest 파라미터와 JSX안에서 rest props를 사용하면 문제를 해결할 수 있다.
import React from 'react';
import { classNames } from '../../utils/classNames';

export function Emoji({ source, label, className, ...restProps }) {
  // restProps사용하여 나머지 props 받기

// {...restProps}와 같이 사용하게 되면 명시적으로 source, label, className과 같이
// 명시되지않은 props인 id, aria-label의 값이 자동으로 들어가진다.
  return (
    <figure
      data-testid="wrapper"
      className={classNames('emoji', className)}
      {...restProps}
    >
      <img src={source} alt={label} title={label}></img>
    </figure>
  );
}

Emoji.defaultProps = {
  className: '',
};
주간 테스트
https://yamoo9.notion.site/No-3-f24c4e5070184079826deacad7b2e3cf