1 파이프라인 코드 작성
Jenkins를 이용해 파이프라인을 구축할 것이다. 우리 프로젝트는 front가 2개이기 때문에 admin 페이지 하나를 먼저 진행한 이후 나중에 user용도 구현할 예정이다.
Jenkinsfile 작성에 앞서 플러그인관리에 들어가 NodeJS Plugin을 설치해준다. 이후 글로벌 도구관리에 들어가서 다음과 같이 설정해준다. 버전은 본인이 사용하고 있는 nodejs 버전으로 진행해주면 된다.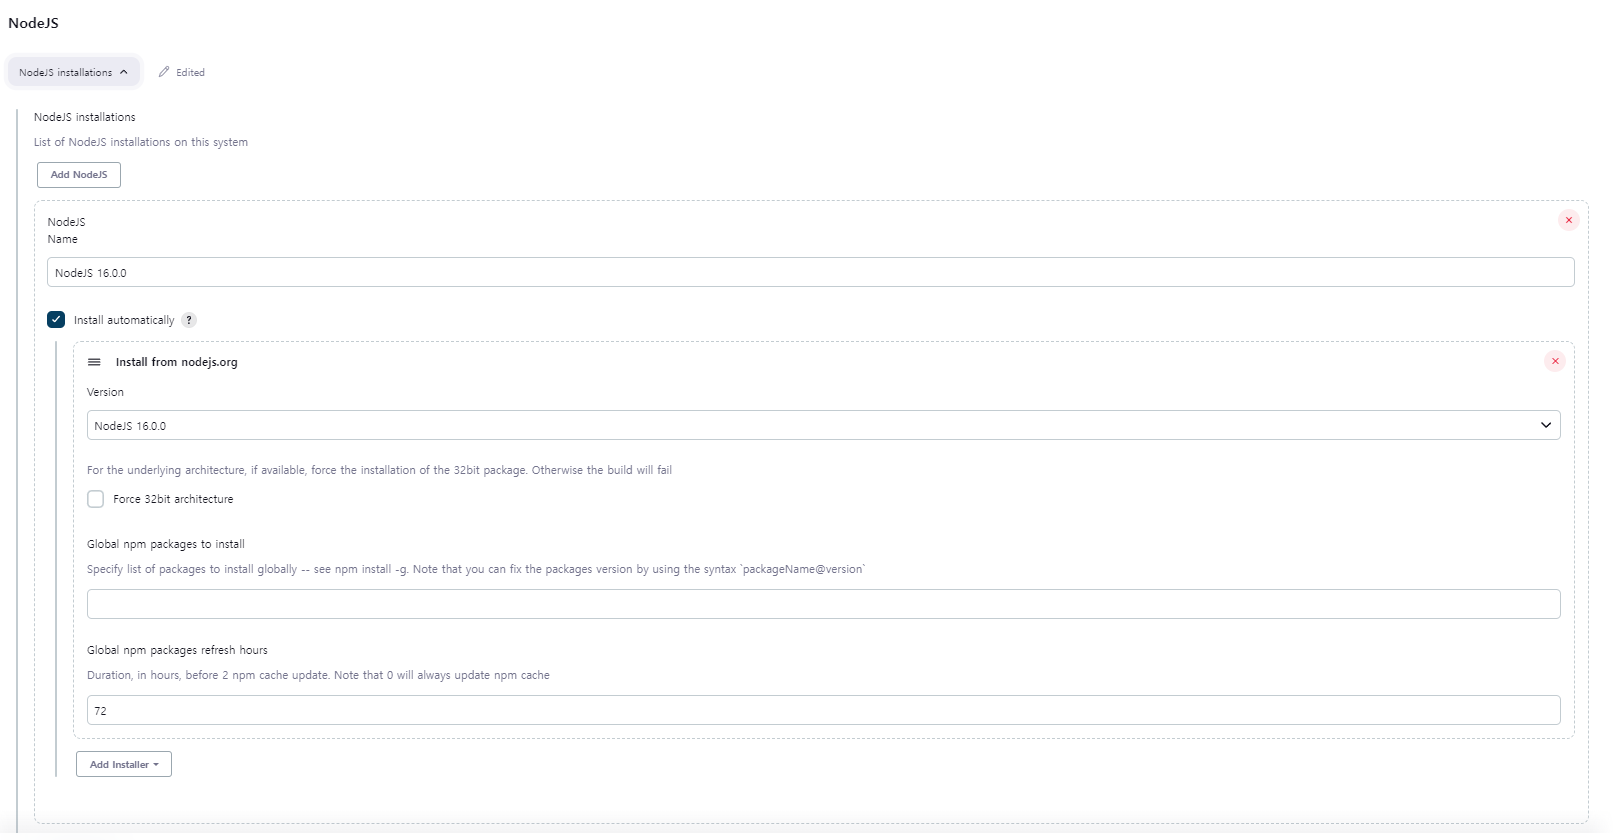
pipeline{
    agent{
        kubernetes{
yaml '''
apiVersion: v1
kind: Pod
spec:
  containers:
  - name: gradle
    image: gradle:8.0.2-jdk11
    command: ['sleep']
    args: ['infinity']
  - name: kaniko
    image: gcr.io/kaniko-project/executor:debug
    command: ['sleep']
    args: ['infinity']
    volumeMounts:
    - name: registry-credentials
      mountPath: /kaniko/.docker
  volumes:
  - name: registry-credentials
    secret:
      secretName: regcred
      items:
      - key: .dockerconfigjson
        path: config.json
'''
      }
    }

    stages{
        stage('checkout'){
          steps{
            container('gradle'){
              git branch: 'main', url:'https://github.com/suhwan12/course-registration-GoormUniversity-admin.git'
              }
            }
        }
        stage('npm install & npm Build & Docker Build & Tag Docker image'){
          steps{
            container('kaniko'){
                    sh "executor --dockerfile=Dockerfile \
                    --context=dir://${env.WORKSPACE} \
                    --destination=suhwan11/frontend:latest \
                    --destination=suhwan11/frontend:${env.BUILD_NUMBER}"
                }
            }
        }
        stage('Update K8s to New Frontend Deployment'){
          steps{
            container('gradle'){
                git branch: 'main' , url:'https://github.com/suhwan12/finalproject-argocd.git'
                sh 'sed -i "s/image:.*/image: suhwan11\\/frontend:${BUILD_NUMBER}/g" front-deployment.yaml'
                sh 'git config --global user.name suhwan12'
                sh 'git config --global user.email xman0120@naver.com'
                sh 'git config --global --add safe.directory /home/jenkins/agent/workspace/Frontend-pipeline'
                sh 'git add front-deployment.yaml'
                sh 'git commit -m "Jenkins Build Number - ${BUILD_NUMBER}"'
                withCredentials([gitUsernamePassword(credentialsId: 'github-credentials', gitToolName: 'Default')]) {
                    sh 'git push origin main'
                }
            }
          }
        }
    }
}-
Dockerfile에서 npm 설치와 빌드를 모두 진행하기 때문에 파이프라인에서 따로 진행해줄 필요 없이 kaniko를 사용하여 한번에 빌드를 진행하면 된다.
-
컨테이너 이미지를 백엔드에서 사용했던 gradle를 그대로 사용하였다. 처음에는 node로 만든 컨테이너를 사용하여 프로젝트를 빌드하였는데 여기에서 git 명령을 사용할 수 없다는 에러가 나왔다. 어차피 젠킨스에서 사용하는 컨테이너는 내부에 명령을 사용하기위해 띄어두는 것이여서 gradle 컨테이너를 사용해도 상관이 없을 것 같다.
2 Dockerfile 작성
컨테이너를 gradle로 띄었기 때문에 컨테이너 내부에서 npm install 및 빌드가 불가능하다. 따라서 도커파일 내부에서 프로젝트를 빌드하고 가져올 수 있도록 내부에서 참조할 수 있는 구조로 만들어 두었다.
FROM node:lts-alpine AS builder
WORKDIR /app
COPY package*.json ./
RUN npm install
COPY . .
RUN npm run build

FROM nginx:stable-alpine
COPY ./nginx.conf /etc/nginx/conf.d/default.conf
COPY --from=builder /app/dist /usr/share/nginx/html
EXPOSE 80
CMD ["nginx",  "-g", "daemon off;"]
3 결과 테스트
Jenkins에서 새로운 item을 생성해서 Pipeline script from SCM을 선택하고 git주소를 등록하고 main으로 변경하였다. 위에서 생성한 Jenkinsfile을 등록하였다.
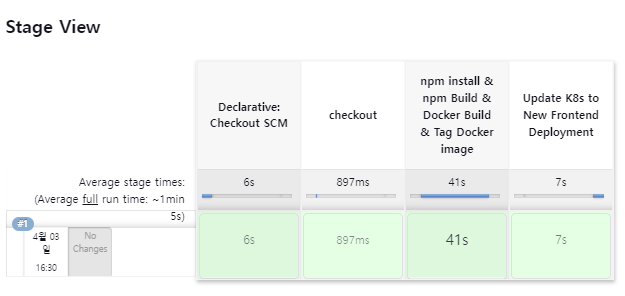
admin 페이지의 파이프 라인이 정상적으로 실행되기 때문에 같은 형식으로 admin 페이지를 빌드하는 파이프인도 똑같이 구성하면 된다.