Three.js tutorial
Three.js는 웹페이지에서 3D 콘텐츠를 최개한 쉽게 얻을 수 있도록 하는 3D 라이브러리이다.
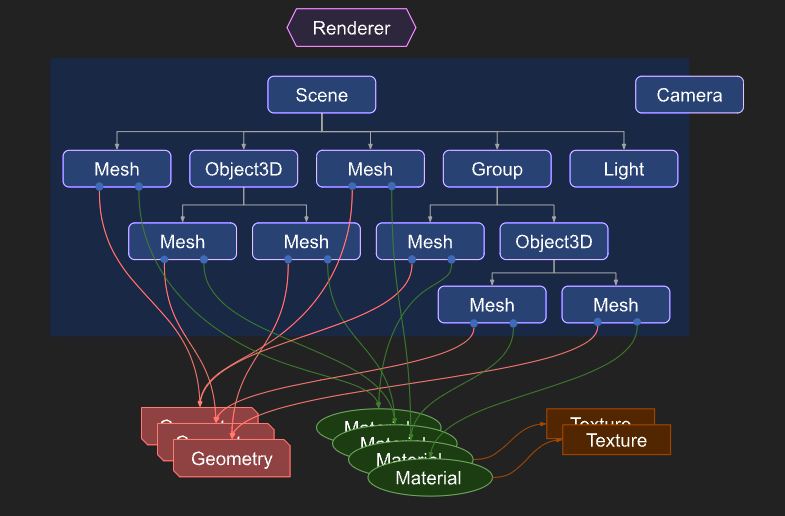
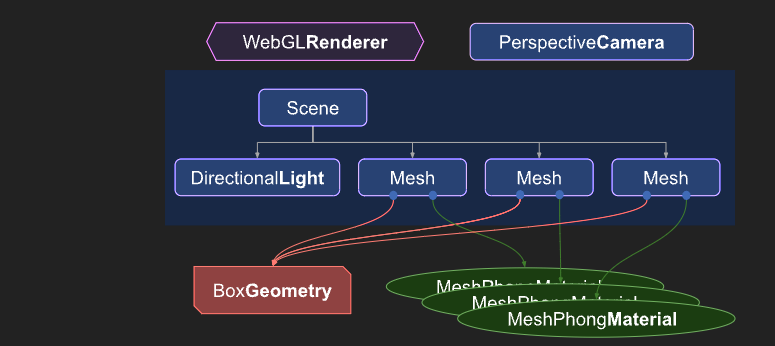
위 구조를 Renderer라고 한다.
이 구조는 three.js의 main object라고 생각하면 된다.
간단하게 설명하면 Scene이라는 것은 내가 만들 3D 객체를 표현할 장소라고 생각하면 된다.
내가 3D 이미지를 어디에 어떻게 보여주겠다고 결정하는 장소.
이 Scene에 보여줄 때 rendering된 3D image를 어떻게 보여줄 지를 결정하는 것을 camera option으로 넣는다고 생각하면 된다.
그렇다면 이 Scene에는 3D 객체가 표현이 되는데, 그 떄 이 3D 객체는 여기에서 표현하는 Mesh나 Object3D, Light 등으로 구현이 된다.
camera같은 경우는 scene처럼 다른 것들과 연관이 있는 것과 달리 독립적으로 구성이 된다.
camera는 본연의 객체로서 parent, child 구조를 가질 수 있다.
즉, main camera 밑에 sub camera가 있을 수 있다는 뜻이다.
mesh는 drawing이 된 객체인데, 3D 객체이기 때문에 점, 선, 면으로 이루어진 어떤 object가 어떤 특정 좌표, geometry에 있는 것이다.
즉, matrial과 geometry가 같이 구성되어있을 수 있고 matrial 단독, 또는 geometry 단독으로도 구성이 되어있을 수 있다.
geometry란 object인데 점 데이터, 좌표계의 점을 데이터로 표현한 것이다.
metrial은 object인데 geometry들이 합친, 연속적인 geometry를 말한 것인데 geometry를 가지고 그린 어떤 평면, 그 평면을 표현한 것을 metrial이라는 object로 선언한 것이다.
또한 texture라는 object이고 image를 싸고 있는 표면인데, 어떤 image 파일을 열었을 때 주로 쓰인다.(이 부분을 말로 설명하기는 좀 어려울 듯 하다)
light는 부가적인 옵션으로 광원효과라고 생각하면 이해하기 쉬울 것이다.
구현 방법
📦src
┣ 📜App.js
┣ 📜Three.js
┣ 📜ThreeFive.js
┗ 📜index.js
	<!DOCTYPE html>
<html lang="en">
 <head>
   <meta charset="utf-8" />
   <meta name="viewport" content="width=device-width, initial-scale=1" />
   <meta name="theme-color" content="#000000" />
   <meta
     name="description"
     content="Web site created using create-react-app"
   />
   <title>React App</title>
 </head>
 <body>
   <canvas id="c"></canvas>
   <div id="root"></div>
 </body>
</html>
/// App.js
import { Canvas } from '@react-three/fiber'; // react 버전 canvas import
import React from 'react';
import Three from './Three'; // Three.js로 js로 만든 componenet import
import ThreeFive from './ThreeFive'; // Three fiber로 react 버전 component import


function App() {
 return (
   <>
   <Three />
   <Canvas> // react 버전으로 사용하기 위한 canvas
     <ambientLight intensity={0.5} />
     <spotLight position={[10, 10, 10]} angle={0.15} penumbra={1} />
     <pointLight position={[-10, -10, -10]} />
     <ThreeFive position={[-1.2, 0, 0]} />
     <ThreeFive position={[1.2, 0, 0]} />
   </Canvas>
  </>
   );
}

export default App;
// Three.js
import React from 'react';
import * as THREE from "three";
const Three = () => {
const canvas = document.querySelector('#c');
const renderer = new THREE.WebGLRenderer({canvas});
// WebGLRenderer는 실제로 제공한 모든 데이터를 가져와 캔버스에 randering을 하는 역할을 한다.
//여기부터 카메라
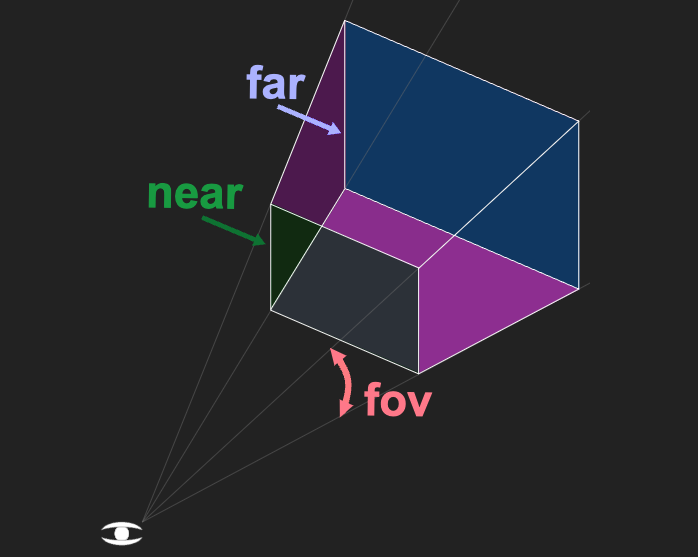
const fov = 75; // field of view의 줄임말. 이 경우는 수직 치수는 75도이다.
const aspect = 2; // 캔버스 표시 측면. 300x150 픽셀로 기본적으로 가로 세로 비율이 300/150, 2가 된다.
const near = 0.1; // near와 far는 rendering이 될 때 camera 앞의 공간을 나타냄. 해당 범위 이전이나 이후에 있는 모든 항목은 잘라낸다.
const far = 5;
const camera = new THREE.PerspectiveCamera(fov, aspect, near, far);
camera.position.z = 2; // x, y, z에서 z가 우리 눈과 수평.
const scene = new THREE.Scene(); // scene 그래프에서의 최상단, 보여주는 공간 method.
const boxWidth = 1;
const boxHeight = 1;
const boxDepth = 1;
const geometry = new THREE.BoxGeometry(boxWidth, boxHeight, boxDepth); // box 자체를 만드는 method
// const material = new THREE.MeshBasicMaterial({color: 0x44aa88}); // 가장 기본적인 material을 만드는 Method. 조명의 영향을 받지 않는 method. 색을 넣을 수 있다.
const material = new THREE.MeshPhongMaterial({color: 0x44aa88});
const cube = new THREE.Mesh(geometry, material); // mesh로 cube를 만든 것인데, 여기서 Mesh는 geometry(object 모양), meterial은 geometry의 수치에 따라 다양한 느낌(질감, 색상 등)을 표현하는 것. 다양한 옵션이 있다.
scene.add(cube); //scene에 cube를 추가
renderer.render(scene, camera); // scene과 camera를 전달하면 카메라 절두체 내부에 있는 3D 장면의 일부를 캔버스에 2D 이미지로 renderer(랜더링)을 한다.
const render = (time) => {
time *= 0.001;
cube.rotation.x = time;
cube.rotation.y = time;
// cubes.forEach((cube, ndx) => {
// const speed = 1 + ndx * .1;
// const rot = time * speed;
// cube.rotation.x = rot;
// cube.rotation.y = rot;
// });
renderer.render(scene, camera);
requestAnimationFrame(render); // loop를 도는 것
}
requestAnimationFrame(render); // 지속적으로 루프를 돌게 만듬.
// 방향 조명
const color = 0xFFFFFF;
const intensity = 1;
const light = new THREE.DirectionalLight(color, intensity);
light.position.set(-1, 2, 4); // 왼쪽, 위, 뒤
scene.add(light)
// // 새로운 큐브
// const makeInstance = (geometry, color, x) => {
// const material = new THREE.MeshPhongMaterial({color});
// const cube = new THREE.Mesh(geometry, material);
// scene.add(cube);
// cube.position.x = x;
// return cube;
// }
// const cubes = [
// makeInstance(geometry, 0x44aa88, 0),
// makeInstance(geometry, 0x8844aa, -2),
// makeInstance(geometry, 0xaa8844, 2),
// ];
};
export default Three;
최종적 구조