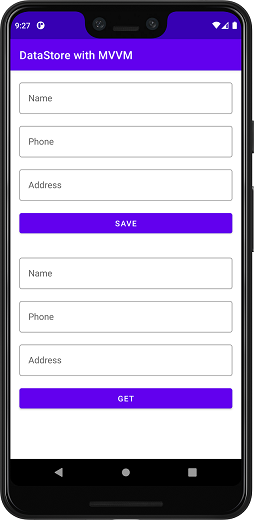
EditText에 작성된 데이터를 DataStore을 이용해 저장하고 GET Button을 눌렀을 때 아래에
있는 칸에 저장된 데이터를 가지고 오는 프로젝트를 설명하겠습니다.
사용기술
- DataBinding
- MVVM
- Dagger-Hilt
- Coroutine
build.gradle
buildgradle(Module)에서
다음의 라이브러리 들을 추가 해줍니다.
버전의 차이가 있을 수 있습니다.
dependencies{
 //DataStore
    implementation "androidx.datastore:datastore-preferences:1.0.0"

    // Lifecycle
    implementation "androidx.lifecycle:lifecycle-viewmodel-ktx:2.4.0"

    // Activity KTX for viewModels()
    implementation "androidx.activity:activity-ktx:1.4.0"

    //Dagger - Hilt
    implementation 'com.google.dagger:hilt-android:2.38.1'
    kapt 'com.google.dagger:hilt-compiler:2.38.1'
    implementation 'androidx.hilt:hilt-lifecycle-viewmodel:1.0.0-alpha03'

}
그리고 DataBinding을 사용하기 위해
android{
	buildFeatures {
    	dataBinding = true
    }
도 추가해줍니다.
그리고 plugins들도 추가해줍니다.
plugins {
	id 'kotlin-kapt'
    id 'dagger.hilt.android.plugin'
    }
다음은 build.gradle(project)에서 dagger-hilt의 classpath를 넣어줍니다.
dependencies {
	  classpath 'com.google.dagger:hilt-android-gradle-plugin:2.38.1'
      }
Android Studio의 버전이 바뀌었다면 setting.gradle에서 선언을 해야하는 것으로 알고있습니다.
repository 생성
저장될 데이터의 data class를 생성합니다.
Phonbook.kt(data class)
data class Phonebook(val name:String,
val address:String , val phone:String)
이제 DataStore에 값을 저장하고 가지고 오는 동작을 하는 Abstract 인터페이스를 생성합니다.
Abstract
interface Abstract {

    suspend fun savePhoneBook(phonebook: Phonebook)

    suspend fun getPhoneBook() : Flow<Phonebook>
}
DataStore에서 값을 가지고 올때는 Flow를 통해 가져올 수 있기때문에 Flow 속성을 통해 Phonebook의 data를 가지고 옵니다.
Flow는 데이터 스트림으로 리액티브 프로그래밍을 지원하기 위해 만들어진 구현체입니다.
추후에 Flow에 관한 글을 작성하도록 하겠습니다.
인터페이스를 상속받아 동작을 정의해줍니다.
ImplRepository.kt
const val DataStore_NAME = "PHONEBOOK"

val Context.datastore: DataStore<Preferences> by preferencesDataStore(name = DataStore_NAME)


class ImplRepository(private val context: Context) : Abstract {


    companion object {
        val NAME = stringPreferencesKey("NAME")
        val PHONE_NUMBER = stringPreferencesKey("PHONE")
        val address = stringPreferencesKey("ADDRESS")
    }

    override suspend fun savePhoneBook(phonebook: Phonebook) {
        context.datastore.edit { phonebooks ->
            phonebooks[NAME] = phonebook.name
            phonebooks[PHONE_NUMBER] = phonebook.phone
            phonebooks[address] = phonebook.address

        }

    }

    override suspend fun getPhoneBook() = context.datastore.data.map { phonebook ->
        Phonebook(
            name = phonebook[NAME]!!,
            address = phonebook[address]!!,
            phone = phonebook[PHONE_NUMBER]!!
        )
    }
}
DataStore의 키 값을 생성할때는 저장되는 타입 + PreferencesKey를 더해주면 됩니다. 위에 보시면 stringPreferencesKey String 타입의 Key를 생성하고 그 Key를 NAME에 저장하였습니다.
저장하는 경우 eidt{}함수로 정의해주는데 코루틴을 지원하기에 suspend를 붙여준 후 이름에 맞게 데이터를 저장을 해줍니다.
저장된 데이터를 받아오는 경우에는 data에 map을 통해 가지고 오는 형식에 맞게 데이터를 이어줍니다.
Module
Dagger-Hilt를 사용하기 위해 Module을 생성해줍니다.
DataModule
@Module
@InstallIn(SingletonComponent::class)
object DataModule {

    @Singleton
    @Provides
    fun provideDataStoreRepository(@ApplicationContext context: Context)= ImplRepository(context)
}
DataModule에@InstallIn(SingletonComponent::class)를 작성하여 싱글톤형식으로 생성합니다.
@Provide의 경우 클래스가 외부라이브러리에서 제공되므로 클래스를 소유하지 않는경우(Retrofit, OkHttpClient 또는 Room) 또는 빌더 패턴으로 인스턴스를 생성해야하는 경우 생성자 삽입이 불가능하기에 @Provide를통해 종속항목을 Hilt에게 알려줍니다.
ViewModel
다음은 ViewModel입니다.
@HiltViewModel
class ActivityViewModel @Inject constructor(private  val implRepository: ImplRepository): ViewModel() {

    var phone : MutableLiveData<String> = MutableLiveData("")
    var address : MutableLiveData<String> = MutableLiveData("")
    var name : MutableLiveData<String> = MutableLiveData("")

    var phonebook : MutableLiveData<Phonebook> = MutableLiveData()

    fun saveData(){
        viewModelScope.launch(Dispatchers.IO) {
            implRepository.savePhoneBook(
                Phonebook(
                    phone = phone.value!!,
                    address = address.value!!,
                    name = name.value!!
                )
            )
        }
    }

    fun retrieveDate(){
        viewModelScope.launch(Dispatchers.IO) {
            implRepository.getPhoneBook().collect{
                phonebook.postValue(it)
            }
        }
    }
}
@Inject를 통해 생성자 삽입을 하여 결합 정보를 Hilt에게 넘겨주고 MVVM 패턴에 맞게 MutableLiveData를 통해 View에는 Read-Only data를 넘겨주게 됩니다. 또한 Dispatchers.IO를 통해 Coroutine를 동작시켜 줍니다. collect의 경우 순차적인 Coroutine동작을 위해 사용합니다.
save 요청을 한 후 바로 get의 요청을 수행한다고 과정을 해봅시다. save의 경우 데이터가 커서 동작을 수행하고 있습니다. 그 사이 바로 get을 요청한다면? Room에서는 데이터가 없기에 아무런 변화가 일어나지 않을 것입니다. 그렇기에
collect를 활용하여 Coroutine 동작내에서 순차 요청이 된 suspend fun을 처리하도록 도와주어 뒤에서 리액트한 동작을 수행할 수 있도록 도와줍니다.
순차적이지 않고(앞에 요청의 처리가 덜 되더라도) 요청에따라 동작을 수행하고 싶다면 collectLatest를 사용하면 됩니다.
MainActivity
@AndroidEntryPoint
class MainActivity : AppCompatActivity() {

    private lateinit var binding:ActivityMainBinding
    private val activityViewModel : ActivityViewModel by viewModels()

    override fun onCreate(savedInstanceState: Bundle?) {
        super.onCreate(savedInstanceState)
        binding = ActivityMainBinding.inflate(layoutInflater)
        setContentView(binding.root)
        binding.lifecycleOwner = this
        binding.viewModel = activityViewModel
    }
}
MVVM구조에 따르면 viewModel은 repositroy를 사용하기 때문에 파라미터로 받아야합니다 즉 종속성이 있어야한다는 것입니다. 그렇기 Activity에 @AndroidEntryPoint를 달아줘 Hilt로부터 제공받아 종속성을 해결합니다.
또한 binding.lifecycleOwner = this
binding.viewModel = activityViewModel를 통해 DataBinding이 동작을 할 수 있게해줍니다.
binding.lifecycleOwner = this :이 코드는 LiveData를 DataBinding으로 사용할 때 사용하는데 Observable대신에 사용합니다.
layout
<?xml version="1.0" encoding="utf-8"?>
<layout xmlns:android="http://schemas.android.com/apk/res/android"
    xmlns:app="http://schemas.android.com/apk/res-auto"
    xmlns:tools="http://schemas.android.com/tools">

    <data>

        <variable
            name="viewModel"
           type="com.example.datastorewithmvvm.viewmodel.ActivityViewModel"/>
    </data>

    <LinearLayout
        android:layout_width="match_parent"
        android:orientation="vertical"
        android:layout_height="match_parent"
        tools:context=".MainActivity">


        <com.google.android.material.textfield.TextInputLayout
            style="@style/Widget.MaterialComponents.TextInputLayout.OutlinedBox"
            android:hint="Name"
            android:layout_width="match_parent"
            android:layout_height="wrap_content"
            android:layout_marginStart="16dp"
            android:layout_marginTop="16dp"
            android:layout_marginEnd="16dp"
            app:layout_constraintEnd_toEndOf="parent"
            app:layout_constraintStart_toStartOf="parent"
            app:layout_constraintTop_toTopOf="parent">

            <com.google.android.material.textfield.TextInputEditText
                android:id="@+id/tvvname"
                android:text="@={viewModel.name}"
                android:layout_width="match_parent"
                android:layout_height="wrap_content" />
        </com.google.android.material.textfield.TextInputLayout>

        <com.google.android.material.textfield.TextInputLayout

            style="@style/Widget.MaterialComponents.TextInputLayout.OutlinedBox"
            android:hint="Phone"
            android:id="@+id/phone"
            android:layout_width="match_parent"
            android:layout_height="wrap_content"
            android:layout_marginStart="16dp"
            android:layout_marginTop="16dp"
            android:layout_marginEnd="16dp"
            app:layout_constraintEnd_toEndOf="parent"
            app:layout_constraintStart_toStartOf="parent"
            app:layout_constraintTop_toTopOf="parent">

            <com.google.android.material.textfield.TextInputEditText
                android:id="@+id/tvphonr"
                android:layout_width="match_parent"
                android:text="@={viewModel.phone}"
                android:layout_height="wrap_content" />
        </com.google.android.material.textfield.TextInputLayout>

        <com.google.android.material.textfield.TextInputLayout

            style="@style/Widget.MaterialComponents.TextInputLayout.OutlinedBox"
            android:hint="Address"
            android:id="@+id/cardView"
            android:layout_width="match_parent"
            android:layout_height="wrap_content"
            android:layout_marginStart="16dp"
            android:layout_marginTop="16dp"
            android:layout_marginEnd="16dp"
            app:layout_constraintEnd_toEndOf="parent"
            app:layout_constraintStart_toStartOf="parent"
            app:layout_constraintTop_toTopOf="parent">

            <com.google.android.material.textfield.TextInputEditText
                android:id="@+id/tvAddress"
                android:text="@={viewModel.address}"
                android:layout_width="match_parent"
                android:layout_height="wrap_content" />
        </com.google.android.material.textfield.TextInputLayout>

        <Button
            android:id="@+id/save"
            android:layout_margin="16dp"
            android:layout_width="match_parent"
            android:text="Save"
            android:onClick="@{() -> viewModel.saveData()}"
            android:layout_height="wrap_content" />

        <LinearLayout
            android:layout_width="match_parent"
            android:orientation="vertical"
            android:layout_height="match_parent"
            tools:context=".MainActivity">


            <com.google.android.material.textfield.TextInputLayout

                style="@style/Widget.MaterialComponents.TextInputLayout.OutlinedBox"
                android:hint="Name"
                android:layout_width="match_parent"
                android:layout_height="wrap_content"
                android:layout_marginStart="16dp"
                android:layout_marginTop="16dp"

                android:layout_marginEnd="16dp"
                app:layout_constraintEnd_toEndOf="parent"
                app:layout_constraintStart_toStartOf="parent"
                app:layout_constraintTop_toTopOf="parent">

                <com.google.android.material.textfield.TextInputEditText
                    android:id="@+id/tvxname"
                    android:text="@{viewModel.phonebook.name}"
                    android:layout_width="match_parent"
                    android:layout_height="wrap_content" />
            </com.google.android.material.textfield.TextInputLayout>

            <com.google.android.material.textfield.TextInputLayout

                style="@style/Widget.MaterialComponents.TextInputLayout.OutlinedBox"
                android:hint="Phone"
                android:id="@+id/tvxphone"
                android:layout_width="match_parent"
                android:layout_height="wrap_content"
                android:layout_marginStart="16dp"
                android:layout_marginTop="16dp"
                android:layout_marginEnd="16dp"
                app:layout_constraintEnd_toEndOf="parent"
                app:layout_constraintStart_toStartOf="parent"
                app:layout_constraintTop_toTopOf="parent">

                <com.google.android.material.textfield.TextInputEditText
                    android:id="@+id/tvcphonr"
                    android:text="@{viewModel.phonebook.phone}"
                    android:layout_width="match_parent"
                    android:layout_height="wrap_content" />
            </com.google.android.material.textfield.TextInputLayout>

            <com.google.android.material.textfield.TextInputLayout

                style="@style/Widget.MaterialComponents.TextInputLayout.OutlinedBox"
                android:hint="Address"
                android:id="@+id/cardxView"
                android:layout_width="match_parent"
                android:layout_height="wrap_content"
                android:layout_marginStart="16dp"
                android:layout_marginTop="16dp"
                android:layout_marginEnd="16dp"
                app:layout_constraintEnd_toEndOf="parent"
                app:layout_constraintStart_toStartOf="parent"
                app:layout_constraintTop_toTopOf="parent">

                <com.google.android.material.textfield.TextInputEditText
                    android:id="@+id/tvxAddress"
                    android:layout_width="match_parent"
                    android:text="@{viewModel.phonebook.address}"
                    android:layout_height="wrap_content" />
            </com.google.android.material.textfield.TextInputLayout>

            <Button
                android:id="@+id/get"
                android:layout_margin="16dp"
                android:layout_width="match_parent"
                android:text="Get"
                android:onClick="@{() ->viewModel.retrieveDate()}"
                android:layout_height="wrap_content" />


        </LinearLayout>

    </LinearLayout>
</layout>
layout의 경우는 코드로만 남겨두겠습니다.
전체 코드를 보고 싶으시다면 제 깃허브에 방문해주세요