
🌱Intro
- 이번 장에서는 먼저 JSON이란 무엇인지 알아보겠습니다.
- JSON 표기 방식과 직렬화(JSON.stringify()), 역직렬화(JSON.parse())하는 방법에 대해서도 보겠습니다.
- 또 Fetch API에 대해서 알아보겠습니다.
- 마지막으로 Fetch API를 GET 방식과 POST 방식으로 가상 서버(json-server)와 통신하는 방법을 살펴보겠습니다.
🌱1. JSON이란?
- JSON(JavaScript Object Notation)은 속성-값 쌍(attribute–value pairs), 배열 자료형(array data types) 또는 기타 모든 시리얼화 가능한 값(serializable value) 또는 "키-값 쌍"으로 이루어진 데이터 오브젝트를 전달하기 위해 인간이 읽을 수 있는 텍스트를 사용하는 개방형 표준 포맷입니다.
- 비동기 브라우저/서버 통신 (AJAX)을 위해, 넓게는 XML(AJAX가 사용)을 대체하는 주요 데이터 포맷입니다.
- 특히, 인터넷에서 자료를 주고 받을 때 그 자료를 표현하는 방법으로 알려져 있습니다.
- 자료의 종류에 큰 제한은 없으며, 특히 컴퓨터 프로그램의 변수값을 표현하는 데 적합합니다. - Wikipedia
- 즉, JSON은 클라이언트와 서버 간의 HTTP 통신을 위한 텍스트 데이터 포맷입니다.
- 대부분의 프로그래밍 언어에서 사용가능 합니다.
1-1. 표기 방식
- JSON은 키와 값으로 구성되어있습니다.
const obj = {
  name: 'harimad',
  age: '10',
  alive: true,
  hobby: ['space', 'ocean']
}
1-2. JSON.stringify()
- 이 함수는 객체 또는 배열을 JSON 포맷의 문자열로 변환시켜줍니다.
- 직렬화(serializing)라고도 부릅니다.
- 클라이언트가 서버로 객체를 전송하려면 객체를 문자열화 해야하는데, 이를 직렬화라고도 합니다.
- 객체 → JSON
const json = JSON.stringify(obj)
console.log(json) // {"name":"harimad","age":"10","alive":true,"hobby":["space","ocean"]}- 배열 → JSON
const person = [
  { id: 1, name: "Kim", age: 20 },
  { id: 2, name: "Lee", age: 30 },
  { id: 3, name: "Park", age: 40 }
];
const json2 = JSON.stringify(person)
console.log(json2) // [{"id":1,"name":"Kim","age":20},{"id":2,"name":"Lee","age":30},{"id":3,"name":"Park","age":40}]
1-3. JSON.parse()
- 이 함수는 JSON 포맷의 무자열을 객체로 변환시켜 줍니다.
- 역직렬화(deserializing)라고도 부릅니다.
- 서버로부터 클라이언트에게 전송된 JSON 데이터는 문자열 타입입니다.
- 이 문자열을 객체로 사용하려면 JSON 포맷의 문자열을 객체화 해야 하는데, 이를 역직렬화라고 합니다.
- JSON 포맷 문자열 → 객체
// JSON.parse() - 1
const obj3 = {
  name: "Soo",
  age: 20,
  alive: true,
  hobby: ["traveling", "piano"]
};
const json3 = JSON.stringify(obj3)
const parsed = JSON.parse(json3)
console.log(parsed) // {name: 'Soo', age: 20, alive: true, hobby: Array(2)}- JSON 포맷 문자열 → 배열
const person2 = [
  { id: 1, name: "Soo", age: 20 },
  { id: 2, name: "Kim", age: 30 },
  { id: 3, name: "Lee", age: 40 }
];
// 직렬화
const json4 = JSON.stringify(person)
// 역직렬화
const parsed2 = JSON.parse(json4)
console.log(parsed2); // (3) [{…}, {…}, {…}]
🌱2. Fetch API
2-1. Fetch API란?
- 요청과 응답 등의 요소를 자바스크립트에서 접근하고 조작할 수 있는 인터페이스를 제공해 줍니다.
- fetch() 메서드로 네트워크의 리소스를 쉽게 비동기적으로 가져올 수 있습니다.
2-2. fetch() 메서드
// Syntax
fetch(resource, options)

// Example
fetch(url, options)
  .then(response => console.log(respons))
  .catch(error => console.log(error))
2-3. fetch()로 데이터 읽기1 - response 객체
<!-- fetch.html -->
<body>
	<script src="fetchAPI.js"></script>
</body>
<script>
  fetch('https://jsonplaceholder.typicode.com/todos/1')
    .then(response=> console.log(response))
    .catch(error => console.log(error))
</script>-
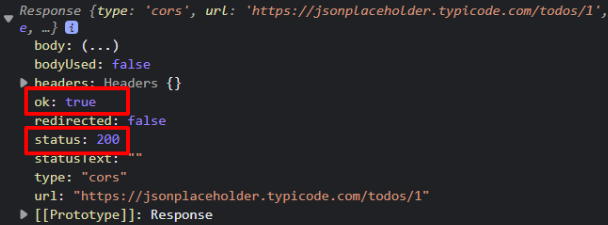
실행결과로 response 객체가 출력됩니다.
-
response 객체는 다음과 같은 특징이 있습니다.
- HTTP 응답 상태(status), HTTP 응답 헤더(headers), HTTP 응답 전문(body) 등을 포함합니다.
- JSON 문자열 형태로 변환을 해줘야 처리가 가능합니다.
- 아래의 2-4. 에서 처럼 response → JSON 형태로 파싱해 줘야 데이터를 읽을 수 있게 됩니다.
- response 객체 메서드는 대표적으로 3가지가 있습니다.
- response.text() : 응답을 텍스트 형태로 변환
- response.json() : 응답을 JSON 현태로 반환
- response.formData() : 응답을 FormData 객체 형태로 반환
2-4. fetch()로 데이터 읽기2 - 데이터 처리
- body 태그 안에 fetch.js 파일을 추가합니다.
<!-- fetch.html -->
<body>
	<script src="fetchAPI.js"></script>
</body>- Mock(가짜) 데이터를 서버에서 받아올 수 있게 jsonplaceholder를 URL로 사용합니다.
// fetch.js

// 방법 1 - fetch
fetch('https://jsonplaceholder.typicode.com/todos/1')
  .then(response => response.json())
  .then(data => console.log(data)) // {userId: 1, id: 1, title: 'delectus aut autem', completed: false}
  .catch(error => console.log(error))

// 방법 2 - async/await
async function foo() {
  const res = await fetch('https://jsonplaceholder.typicode.com/posts/1')
  const data = await res.json()
  console.log(data)
}

foo() // {userId: 1, id: 1, title: 'sunt aut facere repellat provident occaecati excepturi optio reprehenderit', body: 'quia et suscipit\nsuscipit recusandae consequuntur …strum rerum est autem sunt rem eveniet architecto'}
🌱3. Fetch API - GET
- 간단한 REST API server를 사용하기 위해서 json-server 를 이용해 보겠습니다.
- json-server란 json 파일을 사용해서 간단한 테스트를 위한 REST API server를 구축할 수 있는 패키지 입니다.
- 먼저 Node.js가 설치 되어 있어야 합니다.
- 그 다음에 json-server를 터미널에서 설치합니다.
npm install -g json-server - 실행
json-server --watch 파일명 --port 포트번호 - fetch() 메서드를 이용한 GET 방식 호출을 해보겠습니다.
- fetch() 메서드는 디폴트로 GET 방식으로 작동합니다.
- 메서드 호출 시, 별도의 옵션을 추가하지 않아도 됩니다.
- 로컬 JSON 파일을 읽어오겠습니다.
// db.json
{
  "users": [
    {
      "id": 1,
      "name": "Leanne Graham",
      "email": "Sincere@april.biz",
      "phone": "1-770-736-8031 x56442",
      "website": "hildegard.org"
    },
    {
      "id": 2,
      "name": "Ervin Howell",
      "email": "Shanna@melissa.tv",
      "phone": "010-692-6593 x09125",
      "website": "anastasia.net"
    },
    {
      "id": 3,
      "name": "Clementine Bauch",
      "email": "Nathan@yesenia.net",
      "phone": "1-463-123-4447",
      "website": "ramiro.info"
    }
  ]
}- HTML 파일
<body>
  <table>
    <thead>
      <tr>
        <th>ID</th>
        <th>Full Name</th>
        <th>Email</th>
        <th>Phone</th>
        <th>Web Site</th>
      </tr>
    </thead>
    <tbody></tbody>
  </table>
</body>- JS 파일
const $tbody = document.querySelector('tbody')

const makeRow = obj => {
  let result = ''
  obj.forEach(item => {
    result += `
		<tr>
			<td>${item.id}</td>
			<td>${item.name}</td>
			<td>${item.email}</td>
			<td>${item.phone}</td>
			<td>${item.website}</td>
		</tr>
		`
  })

  $tbody.innerHTML = result
}

// 1. 게시판 만들기 (READ)
// async/await
const getData = async () => {
  const response = await fetch('http://localhost:5050/users')
  const data = await response.json()
  makeRow(data)
}
getData()- 실행결과

🌱4. Fetch API - POST
- fetch() 메서드를 이용한 POST 방식 호출을 진행해 보겠습니다.
- fetch() 메서드의 두 번째 매개변수 options를 이용합니다.
- options는 대표적인 속성으로 method, headerss, body가 있습니다.
- method는 데이터 전송 방식, headers는 HTTP 요청 헤더, body는 HTTP 요청 전문을 의미합니다.
- 이제 사용자 정보를 추가하는 기능을 만들어 보겠습니다.
4-1. form 태그로 사용자 추가하기
- HTML 코드
	<!-- Form -->
<form class="form-container">
  <div>
    <label for="userName">Enter your userName: </label>
    <input type="text" name="name" id="userName">
  </div>
  <div>
    <label for="userEmail">Enter your email: </label>
    <input type="email" name="email" id="userEmail">
  </div>
  <div>
    <label for="userPhone">Enter your userPhone: </label>
    <input type="tel" name="phone" id="userPhone" r>
  </div>
  <div>
    <label for="userWebsite">Enter your userWebsite: </label>
    <input type="text" name="website" id="userWebsite">
  </div>
  <div>
    <button type="submit">전송</button>
  </div>
</form>
<script src="jsonserver.js"></script>- JS 코드
const $form = document.querySelector('.form-container') // form 태그 찾기

$form.addEventListener('submit', e => { // submit 이벤트 처리
  e.preventDefault() // 디폴트 행동 제거(새로고침 방지)
  const formData = new FormData($form) // FormData 객체 생성)
  const userInfo = new URLSearchParams(formData) // URLSearchParams 객체 생성

  fetch(`http://localhost:5050/users`, { // 서버에 데이터 전송
    method: 'POST',
    body: userInfo,
  	})
  .then(res => res.json())
  .then(data => console.log(data))
  .catch(err => console.log(err))

  getData()
})
4-2. div 태그로 사용자 추가하기
- form 태그로 서버에 데이터를 POST하는 방식도 있지만, 일반적인 div태그로도 POST방식을 구현할 수 있습니다.
- HTML 코드
<div>
  <div>
    <label for="userName">Enter your userName: </label>
    <input type="text" name="userName" id="userName" />
  </div>
  <div>
    <label for="userEmail">Enter your email: </label>
    <input type="email" name="userEmail" id="userEmail" />
  </div>
  <div>
    <label for="userPhone">Enter your userPhone: </label>
    <input type="tel" name="userPhone" id="userPhone" />
  </div>
  <div>
    <label for="userWebsite">Enter your userWebsite: </label>
    <input type="text" name="userWebsite" />
  </div>
  <div>
    <button id="submitBtn">전송</button>
  </div>
</div>- JS 코드
const $userName = document.querySelector('#userName')
const $userEmail = document.querySelector('#userEmail')
const $userPhone = document.querySelector('#userPhone')
const $userWebsite = document.querySelector('#userWebsite')
const $submitBtn = document.querySelector('#submitBtn')

const createData = async (data = {}) => {
  let res = await fetch(`http://localhost:5050/users`, {
    method: 'POST', // *GET, POST, PUT, DELETE 등
    headers: {
      'Content-Type': 'application/json',
    },
    body: JSON.stringify(data),
  })
  return res.json()
}
$submitBtn.addEventListener('click', () => {
  createData({
    name: $userName.value,
    email: $userEmail.value,
    phone: $userPhone.value,
    website: $userWebsite.value,
  })
  getData()
})-
실행결과1 (입력 전)
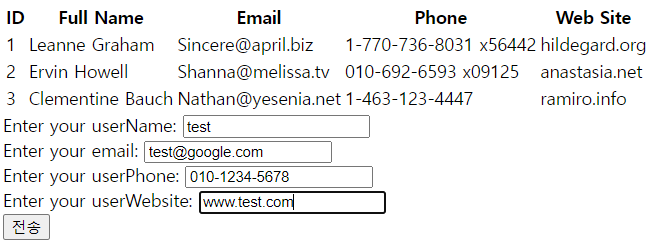
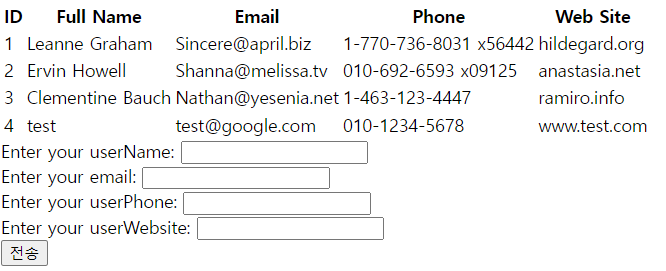
-
실행결과2 (입력 후 -> 입력값 추가됨)
🌱나가면서
- 지금까지 JSON이 무엇인지 알아보고 JSON의 표기 방식에 대해서 알아보았습니다.
- 그리고 Fetch API 개념을 익히고나서 가상서버인 json-server를 통해서 서버통신 방식 중 GET과 POST 방식을 사용해 보았습니다.
- 추가로 알아보고 싶은 내용은 참고사항에 기재된 추가 링크를 참조하시길 바랍니다.
긴글 읽으시느라 수고하셨습니다.😊
🌱참고
- Wikipedia - JSON
- MDN - Fetch 사용하기
- JSON Server
- Nodo.js
- RESTful API란 무엇인가요?
- MDN - FormData()
- MDN - URLSearchParams
'새싹DT 기업연계형 프론트엔드 실무 프로젝트 과정 5주차 블로그 포스팅'

Here and Now. 🧗♂️