현재 보이는 화면을 PDF로 변환하여 출력하는 기능을 구현했다. 사용한 라이브러리는 html2canvas jspdf 이 두개! 약간 PDF 구현할때 국룰 라이브러리 같다..ㅋㅋ
html2canvas 는 DOM요소를 이미지로 변환해주는 라이브러리고 jspdf 는 이미지를 PDF로 변환해주는 라이브러리이다. 간단하게 말하자면 요소를 캡처해서 문서로 만드는거다.
기존 코드
기존 구현된 코드는 pdf로 캡쳐할 부분을 div로 감싸고 해당 div에 ref를 달아서 페이지 전체를 캡처하는 느낌이었다.
// 캡쳐하는 부분
<div ref={pdfRef} >
....
</div>
// PDF 캡처 훅
// 이곳에 있는 ref를 대상 엘리먼트에 연결
export const usePdfDownload = (options?: PdfDownloadOptions): PdfDownloadReturn => {
const targetRef = useRef<HTMLDivElement>(null)
const [isLoading, setIsLoading] = useState(false)
const [error, setError] = useState<string | null>(null)
const filename = `${title}.pdf`
// 에러 상태 초기화
const reset = useCallback(() => {
setError(null)
}, [])
// PDF 생성 및 다운로드
const downloadPdf = useCallback(async () => {
const target = targetRef.current
if (!target) {
setError('대상 엘리먼트를 찾을 수 없습니다')
return
}
setIsLoading(true)
try {
setError(null)
const imageData = await captureToCanvas(target)
const { pdf, pdfWidth, pdfHeight } = setupPdf(dashboardName)
const { imgWidth, imgHeight } = processImage(pdf, imageData, pdfWidth)
addPdfPages(pdf, imageData, imgWidth, imgHeight, pdfHeight)
pdf.save(filename)
} catch (err) {
const errorMessage = err instanceof Error ? err.message : 'PDF 생성 중 오류가 발생했습니다'
setError(errorMessage)
} finally {
setIsLoading(false)
}
}, [dashboardName, filename])
return {
targetRef,
downloadPdf,
isLoading,
error,
reset,
}
}// pdf 캡처 유틸함수들
// 각각 이미지캡처 설정과 pdf생성 설정 함수, pdf에 이미지 넣는 함수이다.
export const captureToCanvas = async (target: HTMLDivElement) => {
const canvas = await html2canvas(target, {
scale: 1.5,
logging: false,
scrollX: 0,
scrollY: -window.scrollY,
useCORS: true,
imageTimeout: 15000,
willReadFrequently: true,
})
return canvas.toDataURL('image/png', 0.8)
}
export const setupPdf = (dashboardName: string) => {
const pdf = new jsPDF({
orientation: 'p',
unit: 'pt',
format: 'a4',
compress: true,
precision: 2,
putOnlyUsedFonts: true,
})
const pdfWidth = pdf.internal.pageSize.getWidth()
const pdfHeight = pdf.internal.pageSize.getHeight()
pdf.setFont('PretendardVariable')
pdf.setFontSize(20)
pdf.text(dashboardName, pdfWidth / 2, 40, { align: 'center' })
return { pdf, pdfWidth, pdfHeight }
}
export const processImage = (pdf: jsPDF, imageData: string, pdfWidth: number) => {
const imgProps = pdf.getImageProperties(imageData)
const imgWidth = pdfWidth
const imgHeight = (imgProps.height * pdfWidth) / imgProps.width
return { imgWidth, imgHeight }
}
export const addPdfPages = (pdf: jsPDF, imageData: string, imgWidth: number, imgHeight: number, pdfHeight: number) => {
let position = 60
pdf.addImage(imageData, 'PNG', 0, position, imgWidth, imgHeight)
let heightLeft = imgHeight - (pdfHeight - position)
while (heightLeft > 0) {
position = heightLeft - imgHeight
pdf.addPage()
pdf.addImage(imageData, 'PNG', 0, position, imgWidth, imgHeight)
heightLeft -= pdfHeight
}
}이미지 잘리는 에러 발생
때문에 페이지가 pdf로 변환하는 크기인 A4보다 크다면 아래처럼 이미지가 잘리는 문제가 발생했다.
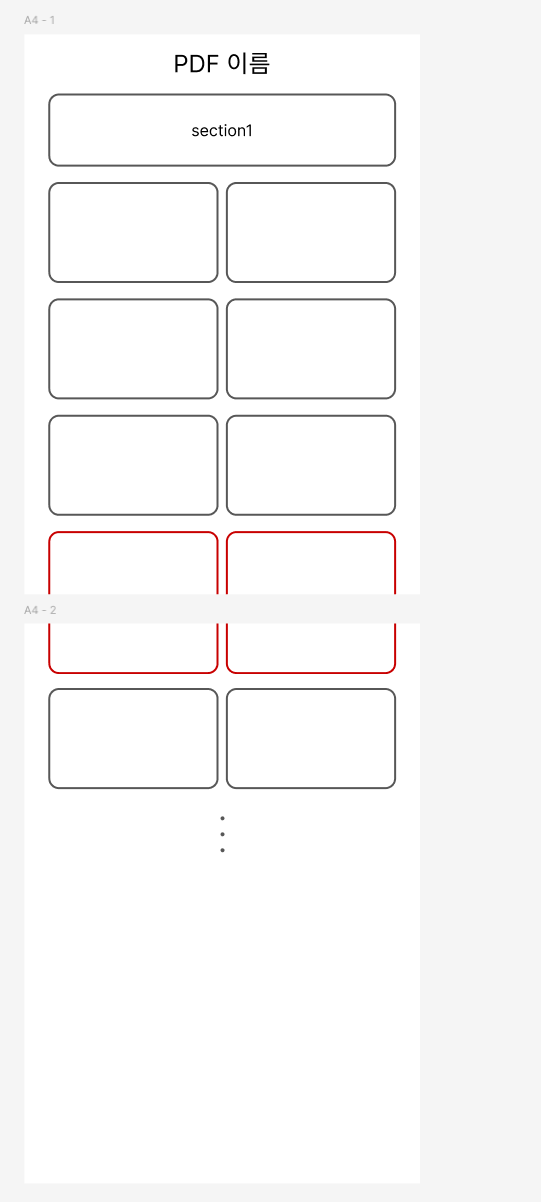
빨간 부분이 잘려서 위 아래 페이지로 출력되는 것!
해결하고 싶어서 열심히 서칭해봤는데 결론은 하나의 ref로는 불가능하다. 페이지 나누고 싶은 만큼 div로 나누고 ref를 하나하나 거는거였음. 근데 난 저 네모네모가 동적으로 갯수 생성되는거라 그냥 하나하나 요소따라 처리해보기로 했다.
해결방법)
먼저 section1은 아무리 많아도 한 페이지를 넘지 않기 때문에 하나의 div로 묶는다. 그리고 data-id 부여함!
//section1 묶은 부분
<div data-id='pdf-chart'>
      ..section1 요소들
</div>
두번째로 아래에있는 네모들은 map으로 돌리고 있어서 해당 컴포넌트에 data-id 부여한다.
<div data-id='pdf-chart'>
      ...네모 렌더링
</div>
이제 로직만 작성하면 끝..! 제일 먼저 data-id에 대한 요소를 뽑아온다
PDF 출력할 요소 선택
나는 다운로드 버튼이 위치한 곳이랑 요소가 있는 위치가 동떨어져있고 요구사항 맞추느라 createPortal같은걸 못쓰기 때문에 document에 querySelectorAll을 돌렸지만 가능하다면 pdf 뽑는 요소를 ref로 묶어서 ref하위에서 querySelectorAll 돌리는거 좀 더 성능상 좋다.
const cards = document.querySelectorAll("[data-id='pdf-card']") as NodeListOf<HTMLDivElement>;
const charts = document.querySelectorAll("[data-id='pdf-chart']") as NodeListOf<HTMLDivElement>;
PDF 객체 생성
그리고 일단 pdf 문서 만들 준비함! 이건 jspdf 예제와 크게 다를것 없다.
const pdf = new jsPDF({
    orientation: 'p',
    unit: 'pt',
    format: 'a4',
    compress: true,
    precision: 2,
    putOnlyUsedFonts: true,
  })
const pdfWidth = pdf.internal.pageSize.getWidth()
const pdfHeight = pdf.internal.pageSize.getHeight()
const margin = 20 // 페이지 좌우 여백
const gap = 10 // 이미지 간 간격
const chartScaledWidth = (pdfWidth - (margin + 10) * 2 - gap) * 0.5 // 이미지 조정 비율

pdf.setFont('PretendardVariable')
pdf.setFontSize(16)
pdf.text(title, pdfWidth / 2, 30, { align: 'center' })

return { pdf, pdfWidth, pdfHeight, margin, gap, chartScaledWidth }
pdf로 만들 페이지의 너비와 높이를 구하고, 만약 리사이징을 할거면 그에 대한 비율을 구해둔다.
나는 네모chart를 조정해서 한줄에 2개씩 나올 수 있도록 할거라 비율을 구했음!
그냥 아래로만 쌓을거면 따로 필요없다.
이미지 출력 준비
한줄에 이미지를 넣을 수 있는 만큼 넣고 넘치면 아래로 넘기기 위해서는 position에 대한 정보도 있어야한다.
const position = { x: margin, y: margin + 30, rowHeight: 0 }y가 magin + 30 인 이유는 pdf준비할 때 맨 처음에 pdf의 제목을 넣었기 때문에 기본여백 + 30(text 있을 위치)를 넣어준다.
rowHeight는 이미지 넣고 높이 얼만큼 잡아먹는지에 대한 정보이다.
그리고 각 요소에 대해 렌더링 시작! 처음에 구했던 dom 요소 배열을 Map 돌면서 이미지 캡처를 한다. 이것도 html2canvas 예제랑 크게 다른거 없다
const captureToCanvas = async (target: HTMLDivElement) => {
  const canvas = await html2canvas(target,{
    scale: 1.5,
    logging: false,
    scrollX: 0,
    scrollY: -window.scrollY,
    useCORS: true,
    imageTimeout: 15000,
    willReadFrequently: true,
  })
  const imgData = canvas.toDataURL('image/png', 0.8)
  const originalWidth = canvas.width
  const originalHeight = canvas.height

  return { imgData, originalWidth, originalHeight }
}
요소영역 계산 후 재배치
그리고 각 이미지의 너비와 높이를 구해서 더해가면 됨 ez
export const renderElements = async (
pdf: jsPDF,
elements: NodeListOf<HTMLDivElement>,
pdfWidth: number,
pdfHeight: number,
margin: number,
gap: number,
position: { x: number; y: number; rowHeight: number },
scaledWidth: number,
scale: boolean
) => {
for (const element of elements) {
const { imgData, originalWidth, originalHeight } = await captureToCanvas(element)
const pageMargin = scale ? margin + 10 : margin - 10
const imgGap = scale ? gap : 0
const imgWidth = scale ? scaledWidth : pdfWidth - pageMargin * 2
const imgHeight = (imgWidth * originalHeight) / originalWidth
// 가로로 더 넣을 수 없으면 줄 바꿈 처리
if (position.x + imgWidth > pdfWidth - pageMargin) {
position.x = pageMargin
position.y += position.rowHeight + imgGap
position.rowHeight = 0
}
// 페이지보다 들어가는 이미지가 더 크면 페이지 추가
if (position.y + imgHeight > pdfHeight - pageMargin) {
pdf.addPage()
position.x = pageMargin
position.y = pageMargin + 30
position.rowHeight = 0
}
// pdf에 이미지 추가
pdf.addImage(imgData, 'PNG', position.x, position.y, imgWidth, imgHeight)
// 들어갈 위치&행 높이 갱신
position.x += imgWidth + imgGap
position.rowHeight = Math.max(position.rowHeight, imgHeight)
}
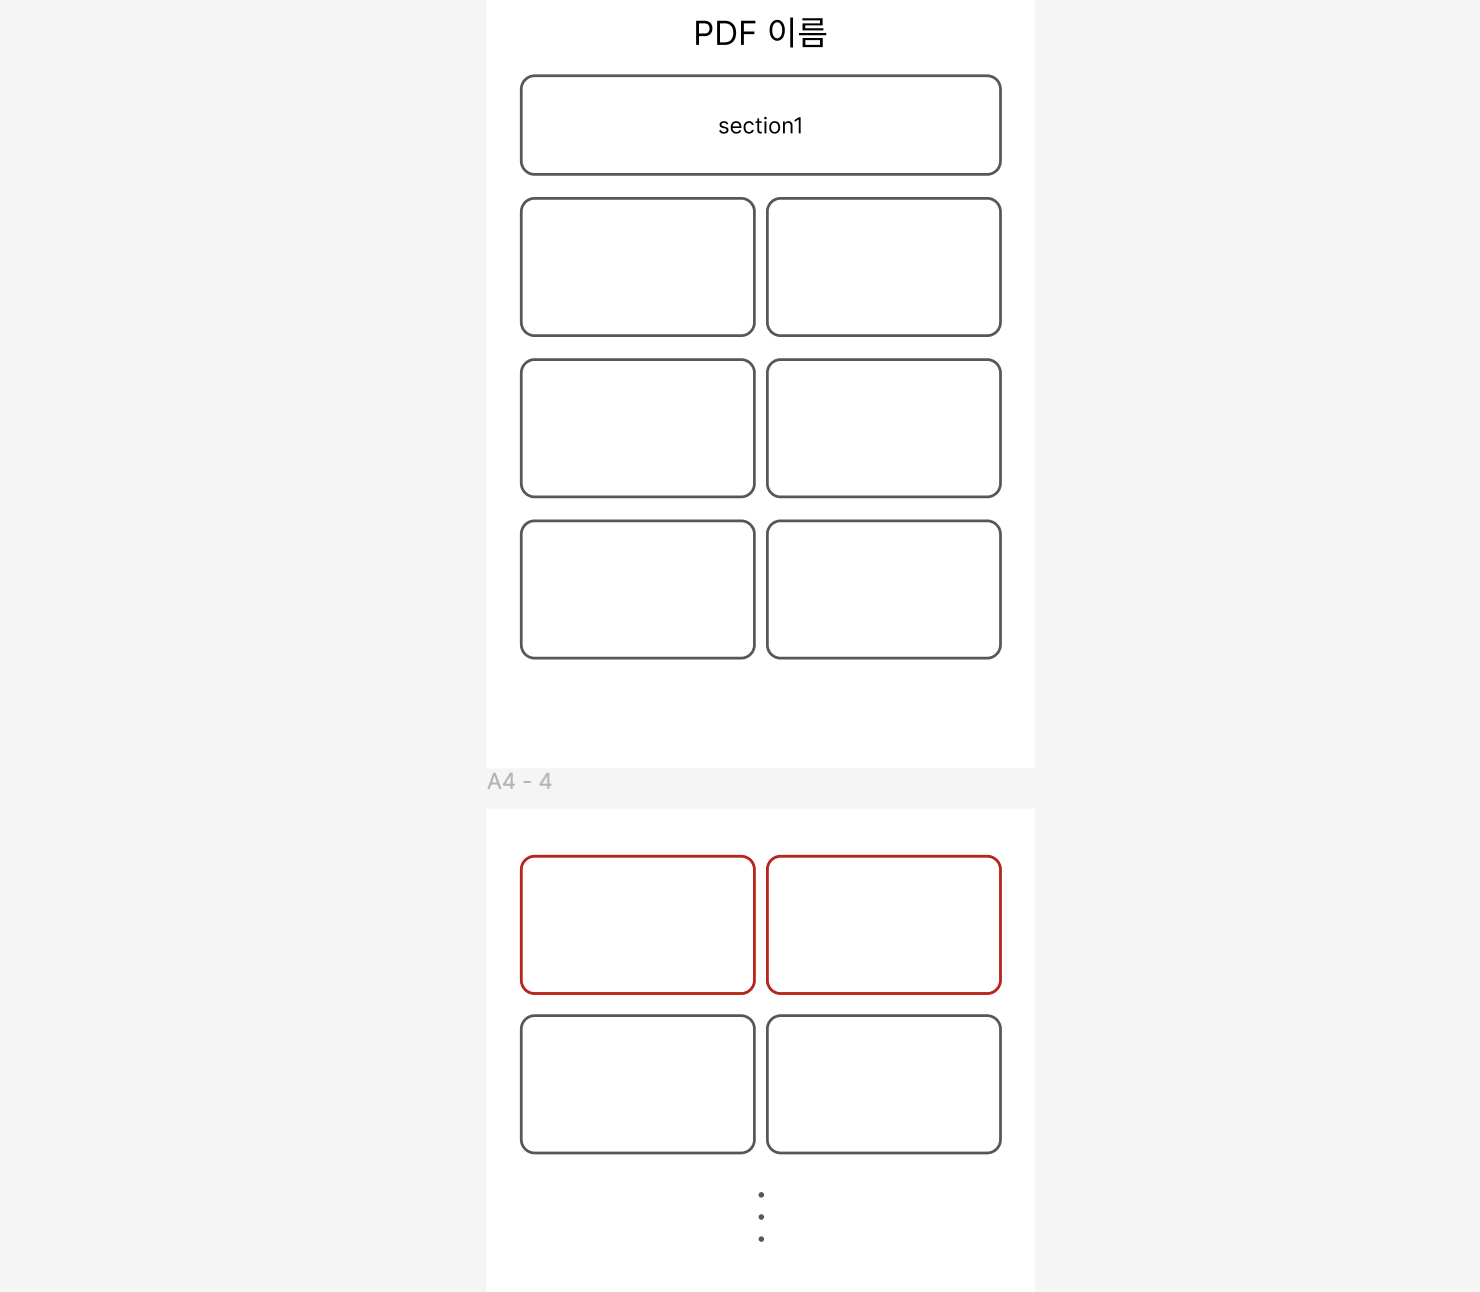
}결과
해결한결과!!
단점
단점)
한 화면보다 큰 요소를 이 방법으로 넣으면 다 깨지거나 에러날거임…
절대 모든 요소가 화면보다 작다는것을 확신할 때 이 방법을 사용하라.
아니면 리사이즈 해서 넣거나ㅠㅠ