
저번 파트에서는 리덕스의 미들웨어인 redux-thunk를 통해서 API 요청을 해보았고 오늘 다뤄볼 미들웨어는 redux-saga이다. redux-saga는 언제 사용되는지 알아보고 제너레이터함수를 통해 어떤 방식으로 동작하는지 간략하게 알아보고자 한다.
redux-saga가 쓰이려면 까다로운 상황에서 유용하다고 한다.
🔎 그 상황의 예시로는 다음과 같다.
- 기존 요청을 취소 처리해야할 때(불필요한 중복 요청을 방진한다. )
- 특정 액션이 발생하였을 때 다른 액션을 발생시키거나, API 요청과 같이 리덕스와 관계없는 코드 실행을 위해서
- 웹소켓을 사용할 때
- API요청 실패 시 재요청해야 할 때
일단 redux-saga를 사용하려면 제너레이터함수라는 문법에 대해 조금 알아봐야 한다. 이 함수의 동작 방식과 유사하게 돌아간다고 한다.
제너레이터함수
제너레이터함수는 포인트는 함수 작성 시 특정 구간에 멈출 수 있고, 아니면 다시 되돌릴 수 있다는 것이다.
일반적으로 다음과 같은 코드가 있을 때 코드는 첫번째 리턴에서 반환되고 끝날텐데 이를 제너레이터함수를 통해서 사용하면 순차적 반환이 가능하고, 함수 실행의 중간에 멈출 수 있다.
function returnFunction(){
	return 1;
	return 2;
  	return 3;
}
제너레이터 함수를 사용할 때 function* 키워드를 사용한다.
위의 함수와 어떤 점이 다른지 살펴보자.
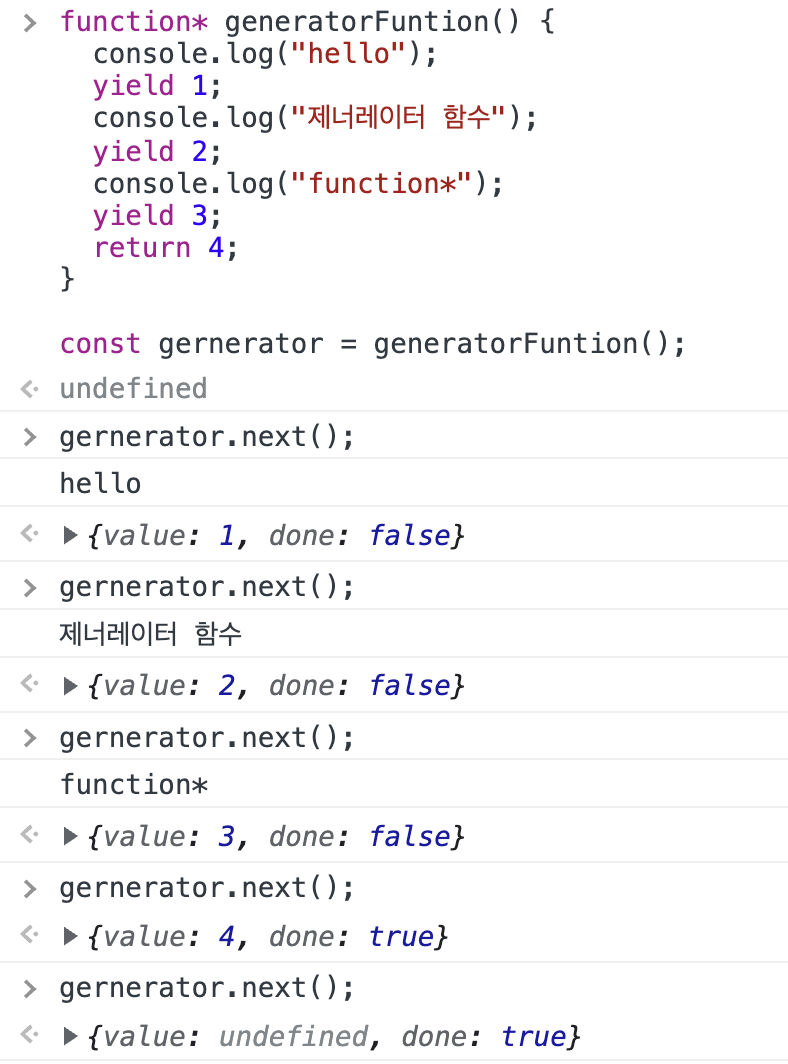
function* generatorFuntion() {
  console.log("hello");
  yield 1;
  console.log("제너레이터 함수");
  yield 2;
  console.log("function*");
  yield 3;
  return 4;
}

const gernerator = generatorFuntion();

gernerator.next();
gernerator.next();
gernerator.next();
gernerator.next();
gernerator.next();
아래의 사진을 보면 함수 호출로 반환되는 객체를 제너레이터라고 한다.
제너레이터함수를 호출하고 처음 객체인 제너레이터가 생성된면 함수는 멈춰있는 상태이다. next()함수가 호출되어야 다음 yield까지 호출되고 또 멈추게 된다. 그래서 next()함수를 한 줄씩 호출해야 다름 함수가 호출된다. 이러한 제너레이터함수는 멈춰있는 상태이고 차례대로 값을 반환시킬 수 있다.
그리고 next()에 파라미터를 넣은 뒤 yield를 이용해 반환된 값도 조회할 수 있다.
function* sumGenerator() {
  console.log("함수가 생성되었습니다.");
  let a = yield;
  let b = yield;
  yield a + b;
}

const sum = sumGenerator();
sum.next();
sum.next(1);
sum.next(2);
sum.next();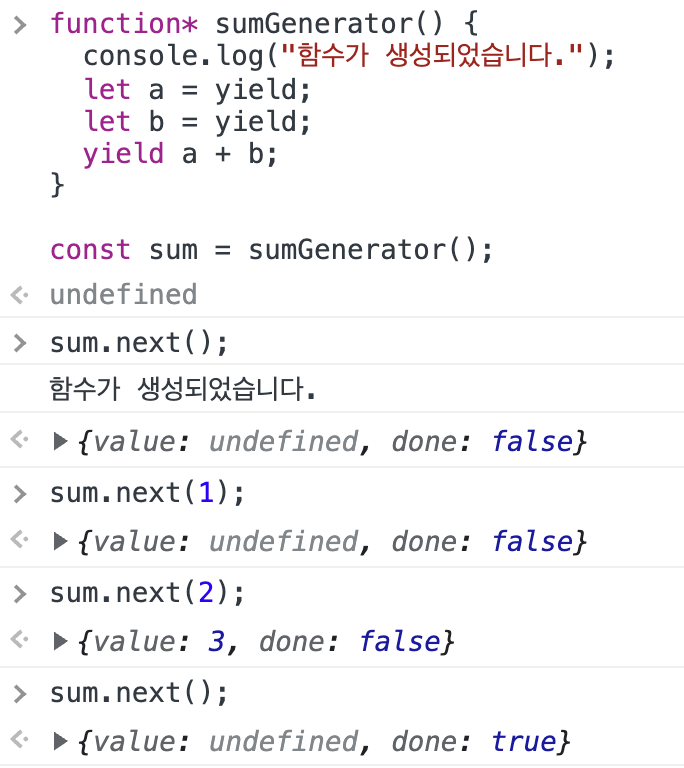
redux-saga는 제너레이터함수 문법을 토대로 비동기 요청을 가능하게 해준다. 우리가 액션을 모니터링하고 상황에 맞게 필요한 작업을 수행할 수 있게 도와주는 기능이라고 생각하면 된다.
다음과 같은 코드와 같이 비슷한 원리로 redux-saga가 작동하고 있다고 한다.
function* watchGenerator() {
  console.log("모니터링 중");
  let prev = null;
  while (true) {
    const action = yield;
    console.log("이전액션: ", prev);
    prev = action;
    if (action.type === "HELLO") {
      console.log("반갑습니다");
    }
  }
}

const watch = watchGenerator();

watch.next();
watch.next({ type: "TEST" });
watch.next({ type: "HELLO" });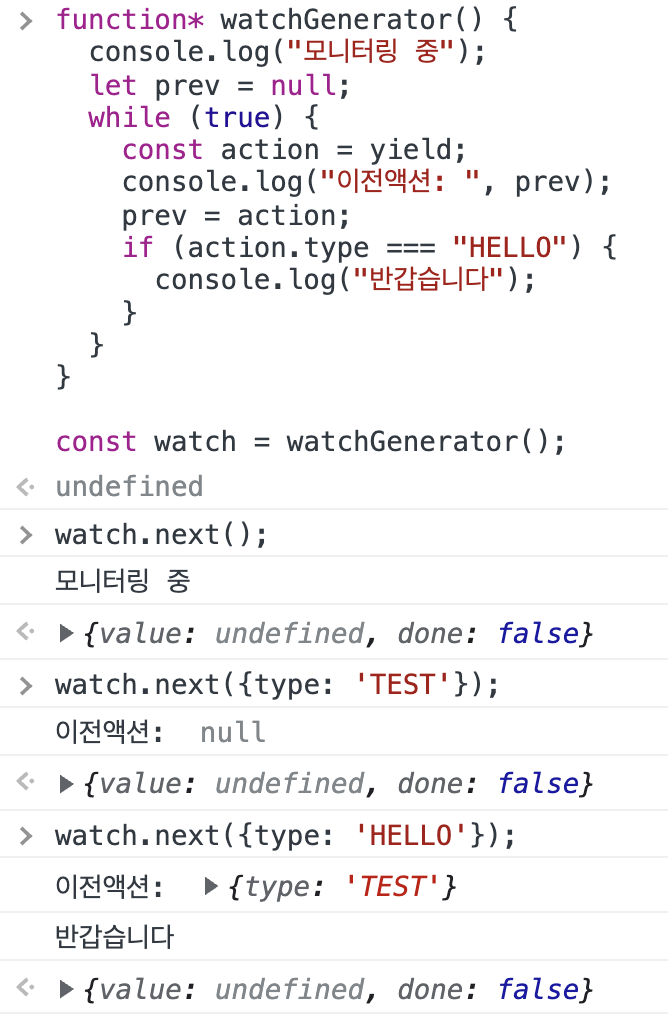
redux-saga를 counter로 상태 관리하기
저번에 사용했던 redux-thunk를 제거하고 이번에는 redux-saga를 통해서 구현해보고자 한다.
npm i redux-saga
라이브러리를 설치하고 기존 thunk 함수를 제거한 뒤 새로운 비동기 함수 구현을 위해 increaseAsync, decreaseAsync타입을 설정한다. 그리고 그에 관한 액션 생성 함수와 제너레이터 함수(saga)를 만들어 준다.
import { createAction, handleActions } from "redux-actions";
import { delay, put, takeEvery, takeLatest } from "redux-saga/effects";
//이펙트를 import 한다.

const INCREASE = "counter/INCREASE";
const DECREASE = "counter/DECREASE";
//타입 정한 뒤
const INCREASE_ASYNC = "counter/INCREASE_ASYNC";
const DECREASE_ASYNC = "counter/DECREASE_ASYNC";

export const increase = createAction(INCREASE);
export const decrease = createAction(DECREASE);

// 액션 생성 함수를 만든다. undefined를 두 번째 인자로 넣는거는
// 마우스 클릭 이벤트를 payload 안에 들어가지 않게 하기 위해서이다.
export const increaseAsync = createAction(INCREASE_ASYNC, () => undefined);
export const decreaseAsync = createAction(DECREASE_ASYNC, () => undefined);

//제너레이터 함수
function* increaseSaga() {
  yield delay(1000); // 1초 기다림
  yield put(increase()); // 위에서 만든 특정 액션을 디스패치한다.
}

function* decreaseSaga() {
  yield delay(1000);
  yield put(decrease());
}

export function* counterSaga() {
  //takeEverey는 요청되는 모든 액션에 대해서 특정 작업을 처리해준다.
  yield takeEvery(INCREASE_ASYNC, increaseSaga);
  // takeLatest는 제일 마지막 액션만 특정 작업 처리하고 그 이전의 액션은 취소한다. (기존 실행될 액션 또한 취소 )
  yield takeLatest(DECREASE_ASYNC, decreaseSaga);
}
const initialState = 0;

const counter = handleActions(
  {
    [INCREASE]: (state) => state + 1,
    [DECREASE]: (state) => state - 1,
  },
  initialState
);

export default counter;
modules / index.js
import { combineReducers } from "redux";
import { all } from "redux-saga/effects";
import counter, { counterSaga } from "./counter"; // 리듀서를 불러온다.
import sample from "./sample";
import loading from "./loading";

const rootReducer = combineReducers({ counter, sample, loading });

export function* rootSaga() {
  //all 함수를 사용해 하나로 합쳐준다.
  yield all([counterSaga()]);
}

export default rootReducer;
index.js
이제 스토어에 미들웨어를 적용한다.
데브툴은 npm i redux-devtools-extension 로 설치
import React from "react";
import { createStore, applyMiddleware } from "redux";
import { Provider } from "react-redux";
import rootReducer, { rootSaga } from "./modules";
import ReactDOM from "react-dom/client";
import App from "./App";
import ReduxThunk from "redux-thunk";
import createSagaMiddleware from "redux-saga"; //미들웨어 적용
import { composeWithDevTools } from "redux-devtools-extension"; // 개발자 도구에서 확인할 데브 툴
const sagaMiddleware = createSagaMiddleware();
const store = createStore(
rootReducer,
composeWithDevTools(applyMiddleware(ReduxThunk, sagaMiddleware))
);//데브툴은 이렇게 감싸주면 된다.
sagaMiddleware.run(rootSaga);//미들웨어 적용
const rootNode = document.getElementById("root");
//새로운 리액트 18 버전에서는 ReactDOM.render를 ReactDOM.createRoot(rootNode).render로 설정
ReactDOM.createRoot(rootNode).render(
<Provider store={store}>
<App />
</Provider>
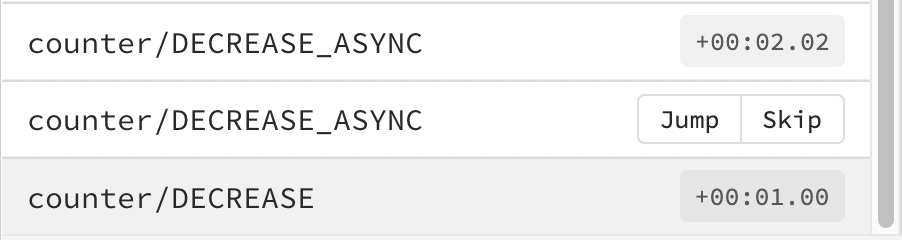
);이제 빠르게 버튼을 클릭해보면
위에서 takeEvery(INCREASE_ASYNC, increaseSaga)함수로 인해 increase는 세 번 실행된 것을 확인할 수 있다. 모든 액션을 특정작업으로 처리된 것을 counter/INCREASE가 세 번 찍힌 걸로 알 수 있다.
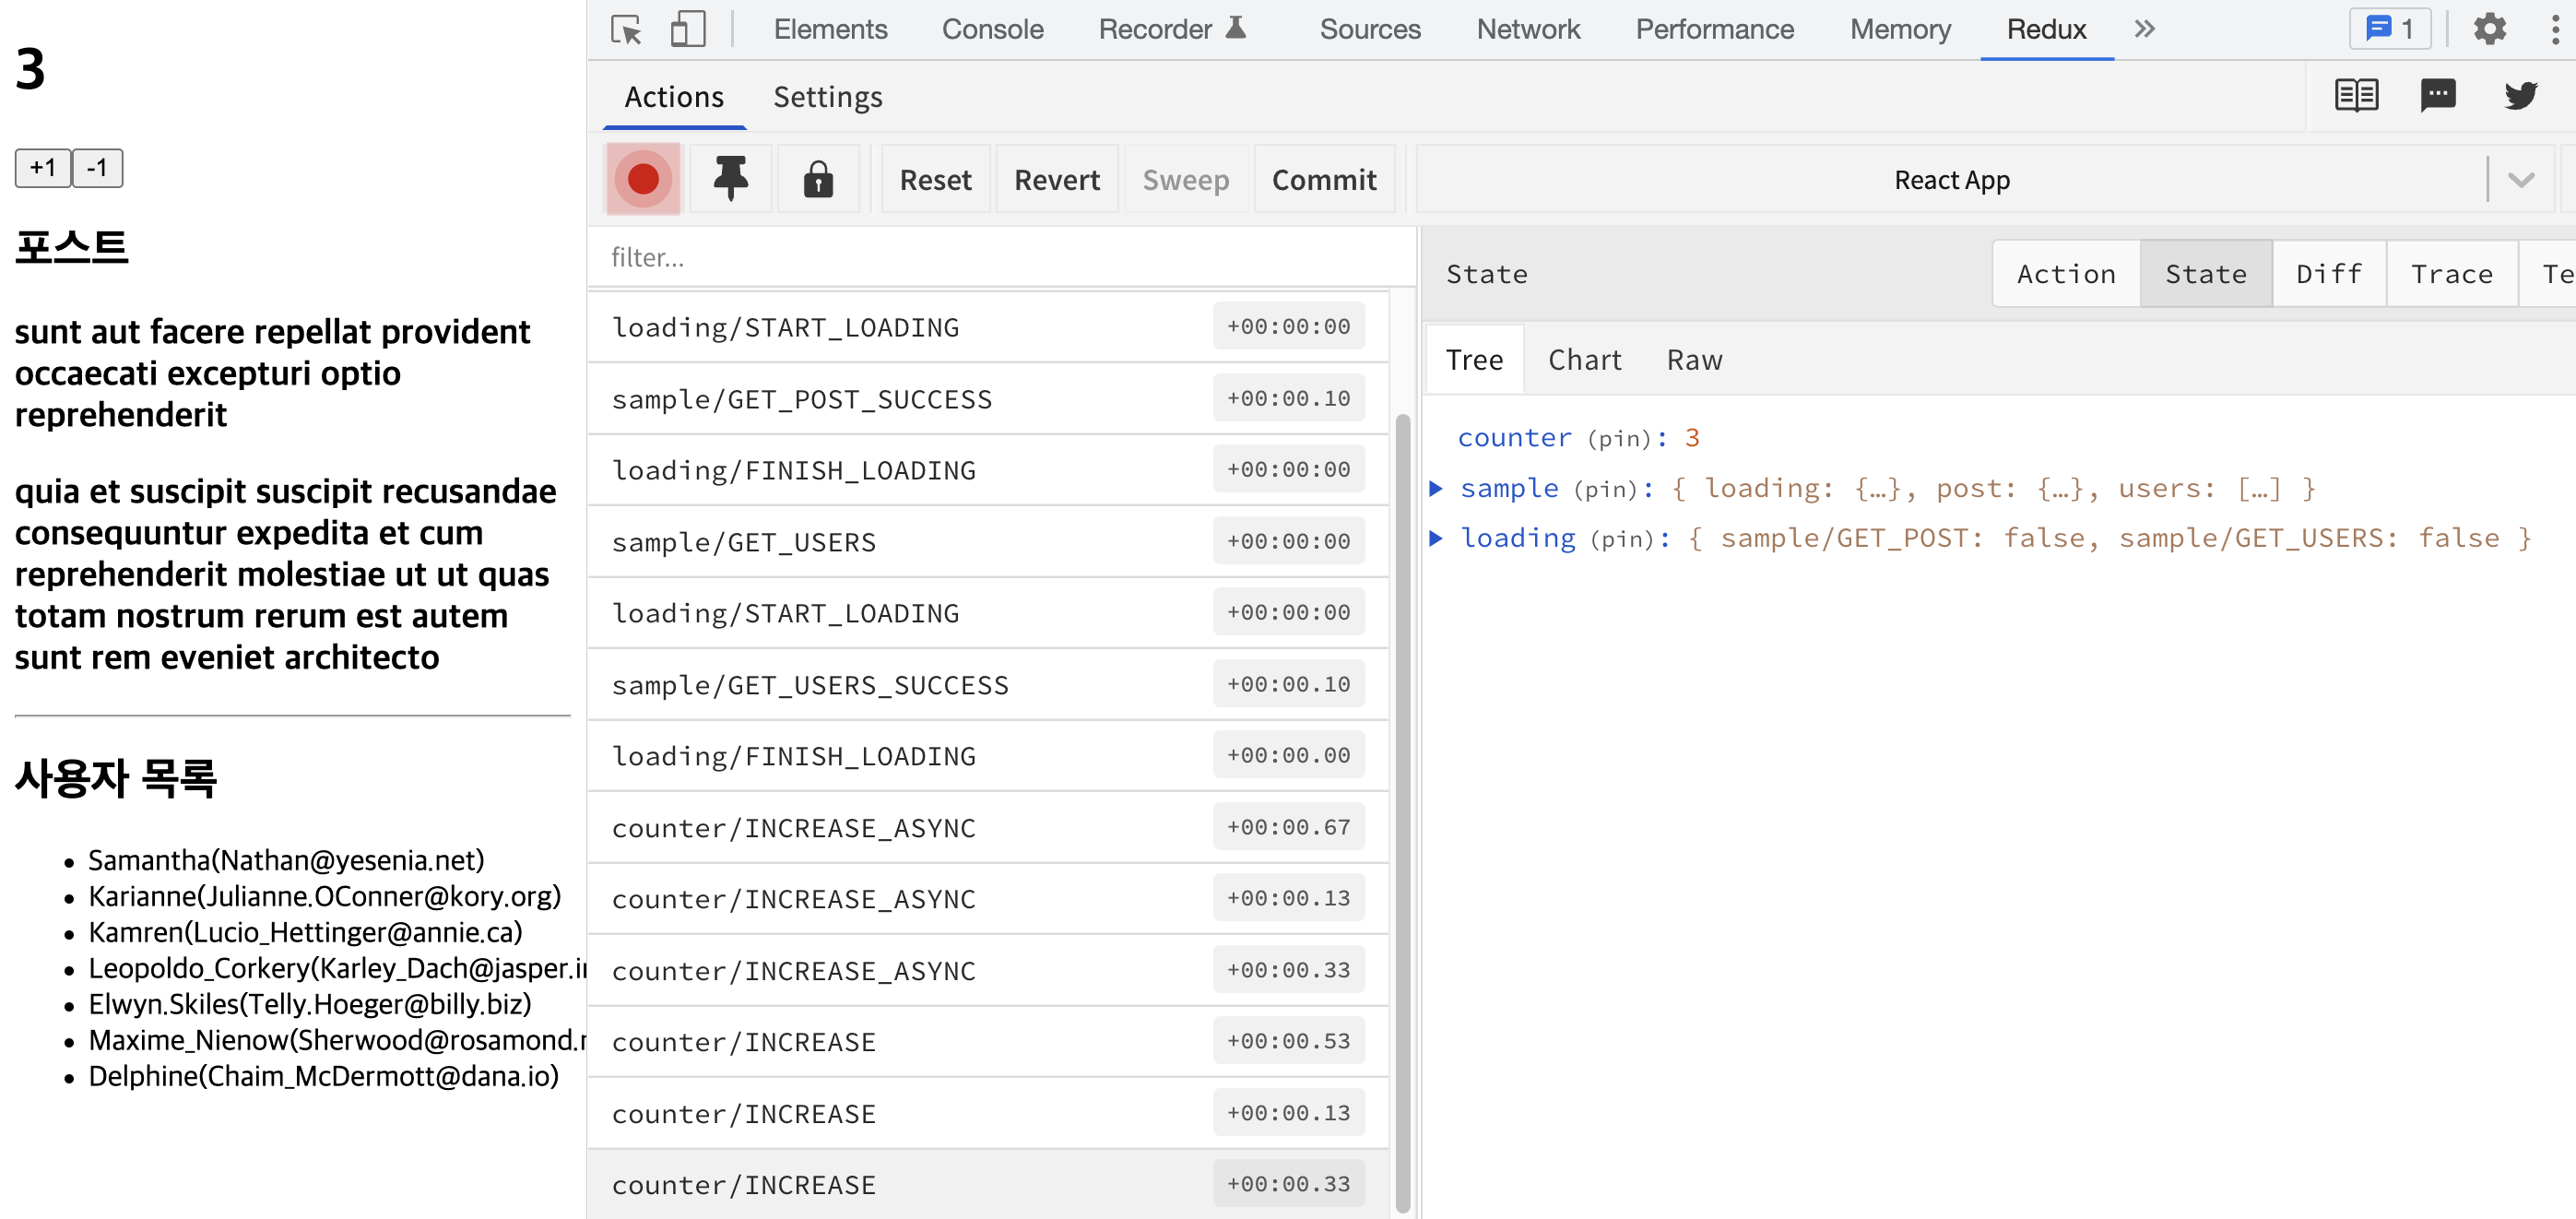
반대로 takeLatest(DECREASE_ASYNC, decreaseSaga)함수는 중간 처리를 취소하기 때문에 마지막 액션만 실행되어 -1을 두 번 클릭해도 counter/DECREASE가 한 번만 처리된 것을 확인할 수 있다.
API 요청하기
마찬가지로 thunk 부분을 지우고 saga로 코드를 짜면 다음과 같다.
API를 호출할 때에는 사가 내부에서 직접 호출하는 것이 아닌 call를 사용해서 호출한다.
post를 할 경우에는 id값으로 조회하기 때문에 payload에 넣어줘야 한다. 지금은 id값이 필요해서 넣는 것이기 때문에 다른 요청에서 필요한 다른 값을 넣을 때에도 payload에 넣어줘야 한다.
call(호출하고 싶은 인수, 함수에 넣어줄 인수)
call(api.getPost, action.payload)
modules/sample.js
import { createAction, handleActions } from "redux-actions";
import * as api from "../lib/api";
import { call, put, takeLatest } from "redux-saga/effects";
import { startLoading, finishLoading } from "./loading";

const GET_POST = "sample/GET_POST";
const GET_POST_SUCCESS = "sample/GET_POST_SUCCESS";
const GET_POST_FAILURE = "sample/GET_POST_FAILURE";

const GET_USERS = "sample/GET_USERS";
const GET_USERS_SUCCESS = "sample/GET_USERS_SUCCESS";
const GET_USERS_FAILURE = "sample/GET_USERS_FAILURE";

export const getPost = createAction(GET_POST, (id) => id);
export const getUsers = createAction(GET_USERS);

function* getPostSaga(action) {
  yield put(startLoading(GET_POST));
  try {
    const post = yield call(api.getPost, action.payload);
    yield put({
      type: GET_POST_SUCCESS,
      payload: post.data,
    });
  } catch (e) {
    yield put({
      type: GET_POST_FAILURE,
      payload: e,
      error: true,
    });
  }
  yield put(finishLoading(GET_POST));
}

function* getUsersSaga() {
  yield put(startLoading(GET_USERS));
  try {
    const users = yield call(api.getUsers);
    yield put({
      type: GET_USERS_SUCCESS,
      payload: users.data,
    });
  } catch (e) {
    yield put({
      type: GET_USERS_FAILURE,
      payload: e,
      error: true,
    });
  }
  yield put(finishLoading(GET_USERS));
}

export function* sampleSaga() {
  yield takeLatest(GET_POST, getPostSaga);
  yield takeLatest(GET_USERS, getUsersSaga);
}
//===========================================================================

const initialState = {
  loading: {
    GET_POST: false,
    GET_USERS: false,
  },
  post: null,
  users: null,
};

const sample = handleActions(
  {
    [GET_POST_SUCCESS]: (state, action) => ({
      ...state,
      loading: {
        ...state.loading,
        GET_USERS: false,
      },
      post: action.payload,
    }),

    [GET_USERS_SUCCESS]: (state, action) => ({
      ...state,
      loading: {
        ...state.loading,
        GET_POST: false,
      },
      users: action.payload,
    }),
  },
  initialState
);

export default sample;
import { combineReducers } from "redux";
import { all } from "redux-saga/effects";
import counter, { counterSaga } from "./counter";
import sample, { sampleSaga } from "./sample";
import loading from "./loading";
const rootReducer = combineReducers({ counter, sample, loading });
export function* rootSaga() {
yield all([counterSaga(), sampleSaga()]);
}
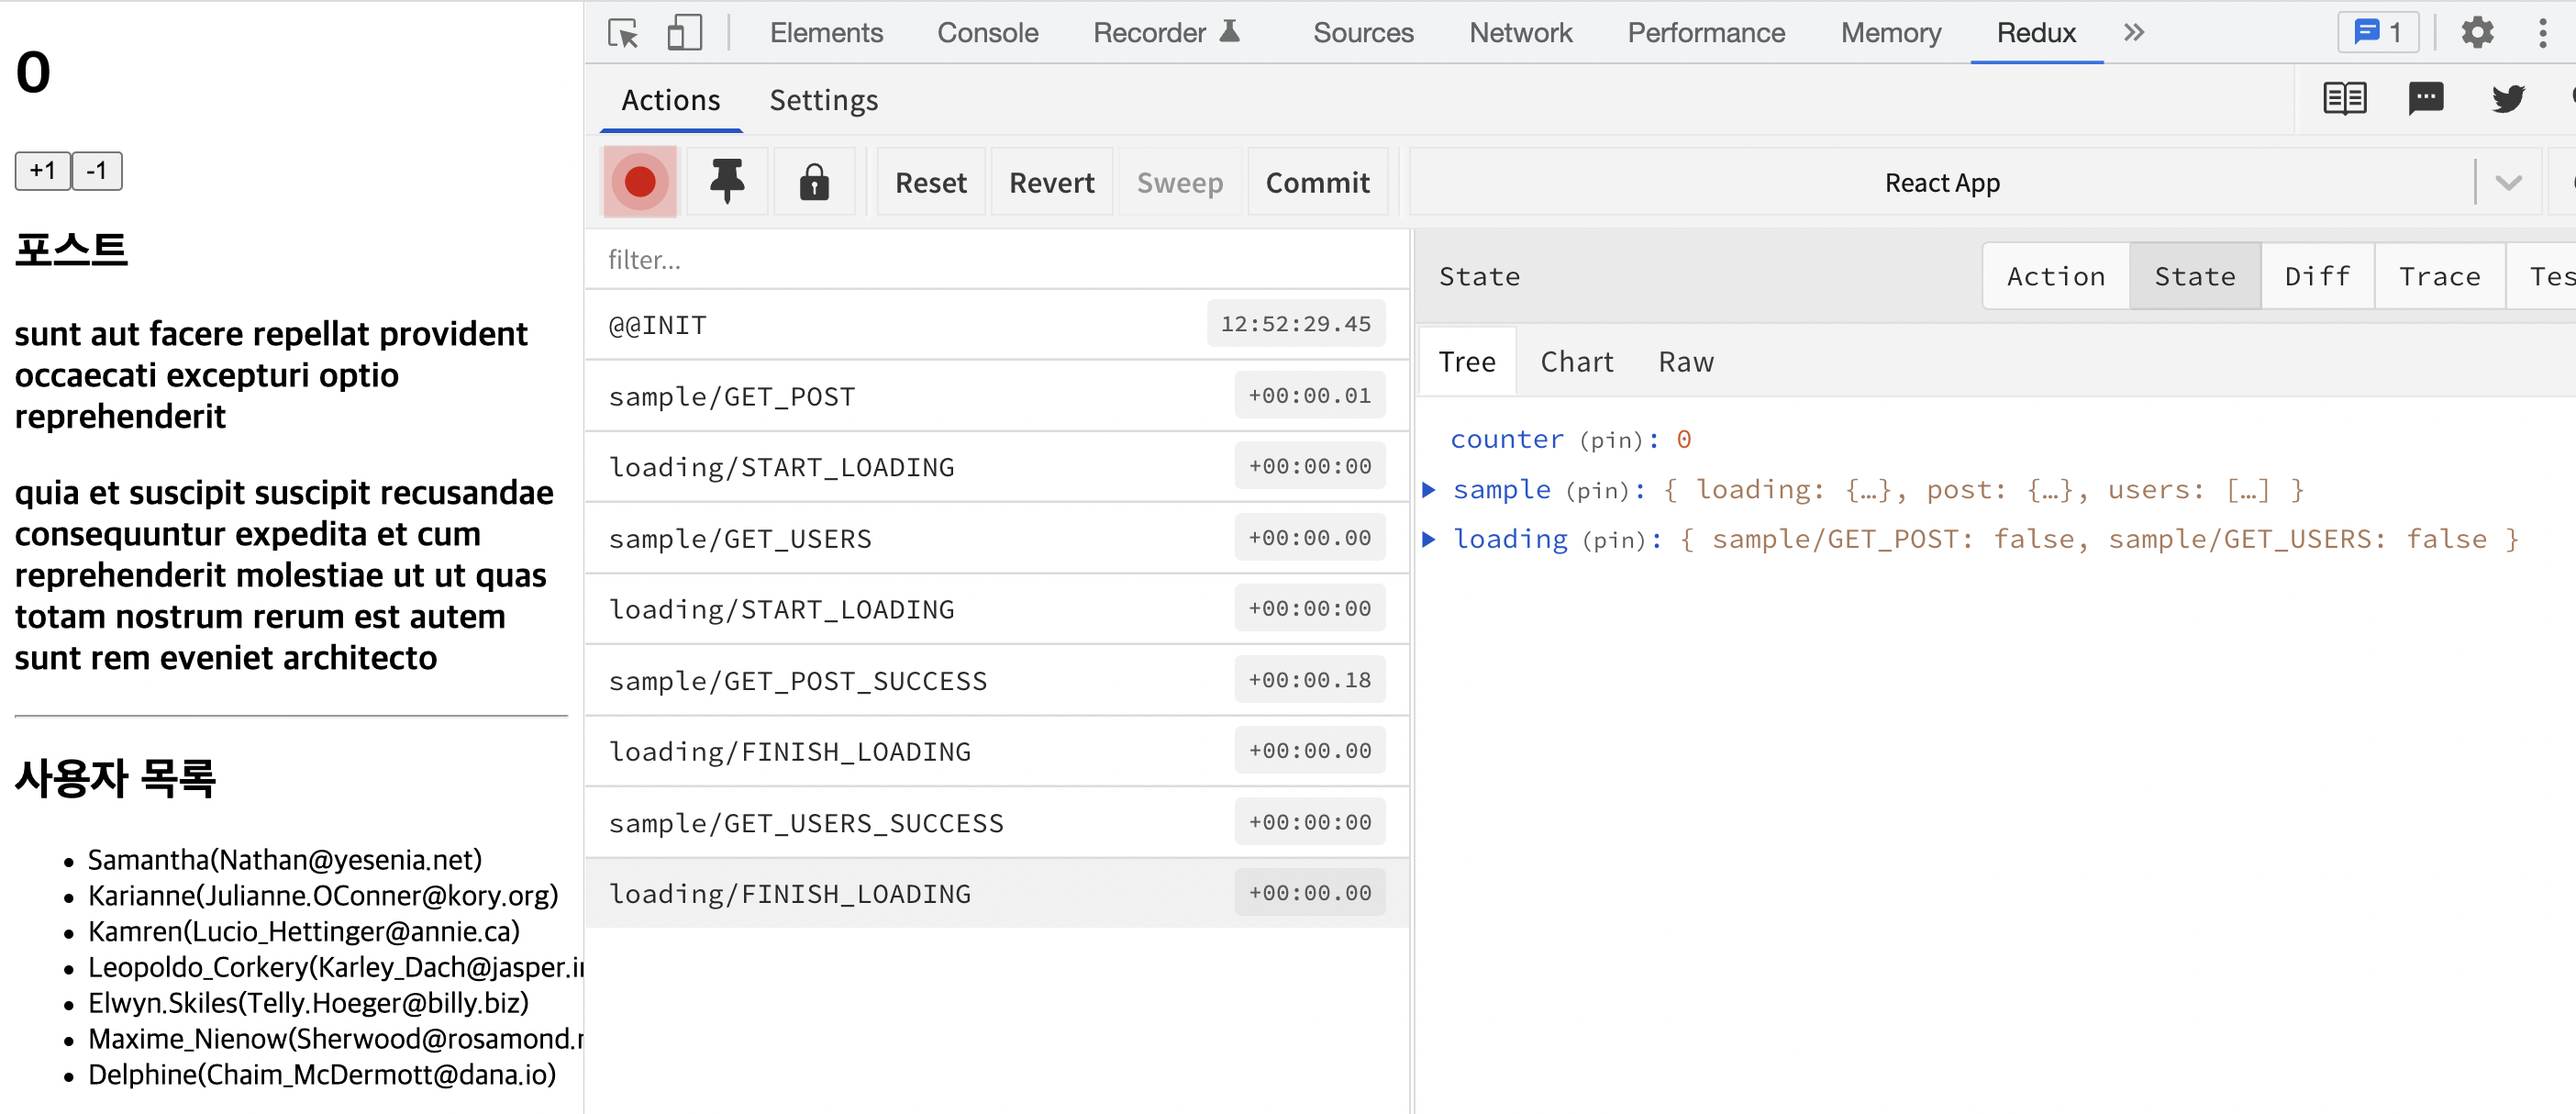
export default rootReducer;sampleSaga()를 이제 루트에 작성하여 API 요청이 잘 되는지 확인하면 된다.
modules/index.js
import { combineReducers } from "redux";
import { all } from "redux-saga/effects";
import counter, { counterSaga } from "./counter";
import sample, { sampleSaga } from "./sample";
import loading from "./loading";

const rootReducer = combineReducers({ counter, sample, loading });

export function* rootSaga() {
  yield all([counterSaga(), sampleSaga()]);
}

export default rootReducer;
아래의 사진에서 볼 수 있듯이 기능이 잘 구현되는 것을 확인할 수 있다.
몇차례에 걸쳐 전반적으로 비동기 상태관리를 위해 redux미들웨어를 다뤄보았고 그 안에 동작원리에 대해서는 실습을 해보면서 어느정도 이해(?)를 하였다. 다른 요청에 대해서도 이러한 라이브러리를 사용하여 난해하게 느껴졌던 개념들을 체득해보고자 한다. 많이 어렵지만 꾸준한 실습을 통해서 부족한 부분들을 메꾸나가야 겠다.
발췌: 리액트를 다루는 기술, 김민준