오렐리앙 제롱, 『Hands-On Machine Learning with Scikit-Learn, Keras & TensorFlow』, 박해선, 한빛미디어-OREILLY(2020), p503-540.
Keyword
데이터셋 API
TFRecord 포맷
TF 변환
Learned
데이터셋 API
tf.data.Dataset- 대용량 데이터셋을 간단하게 읽고 효율적으로 전처리 할 수 있음
- 기능: ETL, shuffling, batch, prefetch
Transformation
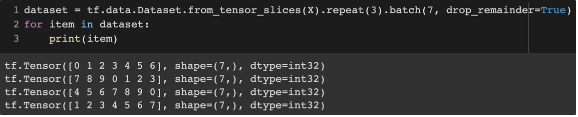
- 연쇄 변환: 여러 종류의 변환을 수행할 수 있음
- ex. slice(입력된 텐서로부터 slices를 생성) → repeat(반복) → batch(그룹)
- slice: (60,000, 28, 28)가 입력 → 60,000개의 slice로 만듦 → 각각의 slice는 28×28의 크기를 가짐
- batch:
drop_remainder=True- 모자란 마지막 배치를 버림
- ex. slice(입력된 텐서로부터 slices를 생성) → repeat(반복) → batch(그룹)
- map, filter, apply 메서드
- map: 각 아이템에 변환 적용
- apply: 데이터셋 전체에 변환 적용
- filter: 각 아이템에 필터링 적용
- Etc
- unbatch
- take: 불러올 배치 수를 정함
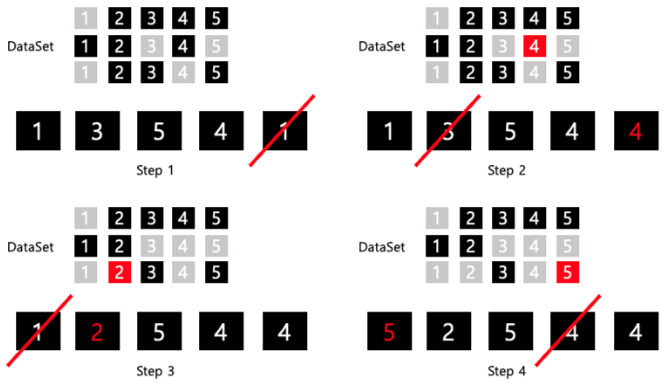
Shuffling
- 샘플이 독립적이고 동일한 분포에 있도록 도와줌
- parameter
- buffer size 지정
- 크게할 수록 shuffling 효과가 좋아짐
- 완벽한 shuffling : buffer_size = dataset size
- random seed 부여
- 셔플링 순서를 동일하게 하기 위함
- buffer size 지정
- 예시 (buffer size = 5, dataset: 1~5 → 3 batch )
- 대규모 dataset
- buffer size가 dataset 보다 작음
- 원본 데이터를 섞어서 shuffling 효과를 향상
-
파일 여러 개를 무작위로 선택 → 파일에서 동시에 읽은 레코드를 돌아가면서 반환
n_readers = 5 dataset = filepath_dataset.interleave( lambda filepath: tf.data.TextLineDataset(filepath).skip(1), cycle_length=n_readers) for line in dataset.take(5): print(line.numpy()) -
파일을 병렬로 읽고 싶을 때 (num_parallel_calls)
n_readers = 5
dataset = filepath_dataset.interleave(
    lambda filepath: tf.data.TextLineDataset(filepath).skip(1),
    num_parallel_calls=tf.data.experimental.AUTOTUNE,
    cycle_length=n_readers)

for line in dataset.take(5):
    print(line.numpy())
-
Preprocessing
n_inputs = 8 # X_train.shape[-1]

@tf.function
def preprocess(line):
    defs = [0.] * n_inputs + [tf.constant([], dtype=tf.float32)]
    fields = tf.io.decode_csv(line, record_defaults=defs)
    x = tf.stack(fields[:-1])
    y = tf.stack(fields[-1:])

return (x - X_mean) / X_std, ydecode_csv: 스칼라 텐서의 리스트 반환
def csv_reader_dataset(filepaths, repeat=1, n_readers=5,
                       n_read_threads=None, shuffle_buffer_size=10000,
                       n_parse_threads=5, batch_size=32):
    dataset = tf.data.Dataset.list_files(filepaths).repeat(repeat)
    dataset = dataset.interleave(
        lambda filepath: tf.data.TextLineDataset(filepath).skip(1),
        cycle_length=n_readers, num_parallel_calls=n_read_threads)
    dataset = dataset.shuffle(shuffle_buffer_size)
    dataset = dataset.map(preprocess, num_parallel_calls=n_parse_threads)
    dataset = dataset.batch(batch_size)

return dataset.prefetch(1)- Prefetch
- 훈련 알고리즘이 한 batch로 작업하는 동안 dataset이 동시에 다음 batch를 준비
- 멀티스레드로 데이터를 적재하고 전처리하면 CPU의 멀티 코어를 활용 → GPU를 거의 100% 활용 가능
TFRecord 포맷
- 크기가 다른 연속된 이진 레코드를 저장하는 단순한 이진 포맷
- csv 파일은 복잡한 데이터 구조를 지원 못함 (ex. image, audio)
- 압축
-
훈련 script로 파일을 다운로드해야 할 때, 시간 단축을 위해서 일반적으로 압축을 활성화함
-
훈련 script와 파일이 같은 공간에 있다면, 압축을 할 필요 없음 (CPU 자원 낭비)
# 압축 파일 쓰기
options = tf.io.TFRecordOptions(compression_type="GZIP")
with tf.io.TFRecordWriter("my_compressed.tfrecord", options) as f:
    f.write(b"This is the first record")
    f.write(b"And this is the second record")

# 압축 파일 읽기
dataset = tf.data.TFRecordDataset(["my_compressed.tfrecord"],
                                  compression_type="GZIP")
-
Protocol Buffer
-
구글이 개발한 이식성과 확장성이 좋고 효율적인 이진 포맷
-
일반적으로는 protocol butter를 설치해야됨
from person_pb2 import Person person = Person(name="Al", id=123, email=["a@b.com"]) # Person 생성 print(person) # Person 출력 # name: "Al" # id: 123 # email: "a@b.com" print(person.name) # Al person.name = "Alice" # 필드 수정 person.email[0] # a@b.com 배열처럼 사용할 수 있는 반복 필드 person.email.append("c@d.com") # 이메일 추가 s = person.SerializeToString() # 바이트 문자열로 직렬화 print(s) # b'\n\x05Alice\x10{\x1a\x07a@b.com\x1a\x07c@d.com' -
tensorflow는
tf.train.Example타입의 protocol buffer를 만들고 파싱할 수 있는 함수를 제공-
TFRecord 파일에서 주로 사용
-
tf.train.Exampleprotocol buffer 정의 예시syntax = "proto3"; message BytesList { repeated bytes value = 1; } message FloatList { repeated float value = 1 [packed = true]; } message Int64List { repeated int64 value = 1 [packed = true]; } message Feature { oneof kind { BytesList bytes_list = 1; FloatList float_list = 2; Int64List int64_list = 3; } }; message Features { map<string, Feature> feature = 1; }; message Example { Features features = 1; }; -
packed = true: 반복적인 수치 필드에 사용 -
Features: 특성 이름과 특성값을 매핑한 dictionary를 가짐# 적용 예시 from tensorflow.train import BytesList, FloatList, Int64List from tensorflow.train import Feature, Features, Example person_example = Example( features=Features( feature={ "name": Feature(bytes_list=BytesList(value=[b"Alice"])), "id": Feature(int64_list=Int64List(value=[123])), "emails": Feature(bytes_list=BytesList(value=[b"a@b.com", b"c@d.com"])) })) with tf.io.TFRecordWriter("my_contacts.tfrecord") as f: f.write(person_example.SerializeToString()) # 직렬화 후 TFRecord 파일에 저장feature_description = { "name": tf.io.FixedLenFeature([], tf.string, default_value=""), "id": tf.io.FixedLenFeature([], tf.int64, default_value=0), "emails": tf.io.VarLenFeature(tf.string), } for serialized_example in tf.data.TFRecordDataset(["my_contacts.tfrecord"]): parsed_example = tf.io.parse_single_example(serialized_example, feature_description) -
parse_single_example: 직렬화된 문자열 스칼라 텐서, description 필요 -
FixedLenFeature: 고정 길이 (텐서로 파싱) -
VarLenFeature: 가변 길이 (희소 텐서로 파싱)
-
-
이미지 처리 적용 예시
data = tf.io.encode_jpeg(img) example_with_image = Example(features=Features(feature={ "image": Feature(bytes_list=BytesList(value=[data.numpy()]))})) serialized_example = example_with_image.SerializeToString() # then save to TFRecord feature_description = { "image": tf.io.VarLenFeature(tf.string) } example_with_image = tf.io.parse_single_example(serialized_example, feature_description) decoded_img = tf.io.decode_jpeg(example_with_image["image"].values[0]) # decoded_img = tf.io.decode_image(example_with_image["image"].values[0])tf.io.decode_image: BMP, GIF, JPEG, PNG 이미지 디코딩 가능
-
SequenceExample
syntax = "proto3"; message FeatureList { repeated Feature feature = 1; }; message FeatureLists { map<string, FeatureList> feature_list = 1; }; message SequenceExample { Features context = 1; FeatureLists feature_lists = 2; };- 구성
- 문맥 데이터를 위한 하나의 Features 객체
- 이름이 있는 1개 이상의 FeatureList를 가진 FeatureLists 객체를 포함
- 파싱
-
단일 :
tf.io.parse_single_sequence_example() -
배치 :
tf.io.parse_sequence_example()⇒ 문맥 특성(dict)과 특성 리스트(dict)를 담은 튜플 반환
-
- 가변 길이의 sequence →
tf.RaggedTensor.from_sparse - 예시
from tensorflow.train import FeatureList, FeatureLists, SequenceExample

context = Features(feature={
    "author_id": Feature(int64_list=Int64List(value=[123])),
    "title": Feature(bytes_list=BytesList(value=[b"A", b"desert", b"place", b"."])),
    "pub_date": Feature(int64_list=Int64List(value=[1623, 12, 25]))
})

content = [["When", "shall", "we", "three", "meet", "again", "?"],
           ["In", "thunder", ",", "lightning", ",", "or", "in", "rain", "?"]]
comments = [["When", "the", "hurlyburly", "'s", "done", "."],
            ["When", "the", "battle", "'s", "lost", "and", "won", "."]]

def words_to_feature(words):
    return Feature(bytes_list=BytesList(value=[word.encode("utf-8")
                                               for word in words]))

content_features = [words_to_feature(sentence) for sentence in content]
comments_features = [words_to_feature(comment) for comment in comments]

sequence_example = SequenceExample(
    context=context,
    feature_lists=FeatureLists(feature_list={
        "content": FeatureList(feature=content_features),
        "comments": FeatureList(feature=comments_features)
    }))

context_feature_descriptions = {
    "author_id": tf.io.FixedLenFeature([], tf.int64, default_value=0),
    "title": tf.io.VarLenFeature(tf.string),
    "pub_date": tf.io.FixedLenFeature([3], tf.int64, default_value=[0, 0, 0]),
}
sequence_feature_descriptions = {
    "content": tf.io.VarLenFeature(tf.string),
    "comments": tf.io.VarLenFeature(tf.string),
}
parsed_context, parsed_feature_lists = tf.io.parse_single_sequence_example(
    serialized_sequence_example, context_feature_descriptions,
    sequence_feature_descriptions)
- 구성
입력 특성 전처리
- 범주형 특성 encoding
class TextVectorization(keras.layers.Layer): def __init__(self, max_vocabulary_size=1000, n_oov_buckets=100, dtype=tf.string, **kwargs): super().__init__(dtype=dtype, **kwargs) self.max_vocabulary_size = max_vocabulary_size self.n_oov_buckets = n_oov_buckets def adapt(self, data_sample): self.vocab = get_vocabulary(data_sample, self.max_vocabulary_size) words = tf.constant(self.vocab) word_ids = tf.range(len(self.vocab), dtype=tf.int64) # 어휘 사전 정의 vocab_init = tf.lookup.KeyValueTensorInitializer(words, word_ids) self.table = tf.lookup.StaticVocabularyTable(vocab_init, self.n_oov_buckets) def call(self, inputs): preprocessed_inputs = preprocess(inputs) return self.table.lookup(preprocessed_inputs)tf.lookup.KeyValueTensorInitializer: 범주 리스트와 인덱스로 룩업 테이블용 초기화 객체tf.lookup.StaticVocabularyTable: 어휘 사전에 있는 단어 인덱스 조회n_oov_buckets=100⇒ 어휘 사전에 없는 범주를 찾으면 룩업 테이블이 계산한 범주의 해시값을 이용하여 oov 버킷 중 하나에 할당- 범주가 자주 바뀌거나 신조어의 경우 훈련 세트에 없을 수 있음
- 범주 개수에 따른 encoding 방식
- 범주 개수가 10개 이하: 원-핫 인코딩
- 범주 개수가 50개 이상: 해시 버킷 사용 (임베딩 선호)
- 범주 개수가 10개~50개: 두 방식 모두 실험
TF 변환
- 전처리는 사전에 처리하면 속도를 높일 수 있음
- 모델에 주입될 데이터를 처리하기 위해 App or Web에 코드를 추가해야됨
- 유지 보수가 어려움
- 전처리 과정을 바꿀 때마다 모바일 앱, JS 코드를 수정해야됨
- 시간 오래 걸림
- 에러가 발생하기 쉬움
- 훈련/서빙 왜곡(training/serving skew) : 훈련 전에 수행한 전처리 연산과 앱 or Web에서 수행하는 전처리가 차이날 수 있음
- 모델에 주입될 데이터를 처리하기 위해 App or Web에 코드를 추가해야됨
- 해결 방법
- 훈련된 모델을 받아 App / Web에 배포하기 전에 전처리를 담당하는 층을 동적으로 추가하는 것
- 전처리 코드가 분리됨
- TF 변환 활용
-
텐서플로 모델 상품화를 위한 end-to-end 플랫폼인 TFX의 일부분
-
모든 텐서플로 연산 사용 가능
-
전처리 연산을 한 번만 정의 가능
-
배포할 모델에 추가할 수 있도록 동일한 역할을 수행하는 텐서플로 함수를 생성
try:
    import tensorflow_transform as tft

    def preprocess(inputs):  # inputs is a batch of input features
        median_age = inputs["housing_median_age"]
        ocean_proximity = inputs["ocean_proximity"]
        standardized_age = tft.scale_to_z_score(median_age - tft.mean(median_age))
        ocean_proximity_id = tft.compute_and_apply_vocabulary(ocean_proximity)
        return {
            "standardized_median_age": standardized_age,
            "ocean_proximity_id": ocean_proximity_id
        }
except ImportError:
    print("TF Transform is not installed. Try running: pip3 install -U tensorflow-transform")
-
- 훈련된 모델을 받아 App / Web에 배포하기 전에 전처리를 담당하는 층을 동적으로 추가하는 것
Question
@tf.function??- 즉시 실행 가능
- 그래프 모드 사용 가능
- gradient 계산 작업 가능
- 적절한 prefetch는 어떻게 설정할까?
- 일반적으로 하나도 충분함, tf.data.experimental.AUTOTUNE을 전달하면 텐서플로가 자동으로 결정
tf.data.experimental.prefetch_to_device(): GPU에서 바로 prefetch 할 수 있음
- protocol buffer가 그래서 뭐지?
- 구조화된 데이터를 직렬화하는 방식
- 직렬화(Serialization): 바이트 스트림 형태로 변환하는 것
- 바이트 스트림 형태: 데이터를 파일로 저장하거나 네트워크 통신에 사용하기 위한 형식
- 장점:
- 직렬화, 역직렬화 속도가 빠름
- 직렬화된 파일의 크기를 월등히 줄일 수 있어서 대용량 데이터를 처리할 때 성능이 더 좋음
- 단점:
- 가독성이 안좋음
- proto파일이 없으면 데이터 해석이 불가능
- 구조화된 데이터를 직렬화하는 방식
Reference
- tf.data.Dataset.from_tensor_slices
- unbatch, take
- parallel interleave
- tf.function
- prefetch
- Protocol Buffer
