졸업 프로젝트로 🤸♀️모션인식을 통한 K-pop 포인트 안무 연습 & 녹화 서비스 를 진행하기로 하였다. 댄서의 Joint를 따서 안무를 구성하고, 이를 사용자가 학습하여 댄서의 춤과 얼마나 유사한 지를 판별해주는 안드로이드 어플을 출시할 예정이다.
이번 학기 말까지는
- openpose를 통한 Joint 따기
- 사진에서 두 사람의 포즈 유사도를 구하기
- Figma를 통해 어플 디자인 결정 후, android Studio로 UI 구성과 간단한 db 연결까지 진행하기로 했다.
이번 프로젝트에서는 나는 프론트엔드, 백엔드 파트의 일부를 담당하기로 하였다.
👏이 포스트에서는 UI 디자인에 따른 레이아웃을 구성한 뒤에 앱의 주요 기능인 랜덤 플레이 비디오 db 연결까지 진행할 예정이다.👏
1. UI 속성 기본 설정
2. UI 구성
3. 비디오 db 연결
4. video를 UI에 띄우기위해 ViewModel 만들기
❤️ 시작해보자 ❤️

😊 UI 속성 기본 설정
- 리소스 폴더 내 파일들 기본 설정하기
- 화면별 프래그먼트 설정
- 프래그래먼트 전환을 위한 BottomNavigation 설정
리소스 폴더 내의 파일들 기본 설정을 해줍니다.
기본 색상 설정
res/values/colors.xml
<resources>
    <color name="colorPrimary">#fafafa</color>
    <color name="colorPrimaryDark">#c7c7c7</color>
    <color name="colorAccent">#03DAC5</color>
    <color name="yellow">#ffeb3b</color>
    <color name="red">#f44336</color>
    <color name="black">#212121</color>
</resources>
Dimension 설정
가로 세로 Margin, Button Size 설정해줍니다.
src/main/res/values/dimens.xml
<resources>
    <!-- Default screen margins, per the Android Design guidelines. -->
    <dimen name="activity_horizontal_margin">16dp</dimen>
    <dimen name="activity_vertical_margin">16dp</dimen>

    <dimen name="round_button_small">38dp</dimen>
    <dimen name="round_button_medium">64dp</dimen>
    <dimen name="round_button_large">72dp</dimen>

</resources>
style 설정
앱의 전체적인 색상, 아이콘 색상, 글 색상등을 정해줍니다.
src/main/res/values/styles.xml
<?xml version="1.0" encoding="utf-8"?>
<resources>
    <!-- Base application theme. -->
    <style name="AppTheme" parent="Theme.MaterialComponents.Light.NoActionBar">
        <!-- Customize your theme here. -->
        <item name="colorPrimary">@color/colorPrimary</item>
        <item name="colorPrimaryDark">@color/colorPrimaryDark</item>
        <item name="colorAccent">@color/colorAccent</item>
    </style>

    <style name="Widget.App.BottomNavigationView" parent="Widget.MaterialComponents.BottomNavigationView.Colored">
        <item name="backgroundTint">@android:color/black</item>
        <item name="itemBackground">@android:color/black</item>
        <item name="iconTint">@color/bottom_icon_color</item>
        <item name="android:textColor">@android:color/white</item>
        <item name="elevation">1dp</item>
    </style>
</resources>
UI 구성
🙋♀️화면별 프래그먼트 설정 및 BottomNav 설정
홈, 서치, 카메라, 알람, 프로필 등 5개의 프래그먼트를 구성해야합니다. 또한 이를 Bottom navigationView를 통해서 각 프래그먼트를 넘나들 수 있도록 구성합니다.
- res 폴더에 AndroidResourceFile을 만들기
- menu_resource 파일 만들기
- res/drawable에 아이콘 vector asset 추가
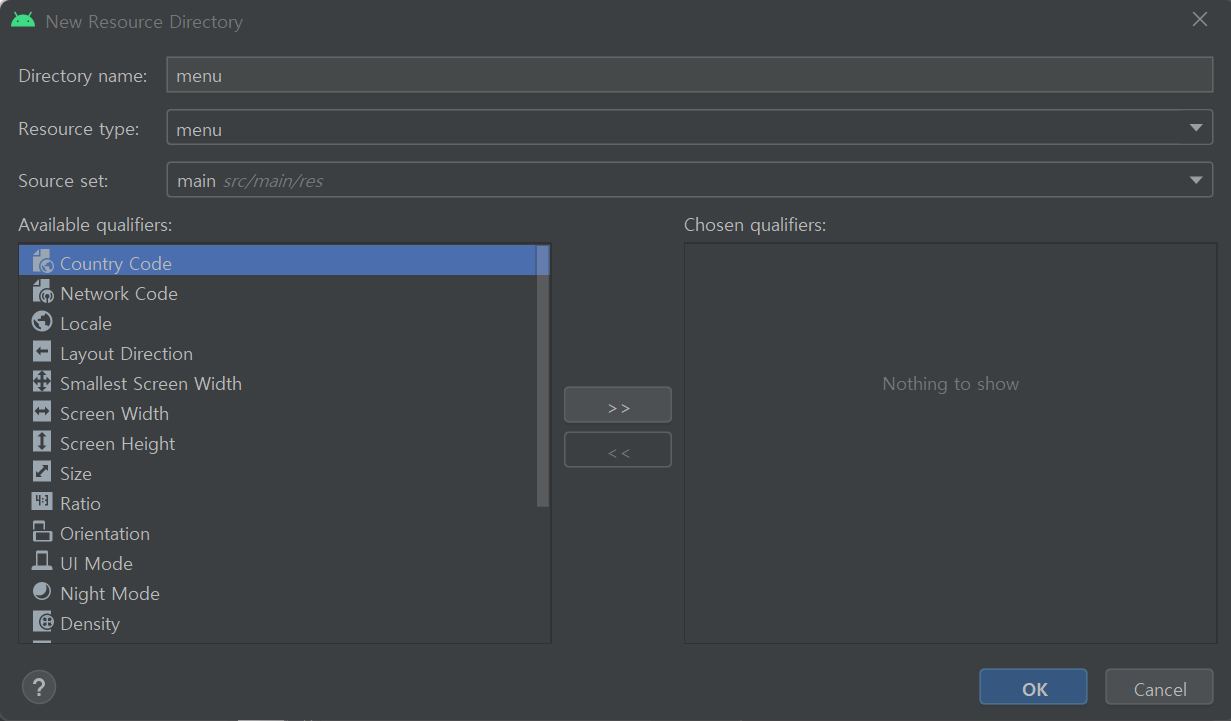
res 폴더에 AndroidResourceFile을 만들어주고 menu_resource 파일을 만들어줍니다.

src/main/res/menu/bottom_nanv_menu.xml
<?xml version="1.0" encoding="utf-8"?>
<menu xmlns:android="http://schemas.android.com/apk/res/android">
    <item
        android:id="@+id/navigation_home"
        android:icon="@drawable/home_icon"
        android:title="@string/title_home" />

    <item
        android:id="@+id/navigation_explore"
        android:icon="@drawable/explore_icon"
        android:title="@string/title_explore" />

    <item
        android:id="@+id/navigation_camera"
        android:icon="@drawable/camera_icon"
        android:title="@string/title_camera" />

    <item
        android:id="@+id/navigation_notifications"
        android:icon="@drawable/notification_icon"
        android:title="@string/title_notifications" />

    <item
        android:id="@+id/navigation_profile"
        android:icon="@drawable/account_icon"
        android:title="@string/title_profile" />
</menu>
res/valuse/string.xml에 string들을 등록해줍니다.
<string name="app_name">ChallWithDance</string>
    <string name="title_home">Home</string>
    <string name="title_explore">Explore</string>
    <string name="title_camera">Camera</string>
    <string name="title_notifications">Notifications</string>
    <string name="title_profile">Profile</string>
<string name="retry_text">Error occurred! Check your internet connection. Tap to retry</string>![]()
Frament 생성
layout 폴더 내에 activity_main.xml, fragment_camera.xml, fragment_explore.xml, fragement_home, fragment_notigications.xml, fragment_profile.xml을 생성합니다.
src/main/res/layout/activity_main.xml
constraintlayout으로 구성하고 BottomNavigation 설정을 해줍니다.
<?xml version="1.0" encoding="utf-8"?>
<androidx.constraintlayout.widget.ConstraintLayout xmlns:android="http://schemas.android.com/apk/res/android"
    xmlns:app="http://schemas.android.com/apk/res-auto"
    android:id="@+id/container"
    android:layout_width="match_parent"
    android:layout_height="match_parent"
    android:paddingTop="?attr/actionBarSize">

    <com.google.android.material.bottomnavigation.BottomNavigationView
        android:id="@+id/nav_view"
        android:layout_width="0dp"
        android:layout_height="wrap_content"
        android:layout_marginStart="0dp"
        android:layout_marginEnd="0dp"
        android:background="?android:attr/windowBackground"
        app:layout_constraintBottom_toBottomOf="parent"
        app:layout_constraintLeft_toLeftOf="parent"
        app:layout_constraintRight_toRightOf="parent"
        app:menu="@menu/bottom_nav_menu" />

    <fragment
        android:id="@+id/nav_host_fragment"
        android:name="androidx.navigation.fragment.NavHostFragment"
        android:layout_width="match_parent"
        android:layout_height="match_parent"
        app:defaultNavHost="true"
        app:layout_constraintBottom_toTopOf="@id/nav_view"
        app:layout_constraintLeft_toLeftOf="parent"
        app:layout_constraintRight_toRightOf="parent"
        app:layout_constraintTop_toTopOf="parent"
        app:navGraph="@navigation/mobile_navigation" />

</androidx.constraintlayout.widget.ConstraintLayout>
src/main/res/layout/fragment_camera.xml
<?xml version="1.0" encoding="utf-8"?>
<androidx.constraintlayout.widget.ConstraintLayout xmlns:android="http://schemas.android.com/apk/res/android"
    xmlns:app="http://schemas.android.com/apk/res-auto"
    xmlns:tools="http://schemas.android.com/tools"
    android:layout_width="match_parent"
    android:layout_height="match_parent"
    tools:context=".ui.camera.CameraFragment">

    <TextView
        android:id="@+id/text_camera"
        android:layout_width="match_parent"
        android:layout_height="wrap_content"
        android:layout_marginStart="8dp"
        android:layout_marginTop="8dp"
        android:layout_marginEnd="8dp"
        android:textAlignment="center"
        android:textSize="20sp"
        app:layout_constraintBottom_toBottomOf="parent"
        app:layout_constraintEnd_toEndOf="parent"
        app:layout_constraintStart_toStartOf="parent"
        app:layout_constraintTop_toTopOf="parent" />
</androidx.constraintlayout.widget.ConstraintLayout>
src/main/res/layout/fragment_explore.xml
<?xml version="1.0" encoding="utf-8"?>
<androidx.constraintlayout.widget.ConstraintLayout xmlns:android="http://schemas.android.com/apk/res/android"
    xmlns:app="http://schemas.android.com/apk/res-auto"
    xmlns:tools="http://schemas.android.com/tools"
    android:layout_width="match_parent"
    android:layout_height="match_parent"
    tools:context=".ui.explore.ExploreFragment">

    <TextView
        android:id="@+id/text_explore"
        android:layout_width="match_parent"
        android:layout_height="wrap_content"
        android:layout_marginStart="8dp"
        android:layout_marginTop="8dp"
        android:layout_marginEnd="8dp"
        android:textAlignment="center"
        android:textSize="20sp"
        app:layout_constraintBottom_toBottomOf="parent"
        app:layout_constraintEnd_toEndOf="parent"
        app:layout_constraintStart_toStartOf="parent"
        app:layout_constraintTop_toTopOf="parent" />
</androidx.constraintlayout.widget.ConstraintLayout>
src/main/res/layout/fragment_home.xml
<?xml version="1.0" encoding="utf-8"?>
<androidx.constraintlayout.widget.ConstraintLayout xmlns:android="http://schemas.android.com/apk/res/android"
    xmlns:app="http://schemas.android.com/apk/res-auto"
    xmlns:tools="http://schemas.android.com/tools"
    android:layout_width="match_parent"
    android:layout_height="match_parent"
    tools:context=".ui.home.HomeFragment">

    <TextView
        android:id="@+id/text_home"
        android:layout_width="match_parent"
        android:layout_height="wrap_content"
        android:layout_marginStart="8dp"
        android:layout_marginTop="8dp"
        android:layout_marginEnd="8dp"
        android:textAlignment="center"
        android:textSize="20sp"
        app:layout_constraintBottom_toBottomOf="parent"
        app:layout_constraintEnd_toEndOf="parent"
        app:layout_constraintStart_toStartOf="parent"
        app:layout_constraintTop_toTopOf="parent" />
</androidx.constraintlayout.widget.ConstraintLayout>
src/main/res/layout/fragment_notifications.xml
<?xml version="1.0" encoding="utf-8"?>
<androidx.constraintlayout.widget.ConstraintLayout xmlns:android="http://schemas.android.com/apk/res/android"
    xmlns:app="http://schemas.android.com/apk/res-auto"
    xmlns:tools="http://schemas.android.com/tools"
    android:layout_width="match_parent"
    android:layout_height="match_parent"
    tools:context=".ui.notifications.NotificationsFragment">

    <TextView
        android:id="@+id/text_notifications"
        android:layout_width="match_parent"
        android:layout_height="wrap_content"
        android:layout_marginStart="8dp"
        android:layout_marginTop="8dp"
        android:layout_marginEnd="8dp"
        android:textAlignment="center"
        android:textSize="20sp"
        app:layout_constraintBottom_toBottomOf="parent"
        app:layout_constraintEnd_toEndOf="parent"
        app:layout_constraintStart_toStartOf="parent"
        app:layout_constraintTop_toTopOf="parent" />
</androidx.constraintlayout.widget.ConstraintLayout>
src/main/res/layout/fragment_profile.xml
<?xml version="1.0" encoding="utf-8"?>
<androidx.constraintlayout.widget.ConstraintLayout xmlns:android="http://schemas.android.com/apk/res/android"
    xmlns:app="http://schemas.android.com/apk/res-auto"
    xmlns:tools="http://schemas.android.com/tools"
    android:layout_width="match_parent"
    android:layout_height="match_parent"
    tools:context=".ui.profile.ProfileFragment">

    <TextView
        android:id="@+id/text_profile"
        android:layout_width="match_parent"
        android:layout_height="wrap_content"
        android:layout_marginStart="8dp"
        android:layout_marginTop="8dp"
        android:layout_marginEnd="8dp"
        android:textAlignment="center"
        android:textSize="20sp"
        app:layout_constraintBottom_toBottomOf="parent"
        app:layout_constraintEnd_toEndOf="parent"
        app:layout_constraintStart_toStartOf="parent"
        app:layout_constraintTop_toTopOf="parent" />
</androidx.constraintlayout.widget.ConstraintLayout>
MainActivity.kt에 BottomNavigationBar 등록
package com.example.ChallWithDance

import android.graphics.Color
import android.os.Bundle
import android.view.View
import androidx.appcompat.app.AppCompatActivity
import androidx.navigation.findNavController
import androidx.navigation.ui.setupWithNavController
import com.google.android.material.bottomnavigation.BottomNavigationView

class MainActivity : AppCompatActivity() {

    override fun onCreate(savedInstanceState: Bundle?) {
        super.onCreate(savedInstanceState)
        setContentView(R.layout.activity_main)
        val navView: BottomNavigationView = findViewById(R.id.nav_view)

        val navController = findNavController(R.id.nav_host_fragment)
        navView.setupWithNavController(navController)

        navController.addOnDestinationChangedListener { _, destination, _ ->
            when (destination.id) {
                R.id.navigation_home -> fullScreen()
                R.id.navigation_camera -> fullScreen()
                else -> clearFullScreen()
            }
        }
    }


    private fun fullScreen() {
        window.decorView.systemUiVisibility =
            View.SYSTEM_UI_FLAG_LAYOUT_STABLE or View.SYSTEM_UI_FLAG_LAYOUT_FULLSCREEN
        window.statusBarColor = Color.TRANSPARENT
        window.setBackgroundDrawableResource(R.color.black)
    }

    private fun clearFullScreen() {
        window.clearFlags(View.SYSTEM_UI_FLAG_LAYOUT_FULLSCREEN)
        window.decorView.systemUiVisibility = View.SYSTEM_UI_FLAG_LIGHT_STATUS_BAR
        window.statusBarColor = Color.WHITE
        window.setBackgroundDrawableResource(R.color.colorPrimary)
    }
💁♀️ Home Layout 세부 설정하기
완성 화면
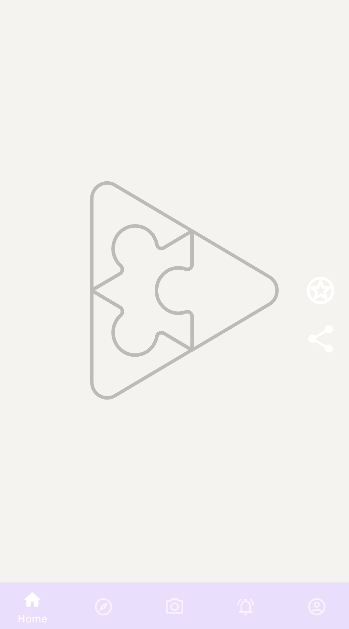
😂 Home Fragement Layout 구성
전체 화면 구성은 Constartraintlayout으로 구성해줍니다.
- 동영상 재생을 위해서 ExoPalyer 가져오기
- 관심 동영상 선택을 위해서 ToggleButton 설정
- 동영상 공유를 위해서 공유 Image 넣기
- 동영상 로딩 상태 표시 Image 넣기
resize_mode를 fill로 구성함으로써 어떤 사이즈의 비디오도 화면을 꽉차게 만들어주고, use_controller의 값을 True로 줌으로써 만들어놨던 palyer_view.xml Layout으로 재구성 할 수 있도록 바꿔줍니다.
<?xml version="1.0" encoding="utf-8"?>
<androidx.constraintlayout.widget.ConstraintLayout xmlns:android="http://schemas.android.com/apk/res/android"
    xmlns:app="http://schemas.android.com/apk/res-auto"
    xmlns:tools="http://schemas.android.com/tools"
    android:layout_width="match_parent"
    android:layout_height="match_parent"
    tools:context=".ui.home.HomeFragment">

    <com.google.android.exoplayer2.ui.PlayerView
        android:id="@+id/player_view"
        android:layout_width="0dp"
        android:layout_height="match_parent"
        android:elevation="0dp"
        app:controller_layout_id="@layout/player_home"
        app:layout_constraintEnd_toEndOf="parent"
        app:layout_constraintStart_toStartOf="parent"
        app:layout_constraintTop_toTopOf="parent"
        app:resize_mode="fill"
        app:show_buffering="always"
        app:use_controller="true" />

    <ToggleButton
        android:id="@+id/switch_like"
        android:layout_width="@dimen/round_button_small"
        android:layout_height="@dimen/round_button_small"
        android:layout_margin="18dp"
        android:background="@drawable/star_icon"
        android:backgroundTint="@color/star_button_color"
        android:elevation="2dp"
        android:textOff=""
        android:textOn=""
        app:layout_constraintBottom_toBottomOf="parent"
        app:layout_constraintEnd_toEndOf="parent"
        app:layout_constraintTop_toTopOf="parent" />

    <ImageView
        android:id="@+id/share"
        android:layout_width="@dimen/round_button_small"
        android:layout_height="@dimen/round_button_small"
        android:layout_margin="18dp"
        android:clickable="true"
        android:elevation="2dp"
        android:focusable="true"
        android:foreground="?android:attr/selectableItemBackgroundBorderless"
        android:src="@drawable/ic_share_black_24dp"
        android:tint="@android:color/white"
        app:layout_constraintEnd_toEndOf="parent"
        app:layout_constraintTop_toBottomOf="@id/switch_like" />

    <LinearLayout
        android:id="@+id/layout_retry"
        android:layout_width="0dp"
        android:layout_height="0dp"
        android:clickable="true"
        android:elevation="8dp"
        android:focusable="true"
        android:gravity="center"
        android:orientation="vertical"
        android:visibility="gone"
        app:layout_constraintBottom_toBottomOf="parent"
        app:layout_constraintEnd_toEndOf="parent"
        app:layout_constraintStart_toStartOf="parent"
        app:layout_constraintTop_toTopOf="parent">

        <ImageView
            android:id="@+id/loading"
            android:layout_width="@dimen/round_button_small"
            android:layout_height="@dimen/round_button_small"
            android:clickable="false"
            android:tint="@android:color/white"
            android:visibility="gone"
            app:srcCompat="@drawable/autorenew_black_24dp" />

        <TextView
            android:id="@+id/text_retry"
            android:layout_width="wrap_content"
            android:layout_height="wrap_content"
            android:layout_margin="18dp"
            android:clickable="false"
            android:text="@string/retry_text"
            android:textAlignment="center"
            android:textColor="@android:color/white"
            android:textSize="17sp"
            android:visibility="gone" />
    </LinearLayout>


</androidx.constraintlayout.widget.ConstraintLayout>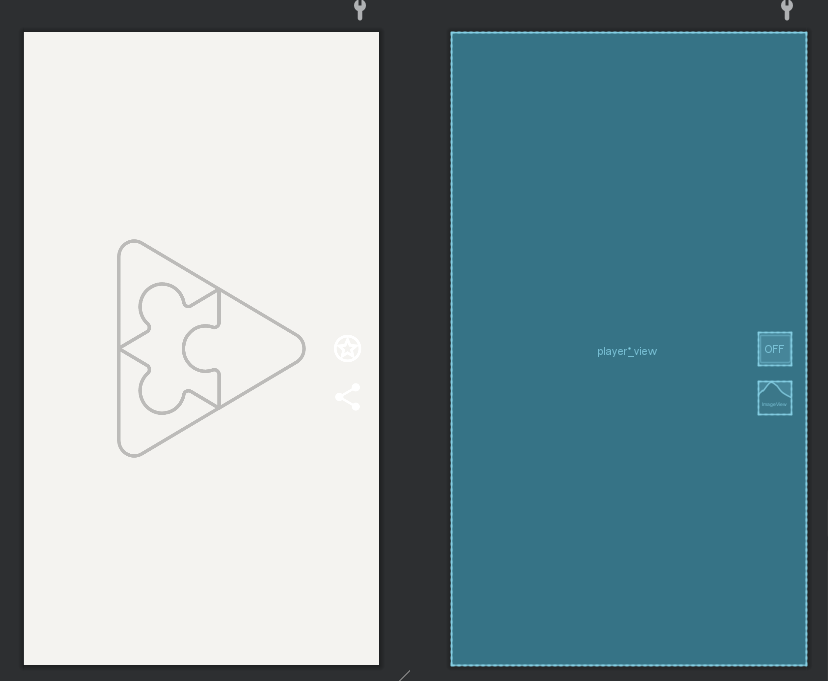
Player_Home.xml
홈 화면의 구성을 만듭니다.
- 이미지 버튼을 통해 Play, Pause, Progress bar을 배치시켜줍니다.
<?xml version="1.0" encoding="utf-8"?>
<FrameLayout xmlns:android="http://schemas.android.com/apk/res/android"
    android:layout_width="match_parent"
    android:layout_height="match_parent">

    <ImageButton
        android:id="@id/exo_play"
        style="@style/ExoMediaButton.Play"
        android:layout_width="100dp"
        android:layout_height="100dp"
        android:layout_gravity="center" />

    <ImageButton
        android:id="@id/exo_pause"
        style="@style/ExoMediaButton.Pause"
        android:layout_width="100dp"
        android:layout_height="100dp"
        android:layout_gravity="center" />

    <com.google.android.exoplayer2.ui.DefaultTimeBar
        android:id="@id/exo_progress"
        android:layout_width="match_parent"
        android:layout_height="wrap_content"
        android:layout_gravity="bottom"
        android:layout_margin="18dp" />

</FrameLayout>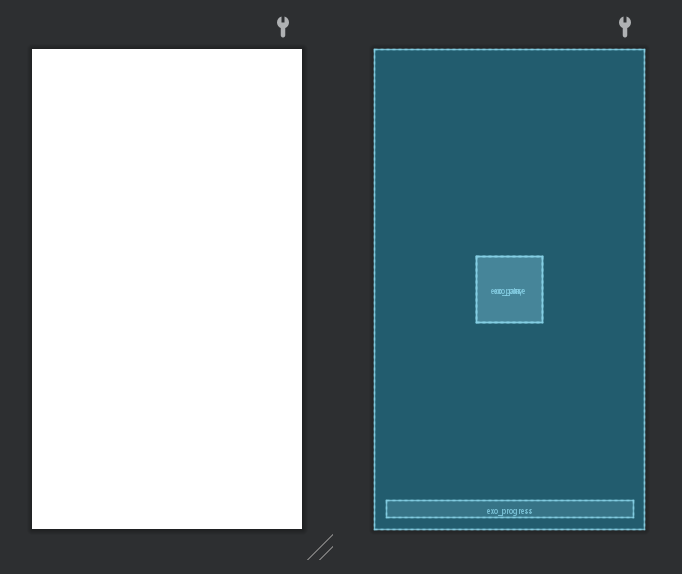
드디어 레이아웃 설정의 기본 단계는 마쳤다!!!!!
💁♀️Video db 연결
Home 구성하기
🙌Retrofit 서비스를 사용해서 data를 fetching 해오고 이를 통해서 동시적으로 비디오 data를 사용자 기기에서 송출될 수 있도록 만들 것입니다.
👍Retrofit 서비스에 대한 간단한 설명은 아래에 나옵니다!
비디오 플레이어가 온라인으로 비디오를 가져오도록 만들 것이기 때문에, API를 호출하고 응답을 받을 http 클라이언트를 만들어야합니다. 하지만 우선은, 'Cloudinary'에서 sample video를 가져와 테스트할 것입니다.
Cloudinary란?
Cloudinary 는 SaaS 기술 회사이다. 이 회사는 클라우드 기반 이미지 및 비디오 관리 서비스를 제공한다. 이를 통해 사용자는 웹 사이트 및 앱에 대한 이미지와 비디오를 업로드, 저장, 관리, 조작 및 전달할 수 있다.
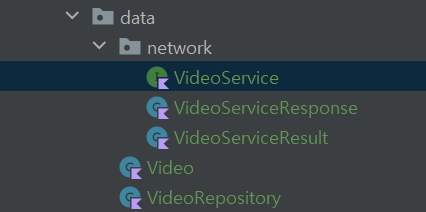
- 최상위 폴더에 data 디렉토리를 만들기
- data 디렉토리에 Video, VideoRepository kotlin 파일 생성
- data 디렉토리 안에 network 디렉토리 생성
- data 디렉토리에 VideoServic Interface 파일, VideoServiceResponse, VideoServiceResult kotlin 파일 생성
서버에서 API를 통해 JSON 값들을 내려받으면 클라이언트인 안드로이드는 이를 파싱해서 필요한 곳에 알맞게 값들을 넣어주거나 표시해야 한다.
그러나 매번 JSONObject, JSONArray를 일일이 선언해서 파싱하기는 번거롭기에 이를 해결하기 위해존재하는 라이브러리가 바로 Gson이라는 라이브러리이다.
Gson은 자바 객체에서 JSON 변환할 때 사용할 수 있는 자바 라이브러리다.
JSON을 Kotlin Data Class로 변경해준다. @SerializedName annotation은 object를 serialization 하거나 deserialization 할 때 사용한다. 이 경우, 필드 publicId는 parsing동안 public_id로 해석된다.
Video.kt 파일 작성
package com.example.data

import com.google.gson.annotations.SerializedName

data class Video(
    @SerializedName("public_id") val publicId: String,
    val version: Int,
    val format: String,
    val width: Int,
    val height: Int,
    val type: String,
    @SerializedName("created_at") val createdAt: String
)
VideoService.kt 파일 작성
API 호출을 수행하기 위해 Retrofit 라이브러리에 의해 사용되는 인터페이스 클래스가 될 것이다.
Retrofit이란?
모바일에서 HTTP API 통신을 할 때 사용하는 라이브러리이다.안드로이드 애플리케이션에서 통신 기능에 사용하는 코드를 사용하기 쉽게 만들어놓았다. REST기반의 웹서비스를 통해 JSON 구조를 쉽게 가져오고 업로드할 수 있다.
Retrofit은 interface을 정의하고, 이 interface class을 Retrofit에 초기화를 하는 과정을 거치면, HTTP 통신을 할 준비가 완료된다.
video의 metadata와 url을 클라우드 샘플에서 fetch 하기 위한 과정을 수행할 것이다.
- @GET에 API endpoint를 정의합니다.
- companion object 안에 base url을 설정해주고, VideoService의 인스턴스를 생성해주는 function을 정의합니다.
- HTTP logger을 생성하여 네트워크 콜 이벤트를 log하는데 사용합니다.
- Retrofit.Builder 설정을 통해 네트워크 콜 이벤트를 발생시킵니다.
package com.example.ChallwithDance.data.network

import okhttp3.OkHttpClient
import okhttp3.logging.HttpLoggingInterceptor
import retrofit2.Retrofit
import retrofit2.converter.gson.GsonConverterFactory
import retrofit2.http.GET

interface VideoService {
   @GET("demo/video/list/samples.json")
   suspend fun fetchVideos(): VideoServiceResponse

   companion object {
       private const val BASE_URL = "https://res.cloudinary.com/"

       fun create(): VideoService {
           val logger =
               HttpLoggingInterceptor().apply { level = HttpLoggingInterceptor.Level.BASIC }

           val client = OkHttpClient.Builder()
               .addInterceptor(logger)
               .build()

           return Retrofit.Builder()
               .baseUrl(BASE_URL)
               .client(client)
               .addConverterFactory(GsonConverterFactory.create())
               .build()
               .create(VideoService::class.java)
       }
   }
}
이 클래스에서 받은 response를 다룰 수 있는 클래스를 설정합니다.
VideoServiceResponse 작성
Json data의 포맷은 "resources":[ { } ]" 로 이루어져, root element는 resources 입니다. 따라서 resources의 value를 받아 JSON 형태의 data를 받을 수 있도록 합니다.
package com.example.ChallWithDance.data.network

import com.example.ChallWithDance.data.Video
import com.google.gson.annotations.SerializedName

data class VideoServiceResponse(
    @SerializedName("resources") val videos: List<Video>
)
VideoServiceResult.kt 작성
받아온 네트워크 콜을 보여줄 수 있도록 만들어줍니다.
이미 response class를 작성했는데 왜 result class가 필요할까요?
현재 reponse는 server에 의해 응답받은 것입니다. 이것은 server에서 주는 그 어떤 것들도 포함할 수 있습니다. 예를 들어, Json Response일 수도 있고, Error Message일 수도 있습니다. 하지만 저희는 Json Response 이외에 아무것도 필요하지 않습니다. 따라서, 저희가 원했던 video metadata만을 포함하도록 정리해줄 필요가 있습니다.
package com.example.ChallWithDance.data.network

sealed class VideoServiceResult {
    data class Success(val data: VideoServiceResponse) : VideoServiceResult()
    data class Error(val error: Exception) : VideoServiceResult()
}
VideoRepository.kt 작성
이 클래스는 VideoService를 부르고, 응답과 처리결과를 다루는데에 사용됩니다.
- videoServiceresult를 담는 변수 생성
- getVideoOnlin(), requestVideo() function 생성
- getVideoOnline() 안에는 비디오를 요청하고 응답으로 videoResult를 돌려받기
- requestVideo()는
- 첫째, fetchVideo를 요청하고 responce 변수에 넣기
- 둘째, VideoServiceResult를 요청
- 이외에 응답을 받지 못했을 때, 예외를 처리해주는 코드 넣어주기
videoResult.asFlow()는 데이터의 stream 형태로 video를 받아온다는 의미입니다.
package com.example.ChallWithDance.data

import com.example.ChallWithDance.data.network.VideoService
import com.example.ChallWithDance.data.network.VideoServiceResult
import kotlinx.coroutines.channels.ConflatedBroadcastChannel
import kotlinx.coroutines.flow.Flow
import kotlinx.coroutines.flow.asFlow
import retrofit2.HttpException
import java.io.IOException

class VideoRepository(private val videoService: VideoService) {

    private val videoResult = ConflatedBroadcastChannel<VideoServiceResult>()

    suspend fun getVideoOnline(): Flow<VideoServiceResult> {
        requestVideo()
        return videoResult.asFlow()
    }

    private suspend fun requestVideo() {
        try {
            val response = videoService.fetchVideos()
            videoResult.offer(VideoServiceResult.Success(response))
        } catch (exception: IOException) {
            videoResult.offer(VideoServiceResult.Error(exception))
        } catch (exception: HttpException) {
            videoResult.offer(VideoServiceResult.Error(exception))
        }
    }
}
비디오를 레포지토리에 가져오는 것까지 마쳤다!!!!!

🙋♀️ViewModel 만들기
- 파일 구성하기
LifeCycle이란?
드로이드의 컴포넌트는 Lifecycle을 가지고 있습니다.
Lifecycle은 컴포넌트가 생성되고 사라지기 전까지 갖게되는 상태의 집합입니다.
컴포넌트는 사용자가 앱을 사용하면서 일어나는 상황에따라 다른 상태로 전환되고, 전환될때마다 안드로이드 시스템은 Lifecycle 콜백을 호출해서 컴포넌트에게 상태 전환을 알려줍니다.
출처 LifeCycle이란
ViewModel이란?
뷰 모델은 ui관련 데이터를 라이프 사이클에 관계없이 저장하고 관리하기 위한 클래스입니다.
라이프 사이클에 관련이 없으므로 화면 회전이나, 폰트 변경 등 설정이 변경되어 액티비티가 다시 실행되더라도 데이터가 유지됩니다.
출처 AndroidDeveloper
파일구성
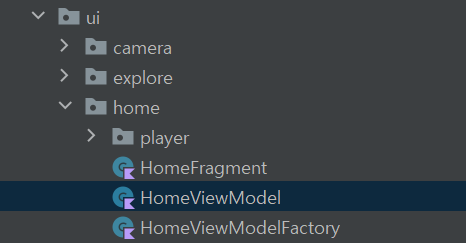
HomeViewModel.kt 작성
여기서 주목해야할 점은 어떻게 비디오를 fetching 하는가 입니다. 지금까지 저희는 ExoPlayer에게 비디오의 URL을 가져다 주는 작업까지 마쳤습니다.
- retry는 어떤 네트워크에서 에러가 생겼을 때 재호출을 합니다.
- getVideoServiceResult() function은 videoServiceResult의 라이브 데이터를 받아옵니다.
- VideoService의 flow를 받아서 livedata 형태를 변환한 뒤 값을 돌려줍니다.
package com.example.ChallWithDance.ui.home

import androidx.lifecycle.*
import com.example.ChallWithDance.data.VideoRepository
import com.example.ChallWithDance.data.network.VideoServiceResult
import com.example.ChallWithDance.ui.home.player.PlayerState
import com.google.android.exoplayer2.Player

class HomeViewModel(private val repository: VideoRepository) : ViewModel() {

    private val playerState = PlayerState(true, 0, 0L)
    val retry: MutableLiveData<Boolean> = MutableLiveData(false)

    private fun getVideoServiceResult(): LiveData<VideoServiceResult> = liveData {
        val videos = repository.getVideoOnline().asLiveData()
        emitSource(videos)
    }

    private val _retry: LiveData<VideoServiceResult> =
        Transformations.switchMap(retry) { getVideoServiceResult() }

    val urls: LiveData<List<String>> =
        Transformations.map(_retry) { videos ->
            val listOfUrl = mutableListOf<String>()
            when (videos) {
                is VideoServiceResult.Success -> {
                    videos.data.videos.forEach { video ->
                        if (video.format == "mp4" && !video.publicId.contains(" ")) {
                            listOfUrl.add("https://res.cloudinary.com/demo/video/${video.type}/v${video.version}/${video.publicId}.${video.format}")
                        }
                    }
                    return@map listOfUrl
                }
                is VideoServiceResult.Error -> emptyList<String>()
            }
        }

    fun setPlayerState(player: Player) {
        playerState.playWhenReady = player.playWhenReady
        playerState.currentWindow = player.currentWindowIndex
        playerState.playbackPosition = player.currentPosition
    }

    fun getPlayerState() = playerState

}
HomeViewModelFactory.kt 작성
다음은 뷰모델의 의존성을 부여하는 factory class를 작성해줍니다.
package com.example.ChallWithDance.ui.home

import androidx.lifecycle.ViewModel
import androidx.lifecycle.ViewModelProvider
import com.example.zigzag.data.VideoRepository

class HomeViewModelFactory(
    private val videoRepository: VideoRepository
) : ViewModelProvider.Factory {
    @Suppress("UNCHECKED_CAST")
    override fun <T : ViewModel?> create(modelClass: Class<T>): T {
        return HomeViewModel(
            videoRepository
        ) as T
    }
}
드디어 마쳤습니다!!! 이전에도 안드로이드 앱 개발을 해본 적은 있지만, 비디오 fetching 과 뷰모델을 직접 개발해 본 경험은 이번이 처음이라 애를 많이 먹었다😂😂
방학동안 개발하면서 더 많은 부분을 채워나갈 수 있었으면 좋겠다😊


잘 읽었어요~