사용자 정보를 담을Member엔티티 관련 기본 구현SecurityConfig작성예제에서 사용할 간단한 프론트 페이지 구현- 이메일 인증 기능 추가
사용자 인증을 위한UserDetailsJWT 생성, 검출, 발급, 검증 구현- 액세스 토큰
- 리프레시 토큰
- 로그인 유지
1. Introduction
로그인을 하면서 발급 받은 액세스 토큰으로 인증을 해보자.
2. JsonAuthenticationFilter
@Slf4j
public class JwtAuthenticationFilter extends AbstractAuthenticationProcessingFilter {

    private final JwtService jwtService;

    public JwtAuthenticationFilter(RequestMatcher requestMatcher, JwtService jwtService) {
        super(requestMatcher);
        this.jwtService = jwtService;
    }

    @Override
    public Authentication attemptAuthentication(HttpServletRequest request, HttpServletResponse response) throws AuthenticationException, IOException, ServletException {
        String accessToken = jwtService.extractAccessToken(request)
                .orElseThrow(() -> new AuthenticationServiceException("No access token"));

        Authentication preAuthentication = JwtAuthenticationToken.unAuthenticated(accessToken, null);
        return this.getAuthenticationManager().authenticate(preAuthentication);
    }

    @Override
    protected void successfulAuthentication(HttpServletRequest request, HttpServletResponse response, FilterChain chain, Authentication authResult) throws IOException, ServletException {

        JwtAuthenticationToken jwtAuthenticationToken = (JwtAuthenticationToken) authResult;
        SecurityContextHolder.getContext().setAuthentication(jwtAuthenticationToken);
        chain.doFilter(request, response);
    }
}attemptAuthentication()에서는 이전에 구현한 JwtService를 이용해 요청에서 액세스 토큰을 추출하고, 이를 JwtAuthenticationToken 객체의 principal로 넣어 인증 매니저로 인증을 진행한다.
인증에 성공하면 아래의 successfulAuthentication()에서, 인증 매니저가 뱉어낸 Authentication 객체를 보안 컨텍스트에 저장하고 filterChain.dofilter()로 다음 필터로 넘어간다. AbstractAuthenticationProcessingFilter의 기본 구현에서는 인증을 성공하면 그 다음 필터로 넘어가지 않는다. 이전 글의 JsonUsernamePasswordAuthenticationFilter과 비교해보자.
주목할 점은 생성자에서 받고 있는 requestMatcher다. 이 필터는 JWT 인증이 필요하지 않은 요청들을 제외한, 모든 요청을 필터링해야 한다.
public class FilterSkipMatcher implements RequestMatcher {

    private final OrRequestMatcher orRequestMatcher;

    public FilterSkipMatcher(List<String> skipList) {
        this.orRequestMatcher = new OrRequestMatcher(
            skipList.stream()
                    .map(AntPathRequestMatcher::new)
                    .collect(Collectors.toList())
        );
    }

    @Override
    public boolean matches(HttpServletRequest request) {
        return !orRequestMatcher.matches(request);
    }
}
이 FilterSkipMatcher 클래스가 그 역할을 한다. 생성자의 인자로 들어오는, 스킵할 요청 URI의 리스트 안에 있는 URI는 막고, 그것들을 제외한 모든 URI는 통과시킨다. SecurityConfig에서 필터를 등록할 때 FilterSkipMatcher 객체를 주입시켜줄 것이다.
public class JwtAuthenticationToken extends AbstractAuthenticationToken {

    private final Object principal;
    private final Object credentials;

    protected JwtAuthenticationToken(Object principal, Object credentials) {
        super(null);
        setAuthenticated(false);
        this.principal = principal;
        this.credentials = credentials;
    }

    protected JwtAuthenticationToken(Object principal, Object credentials, Collection<? extends GrantedAuthority> authorities) {
        super(authorities);
        setAuthenticated(true);
        this.principal = principal;
        this.credentials = credentials;
    }

    public static JwtAuthenticationToken authenticated(Object principal, Object credentials, Collection<? extends GrantedAuthority> authorities){
        return new JwtAuthenticationToken (principal, credentials, authorities);
    }

    public static JwtAuthenticationToken unAuthenticated(Object principal, Object credentials){
        return new JwtAuthenticationToken(principal, credentials);
    }

    @Override
    public Object getCredentials() {
        return this.credentials;
    }

    @Override
    public Object getPrincipal() {
        return this.principal;
    }
}JwtAuthenticationToken은 인증을 할 토큰이다. public static 메서드를 만들어 인증 처리가 되기 전후 principal 필드의 의미가 바뀐다. 인증 전에는 액세스토큰에 해당하는 String, 인증 후에는 UserDetails에 해당한다.
3. JwtAuthenticationProvider
@RequiredArgsConstructor
public class JwtAuthenticationProvider implements AuthenticationProvider {

    private final JwtService jwtService;
    private UserDetailsService userDetailsService;

    @Override
    public Authentication authenticate(Authentication authentication) throws AuthenticationException {
        String accessToken = authentication.getPrincipal().toString();
        UserDetails userDetails = retrieveUser(accessToken);
        return new JwtAuthenticationToken(userDetails, null, userDetails.getAuthorities());
    }

    protected UserDetails retrieveUser(String accessToken) throws AuthenticationException {
        return jwtService.extractName(accessToken)
                .map(userDetailsService::loadUserByUsername)
                .orElseThrow(()-> new AuthenticationServiceException("Could not extract username from JWT token"));
    }

    @Override
    public boolean supports(Class<?> authentication) {
        return ClassUtils.isAssignable(JwtAuthenticationToken.class, authentication);
    }

    public void setUserDetailsService(UserDetailsService userDetailsService) {
        this.userDetailsService = userDetailsService;
    }
AuthenticationManager 안에는 여러 개의 AuthenticationProvider들이 있고, 이들은 자신이 처리할 수 있는 인증 토큰의 종류에 따라 저마다의 인증 처리를 진행한다. boolean supports()에 이 토큰이 JwtAuthenticationToken 클래스의 토큰에 대한 인증 처리를 할 것임을 명시해놨다.
인증은 간단하게 말해, JwtService를 이용해 주어진 액세스 토큰에서 사용자의 이름을 추출하고 해당 이름으로 DB에서 사용자를 로드하는 방식으로 이루어진다. loadUserByUsername()으로 반환되는 UserDetails 객체는 JwtAuthenticationToken의 principal로 들어간다.
4. SecurityConfig
    public JwtAuthenticationFilter jwtAuthenticationFilter() throws Exception{
        List<String> skipList = new ArrayList<>();
        skipList.add("/login");
        skipList.add("/member/register");

        FilterSkipMatcher skipMatcher = new FilterSkipMatcher(skipList);

        JwtAuthenticationFilter filter = new JwtAuthenticationFilter(skipMatcher, jwtService);
        filter.setAuthenticationManager(authenticationManager());
        return filter;
    }
통과시킬 URI 리스트를 만들고 이를 통해 FilterSkipMatcher 객체를 만들어 JwtAuthenticationFilter 객체에 주입한다. 필터의 인증 매니저도 설정해준다.
    @Bean
    public AuthenticationManager authenticationManager() throws Exception {
        DaoAuthenticationProvider daoAuthenticationProvider = new DaoAuthenticationProvider();
        daoAuthenticationProvider.setPasswordEncoder(passwordEncoder());
        daoAuthenticationProvider.setUserDetailsService(userDetailsService());

        JwtAuthenticationProvider jwtAuthenticationProvider = new JwtAuthenticationProvider(jwtService);
        jwtAuthenticationProvider.setUserDetailsService(userDetailsService());

        return new ProviderManager(daoAuthenticationProvider, jwtAuthenticationProvider);
    }
기존에 사용하던 인증 매니저에 JWT 인증 처리를 담당할 JwtAuthenticationProvider를 만들어 추가해준다. 이제 DaoAuthenticationProvider는 사용자명&비밀번호로 들어오는 인증 요청을 처리하고, JwtAuthenticationProvider는 JWT가 포함된 요청의 인증 처리에 쓰이게 될 것이다.
    @Bean
    public SecurityFilterChain httpFilterChain(HttpSecurity http) throws Exception {
        http
                .httpBasic(AbstractHttpConfigurer::disable)
                .cors(cors ->
                  cors.configurationSource(corsConfigurationSource()))
                .csrf(AbstractHttpConfigurer::disable)
                .formLogin(AbstractHttpConfigurer::disable)
                .sessionManagement(sessionManagement -> sessionManagement
                        .sessionCreationPolicy(SessionCreationPolicy.STATELESS))
                .authorizeHttpRequests((authorizeRequests) -> authorizeRequests
                        .requestMatchers("/login").permitAll()
                        .requestMatchers("/member/register/**").permitAll()
                        .anyRequest().authenticated()
                );

        http.addFilterAfter(jsonUsernamePasswordAuthenticationFilter(), LogoutFilter.class);
        http.addFilterBefore(jwtAuthenticationFilter(), JsonUsernamePasswordAuthenticationFilter.class);
        return http.build();
    }
이렇게 만든 필터를 필터 체인에 추가해줘야 한다. 필터를 이전에 추가한 JsonUsernamePasswordAuthentication 필터 앞에 추가해주기는 했지만, 이 둘이 서로 disjoint하니 순서는 크게 상관이 없을 것 같다.
(2025.05.23)
스프링 시큐리티에서 logout은 기본적으로 authenticated이므로 액세스 토큰 인증 -> 로그아웃 -> 로그인 순으로 필터 순서를 제어해야 할 것 같습니다.
- (액세스 토큰 인증 -> 로그아웃): 명시적 로그아웃 요청이 가능한 대상인지 확인 후 로그아웃 처리
- (로그아웃 -> 로그인): 로그아웃 처리가 완료되면 이후 필터를 거칠 필요가 없으므로 컷
4. 테스트
컨트롤러에 간단하게 테스트용 API를 만들어서 테스트해보자. 요청에 제대로 된 액세스 토큰이 담겨 있으면 브라우저 콘솔에 "hello"가 출력될 것이다.
//MemberController.java
    @GetMapping("/test")
    public ResponseEntity<String> authenticatedApi() {
        log.info("hello");
        return new ResponseEntity<>("hello", HttpStatusCode.valueOf(200));
    }
이전 글에서는 로그인을 해서 받은 액세스 토큰을 출력하기만 했지만, 이제는 받은 액세스 토큰을 저장해두고 사용해야 한다.
//./SignupForm.js
    const [accessToken, setAccesstoken] = useState('');

	// ...

    const handleLogin = async (e) => {
        e.preventDefault();
        const body = {
            username: username,
            password: password
        };

        axios.post('http://localhost:8080/login', body,
        { withCredentials: true },
        )
            .then((res) => {
                if (res.status === 200) {
                    let accessToken = res.headers['authorization'];
                    setAccesstoken(accessToken);
					//받아온 토큰을 자바스크립트 변수에 저장
                    console.log(accessToken);
                }
            })
            .catch((res) => {
                console.log(res);
            })
    }
요청을 보내기 위한 버튼도 하나 추가해주자.
    const handleAuthenticatedApiButton = async (e) => {
        e.preventDefault();

        axios.get('http://localhost:8080/member/test', {
            headers: {
                Authorization: accessToken //저장해놓은 액세스 토큰을 헤더에 넣어 보내자
            },
        })
            .then((res) => {
                if (res.status === 200) {
                    console.log(res.data) //"hello" 출력
                }
            })
            .catch((res) => {
                console.log(res);
            })
    }
	return (
		<div className="formContainer">
			<form onSubmit={handleSubmit} className="form">
				<div className="formGroup">
					<input className="formInput" onChange={e=>setUsername(e.target.value)} type="id" placeholder="이메일 입력" />
				</div>
				<div className="formGroup">
					<input className="formInput" onChange={e=>setPassword(e.target.value)} type="password" placeholder="비밀번호 입력" />
				</div>
				<button onClick={handleSubmit} className='submitButton' type='submit'> sign up </button>
				<button onClick={handleLogin} className='submitButton' type='submit'> login </button>
				<button onClick={handleAuthenticatedApiButton} className='submitButton' type='button'> api </button>
			</form>
		</div>
    )
테스트를 해보면?
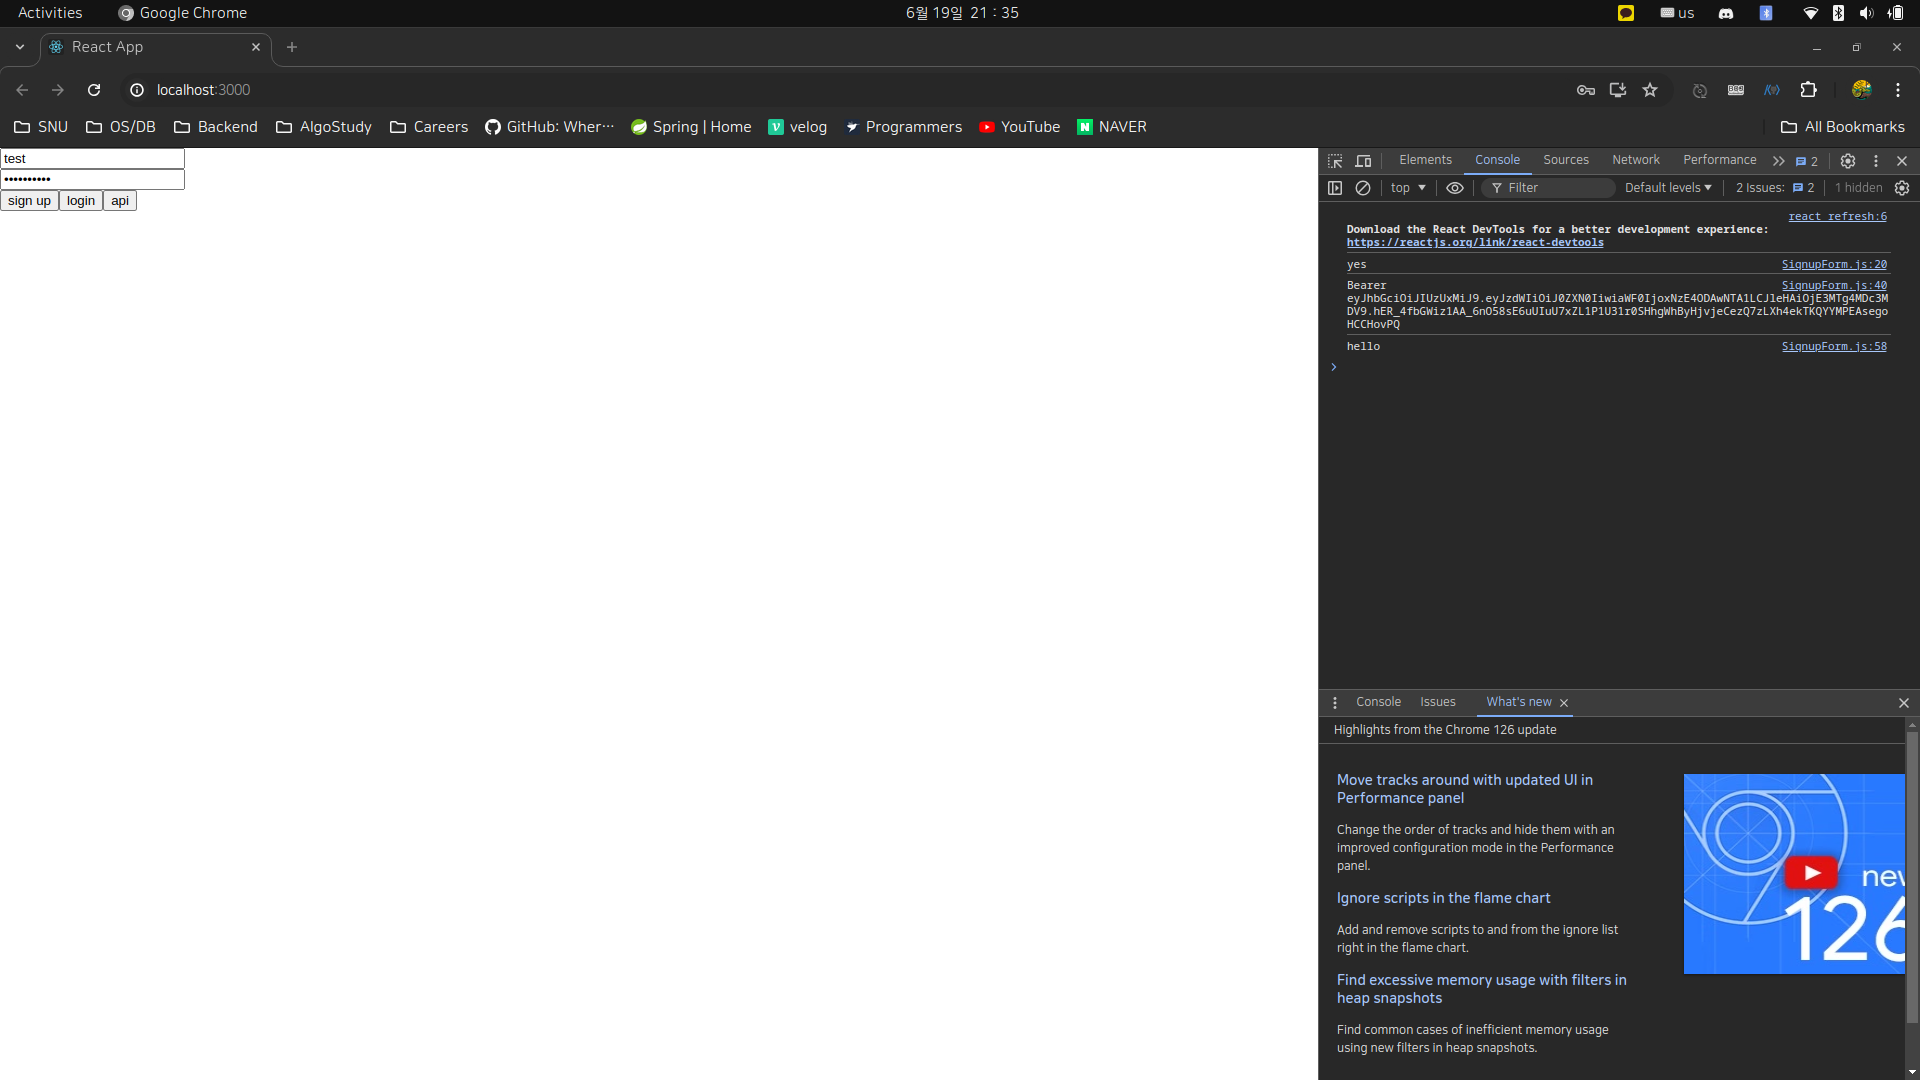
잘 나온다.
새로고침을 눌러 자바스크립트 변수에 저장된 액세스 토큰을 날려버리고 api 버튼을 누르면

액세스 토큰이 없어 인증에 실패하고 401 에러를 받게 된다.