1. Security Tag Library
- SecurityContextHolder
- SecurityContext
- Authentication
- Principal
- Credentials
- Authorities
1-1. Controller에서 사용하기
LoginController.java
package edu.global.ex.controller;

import java.security.Principal;

import org.springframework.security.core.Authentication;
import org.springframework.security.core.context.SecurityContextHolder;
import org.springframework.stereotype.Controller;
import org.springframework.ui.Model;
import org.springframework.web.bind.annotation.GetMapping;
import org.springframework.web.bind.annotation.RequestMapping;
import org.springframework.web.bind.annotation.RequestMethod;

import lombok.extern.slf4j.Slf4j;

@Slf4j
@Controller
public class LoginController {
	@GetMapping("/login")
	public String login() {
		log.info("login() ..");
		return "login/login";
	}

	@RequestMapping(value = "/loginInfo", method = RequestMethod.GET)
	public String loginInfo(Authentication authentication, Principal principal, Model model) {

		String user_id;

		// 1.SpringContextHolder를 통하여 가져오는 방법(일반적인 빈에서 사용 할수있음 )
		Authentication auth = SecurityContextHolder.getContext().getAuthentication();
		user_id = auth.getName();
		System.out.println("유저 아이디:" + user_id);

		// 2.authentication 객체로 가져오는 방법(많은 )
		System.out.println("authentication 유저 아이디:" + authentication.getName());
		System.out.println("authentication 권한들:" + authentication.getAuthorities());

		// 3.Principal 객체로 가져오는 방법(가져올수 있는게 getName() 정도
		System.out.println("Principal 유저 아이디:" + principal.getName());

		return "redirect:/";
	}

}
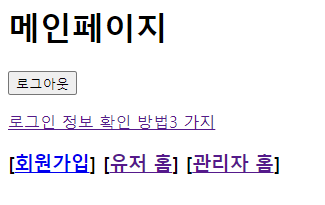
- '로그인 정보 확인방법 3가지' 클릭
(home.jsp에 a 링크로 걸려있는 것(/logInfo)을 @RequestMapping에서 실행)
[Console]
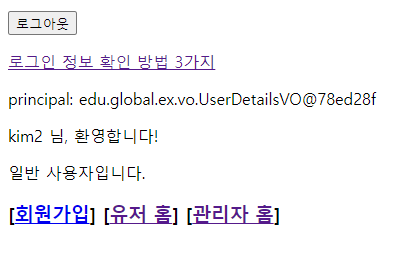
- (kim2, kim2로 접속 - 유저 계정)
유저 아이디:kim2
authentication 유저 아이디:kim2
authentication 권한들:[ROLE_USER]
Principal 유저 아이디:kim2
- (admin2, admin2로 접속 - 관리자 계정)
유저 아이디:admin2
authentication 유저 아이디:admin2
authentication 권한들:[ROLE_ADMIN]
Principal 유저 아이디:admin2
- 세션에 저장되어 있는 Security 객체의 내용을 가져오게 된다.
1-2. JSP에서 사용하기
- pom.xml에 spring-security-taglibs 내용이 있어야 한다.
- JSP 파일에서 Security Library를 쓴다고 선언해야 한다.
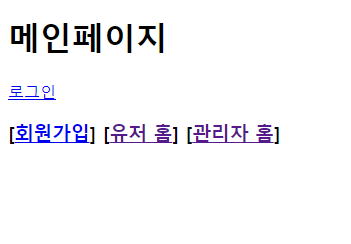
<%@ taglib prefix="sec" uri="http://www.springframework.org/security/tags"%><sec:authorize access="isAnonymous()">: 로그인이 아직 되지 않은 상태일 때<sec:authorize access="isAuthenticated()">: 로그인한 사람이 있을 때
1-3. 환영합니다 뿌려보기
	<sec:authorize access="isAuthenticated()">
		<form:form action="${pageContext.request.contextPath}/logout"
			method="POST">
			<input type="submit" value="로그아웃" />
		</form:form>
		<p>
			<a href="<c:url value="/loginInfo" />">로그인 정보 확인 방법 3가지</a>
		</p>
		<p>
			principal:
			<sec:authentication property="principal" />
		</p>
		<p>
			<sec:authentication property="principal.username" /> 님, 환영합니다!
		</p>
	</sec:authorize>
principal: edu.global.ex.vo.UserDetailsVO@603004b6
kim2 님, 환영합니다!
- 로그인한 사람에 대한 내용을 출력할 수 있다.
	<sec:authorize access="hasRole('ADMIN')">
		<p>관리자입니다.</p>
	</sec:authorize>

	<sec:authorize access="hasRole('USER')">
		<p>일반 사용자입니다.</p>
	</sec:authorize>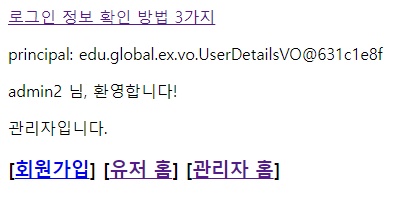
<sec:authentication property="principal.authorities" />: 사용자의 권한을 출력한다.
1-4. UserDetailsVO에 함수 만들고 home.jsp에 뿌리기
UserDetailsVO.java
	public String getCart() {
		return "장바구니";
	}
home.jsp
<p>
	<sec:authentication property="principal.cart" />
</p>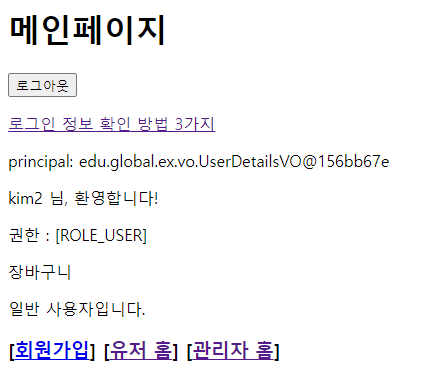

velog, GitHub, Notion 등에 작업물을 정리하고 있습니다.