글을 쓰게 된 이유
그동안은 회사에서 tensorflow를 사용해왔다. 공개된 weight, 코드가 pytorch인 경우가 많고, 이때 회사에서 구현한 api에서 pytorch도 사용할 수 있도록 포팅을 하고 있다.
요구사항은 다음과 같다.
- 인자만 바꾸면 pytorch와 tensorflow를 선택해서 쓸 수 있게 기존에 구현된 tensorflow의 인자에 맞추어 pytorch 함수 구현
- 학습 시 최대한 같은 결과가 나올 수 있게 구현
Linear Layer, Conv Layer 등 Layer를 생성하는 함수를 구현하는 과정에서 tensorflow와 pytorch의 Layer Weight Innitialization 방법이 달라 이를 맞추며 공부한 내용이다.
Weight Initialization?
pytorch 사용자라면 아래와 같은 코드를 본적이 있을 것이다.
import torch
import torch.nn as nn
import torch.nn.init as init
from torchvision import models
from torchvision.models.vgg import model_urls

def init_weights(modules):
    for m in modules:
        if isinstance(m, nn.Conv2d):
            init.xavier_uniform_(m.weight.data)
            if m.bias is not None:
                m.bias.data.zero_()
        elif isinstance(m, nn.BatchNorm2d):
            m.weight.data.fill_(1)
            m.bias.data.zero_()
        elif isinstance(m, nn.Linear):
            m.weight.data.normal_(0, 0.01)
            m.bias.data.zero_()

class vgg16_bn(torch.nn.Module):
    def __init__(self, pretrained=True, freeze=True):
        super(vgg16_bn, self).__init__()
        model_urls['vgg16_bn'] = model_urls['vgg16_bn'].replace('https://', 'http://')
        vgg_pretrained_features = models.vgg16_bn(pretrained=pretrained).features
        self.slice1 = torch.nn.Sequential()
        self.slice2 = torch.nn.Sequential()
        self.slice3 = torch.nn.Sequential()
        self.slice4 = torch.nn.Sequential()
        self.slice5 = torch.nn.Sequential()
        for x in range(12):         # conv2_2
            self.slice1.add_module(str(x), vgg_pretrained_features[x])
        for x in range(12, 19):         # conv3_3
            self.slice2.add_module(str(x), vgg_pretrained_features[x])
        for x in range(19, 29):         # conv4_3
            self.slice3.add_module(str(x), vgg_pretrained_features[x])
        for x in range(29, 39):         # conv5_3
            self.slice4.add_module(str(x), vgg_pretrained_features[x])

        # fc6, fc7 without atrous conv
        self.slice5 = torch.nn.Sequential(
                nn.MaxPool2d(kernel_size=3, stride=1, padding=1),
                nn.Conv2d(512, 1024, kernel_size=3, padding=6, dilation=6),
                nn.Conv2d(1024, 1024, kernel_size=1)
        )

        if not pretrained:
            init_weights(self.slice1.modules())
            init_weights(self.slice2.modules())
            init_weights(self.slice3.modules())
            init_weights(self.slice4.modules())

...
Layer를 만들고, init_weights 함수를 통해 Layer의 weight를 어떤 분포를 가지도록 초기화하는 것이다. 이러한 가중치 초기화는 왜 필요한 것일까?
최적화(optimization) 에서 가중치의 초깃값에 따라 local minimum에 빠지느냐 global minimum을 찾느냐가 결정되기도 한다. 아무리 좋은 optimzer를 쓰더라도 가중치의 초깃값을 잘못 설정하면 global minimum에 수렴하기가 쉽지 않다.
딥러닝 모델은 거대한 feature space를 가지고 있기 때문에 올바른 초기값을 설정하는 것은 어렵다. 그래서 조금 다른 목적으로 사용된다.
forward시 에는 전달되는 값이 너무 너무 작아지거나 커지지 않도록
backward시 에는 gradient값이 너무 작아지거나(gradient vanishing) 너무 커지지 않도록(gradient exploding)
가중치의 값을 적절히 초기화를 해야한다.
또한 활성화함수(activation function)이 선형인지, 비선형인지에 따라 다른 분포로 초기화를 해야한다.
(보다 자세한 설명은 이 글이 도움이 될 것이다.)
초기화를 하는데에는 다양한 분포가 사용된다. 이 글에서는 많은 분포를 다 다루지는 않고, lecun uniform과 lecun normal을 중점적으로 다룰 것이다.
두 라이브러리의 Weight & bias initialzation 비교
큰 차이점 두가지는 분포의 이름과 초기화 방법이다.
-
이름
pytorch 사용자들에게Xavier Uniform/Normal로 사용되는 분포는 tensorflow에서는Glorot Uniform/Normal이며, Kaiming He가 제안한 He 분포 또한 pytorch에서는Kaiming Uniform/Normal인 반면 tensorflow에서는He Uniform/Normal이다. 자세한 비교는 아래 표에서. -
방법
tensorflow도 pytorch처럼 일단 Layer instance를 만든 후에 module을 인자로 전달하여 초기화를 할까? tensorflow는 Layer를 생성할 때 원하는 분포를 인자로 전달하면 weight, bias가 해당 분포를 가지도록 초기화되어 Layer를 만들 수 있다.
tf.keras.Innitializer
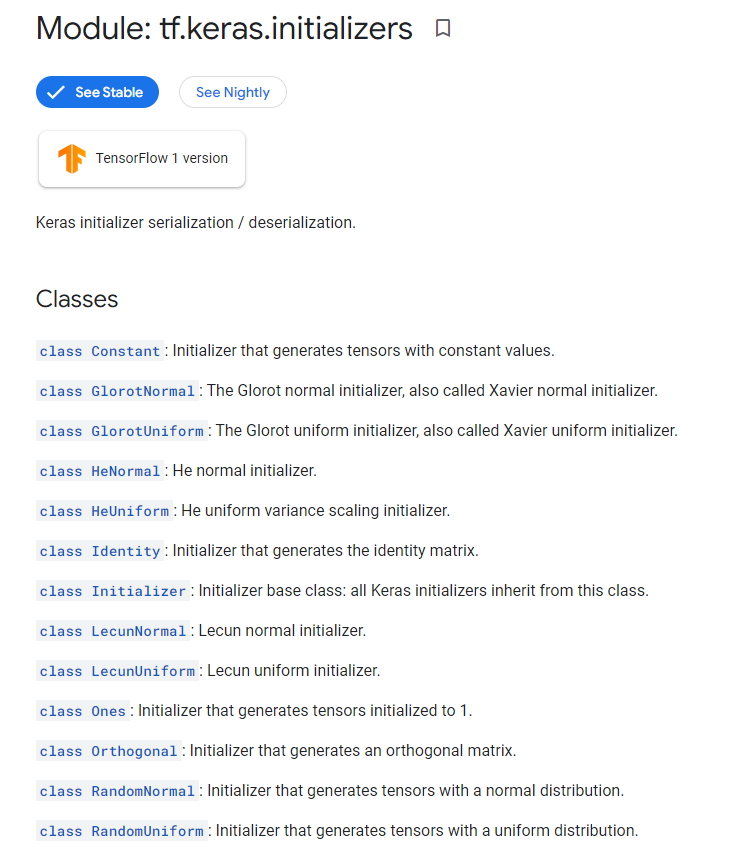
# Usage in a Keras layer:
initializer = tf.keras.initializers.GlorotUniform()
layer = tf.keras.layers.Dense(3, kernel_initializer=initializer)

# Usage2 in a Keras layer:
layer = tf.keras.layers.Dense(3, kernel_initializer='glorot_uniform')
tensorflow는 위의 코드처럼 layer 생성시 initializer 또는 string 인자를 전달하면 초기화가 가능하다.
torch.nn.init
pytorch는 nn.init.분포 함수에 인자로 weight를 전달한다.
각 initialization algorithm 표로 정리
| Tensorflow | Pytorch |
|---|---|
| constant | constant_ |
| glorot_normal | xaviernormal |
| glorat_uniform | xavieruniform |
| he_normal | kaimingnormal |
| he_uniform | kaiminguniform |
| identity | eye_ |
| lecun_normal | None |
| lecun_uniform | None(default) |
| ones | ones_ |
| orthogonal | orthogonal_ |
| random_normal | normal_ |
| random_uniform | uniform_ |
| truncated_normal | truncnormal |
| variance_scailing | None |
| zeros | zeros_ |
Lecun distribution
위의 표에서 lecun_uniform, lecun_normal 은 뭘까.
초기 CNN인 lenet으로 유명한 Yann Lecun 교수님의 1998년 페이퍼에서 제안된 기법이다. 기본적으로 uniform distribution 혹은 normal distribution에서 추출한 랜덤 값으로 웨이트를 초기화 시키되, 이 확률 분포를 fan in값으로 조절하자는 아이디어.
fan_in : 해당 레이어에 들어오는 input tensor의 차원 크기
fan_out : fan out은 레이어가 출력하는 output tensor의 크기
- 1000 x 200 크기의 FC 레이어의 fan in은 1000, fan out은 200
- Conv Layer의 fan in: receptive field x input channel, fan out: receptive field x output channel
(receptive field : 전체 인풋에서 해당 커널이 얼만큼 인식하는 지)
수식은 다음과 같다.
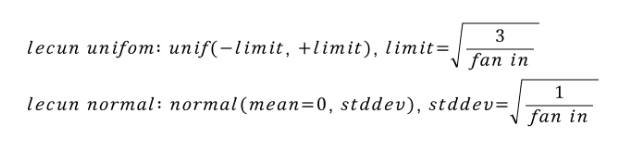
tensorflow 설명
lecun uniform: Draws samples from a uniform distribution within [-limit, limit], where limit = sqrt(3 / fan_in) (fan_in is the number of input units in the weight tensor).
lecun normal: Draws samples from a truncated normal distribution centered on 0 with stddev = sqrt(1 / fan_in) where fan_in is the number of input units in the weight tensor.
pytorch에서 어떻게 tensorflow 처럼 동작하도록 할까 - 코드
그러면 tensorflow에는 lecun_uniform, lecun_normal 이 있는데 pytorch는 없으니
pytorch를 사용할 때 kernel_initializer = 'lecun_uniform', kernel_initializer = 'lecun_normal'인자를 받아도 tensorflow와 똑같이 초기화가 되도록 구현해보자.
init_weights function
모든 분포의 경우마다 if문으로 나누는 코드는,,, 해석은 편하지만 매우 귀찮다.
그 대신 Layer의 종류(Linear, Conv...)에 상관없이
1. 인자로 tensorflow initializer string 인자가 들어오면
2. torch.nn.init 에 해당하는 이름으로 바꾸고(없을 경우 새로 구현 or NotImplemented Error)
3. getattr 로 불러와서 partial로 다시 함수로 만든다.
# how to get init func
import torch.nn.init as init
from functools import partial

init_weight_func = partial(getattr(init, 'uniform_'))
이렇게 하면 init_weight_func 이 torch.nn.init.uniform_ 함수가 된다.
import torch
import torch.nn as nn
import torch.nn.init as init
import torch.nn.functional as F

# Tensorflow initializer to Pytorch init
tfInitilizer2Torch = {'constant' : 'constant_',
                      'glorot_uniform' : 'xavier_uniform_',
                      'glorot_normal' : 'xavier_normal_',
                      생략...,
                      }

def init_weights(module, kernel_initializer, bias_initializer,**kwargs):
	# 1
    weight_initializer = tfInitilizer2Torch[kernel_initializer]
    bias_initializer = tfInitilizer2Torch[bias_initializer]

    # 2
    if weight_initializer == None or bias_initializer == None:
        raise NotImplementedError('Not Implemented in Pytorch')
    # 3
    init_weight_func = partial(getattr(init, weight_initializer))
    init_weight_func(module.weight.data, **kwargs)
이렇게만 코드를 짜면 lecun_uniform, lecun_normal 분포는 처리가 안되니,,, 따로 함수를 작성해주도록 하자.
lecun 분포는 fan_in, fan_out 계산이 필요하다.
get fan_in
torch.nn.init을 보면 _calculate_fan_in_and_fan_out 함수가 있다. 코드는 다음과 같다.
def _calculate_fan_in_and_fan_out(tensor):
    dimensions = tensor.dim()
    if dimensions < 2:
        raise ValueError("Fan in and fan out can not be computed for tensor with fewer than 2 dimensions")

    num_input_fmaps = tensor.size(1)
    num_output_fmaps = tensor.size(0)
    receptive_field_size = 1
    if tensor.dim() > 2:
        # math.prod is not always available, accumulate the product manually
        # we could use functools.reduce but that is not supported by TorchScript
        for s in tensor.shape[2:]:
            receptive_field_size *= s
    fan_in = num_input_fmaps * receptive_field_size
    fan_out = num_output_fmaps * receptive_field_size

    return fan_in, fan_out
분포 함수 내에서 사용방법은 다음과 같다.
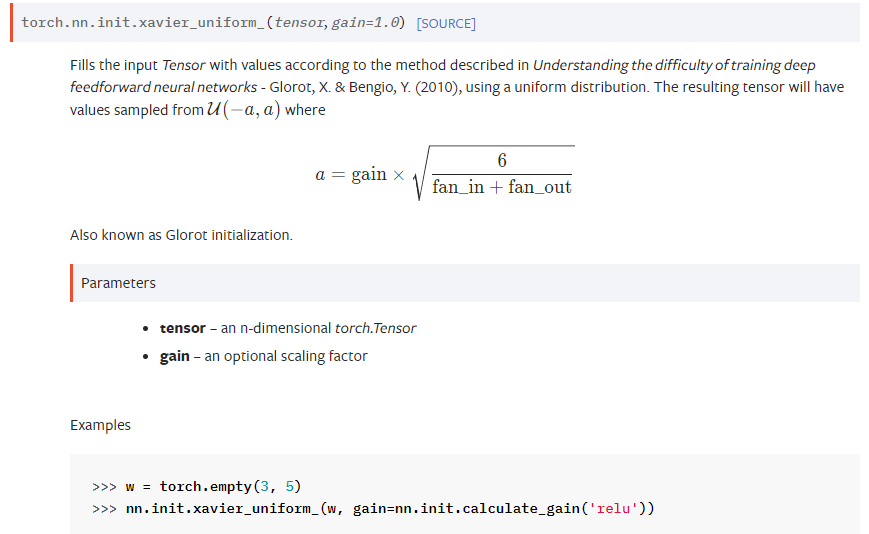
def xavier_uniform_(tensor: Tensor, gain: float = 1.) -> Tensor:
    r"""Fills the input `Tensor` with values according to the method
    described in `Understanding the difficulty of training deep feedforward
    neural networks` - Glorot, X. & Bengio, Y. (2010), using a uniform
    distribution. The resulting tensor will have values sampled from
    :math:`\mathcal{U}(-a, a)` where

    .. math::
        a = \text{gain} \times \sqrt{\frac{6}{\text{fan\_in} + \text{fan\_out}}}

    Also known as Glorot initialization.

    Args:
        tensor: an n-dimensional `torch.Tensor`
        gain: an optional scaling factor

    Examples:
        >>> w = torch.empty(3, 5)
        >>> nn.init.xavier_uniform_(w, gain=nn.init.calculate_gain('relu'))
    """
    fan_in, fan_out = _calculate_fan_in_and_fan_out(tensor)
    std = gain * math.sqrt(2.0 / float(fan_in + fan_out))
    a = math.sqrt(3.0) * std  # Calculate uniform bounds from standard deviation

    return _no_grad_uniform_(tensor, -a, a)
nn._calculate_fan_in_and_fan_out 으로 가져다쓰면 된다.
lecun uniform
Dense Layer (Linear Layer)를 기준으로 pytorch는 nn.Linear를 생성하면 자동으로 lecun uniform으로 초기화가 된다. (tensorflow는 Linear, Con2d 모두 디폴트가 weight:glorot_uniform, bias:zeros)
 tensorflow와 다른점은 분자가 이라는 것,,, 아래처럼 작성하면 tensorflow와 같게 동작할 것이다.
import math
if isinstance(module, nn.Linear):
  if weight_initializer == 'lecun_uniform':
      module.weight.data = module.weight.data * math.sqrt(3)
하지만 요구사항은 Layer 에 상관없이 동작하도록 하는 것이므로 그냥 함수를 작성해준다.
전체 코드
def lecun_uniform_(tensor, is_weight :bool, **kwargs):
    init_func = partial(getattr(init, 'uniform_'))
    fan_in, _ = init._calculate_fan_in_and_fan_out(tensor)
    limit = math.sqrt(3 / fan_in)
    kwargs['a'] = -limit
    kwargs['b'] = limit
    init_func(tensor, **kwargs)

def lecun_normal_(tensor, is_weight :bool, **kwargs):
    init_func = partial(getattr(init, 'normal_'))
    fan_in, _ = init._calculate_fan_in_and_fan_out(tensor)
    kwargs['std'] = 1/fan_in
    init_func(tensor, **kwargs) # std = var value

def init_weights(module, kernel_initializer = 'glorot_uniform', bias_initializer = 'zeros',**kwargs):
	생략...

    if weight_initializer == 'lecun_uniform':
        lecun_uniform_(tensor, True, **kwargs)
    elif weight_initializer == 'lecun_normal':
        lecun_normal_(tensor, True, **kwargs)

    생략...
결론 및 생각해봐야 할 점
weight initialization시 tensorflow와 pytorch의 차이점에 대해 비교해보고 서로 같게 동작하려면 어떻게 해야할지 알아보았다. 다만 이글에서는 오로지 분포를 인자로 받아 코드가 돌아가게끔 하는것에 집중했지만,,, (또한 회사 코드를 그대로 올리면 안되니 아이디어용 수도코드에 가깝다, 실제로 동작하게 하려면 많이 수정해야 함)
가중치 초기화를 더 깊게 파고들려면 activation function과의 관계도 신경써야하고 인자의 값 또한 고려해야한다. (nonlinearity와 gain, nn.init.calculate_gain 함수는 뭔지 등)
그리고 이런 글도 있다...
pytorch의 Conv2d Layer 초기화는 kaiming uniform을 사용하는데, 그 때 negative slope(gain 인자)의 디폴트 값은 이다. 그런데 이게 왜 인지 아무도 모른다는 이야기 ^.^,,,, magic number 라고도 불리던데,,, 뭔가 흥미로운 주제라 알아봐야겠다.
관련된 블로그 글1
관련된 이슈2
관련된 이슈3