
multer를 이용하여 이미지 저장
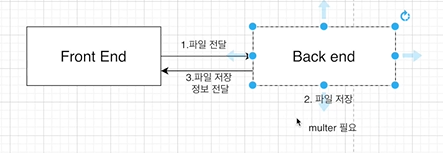
파일을 저장 할 때 multer 가 필요하다.
multer npm 사용 방법
https://www.npmjs.com/package/multer
product.js
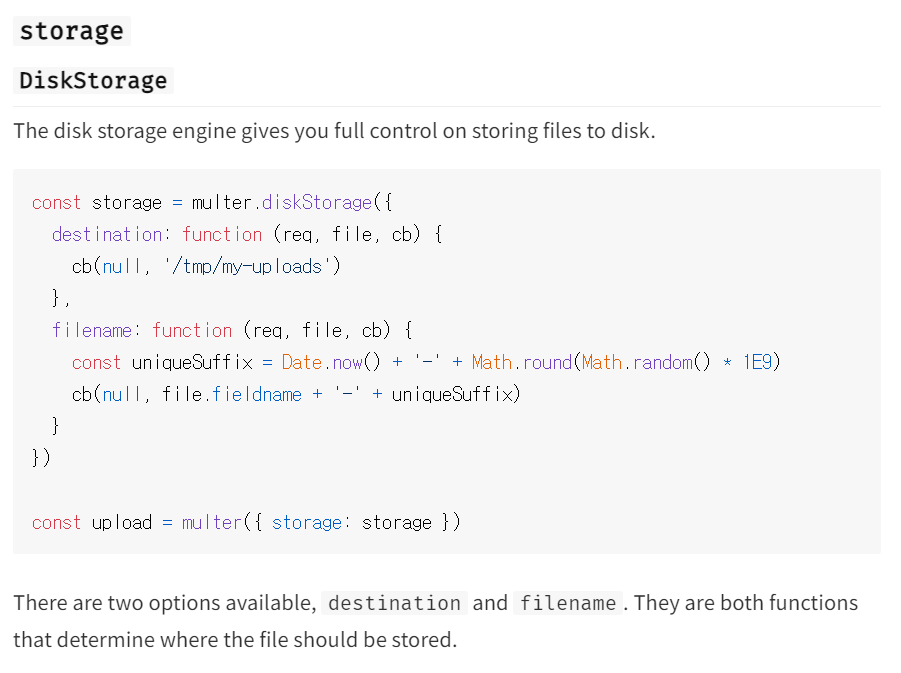
const storage = multer.diskStorage({
  destination: function (req, file, cb) {
    cb(null, '/tmp/my-uploads')
  },
  filename: function (req, file, cb) {
    const uniqueSuffix = Date.now() + '-' + Math.round(Math.random() * 1E9)
    cb(null, file.fieldname + '-' + uniqueSuffix)
  }
})

const upload = multer({ storage: storage })
destination : 어디에 파일이 저장이 되는지
filename : 어떤 이름으로 저장해줄건지
root에 uploads 파일 만들어주기
product.js
const express = require('express');
const router = express.Router();
const multer = require('multer');

//=================================
//             Product
//=================================


const storage = multer.diskStorage({
    destination: function (req, file, cb) {
      cb(null, 'uploads/')
    },
    filename: function (req, file, cb) {
      const uniqueSuffix = Date.now() + '-' + Math.round(Math.random() * 1E9)
      cb(null, `${Date.now()}_${file.originalname}`)
    }
  })

const upload = multer({ storage: storage }).single("file")


router.post('/image', (req, res) => {

    //가져온 이미지를 저장 해주면 된다.
    upload(req, res, err => {
        if(err) {
            return req.json({ success: false, err})
        }
        return res.json({ seuccess: true, filePath: res.req.file.path, fileName: res.req.file.filename })
        // 파일을 어디에, 무슨 이름으로 저장했는지 전달해주는 역할
    })

})


module.exports = router;
여행 상품 업로드 페이지에서 확인을 누르면 백엔드에 같이 전달해줘야 한다.
그러기 위해선 이걸 먼저 어딘가에다가 저장을 해야 한다.
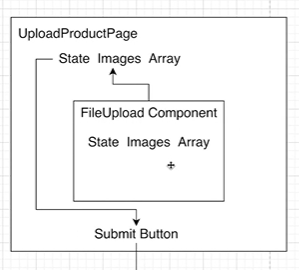
이 정보들을 state에다가 저장을 해놓을 것이다.
코드를 입력하세요이미지 지우기
이미지를 업로드 하면 state 배열에 이미지가 존재하는 것이다.
이걸 지우는 것을 만들 것이다.
FileUpload.js
import React, {useState} from 'react'
import Dropzone from 'react-dropzone'
import { Icon } from 'antd';
import axios from 'axios';

function FileUpload() {

  const [Images, setImages] = useState([]);
  //이미지를 몇개 올릴 수 있게 하기 위해서 배열로 생성

  const dropHandler = (files) => {
    // 파일을 backend에 전달해줘야 한다.
    // 그리고 파일을 전달 할 때 따로 해줘야 하는게 있다.

    let formData = new FormData();

    const config = {
      header: { 'content-type': 'multipart/form-data'}
    };
    formData.append("file", files[0]);

    axios.post('/api/product/image', formData, config).then((response) => {
        if (response.data.success){
            setImages([...Images, response.data.filePath])
        } else {
            alert('파일을 저장하는데 실패했습니다.')
        }
      });
    // formData와 config를 넣어주지 않으면은 파일을 보낼 때 에러가 발생하게 된다.
  };

  const deleteHandler = (image) => {  // 이미지 파라미터를 넣어주기
    const currentIndex = Images.indexOf(image)
    // 클릭하는거에 대한 index를 파악해준다.

    let newImages = [...Images]
    // 존재하는 이미지를 복사!
    newImages.splice(currentIndex, 1)
    // 하나만 지울 것이기 때문에 1적어주기.
    setImages(newImages)
    // 지우고 나서 다시 넣어주기 (새로고침 느낌스~)
  }


  return (
    <div style={{ display: 'flex', justifyContent: 'space-between' }}>
          <Dropzone onDrop={dropHandler}>
              {({ getRootProps, getInputProps }) => (
                  <section>
                      <div
                          style={{
                            width: 300, height: 240, border: '1px solid lightgray',
                            display: 'flex', alignItems: 'center', justifyContent: 'center'
                          }}
                          {...getRootProps()}>
                          <input {...getInputProps()} />
                          <Icon type="plus" style={{ fontSize: '3rem'}} />
                      </div>
                  </section>
              )}
          </Dropzone>

          <div style={{ display: 'flex', width: '350px', height: '240px', overflowX: 'scroll'}}>

            {Images.map((image, index) => (
              <div onClick={()=> deleteHandler(image)} key={index}>
                <img style={{ minWidth: '300px', width: '300px', height: '240px' }}
                  src={`http://localhost:5000/${image}`}
                />
              </div>
            ))}
          </div>
    </div>
  )
}

export default FileUpload
product.js
const express = require('express');
const router = express.Router();
const multer = require('multer');

//=================================
//             Product
//=================================


const storage = multer.diskStorage({
    destination: function (req, file, cb) {
      cb(null, 'uploads/')
    },
    filename: function (req, file, cb) {
      const uniqueSuffix = Date.now() + '-' + Math.round(Math.random() * 1E9)
      cb(null, `${Date.now()}_${file.originalname}`)
    }
  })

const upload = multer({ storage: storage }).single("file")


router.post('/image', (req, res) => {

    //가져온 이미지를 저장 해주면 된다.
    upload(req, res, (err) => {
        if(err) {
            return req.json({ success: false, err})
        }
        return res.json({ seuccess: true, filePath: res.req.file.path, fileName: res.req.file.filename })
        // 파일을 어디에, 무슨 이름으로 저장했는지 전달해주는 역할
    })

})


module.exports = router;
이미지 State을 부모 컴포넌트로 업데이트하기
- Product Model 만들기
- Upload File Component 가져오기
- 파일 데이터를 uploadFile 컴포넌트에서 부모 컴포넌트로 업데이트하기
- onSubmit Function 만들기
- 모든 정보를 서버로 보내기
- 보내진 정보를 몽고 DB에 저장하기
모든 상품 정보를 데이터베이스에 저장하기
- Product Model 만들기
- Upload File Component 가져오기
- 파일 데이터를 uploadFile 컴포넌트에서 부모 컴포넌트로 업데이트 하기
- onSubmit Function 만들기
- 모든 정보를 서버로 보내기
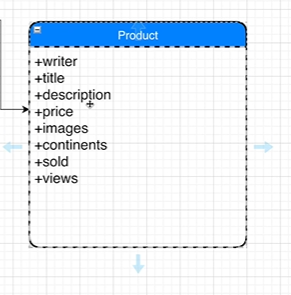
Product
- writer
- title
- description
- price
- images
- continents
- sold
- views
모든 정보를 담고 있는 것을 "submit" 제출을 누르면 Server로 보내줘서 Database에 저장을 해줘야 한다.
그래서 product 모델을 만들어 줄 것이다.
흐음 나 왜 업로드가 안되지?
Product.js
product.js
UploadProductPage.js
auth.js
데이터베이스에 들어 있는 모든 상품을 가져오기
- 빈 랜딩 페이지 생성
- 몽고 DB에 저장되어 있는 데이터들을 가져오기
- 랜딩 페이지 UI 만들기
- 상품 리스트들을 화면에 보여주기 -> map() methods 사용
product.js
router.post('/products', (req, res) => {

  // product collection에 들어 있는 모든 상품 정보를 가져오기

  Product.find()
    .populate("writer")
    .exec((err, productInfo) => {
      if(err) return res.status(400).json({ success: false, err})
      return res.status(200).json({ success: true, productInfo})
    })

})
LandingPages.js
import { Divider } from 'antd';
import React, { useEffect } from 'react'
import { FaCode } from "react-icons/fa";
//백엔드 정보 가져오려고
import axios from "axios";

function LandingPage() {

    useEffect(() => {


        axios.post('/api/product/products',)
            .then(response => {
                if(response.data.success){
                    console.log(response.data)
                } else {
                    alert(" 상품들을 가져오는데 실패 했습니다.")
                }
            })

    }, [])

    return (
        <div>
            Landing Page
        </div>
    )
}

export default LandingPage
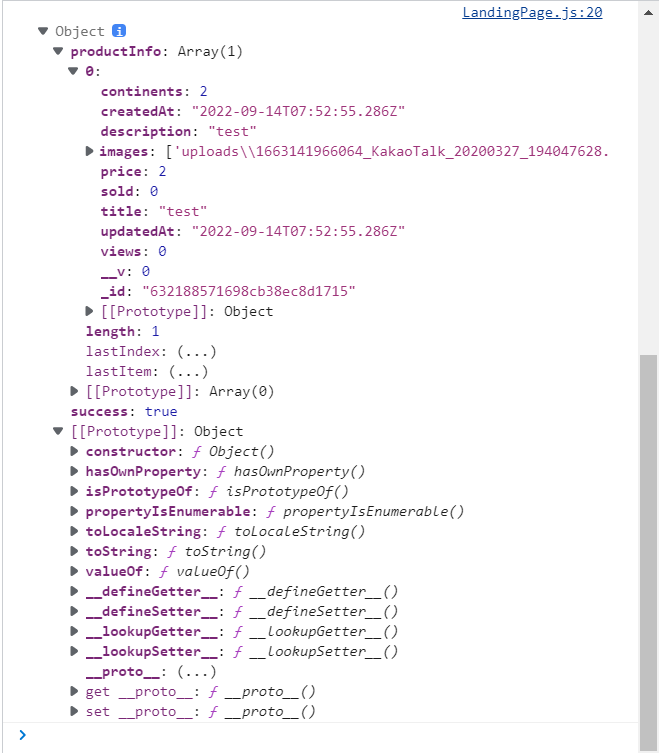
가져오기 성공~ ㅎ_ㅎ
카드 만들기
import { Icon, Col, Card, Row } from 'antd';
import React, { useEffect, useState } from 'react'
import { FaCode } from "react-icons/fa";
//백엔드 정보 가져오려고
import axios from "axios";
import Meta from 'antd/lib/card/Meta';

function LandingPage() {

    const [Products, setProducts] = useState([])

    useEffect(() => {


        axios.post('/api/product/products',)
            .then(response => {
                if(response.data.success){
                    setProducts(response.data.productInfo)
                } else {
                    alert(" 상품들을 가져오는데 실패 했습니다.")
                }
            })

    }, [])

    const renderCards = Products.map((product, index) => {

        console.log('product', product)

        return <Col lg={6} md={8} xs={24} key={index}>

            <Card
                cover={<img style={{width:'100%', maxHeight: '150px' }} src={`http://localhost:5000/${product.images[0]}`} />}
            >
                <Meta
                    title={product.title}
                    description={`${product.price}`}
                />
            </Card>
        </Col>
    })

    return (
        <div style={{ width: '75%', margin: '3rem auto' }}>
            <div style={{ textAlign: 'center' }}>
                <h2>Let's Travel Anywhere <Icon type="rocket" /></h2>
            </div>

            {/* Filter */}

            {/* Search */}

            {/* Cards */}


            <Row gutter={[16, 16]}>
                {renderCards}
            </Row>


            <div style={{ display:'flex', justifyContent: 'center' }}>
                <button>더보기</button>
            </div>

        </div>
    )
}

export default LandingPage
이미지 슬라이더 만들기
carousel
https://ant.design/components/carousel/
utils > ImageSlider.js
더보기 버튼 만들기
- 더보기 버튼 만들기
- 더보기 버튼을 위한 onClick Function 만들기
- SKIP과 LIMIT을 위한 STATE 만들기
- 더보기 버튼 기능을 사용하기 위해서 getProduct Route를 바꾸기
- Spread Operator를 사용해서 방금 가져온 데이터들을 현재 상품 STATE에 더해주기
SKIP
- 어디서부터 데이터를 가져오는지에 대한 위치
- 처음에는 0부터 시작 Limit이 6이라면 다음 번에는 2rd Skip= 0 + 6
MongoDB Method
LIMIT
- 처음 데이터를 가져올 때와 더보기 버튼을 눌러서 가져올 때 얼마나 많은 데이터를 한 번에 가져오는지!
체크 박스 필터 만들기 #1
- CheckBox 리스트 데이터들을 만들기
- checkbox를 위한 UI 만들기
- onChange Function 만들기
- Checked State를 부모 컴포넌트로 업데이트 하기

이런 리스트를 만들기!
https://ant.design/components/collapse/
체크 박스 필터 만들기 #2~#3
- handleFilter Function 만들기
- Filter State 만들기
- getProduct Route를 필터 기능에 맞게 바꾸기
라디오 박스 필터 만들기
- RadioBox 리스트
- Radiobox를 위한 UI 만들기
- onChange Function 만들기
- Checked State를 부모 컴포넌트로 업데이트 하기