리액트 / Mongo DB 연결 / onChangeEvent 처리하기 / Select Option 처리하기 / Drop-Zone 적용하기 / #1~#7
노드 & 리액트

Boiler-plate을 가져오고 Mongo DB 연결하기
1. Bolier-plate 이용 이유
- 더 빠르게 개발을 완성하기 위해서
- 이 프로젝트의 중요한 부분을 더욱 집중할 수 있기 위해서
(npm을 사용할거면 node.js가 설치되어 있어야 한다.
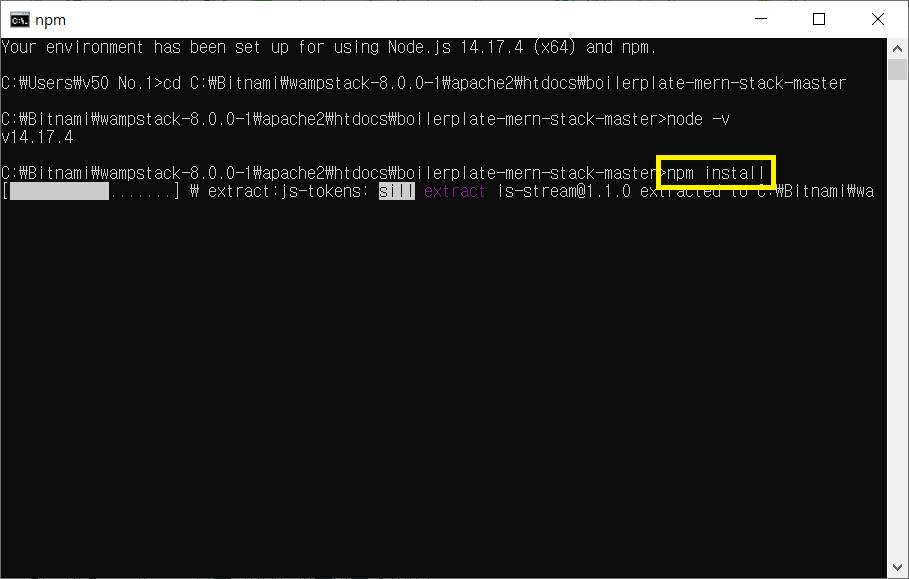
설치가 되어있는지 궁금하다면 터미널에 "node -v"라고 입력을 해야 한다.
node -v
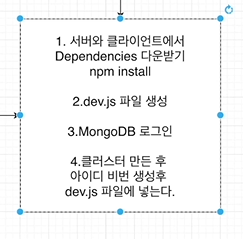
server\config\dev.js 파일 만들어주기
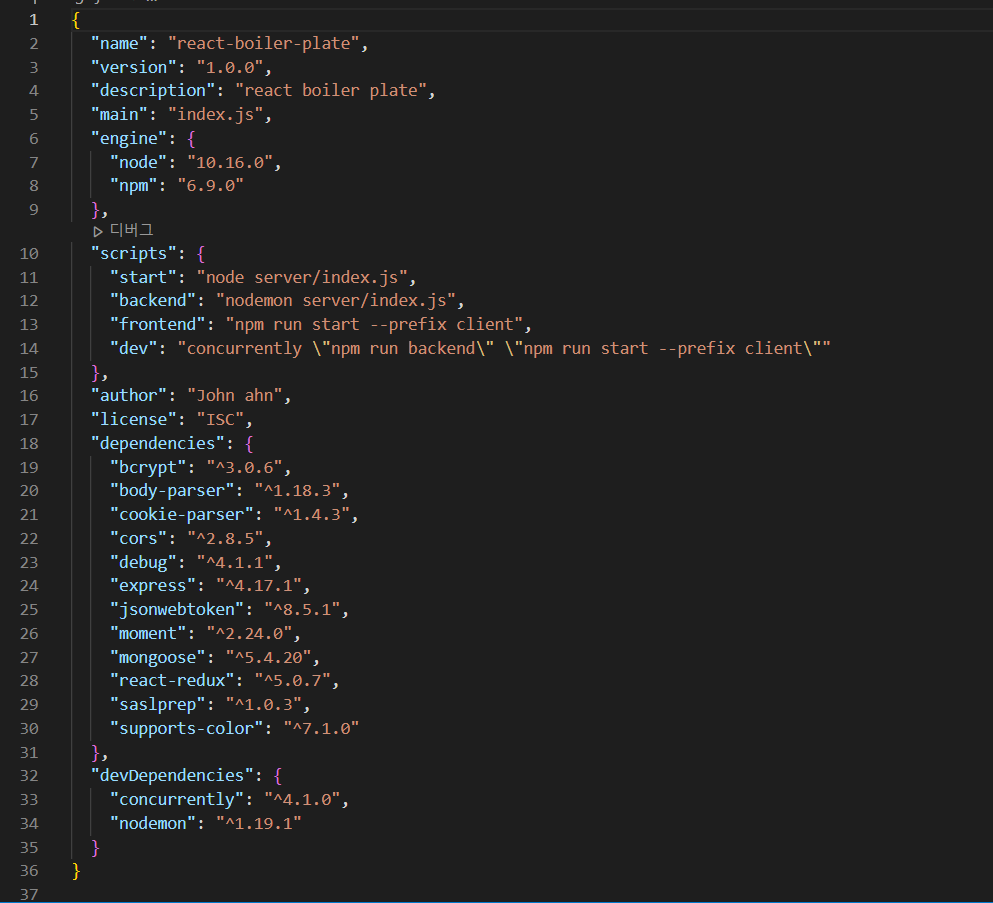
이것들은 흔히 말하는 라이브러리이다.
만들어놓은 기능을 다운받아서 사용하는 것이다.
다운받기 위해서 터미널에 들어가 npm install을 해준다.
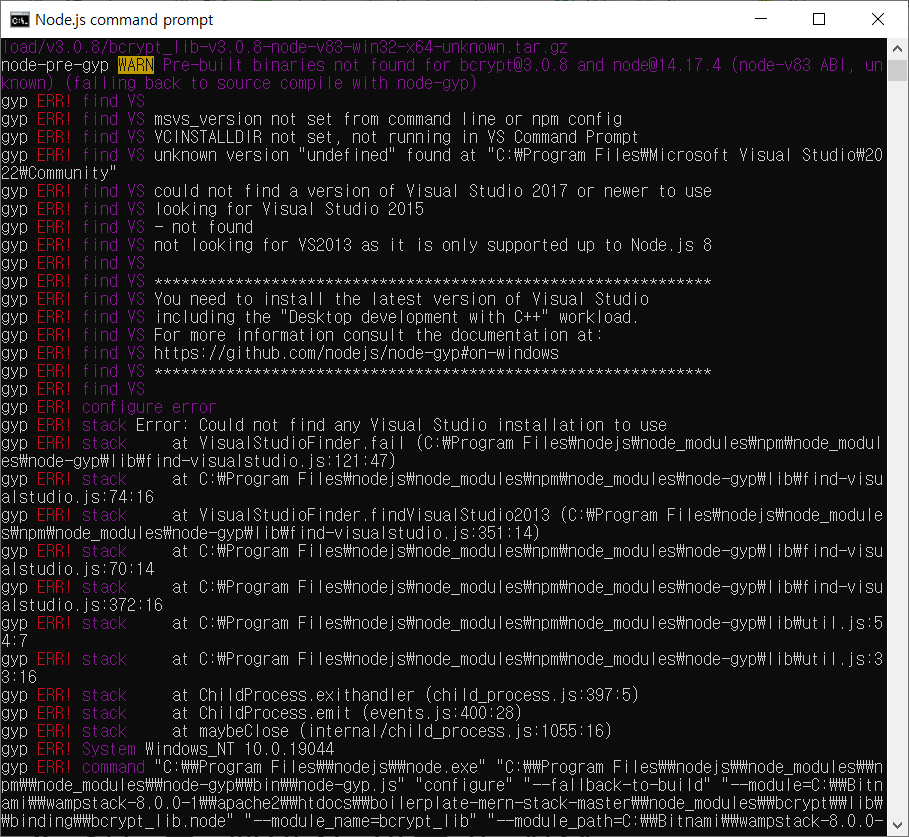
흐음 알 수 없는 오류들이 뜨는 중
일단 클라이언트에서 npm install은 제대로 설치가 되었다.
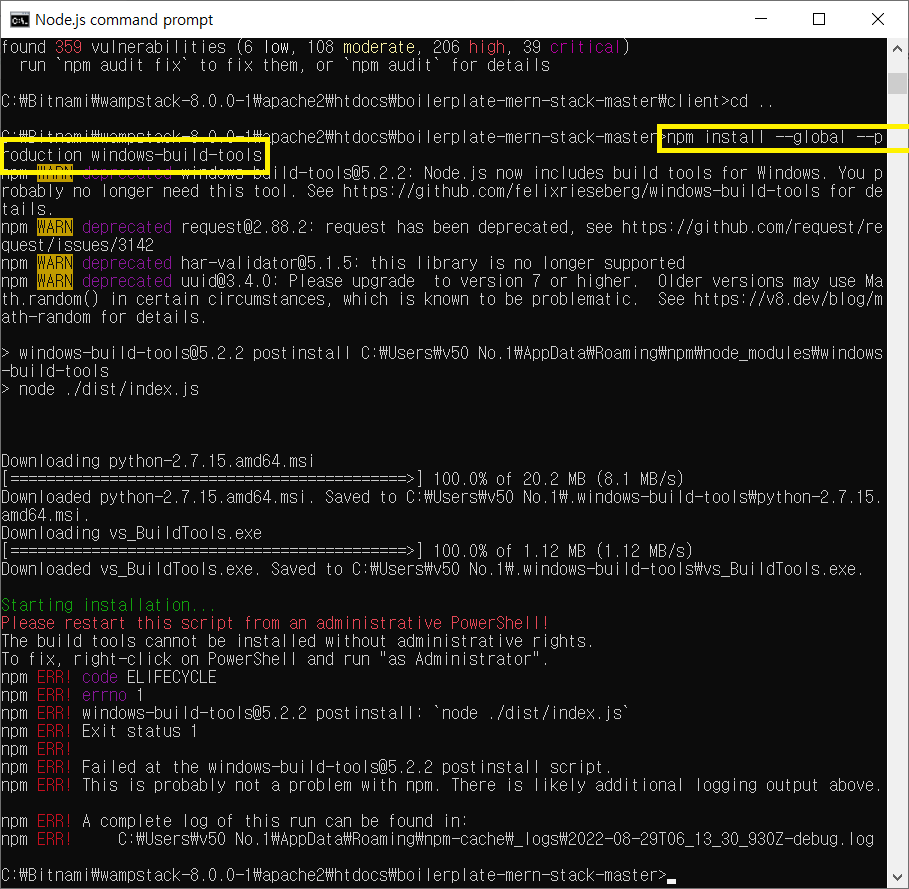
https://github.com/felixrieseberg/windows-build-tools/issues/56
여기에 나와있는 방법으로 진행을 했다.
But 안되는 것 같음
업로드 페이지 만들기 시작
페이지 만들 순서는
- 비어있는 업로드 페이지 생성
- 업로드 페이지 Route 만들기
- 업로드 페이지 탭 만들기
- Drop Zone을 제외한 Form을 만들기
-> 파일 업로드만을 위한 컴포넌트 만들기- 모든 INPUT을 위한 onChange Function 만들기
-> form에 키보드 입력이 가능하게?
client\src\component\views 에서
UploadProductPage 폴더 만들고 UploadProductPage.js 폴더 생성하기
rfce 로 function 만들어주기
1. 비어있는 업로드 페이지 생성
UploadProductPage.js
import React from 'react'

function UploadProductPage() {
  return (
    <div>
      UploadProductPage
    </div>
  )
}

export default UploadProductPage
step1. 완료 완.
2. 업로드 페이지 Route 만들기
App.js
import React, { Suspense } from 'react';
import { Route, Switch } from "react-router-dom";
import Auth from "../hoc/auth";
// pages for this product
import LandingPage from "./views/LandingPage/LandingPage.js";
import LoginPage from "./views/LoginPage/LoginPage.js";
import RegisterPage from "./views/RegisterPage/RegisterPage.js";
import NavBar from "./views/NavBar/NavBar";
import Footer from "./views/Footer/Footer"
import UploadProductPage from "./views/UploadProductPage/UploadProductPage.js";

//null   Anyone Can go inside
//true   only logged in user can go inside
//false  logged in user can't go inside

function App() {
  return (
    <Suspense fallback={(<div>Loading...</div>)}>
      <NavBar />
      <div style={{ paddingTop: '69px', minHeight: 'calc(100vh - 80px)' }}>
        <Switch>
          <Route exact path="/" component={Auth(LandingPage, null)} />
          <Route exact path="/login" component={Auth(LoginPage, false)} />
          <Route exact path="/register" component={Auth(RegisterPage, false)} />
          <Route exact path="/product/upload" component={Auth(UploadProductPage, true)} />
        </Switch>
      </div>
      <Footer />
    </Suspense>
  );
}

export default App;
UploadProductPage가 true인 이유는 로그인 되어있는 사람만 들어와서 만들 수 있게
문제

DB연결이 안돼서 (회원가입이 계속 안돼서) "npm install -g node-gyp"을 해주었다.
bcrypt가 Nodejs로 되어있는게 아니라 C언어로 되어있어서 Nodejs에서 인식을 하려면 binary로 바꿔줘야 한다고 들었다.
그래서 그렇게 바꿔주는 compilation? 과정 중에서 노드 버전에 따라 이 과정을 지원 안하는 것도 있다고 한다. 그래서 저 명령어를 실행해주면 compiliation의 다리 역할을 해준다고 한다.
npm install -g node-gyp
저걸 깔아서 그런건지
bcrypt도 다시 지웠다가 깔아서 그런건지는 모르겠지만 회원가입하는데에 성공했다
쮸아앙아아아압 씐난다 ㅎㅎ
onChange Event 처리하기
UploadProductPage.js
import { Typography, Button, Form, Input } from 'antd'
import React, {useState} from 'react'
const { TextArea } = Input;
function UploadProductPage() {
const [Title, setTitle] = useState("") //제목
const [Description, setDescription] = useState("") //설명
const [Price, setPrice] = useState(0) //가격
const [Continent, setContinent] = useState(1) //장소
const [Images, setImages] = useState([]) //이미지
const titleChangeHandler = (event) =>{
setTitle(event.currentTarget.value)
}
// 이벤트가 일어날 때마다, 타이핑을 할 때마다 value를 바꿔줘야 한다.
const descriptionChangeHandler = (event) =>{
setDescription(event.currentTarget.value)
}
const priceChangeHandler = (event) =>{
setPrice(event.currentTarget.value)
}
return (
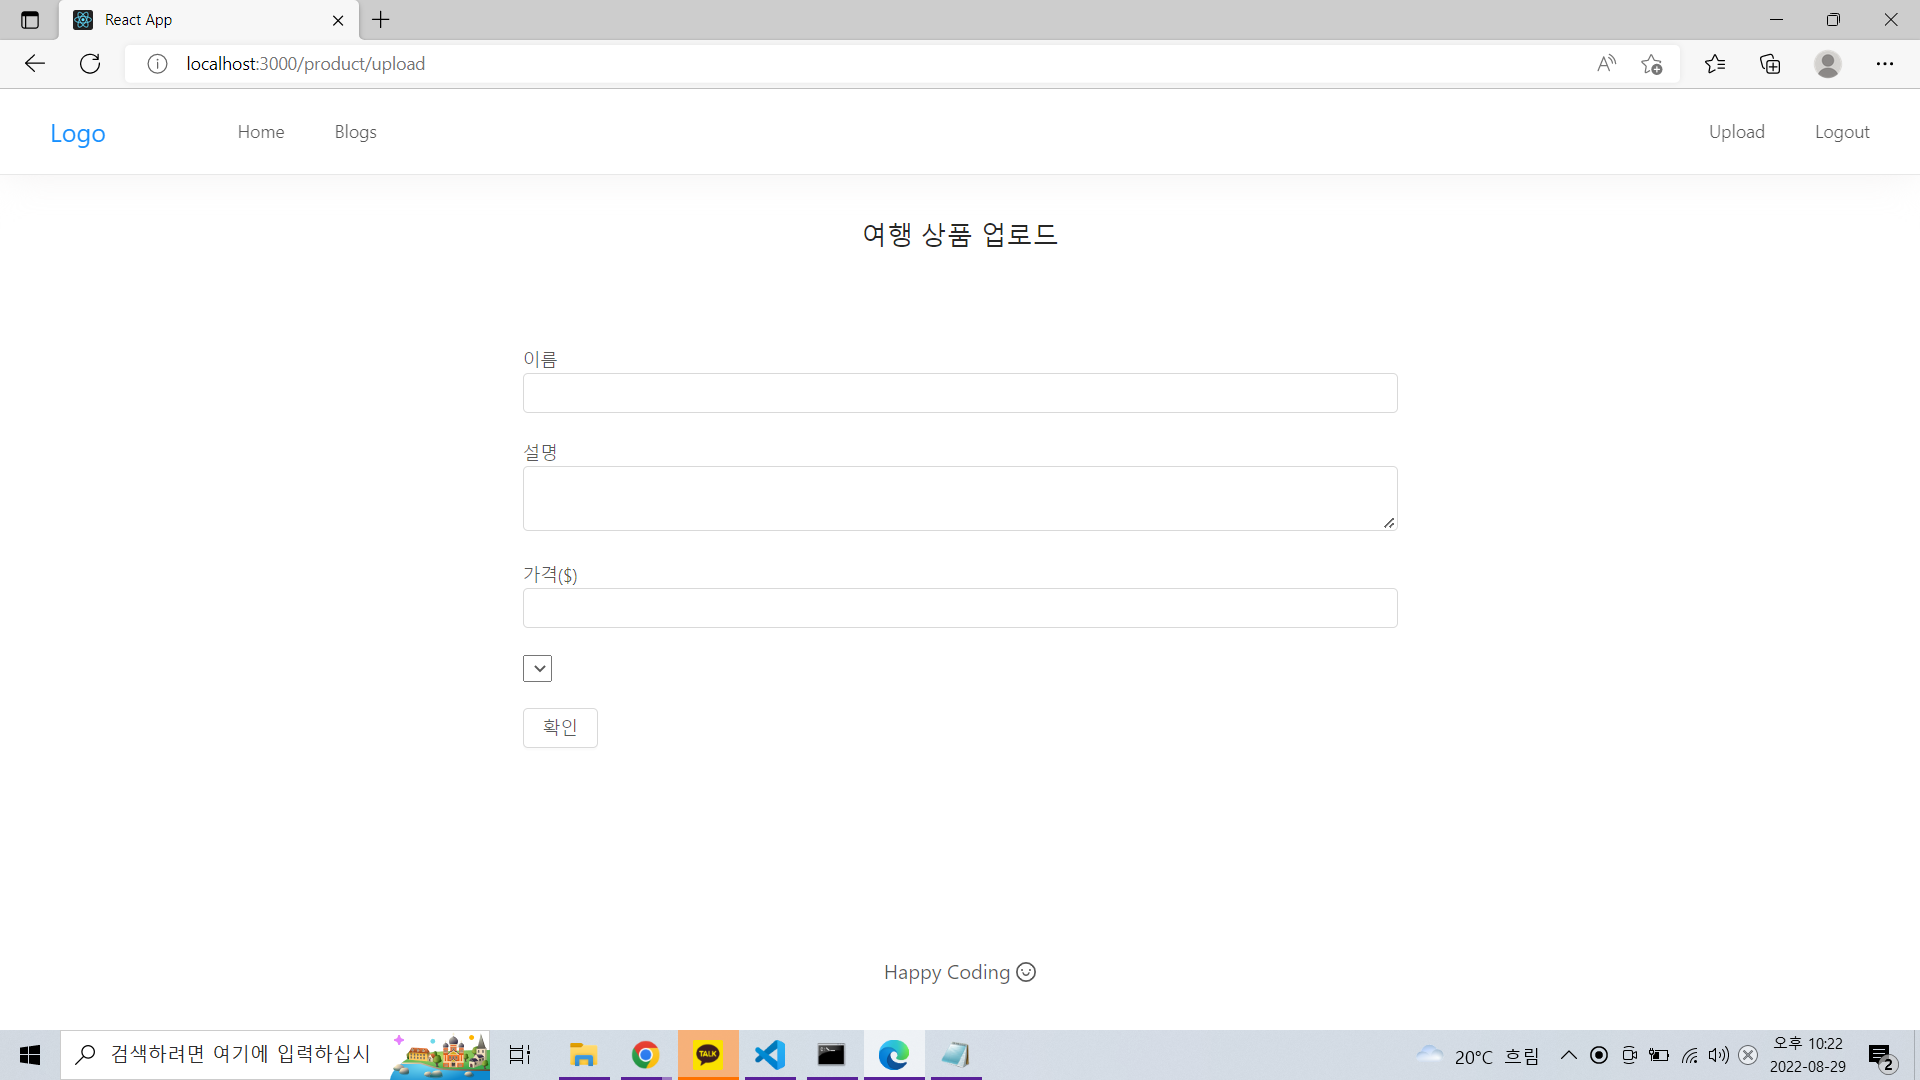
<div style={{ maxWidth: '700px', margin: '2rem auto' }}>
<div style={{ textAlign: 'center', marginBottom: '2rem'}}>
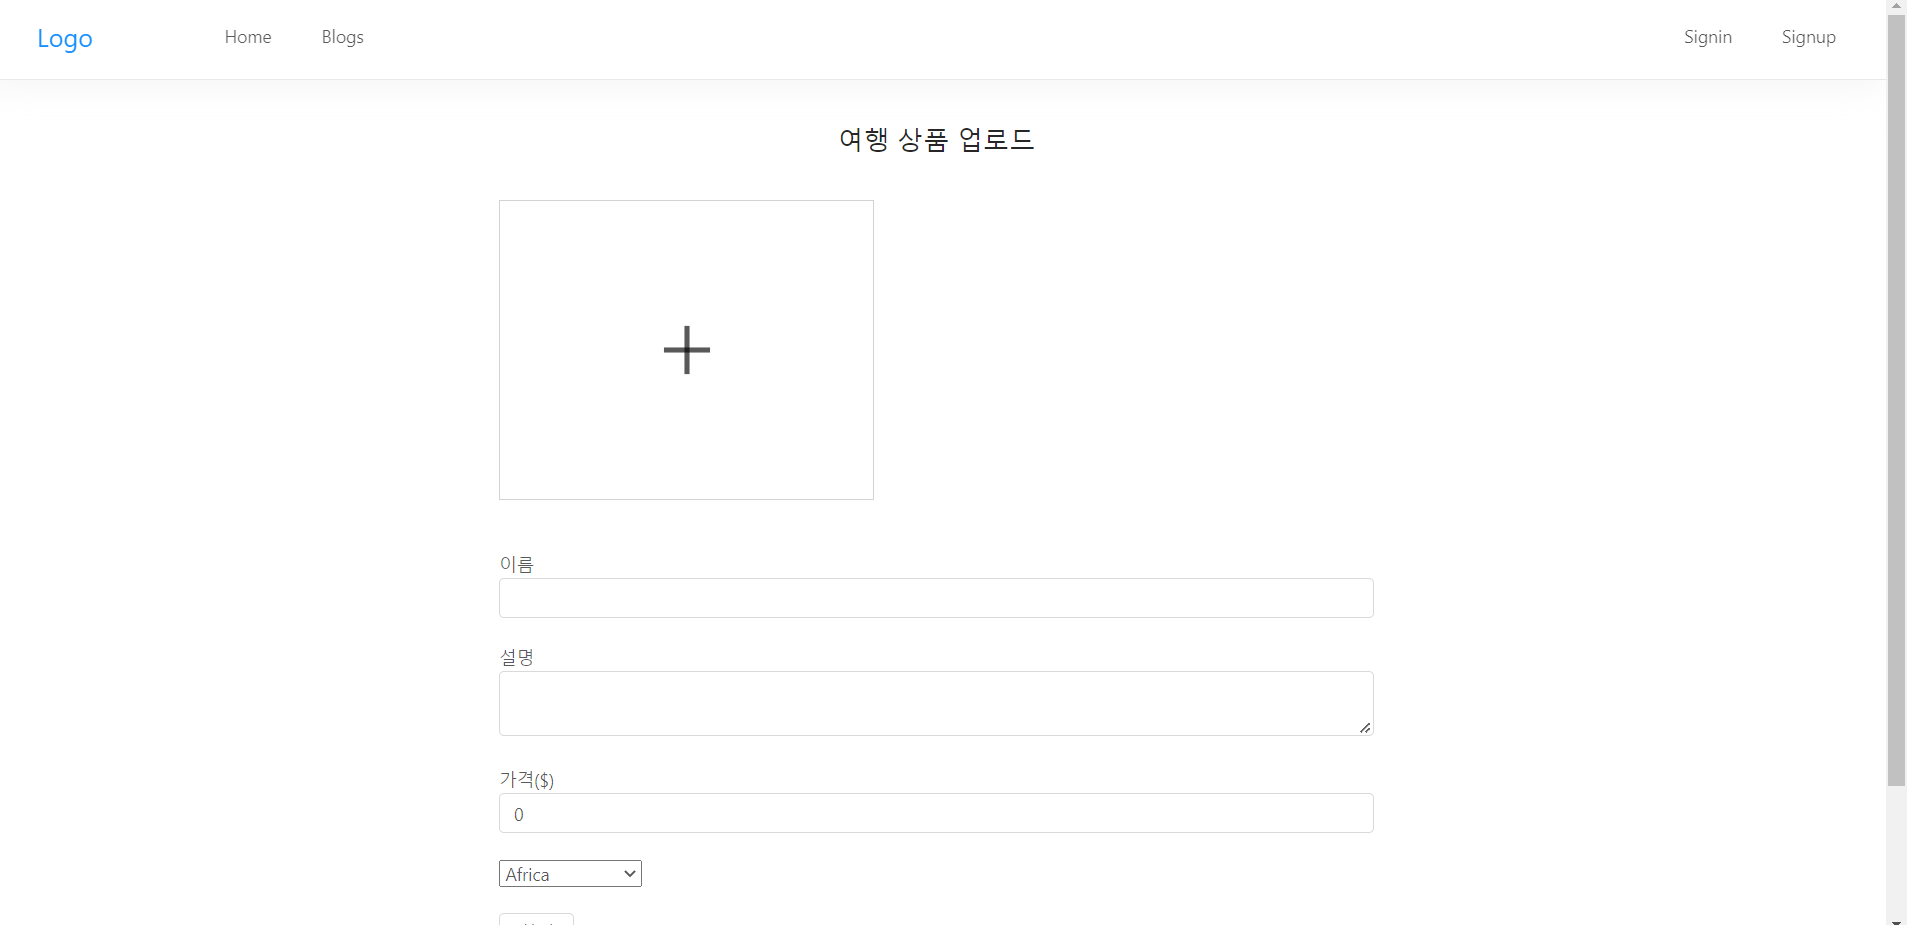
<h2>여행 상품 업로드</h2>
</div>
<Form>
{/* DropZone */}
<br />
<br />
<label>이름</label>
<Input onChange={titleChangeHandler} value={Title}/>
<br />
<br />
<label>설명</label>
<TextArea onChange={descriptionChangeHandler} value={Description} />
<br />
<br />
<label>가격($)</label>
<Input type="number" onChange={priceChangeHandler} value={Price}/>
<br />
<br />
<select>
<option></option>
</select>
<br />
<br />
<Button>
확인
</Button>
</Form>
</div>
)
}
export default UploadProductPage
Select Option 처리하기
input의 onChange는 키보드를 타이핑할 때 value가 바뀌게 해주는 것이고,
select의 onchange는 option들이 변화될 때 이 option에 value가 바뀔 수 있게 해주는 것이다.
UploadProductPage.js
import { Typography, Button, Form, Input } from 'antd'
import React, {useState} from 'react'
const { TextArea } = Input;
const Continents = [
{key: 1, value: "Africa"},
{key: 2, value: "Europe"},
{key: 3, value: "Asia"},
{key: 4, value: "North America"},
{key: 5, value: "South America"},
{key: 6, value: "Australia"},
{key: 7, value: "Antarctica"}
] // 선택 나라(대륙) 정의
function UploadProductPage() {
const [Title, setTitle] = useState("") //제목
const [Description, setDescription] = useState("") //설명
const [Price, setPrice] = useState(0) //가격
const [Continent, setContinent] = useState(1) //장소
const [Images, setImages] = useState([]) //이미지
const titleChangeHandler = (event) =>{
setTitle(event.currentTarget.value)
}
const descriptionChangeHandler = (event) =>{
setDescription(event.currentTarget.value)
}
const priceChangeHandler = (event) =>{
setPrice(event.currentTarget.value)
}
const continentChangeHandler = (event) =>{
setContinent(event.currentTarget.value)
}
return (
<div style={{ maxWidth: '700px', margin: '2rem auto' }}>
<div style={{ textAlign: 'center', marginBottom: '2rem'}}>
<h2>여행 상품 업로드</h2>
</div>
<Form>
{/* DropZone */}
<br />
<br />
<label>이름</label>
<Input onChange={titleChangeHandler} value={Title}/>
<br />
<br />
<label>설명</label>
<TextArea onChange={descriptionChangeHandler} value={Description} />
<br />
<br />
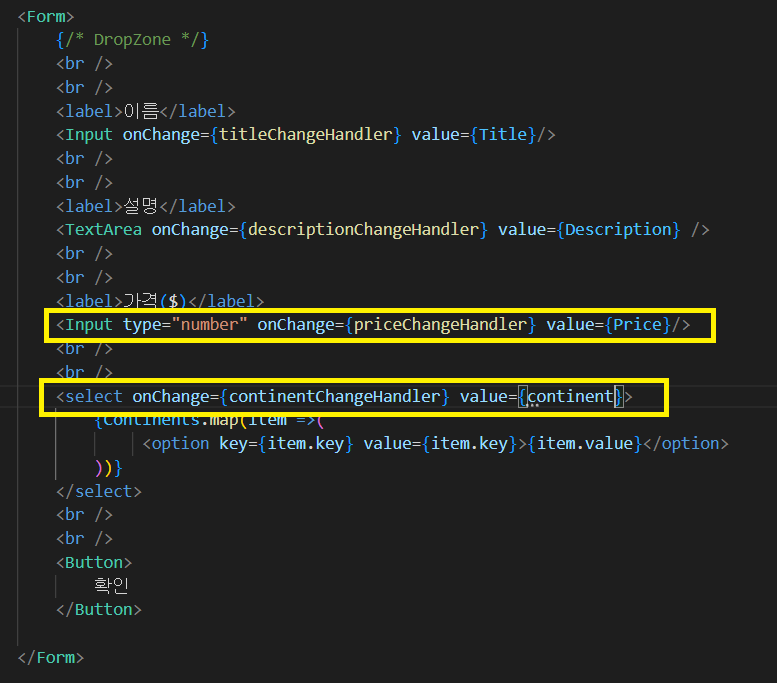
<label>가격($)</label>
<Input type="number" onChange={priceChangeHandler} value={Price}/>
<br />
<br />
<select onChange={continentChangeHandler} value={Continent}>
{Continents.map(item =>(
// item에 대륙 중 하나의 값이 들어가 있음
<option key={item.key} value={item.key}>{item.value}</option>
))}
</select>
<br />
<br />
<Button>
확인
</Button>
</Form>
</div>
)
}
export default UploadProductPage
Drop-Zone 적용하기
- Utils 폴더 안에 파일 업로드 파일 만들기
- Drop-zone 라이브러리 다운받기 -> npm install react-dropzone --save
- File 업로드 컴포넌트를 위한 UI 만들기
- onDrop Function 만들기 (Multer) -> npm install multer --save
- onDelete Function 만들기
파일 업로드 하는 코드들은 다른 곳에다가 만들거임
왜냐하면 여기뿐만아니라 다른 곳에서도 가져다가 쓸 수 있게 하기 위해서
그런 파일들이 모여있는 폴더를 utils라고 함! (규칙같음)
client>src>components 에다가 utils 폴더 만들어주기
이 폴더에 FileUpload.js 만들어주기
FileUpload.js 와 UploadProductPage import 해줄거야!!
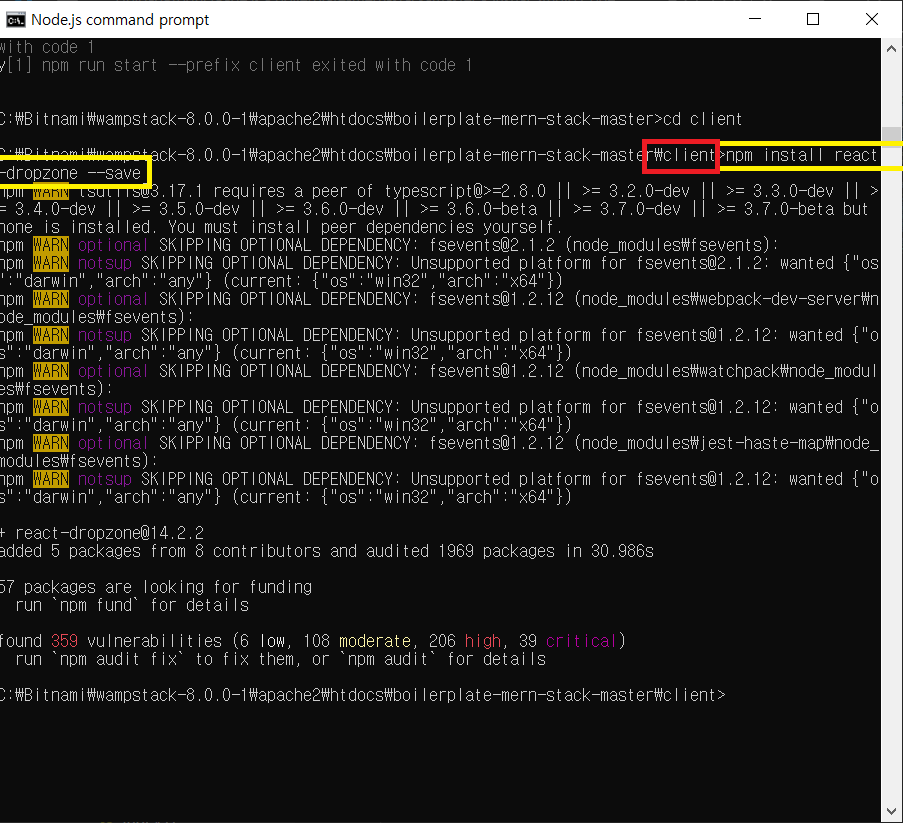
client에서 "npm install react-dropzone --save" 설치하기
https://www.npmjs.com/package/react-dropzone
-> 파일 업로드를 구현하기 위한 라이브러리
FileUpload.js
import React from 'react'
import Dropzone from 'react-dropzone'
import { Icon } from 'antd';

function FileUpload() {
  return (
    <div style={{ display: 'flex', justifyContent: 'space-between' }}>
          <Dropzone onDrop={acceptedFiles => console.log(acceptedFiles)}>
              {({ getRootProps, getInputProps }) => (
                  <section>
                      <div
                          style={{
                            width: 300, height: 240, border: '1px solid lightgray',
                            display: 'flex', alignItems: 'center', justifyContent: 'center'
                          }}
                          {...getRootProps()}>
                          <input {...getInputProps()} />
                          <Icon type="plus" style={{ fontSize: '3rem'}} />
                      </div>
                  </section>
              )}
          </Dropzone>
    </div>
  )
}

export default FileUpload
이미지 파일을 서버로 보내기
FileUpload.js
import React from 'react'
import Dropzone from 'react-dropzone'
import { Icon } from 'antd';
import axios from 'axios';
function FileUpload() {
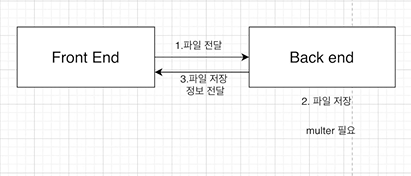
const dropHandler = (files) => {
// 파일을 backend에 전달해줘야 한다. axios를 사용해서.
let formData = new FormData();
// 파일을 전달 할 때 따로 해줘야 하는게 있다.
// formData에 파일에 대한 정보가 들어가게 되는 것이다.
const config = {
header: { 'content-type': 'multipart/form-data'}
// header에다가 어떤 파일인지에 대한 content-type을 정리해줌
// 서버에서 이 정보를 받을 때 에러가 없게 받을 수 있게 해준다.
}
formData.append("file", files[0])
axios.post('/api/product/image', formData, config)
// formData, config 인자를 보내지 않으면 오류가 발생하게 된다.
.then(response => {
if (response.data.success){
} else {
alert('파일을 저장하는데 실패했습니다.')
}
})
// formData와 config를 넣어주지 않으면은 파일을 보낼 때 에러가 발생하게 된다.
}
return (
<div style={{ display: 'flex', justifyContent: 'space-between' }}>
<Dropzone onDrop={dropHandler}>
{({ getRootProps, getInputProps }) => (
<section>
<div
style={{
width: 300, height: 240, border: '1px solid lightgray',
display: 'flex', alignItems: 'center', justifyContent: 'center'
}}
{...getRootProps()}>
<input {...getInputProps()} />
<Icon type="plus" style={{ fontSize: '3rem'}} />
</div>
</section>
)}
</Dropzone>
</div>
)
}
export default FileUpload
server에 있는 index.js
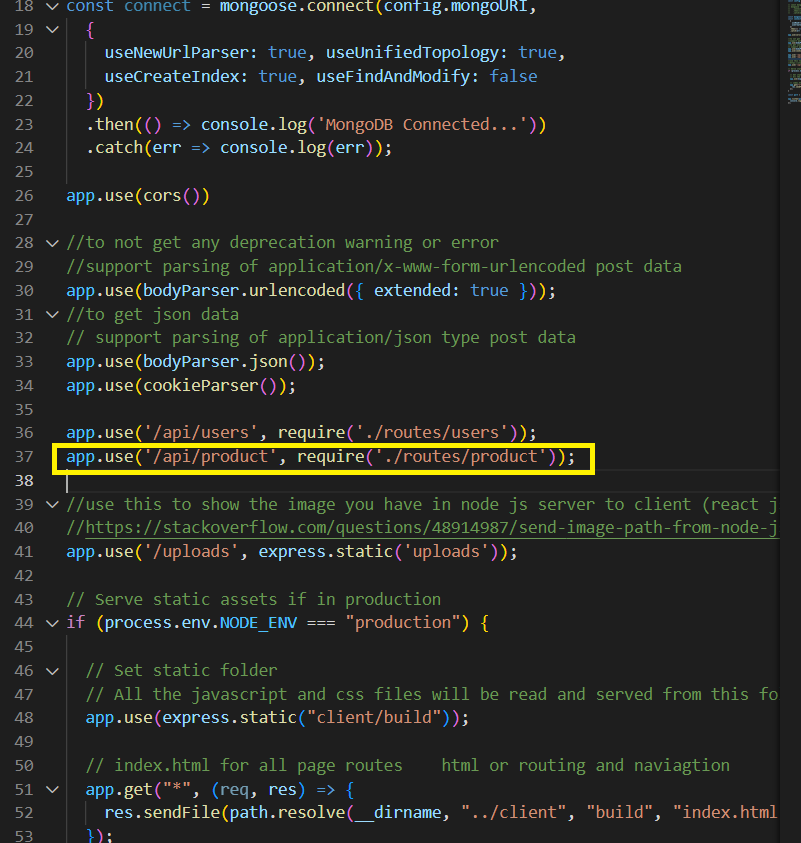
server > routes 에 product.js 만들어주기
const express = require('express');
const router = express.Router();

//=================================
//             Product
//=================================


router.post('/image', (req, res) => {

    //가져온 이미지를 저장 해주면 된다.

})
module.exports = router;
multer 다운 받아 주기
multer library란?
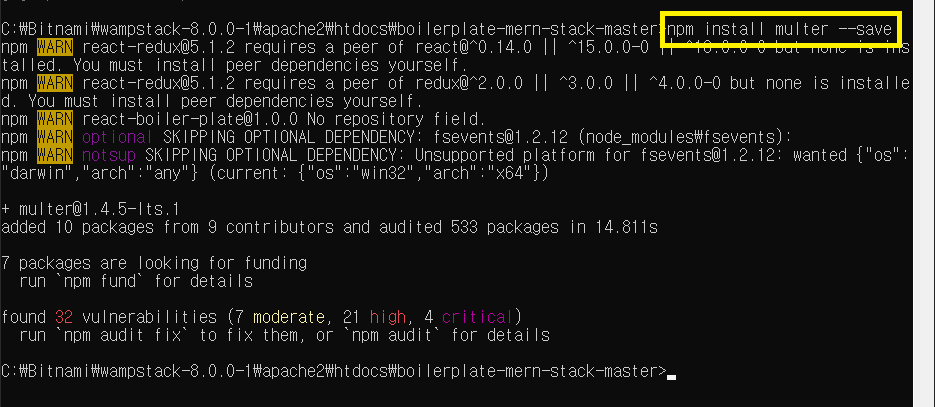
npm install multer --save