
div & span

다른여백
<div style="width: 200px; height: 200px; background-color: green"> div태그 </div>
다른여백|
<span style="width: 200px; height: 200px; background-color: yellow"> span태그는 크기가 적용되지 않는다. </span>
span 태그에도 width와 height을 지정해줬지만 span태그에는 크기가 적용되지 않은 것을 볼 수 있다.
table
<th>내용</th>: table head / 표의 제목을 쓰는 곳
<tr>내용</tr>: table row / 가로줄을 만드는 곳
<td>내용</td>: table data / 셀을 만드는 곳
기본 테이블
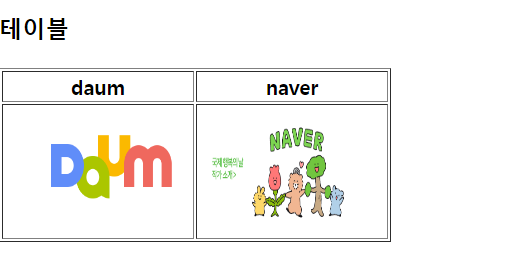
<h3>테이블</h3>
	<table border="1">
		<tr>
			<th>daum</th>
			<th>naver</th>
		</tr>
		<tr>
			<td><img src="../img/daum.png" style="width:150px; height:100px"></td>
			<td><img src="../img/naver.gif" style="width:150px; height:100px"></td>
		</tr>
	</table>
칸 가로로 합치기
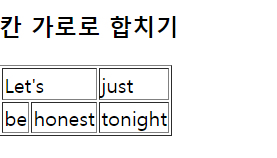
<h3>칸 가로로 합치기</h3>
<table border="1">
<tr><td colspan="2">Let's</td><td>just</td></tr>
<tr><td>be</td><td>honest</td><td>tonight</td></tr>
</table>
칸 세로로 합치기

<h3>칸 세로로 합치기</h3>
<table border="1">
<tr><td rowspan="2">me</td><td>on the</td><td>roof</td></tr>
<tr><td>for</td><td>everything</td></tr>
</table>
폼
폼 값 전달
<!DOCTYPE html>
<html>
<head>
<meta charset="EUC-KR">
<title>Insert title here</title>
</head>
<body>
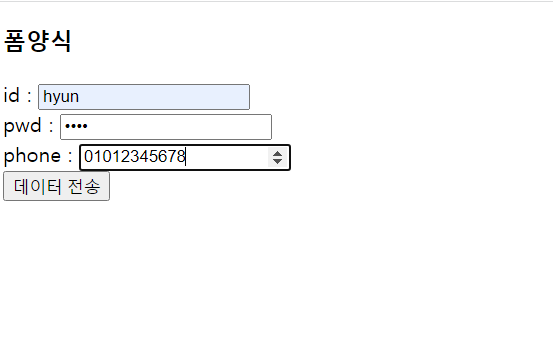
<h3>폼양식</h3>
<form action="/webApp1/MyServlet" method="post">
id : <input type="text" name="id"><br/>
pwd : <input type="password" name="pwd"><br/>
phone : <input type="number" name="phone"><br/>
<input type="submit" value="데이터 전송"> <!-- 폼 제출 버튼 -->
</form>
</body>
</html>input을 보면 이 양식에 대한 이름을 name="id"라고 지정해줬다.
여기서 제출한 것은 MyServlet으로 가는데 post방식으로 전해준다.
그럼 전달된 값을 어떻게 읽을까?
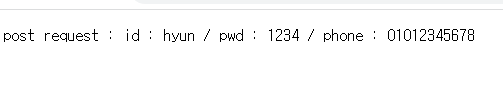
MyServlet.java 을 보자.
protected void doPost(HttpServletRequest request, HttpServletResponse response) throws ServletException, IOException {
		String id=request.getParameter("id");
		String pwd=request.getParameter("pwd");
		String phone=request.getParameter("phone");
		response.getWriter().append("post request : id : "+id+" / pwd : "+pwd+" / phone : "+phone);
	}
String id=request.getParameter("id");
request.getParameter()
파라미터 이름이 id인 걸 읽어오라고 하는 것이다.
이걸 읽어와 String 타입 변수 id에 넣었다.
그걸 id, pwd, phone 세 개의 값을 받아서 출력해줬다.
이제 여기서 응용한다면 이 값을 디비에 넣는다면 회원가입을 할 수 있게 되는 것이다.
폼 종류
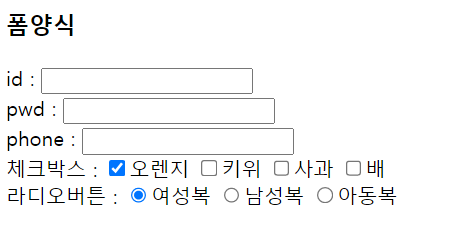
<h3>폼양식</h3>
<form action="/webApp1/MyServlet" method="post">
id : <input type="text" name="id"><br/>
pwd : <input type="password" name="pwd"><br/>
phone : <input type="number" name="phone"><br/>

체크박스 : <input type="checkbox" name="ch" value="1" checked>오렌지
<input type="checkbox" name="ch" value="2">키위
<input type="checkbox" name="ch" value="3">사과
<input type="checkbox" name="ch" value="4">배 <br/>

라디오버튼 : <input type="radio" name="ra" value="f" checked>여성복
<input type="radio" name="ra" value="m">남성복
<input type="radio" name="ra" value="c">아동복 <br/>
콤보박스 :
<select name="sel">
	<option value="a">1학년</option>
	<option value="b">2학년</option>
	<option value="c">3학년</option>
	<option value="d">4학년</option>
</select>
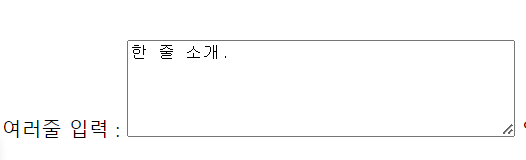
여러줄 입력 : <textarea rows="5" cols="40">한 줄 소개.</textarea>
약관 : <iframe src="5.html" style="width:300px; height:300px"></iframe>
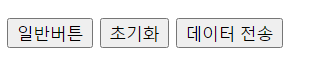
<input type="button" value="일반버튼" onclick="a()">
<input type="reset" value="초기화">
<input type="submit" value="데이터 전송"> <!-- 폼 제출 버튼 -->
</form>
hidden
<input type="hidden" name="h" value="로제떡볶이"> 사용자가 입력하지 않은 값인데 서버에 전송해야 할 정보이면 같이 묶어서 보내주기 위해서 hidden이 존재한다.
화면에는 안 보이지만 value 값을 서버로 전송할 때 사용한다.
서버에서 이용하기 위해서 사용한다 (사용자를 위한 것은 아니다.)
기본 CSS
<!DOCTYPE html>
<html>
<head>
<meta charset="EUC-KR">
<title>Insert title here</title>
<style type="text/css">
h1 {
width: 100px;
height: 100px;
background-color: yellow;
}
body {
color: blue;
}
/* 아이디가 h1_1인 요소 */
#h1_1 {
color: red;
}
/* h1 태그중 아이디가 h1_2인 요소*/
h1#h1_2 {
color: pink;
}
.c1 {
background-color: skyblue;
}
h3.c2{
background-color : black;
color:white;
}
</style>
</head>
<body>
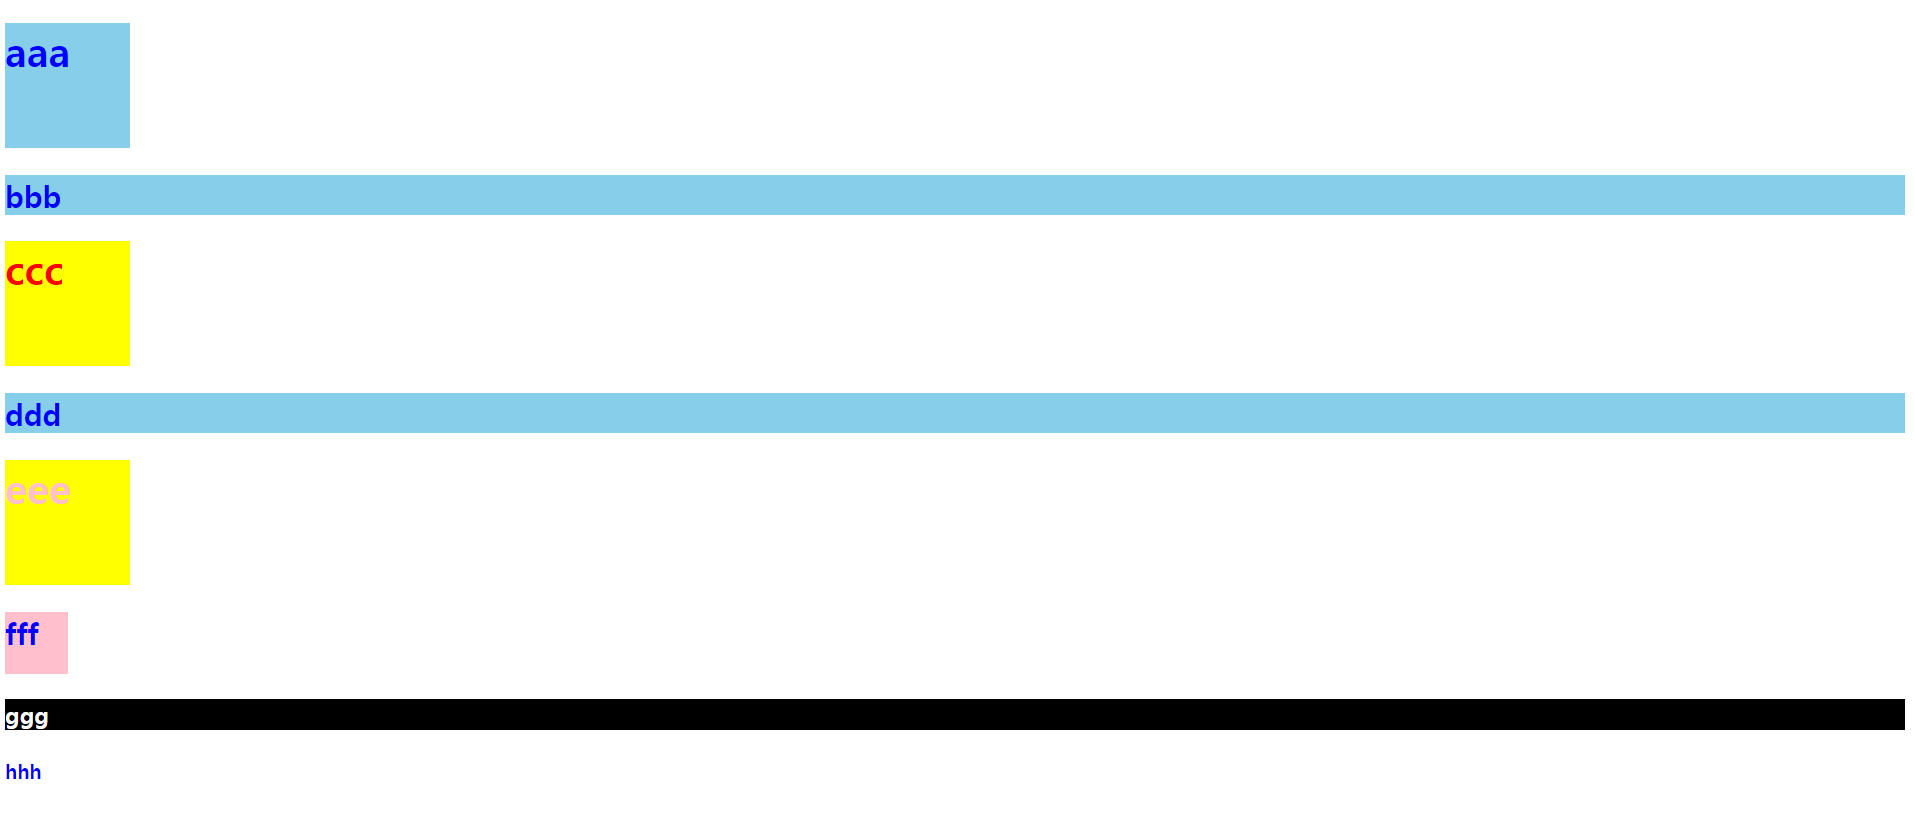
<h1 class="c1">aaa</h1>
<h2 class="c1">bbb</h2>
<h1 id="h1_1">ccc</h1>
<h2 class="c1">ddd</h2>
<h1 id="h1_2">eee</h1>
<h2 class="c1"
style="width: 50px; height: 50px; background-color: pink">fff</h2>
<h3 class="c2">ggg</h3>
<h4 class="cs">hhh</h4>
</body>
</html>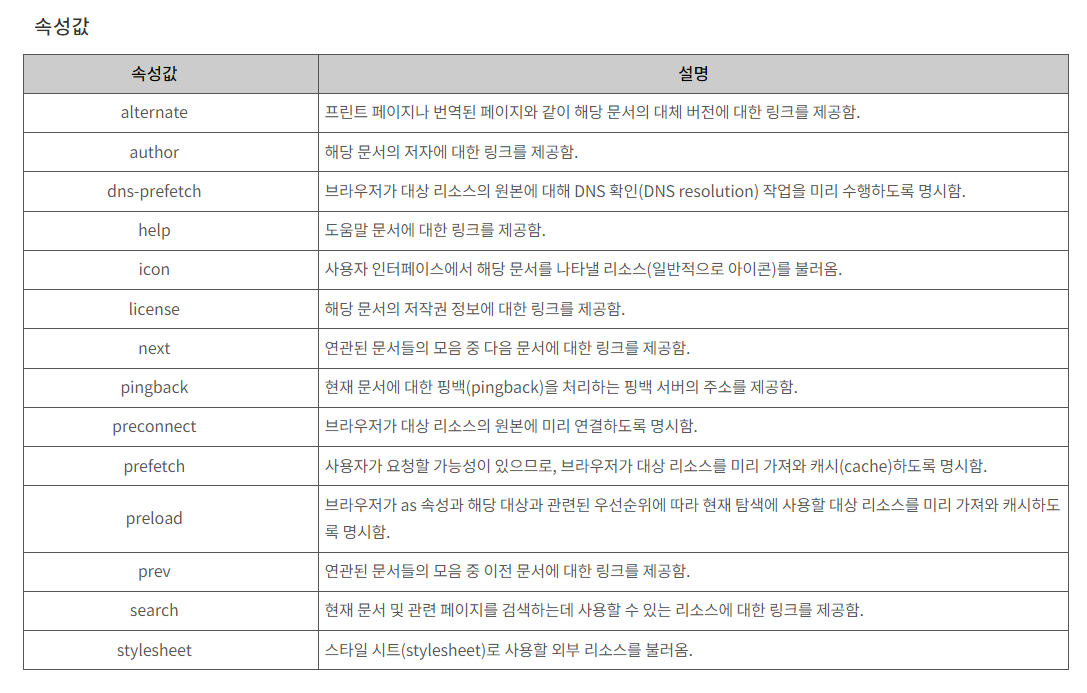
background-image , repeat

<!DOCTYPE html>
<html>
<head>
<meta charset="EUC-KR">
<title>Insert title here</title>
<style type="text/css">
input[type=button]{
	width:200px;
	height:200px;
	float:left;
}

#b1{
	background-color:yellow;
}

#b2{
	background-image:url("../img/star.png");
}

#b3{
	background-image:url("../img/star.png");
	background-repeat:repeat-x;

}
#b4{
	background-image:url("../img/star.png");
	background-repeat:repeat-y;
}
#b5{
	background-image:url("../img/star.png");
	background-repeat:no-repeat;
	background-position:center middle;
}

</style>
</head>
<body>
<input type="button" id="b1" value="button1">
<input type="button" id="b2" value="button2">
<input type="button" id="b3" value="button3">
<input type="button" id="b4" value="button4">
<input type="button" id="b5" value="button5">
</body>
</html>
실수하지 말어라 / 새롭게 알게 된 것들
❕ css에서 width 지정할 때 px 써라... -.-
❕ text-align : <div>와 같은 블록 레벨 컨테이너 안에 있을 때만 작동
❕ position 속성을 별도로 지정해주지 않으면 기본값인 static이 적용된다.
❕ 서버와 연결이 되는 폼에 대해서 제대로 이해하고 있어야 한다.
❕ 폼에서 값을 받고 처리하는 것이 중요하다.
<div> & <span>
위 두 개는 영역을 잡아두기 위해 쓰는 것이다.
아무것도 없다가 나중에 결과를 출력하게 할 때 쓰기 위해서 이걸 쓴다.
두 개의 차이점
| 크기 지정 | 줄바꿈 | |
|---|---|---|
| div | 가능 | 가능 |
| span | 불가능 | 불가능 |
<colspan> & <rowspan>
칸 가로로 합치기 : colspan="칸개수"
칸 세로로 합치기 : rowspan="칸개수"
<form> & </form>
폼태그에 중요한 옵션이 두 가지가 있다.
① action
② method
<form action="서버 페이지 경로" method="전송방식"></form>폼 : 사용자가 입력한 데이터를 서버 페이지에 제출
→ 서버 페이지는 전달한 값들을 받아서 처리
서버 페이지 경로를 제대로 적어야 전송이 제대로 된다.
method에는 두 가지만 쓸 수 있다.
① get
② post
나머지 전송방식은 method가 이해를 못하고 나중에 ajax를 통해서 전달해줄 수 있다. (이 부분은 나중에 배울 내용)
전송방식에 따라서 호출되는 메소드가 달라진다.
get : 전송할 데이터를 url뒤에 붙여서 보냄
데이터 노출됨.
url길이의 제약이 있어서 데이터 크기 제약됨.
get방식이 한글이 더 깨진다.
post : 패킷에 데이터를 담아서 전송.
url 노출되지 않음.
데이터 크기 제약 없음.
<form action="/webApp1/MyServlet" method="post">
<input type="submit" value="데이터 전송">
</form>
(action에 있는) /는 절대 경로를 뜻한다.
server.xml
포트충돌이 일어날 때 포트 찾기 힘들다면 껐다가 키기
아니면 Ctrl + tab을 통해서 포트 죽이기
<Context docBase="webApp1" path="/webApp1" reloadable="true" source="org.eclipse.jst.jee.server:webApp1"/>현재 여기서 중요한게 path이다.
패스를 다르게 준다면 (내가 마음대로 바꿀 수 있음) html에 작성할 때도 다르게 적은 값으로 넣어줘야 한다.
자바 소스가 같이 서버에 올라가는게 아니라 컴파일된 결과만 올라가게 된다.
<MyServlet.java>
@WebServlet("/MyServlet")위 파일은 @WebServlet블라블라로 시작하는데 @로 시작하는 건 어노테이션이다.
원래는 서블릿은 사용하는게 더 복잡했었는데
복잡한 xml을 빼고 어노테이션으로 필요한 걸 즉시즉시할 수 있게 변경했다.
❓ 근데 어노테이션이 뭐야? (Annotation)
어노테이션은 사전적 의미로 주석이라는 뜻이다.
기존의 자바 주석처럼 소스 안에 @기호와 함께 사용되지만 개발자가 아닌 Complier 또는 JVM"을 위한 주석이다.
즉, 실행에 필요한 것은 아니지만, 컴파일러에게 해당클래스에 대한 정보를 알려주거나 자바 프로그램 실행에 관한 내용을 설정하는 용도로 사용된다.
예를 들어, @Override 어노테이션은 @Override 다음에 선언하는 메소드를 상속받은 메소드를 재정의하겠다고 명시하는 것이고,
@SuppressWarnings는 컴파일러의 경고를 무시하겠다고 명시하는 것이다.
기본 특징
① 어노테이션도 클래스와 마찬가지로 구현 시 패키지를 가질 수 있으니 import가 필요하다.
② 어노테이션은 메소드는 없지만 속성(Attribute) 은 가진다.
③ 클래스 선언부, 멤버 변수 선언부, 메소드 선언부 위에 선언한다.
④ 속성이 있는 경우 @어노테이션이름(속성=값)의 형식으로 사용하면 되고, 속성이 값 하나인 경우 속성의 이름을 적지 않고 바로 값을 적기도 한다.
<input>
<input type="text" name="id">
<input type="password" name="pwd">
<input type="number" name="phone">
타입은 입력 방식 종류를 적어준다.
<input>-checkbox
<input type="checkbox" name="ch" value="1">오렌지
<input type="checkbox" name="ch" value="2">키위
<input type="checkbox" name="ch" value="3">사과
<input type="checkbox" name="ch" value="4">배
하나의 그룹으로 하고 싶다면 이름을 똑같이 설정해야 한다.
name="ch"
<input>-radio
<input type="radio" name="ra" value="f" checked>여성복
<input type="radio" name="ra" value="m">남성복
<input type="radio" name="ra" value="c">아동복
checked는 체크된 상태로 만들어주는 것을 말한다.
그외 input
<input type="button" value="일반버튼" onclick="a()">
<input type="reset" value="초기화">
<input type="submit" value="데이터 전송">
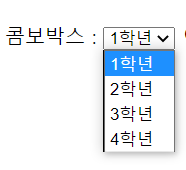
<select>
콤보박스 :
<select name="sel">
<option value="a">1학년</option>
<option value="b">2학년</option>
<option value="c">3학년</option>
<option value="d">4학년</option>
</select>🎃 이제 CSS 시간 ~.~
요소선택 : 태그명 / id / class
작성법
1. 페이지 전체 적용 : <head>에 정의
<head>
	<style>
		a{
        	text-decoration : none;
        }
	</style>
</head>
<body>
</body>
2. 요소 한 개에 적용 : style 속성으로 css 작성
<body>
	<a href="www.naver.com" style="text-decoration : none">네이버</a>
</body>
3. 파일을 따로 하나 만들기 index.css
<head>
	<link rel="stylesheet" type="text/css" href="/examples/media/expand_style.css">
</head>
🤍 id vs class
class는 그룹이라는 뜻이다.
그룹으로 같이 묶어서 처리하고 싶은 것들을 class로 지정해주고
독립적으로 설정하고 싶은 것은 id로 지정해준다.
<link rel="stylesheet" href="myStyle.css">rel의 relation : 관계의 줄인 말
링크 태그에 달리는 링크가 현재 페이지와 어떤 관계를 갖는지를 설명하는 attribute(속성)이다.
rel의 속성값의 종류
는 이렇게 된다.
🤍 position
position static 물 흘러가는대로 순서대로
position:relative로 하면 상대 위치를 지정