
element.style
style 요소는 속성값에 1대 1로 대응됩니다.
css에는 일반글을 사용하지만 style에 대응하면 속성은 camelCase로 대응됩니다.
background-color  => elem.style.backgroundColor
z-index           => elem.style.zIndex
border-left-width => elem.style.borderLeftWidth
getComputedStyle
const section1 = document.body.querySelector('#section--1');
console.log(getComputedStyle(section1));
console.log(getComputedStyle(section1).margin);
console.log(getComputedStyle(section1).color);
/*
CSSStyleDeclaration {0: "align-content", 1: "align-items", 2: "align-self", 3: "alignment-baseline", 4: "animation-delay", 5: "animation-direction", 6: "animation-duration", 7: "animation-fill-mode", 8: "animation-iteration-count", 9: "animation-name", 10: "animation-play-state", 11: "animation-timing-function", 12: "appearance", 13: "backdrop-filter", 14: "backface-visibility", 15: "background-attachment", 16: "background-blend-mode", 17: "background-clip", 18: "background-color", 19: "background-image", 20: "background-origin", 21: "background-position", 22: "background-repeat", 23: "background-size", 24: "baseline-shift", 25: "block-size", 26: "border-block-end-color", 27: "border-block-end-style", 28: "border-block-end-width", 29: "border-block-start-color", 30: "border-block-start-style", 31: "border-block-start-width", 32: "border-bottom-color", 33: "border-bottom-left-radius", 34: "border-bottom-right-radius", 35: "border-bottom-style", 36: "border-bottom-width", 37: "border-collapse", 38: "border-end-end-radius", 39: "border-end-start-radius", 40: "border-image-outset", 41: "border-image-repeat", 42: "border-image-slice", 43: "border-image-source", 44: "border-image-width", 45: "border-inline-end-color", 46: "border-inline-end-style", 47: "border-inline-end-width", 48: "border-inline-start-color", 49: "border-inline-start-style", 50: "border-inline-start-width", 51: "border-left-color", 52: "border-left-style", 53: "border-left-width", 54: "border-right-color", 55: "border-right-style", 56: "border-right-width", 57: "border-start-end-radius", 58: "border-start-start-radius", 59: "border-top-color", 60: "border-top-left-radius", 61: "border-top-right-radius", 62: "border-top-style", 63: "border-top-width", 64: "bottom", 65: "box-shadow", 66: "box-sizing", 67: "break-after", 68: "break-before", 69: "break-inside", 70: "buffered-rendering", 71: "caption-side", 72: "caret-color", 73: "clear", 74: "clip", 75: "clip-path", 76: "clip-rule", 77: "color", 78: "color-interpolation", 79: "color-interpolation-filters", 80: "color-rendering", 81: "column-count", 82: "column-gap", 83: "column-rule-color", 84: "column-rule-style", 85: "column-rule-width", 86: "column-span", 87: "column-width", 88: "content", 89: "cursor", 90: "cx", 91: "cy", 92: "d", 93: "direction", 94: "display", 95: "dominant-baseline", 96: "empty-cells", 97: "fill", 98: "fill-opacity", 99: "fill-rule", …}*/

// 0px
// rgb(68, 68, 68)
이렇게 해당 요소가 가지고 있는 스타일을 객체로 반환하며, 객체의 프로퍼티로 해당 스타일의 속성을 접근하면 속성값을 문자열로 반환한다.
elem.style.setProperty()
elem.style.setProperty(property, value);

section1.style.color = 'orange';
const section1Style = getComputedStyle(section1);
console.log(section1Style.color);
section1.style.setProperty('color', 'blue');
console.log(section1Style.color);
이 함수는 그냥 elem.style.property = value; 와 같습니다.
classList Crud
elem.classList.add("class") – class를 추가
elem.classList.remove("class") - class를 제거
elem.classList.toggle("class") – class가 존재할 경우 class를 제거하고, 그렇지 않은 경우엔 추가
elem.classList.contains("class") – class 존재 여부에 따라 true/false를 반환
class도 속성이기 때문에 elem.className = 'something'과 같이 수정할 수 있습니다. 하지만 이러한 방법은 절대로 하지말아야합니다. class 전체를 삭제하고 재할당하는 방법이기 때문입니다. 따라서 위와 같이 classList.add() 함수를 사용해야 합니다.
getBoundingClientRect()
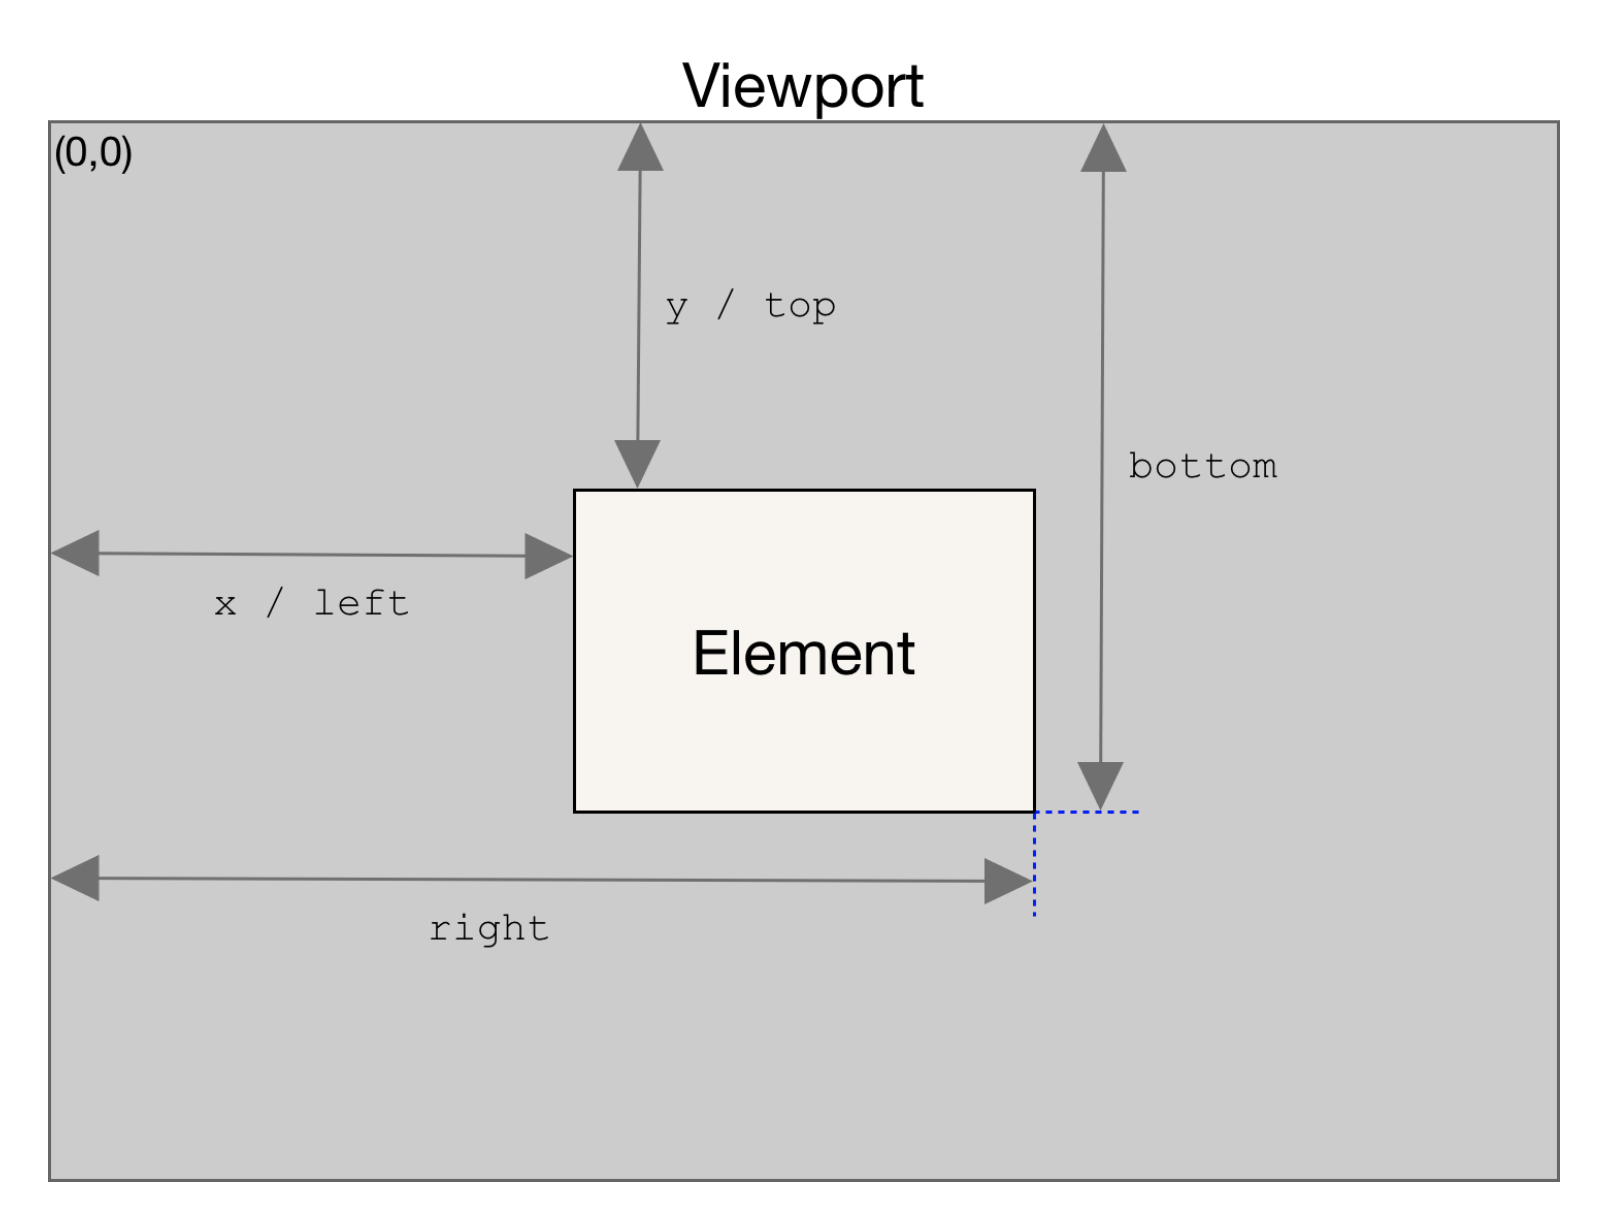
const logo = document.querySelector('.nav__logo');
console.log(logo.getBoundingClientRect());
/*
DOMRect
{
    "x": 90,
    "y": -3.5,
    "width": 148.578125,
    "height": 45,
    "top": -3.5,
    "right": 238.578125,
    "bottom": 41.5,
    "left": 90
}
*/
위 코드는 DOM의 현재 상태와 모습에대해서 상세하게 알려준다.
Scroll
스크롤은 현재 윈도우창이 모니터창 이상보다 클때에 이를 구현줍니다.
관련된 메서드들로 window안에서 스크롤을 구현할때 도움을 주는 도구들이 있습니다.
pageXOffset, pageYOffset
사용자의 화면이 현재 어디의 위치를 가르키고 있는지 알려줍니다.
사용자 화면 기준으로 좌 상의 꼭지점의 현재 위치라고 보시면 됩니다.
이 속성은 다른 이름으로 scrollX,scrollY로도 사용가능합니다.
console.log(window.pageXOffset, window.pageYOffset); // 0 642
console.log(window.scrollX, window.scrollY); // 0 642
document.documentElement.clientWindth/clientHeight
console.log(
  document.documentElement.clientHeight,
  document.documentElement.clientWidth
);// 614 1440
현재 사용자가 보고 있는 웹창의 크기를 보여줍니다.
window.scrollTo(left, top)
const section1 = document.querySelector('#section--1');
const section1Locate = section1.getBoundingClientRect();

const btn = document.querySelector('.btn--scroll-to');
btn.addEventListener('click', () => {
  window.scrollTo(section1Locate.left, section1Locate.top);
});
사용자의 화면을 사용자의 화면의 최 좌상 포인트를 기준으로 옮겨다준다.
즉, 스크롤 시켜준다. 사용자의 현재 상태의 화면을 기준으로 한다. 따라서 사용자의 현재 화면 상태가
window.scrollTo({left: ,top: ,behavior: })
console.log(window.scrollX, window.scrollY);
btn.addEventListener('click', function () {
  window.scrollTo({
    left: section1Locate.left,
    top: section1Locate.top,
    behavior: 'smooth',
  });
  //console.log(window.scrollX, window.scrollY);
});
객체로 넘겨서 behavior이라는 애니메이션도 줄수 있다. 부드럽게 스크롤링을 시켜주는 애니메이션이다. 대체로 이방법을 더 선호한다.
elem.scrollIntoView({behavior: })
위 방법은 엘레멘트의 left, top의 위치를 알아야했다는 단점이 있다. 하지만 이 코드는 해당 엘레멘트를 직접불러 스크롤 시킨다.
btn.addEventListener('click', function () {
  section1.scrollIntoView({ behavior: 'smooth' });
});
굉장히 쉽고 간단하다.