JavaScript - 22
코어 자바스크립트

DOM 프로퍼티
일반적인 객체처럼 행동합니다.
- 어떤 값이든 가질 수있으며
- 대소문자를 구분합니다.
Element.prototype.sayHi = function() {
  alert(`Hello, I'm ${this.tagName}`);
};

document.documentElement.sayHi(); // Hello, I'm HTML
document.body.sayHi(); // Hello, I'm BODY
이렇게 객체엘레멘트의 속성을 추가하여 모든 엘레멘트에서 해당 속성을 사용할수도 있습니다.
HTML 프로퍼티
HTML코드를 파싱하며 DOM트리를 만들때 HTML 표준 속성을 인식하고 이 표준속성을 이용해 DOM트리를 만듭니다. 따라서 요소가 id와 같은 표준속성으로만 구성되었다면 이에 해당하는 프로퍼티가 자연스럽게 만들어집니다. 하지만 표준속성이 아니라면 이에 매핑하는 DOM프로퍼티가 생성되지 않습니다. 한 태그의 요소에서 표준속성일지 모르지만 다른 태그의 요소에서는 표준속성이 아닐수도 있습니다.
<body id="body" type="body">
  <input id="input" type="text">
  <script>
    alert(input.type); // text
    alert(body.type); // type은 body의 표준 속성이 아니므로 DOM 프로퍼티가 생성되지 않아 undefined가 출력됩니다.
  </script>
</body>
그래도 비표준속성에 접근할수 있습니다.
elem.hasAttribute(name)– 속성 존재 여부 확인elem.getAttribute(name)– 속성값을 가져옴elem.setAttribute(name, value)– 속성값을 변경함elem.removeAttribute(name)– 속성값을 지움
여기에 더하여 elem.attributes 을 사용하면 모든 속성값을 읽을 수도 있습니다. elem.attributes을 호출하면 내장 클래스 Attr를 구현한 객체들을 담은 컬렉션이 반환되는데, 객체엔 name과 value 프로퍼티가 존재합니다.
이중에서 getAttribute()는 경로를 가져올때 상대경로를 가져옵니다.
const logo1 = document.createElement('img');
logo1.src = 'img/logo.png';
console.log(logo1.src); // http://127.0.0.1:8080/img/logo.png
console.log(logo1.getAttribute('src')); // img/logo.png
위와 같이 logo.src 는 절대경로를 가져오지만,
logo1.getAttribute는 상대경로를 가져옵니다.
속성과 프로퍼티의 동기화
보통이렇게 태그의 속성과 element의 프로퍼티는 동기화가 됩니다.
❗️ 하지만 수정이 안되는 프로퍼티도 있습니다. value는 속성을 추가해서 프로퍼티 값을 수정을 수 있지만 프로퍼티 값을 수정해도 속성은 변하지 않는 경우가 있습니다.
 let input = document.querySelector('input');
  // 속성 추가 => 프로퍼티 갱신
  input.setAttribute('value', 'text');
  alert(input.value); // text (갱신)
  // 프로퍼티를 변경해도 속성이 갱신되지 않음
  input.value = 'newValue';
  alert(input.getAttribute('value')); // text (갱신 안됨!)
이는 유저가 어떤 행동을해서 프로퍼티 값이 수정이 되었을때 속성값을 가져와서 원래 데이터로 복구하는데 쓰일수 있습니다.
'data-*' 속성과 dataset 프로퍼티
’data-'로 시작하는 속성 전체는 개발자가 용도에 맞게 사용하도록 별도로 예약됩니다. dataset 프로퍼티를 사용하면 이 속성에 접근할 수 있습니다.
<body data-about="Elephants">
<script>
  alert(document.body.dataset.about); // Elephants
</script>
DOM CRUD
DOM 수정
요소 생성하기
DOM 요소를 만들때 사용하는 메서드는 크게 두개 입니다.
document.createElement(tag): 태그를 인수로 받아 엘레멘트 노드를 생성한다.document.createTextNode(text): 텍스트를 인수로 받아 텍스트 노드를 생성한다.
삽입 메서드
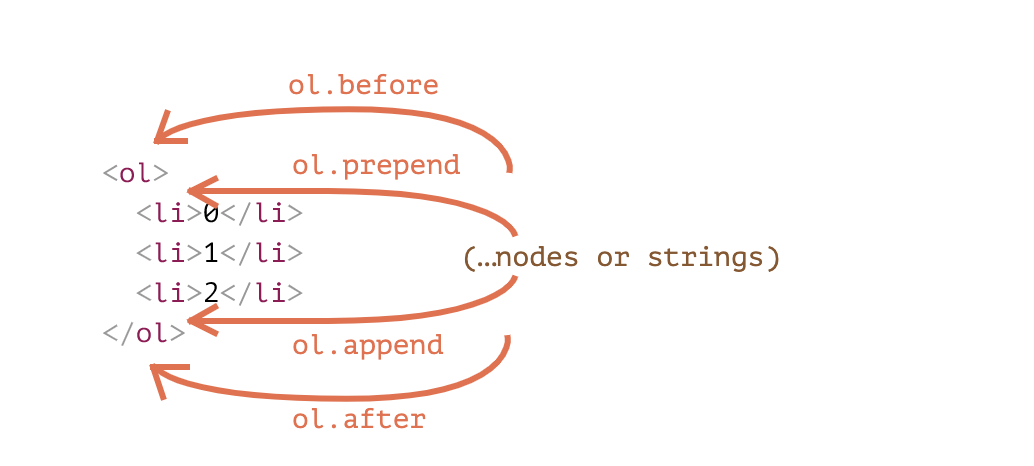
- node.append(노드나 문자열) – 노드나 문자열을 node 끝에 삽입합니다.
- node.prepend(노드나 문자열) – 노드나 문자열을 node 맨 앞에 삽입합니다.
- node.before(노드나 문자열) –- 노드나 문자열을 node 이전에 삽입합니다.
- node.after(노드나 문자열) –- 노드나 문자열을 node 다음에 삽입합니다.
- node.replaceWith(노드나 문자열) –- node를 새로운 노드나 문자열로 대체합니다.
const section1 = document.body.querySelector('#section--1');
const testElement = document.createElement('p');
testElement.className = 'test';
testElement.innerHTML = '테스트 엘레멘트 생성';
section1.before(testElement);
section1.prepend(testElement);
section1.append(testElement);
section1.after(testElement);
DOM 요소 삭제
remove()를 이용하면 해당 노드가 DOM에서 삭제가 됩니다.
const section1 = document.body.querySelector('#section--1');
section1.remove();
DOM 요소 위치 이동
<div id="first">First</div>
<div id="second">Second</div>
<script>
  // remove 메서드를 호출할 필요가 없습니다.
  second.after(first); // id가 second인 노드를 가져오고, 해당 노드의 뒤에 id가 first인 노드를 삽입
</script>
DOM의 위치이동시 remove 필요없이 해도 된다. 기존의 자리는 삭제하고 추가하기 때문입니다.
DOM 요소의 깊은 복사
cloneNode() 이란 함수는 element를 복사해줍니다.
인수값으로 boolean을 받으며 true을 넣으면 후손 노드까지 전부다 복사해주는 깊은 복사를 하고 false를 받으면 딱 겉에만 복사합나다.
const section1 = document.body.querySelector('#section--1');
const sectionCopy = section1.cloneNode(true);
const sectionFrame = section1.cloneNode(false);
section1.after(sectionCopy);
// section1 바로 다음의 위치에 sectionCopy라고 완전히 같은 노드가 더 추가된다.
console.log(sectionFrame);
// <section class="section" id="section--1"></section>
Document Fragment
하나의 element 보따리라고 생각하면된다. new DocumentFragment()로 새로운 fragment를 생성한다음에 여기에 넣고싶은 엘레먼트들을 넣으면 된다.
그냥 하나의 div 엘레멘트를 만들고 거기에 집어 넣는다고 생각해도 된다.
하지만 이런 함수를 직접 쓸일은 흔치 않습니다.
그리고 원하는 공간에 삽입하면 되는데 fragment는 안에 있는 내용물만 쏙 넣고 틀을 남기지 않는다.
const section1 = document.body.querySelector('#section--1');
function getListContent() {
  let fragment = new DocumentFragment();
  for (const item of Array.from({ length: 3 }, (_, index) => index + 1)) {
    const list = document.createElement('li');
    list.innerHTML = `${item}`;
    fragment.append(list);
  }
  return fragment;
}
const ul = document.createElement('ul');
ul.append(getListContent());
section1.after(ul);
const section1 = document.body.querySelector('#section--1');
function getListContent() {
let result = [];
for (const item of Array.from({ length: 3 }, (_, index) => index + 1)) {
const list = document.createElement('li');
list.innerHTML = `${item}`;
result.push(list);
}
return result;
}
const ul = document.createElement('ul');
ul.append(...getListContent());
section1.after(ul);배열을 이용해서 충분히 대신 할수 있다.