⭐컴포넌트 스캔과 자동 주입 시작하기
스프링 빈을 등록할 때 자바 코드의 @Bean이나 XML 등을 통해서 설정 정보에 직접 등록할 스프링 빈을 나열했다.
스프링은 설정 정보가 없어도 자동으로 스프링 빈을 등록하는 컴포넌트 스캔이라는 기능을 제공한다.
또한 의존관계도 자동으로 주입하는 @Autowired라는 어노테이션도 제공한다.
package hello.core;

import org.springframework.context.annotation.ComponentScan;
import org.springframework.context.annotation.Configuration;
import org.springframework.context.annotation.FilterType;

@Configuration
@ComponentScan(
        excludeFilters = @ComponentScan.Filter(type = FilterType.ANNOTATION, classes = Configuration.class)
)
public class AutoAppConfig {

}excludeFilters를 사용하는 이유는 기존에 작성했던 AppConfig과 충돌하여 중복으로 스프링 빈에 등록되는 오류를 방지하고자 하는 것으로 자동 컴포넌트 스캔에 대해서만 초점을 맞추기 위해 사용한 것이다.
컴포넌트 스캔을 사용하려면 먼저 @ComponentScan을 설정 정보에 붙여주면 된다.
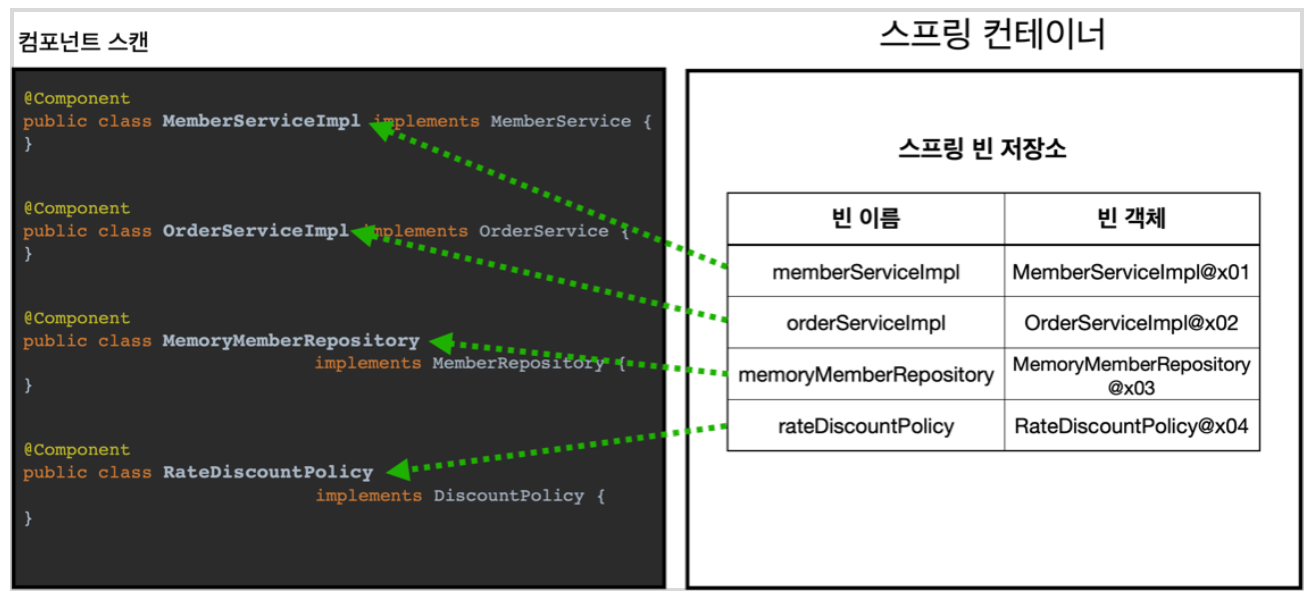
@ComponentScan은 @Component가 붙은 모든 클래스를 스프링 빈으로 등록한다.
- 빈 이름 기본 전략 :
MemberServiceImpl클래스 →memberServiceImpl - 빈 이름 직접 지정 : 직접 지정하고자 한다면
@Component("memberService2")와 같은 형식으로 이름을 부여하면 된다.

생성자에 @Autowired를 지정하면 스프링 컨테이너가 자동으로 해당 스프링 빈을 찾아서 주입한다.
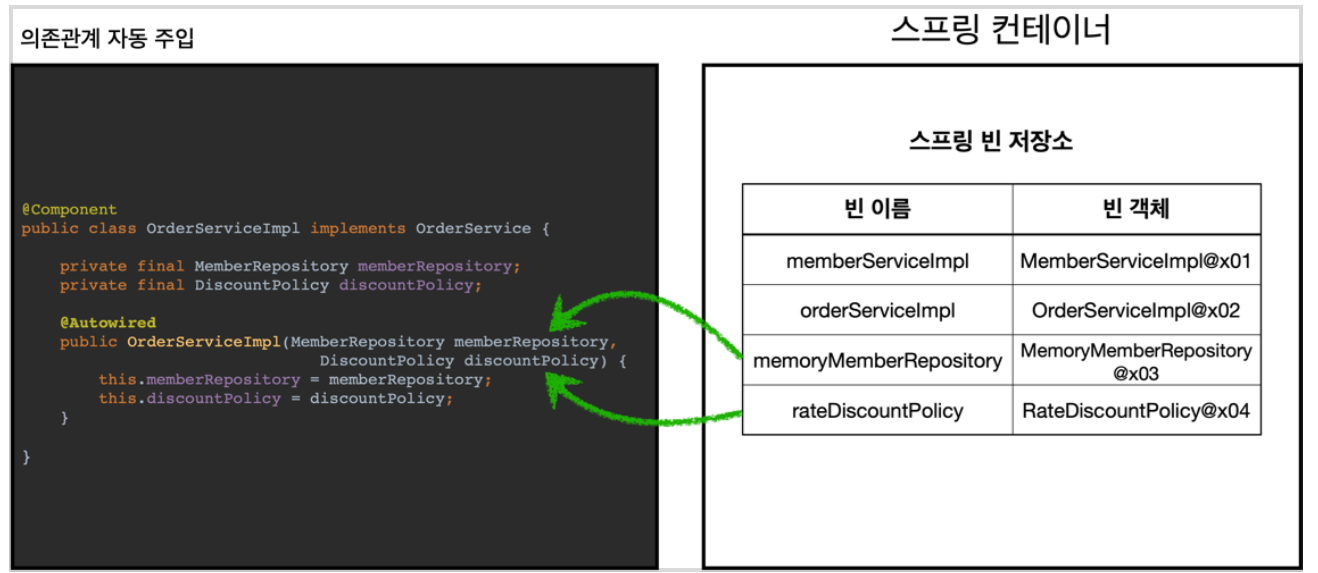
생성자 파라미터가 많아도 다 찾아서 자동으로 주입한다.
❗️CoreApplicationTest 실행 오류
Caused by: org.springframework.beans.factory.UnsatisfiedDependencyException: Error creating bean with name 'memberServiceImpl' defined in file....

...

Caused by: org.springframework.beans.factory.NoUniqueBeanDefinitionException: No qualifying bean of type 'springbootstudy2.core.member.MemberRepository' available: expected single matching bean but found 2: memoryMemberRepository,memberRepository
코드를 여러 번 보다가 위 에러를 마주했다. 구글링해서 찾아보니 코드의 에러라기보다는 스프링 부트 3.2버전으로 프로젝트 생성 시 매개변수의 이름을 인식하지 못하는 문제가 있다고 한다.
바로 의존관계를 자동으로 주입해주는 @Autowired때문인데 [해결 방안3(권장)]을 참고해서 해결할 수 있었다. 바로 Gradle을 사용해서 빌드하고 실행하는 것이다.
참고로 이 문제는 인텔리제이 IDE의 설정을 통해서 해결할 수 있는데 [FILE] → [Settings] → [Build, Execution, Deployment] → [Gradle]에서 [Build and run using]과 [Run tests using]의 값을 Gradle로 변경하면 된다. Gradle로 선택하는 경우 Gradle이 컴파일 시점에 해당 옵션을 자동으로 적용해준다.
📡탐색 위치와 기본 스캔 대상
설정 정보 클래스의 위치를 프로젝트 최상단에 둔다.
컴포넌트 스캔 기본 대상
@Component: 컴포넌트 스캔에서 사용@Controller: 스프링 MVC의 컨트롤러로 인식@Service: 핵심 비즈니스 로직이 있는 비즈니스 계층을 인식@Repository: 데이터 접근 계층으로 인식@Configuration: 스프링 설정 정보
❓필터
package hello.core.scan.filter;

import java.lang.annotation.*;

@Target(ElementType.TYPE)
@Retention(RetentionPolicy.RUNTIME)
@Documented
public @interface MyExcludeComponent {
}
package hello.core.scan.filter;
import java.lang.annotation.*;
@Target(ElementType.TYPE)
@Retention(RetentionPolicy.RUNTIME)
@Documented
public @interface MyIncludeComponent {
}package hello.core.scan.filter;
@MyIncludeComponent
public class BeanA {
}package hello.core.scan.filter;
@MyExcludeComponent
public class BeanB {
}package hello.core.scan.filter;
import org.assertj.core.api.Assertions;
import org.junit.jupiter.api.Test;
import org.springframework.context.annotation.AnnotationConfigApplicationContext;
import org.springframework.context.annotation.ComponentScan;
import org.springframework.context.annotation.Configuration;
import org.springframework.context.annotation.FilterType;
public class ComponentFilterAppConfigTest {
@Test
void filterScan() {
AnnotationConfigApplicationContext ac = new AnnotationConfigApplicationContext(ComponentFilterAppConfig.class);
BeanA beanA = ac.getBean("beanA", BeanA.class);
Assertions.assertThat(beanA).isNotNull();
}
@Configuration
@ComponentScan(includeFilters = @ComponentScan.Filter(type = FilterType.ANNOTATION, classes = MyIncludeComponent.class),
excludeFilters = @ComponentScan.Filter(type = FilterType.ANNOTATION, classes = MyExcludeComponent.class))
static class ComponentFilterAppConfig {
}
}컴포넌트 스캔시 제외할 필터와 포함할 필터를 선택적으로 적용해서 컴포넌트 스캔을 할 수 있다.
