클래스
- 클래스란 : 객체 생성을 위한 틀
- 붕어빵 틀 (클래스) : 붕어빵 (객체)
- 객체지향의 기본 모토 : 현실세계에 존재하는 모든 것을 프로그램의 객체로 구현할 수 있다.
- 객체는 프로그램 안에서 사용할 수 있어야 한다. 객체화시키기위한 도구가 클래스이다.
class 붕어빵 {
	속재료변수;
	피재료변수;
	붕어빵만들기(){}
}

붕어빵 a = new 붕어빵(); -> 붕어빵 객체
클래스의 구성 요소
- 멤버 변수(클래스 변수) - 데이터(값) 저장 용도
- 메소드 - 기능
클래스 만들기
public class Student {

	String hakbun, name;
	int kor, eng, mat;
	double tot, avg;

	void sum() {
		this.tot = kor + eng + mat;
		// this - 현재 자기자신의 클래스명과 같다.
	}

	void average() {
		this.avg = this.tot / 3.0;
	}

	void output() {
		System.out.println("이름: " + this.name + "총점: " + this.tot + "평균: " + this.avg);
	}
}
클래스 사용
public class StudentMain {

	public static void main(String[] args) {
		// TODO Auto-generated method stub
		Student st = new Student();
		st.hakbun = "2122222";
		st.name = "홍동우";
		st.kor = 100;
		st.eng = 70;
		st.mat = 50;
		st.sum();
		st.average();
		st.output();
	}

}- 문제점
- 외부에서 멤버변수에 직접 접근할 수 있기 때문에 보안상 취약하다.
private, setter, getter
- 외부에서 멤버변수에 접근할 수 없도록 private 키워드를 붙여 선언한다. 이렇게 하면 자기 클래스 내부에서만 멤버변수에 접근할 수 있게 된다.
- private 멤버변수에 접근할 수 있는 setter와 getter 를 만든다.
public class Student {

	private String hakbun, name;
	private int kor, eng, mat;
	private double tot, avg;

	void sum() {
		this.tot = kor + eng + mat;
		// this - 현재 자기자신의 클래스명과 같다.
	}

	void average() {
		this.avg = this.tot / 3.0;
	}

	void output() {
		System.out.println("이름: " + this.name + " 총점: " + this.tot + " 평균: " + this.avg);
	}

	// setter, getter 메소드를 이용해서 접근
	// setter : 값 초기화 (파라미터 필요)
	// getter : 값 얻기 (return 값 필요)
	public void setName(String name) {
		this.name = name;
	}

	public String getName() {
		return this.name;
	}
}
한꺼번에 getter/setter 만들기
- 멤버변수 영역 block 잡기 → source → generate Getters and Setters → generate
멤버변수 값 한번에 setting
- 세팅이 필요한 멤버변수를 한꺼번에 세팅할 수 있는 메소드 setStudent 만들기
public void setStudent(String hakbun, String name, int kor, int eng, int mat) {
		this.hakbun = hakbun;
		this.name = name;
		this.kor = kor;
		this.eng = eng;
		this.mat = mat;
	}

// main
public static void main(String[] args) {
		// TODO Auto-generated method stub
		Student st = new Student();
		// setStudent 사용
		st.setStudent("1234566", "홍동우", 100, 90, 70);

		st.sum();
		st.average();
		st.output();
	}
생성자(함수) ⭐
- 클래스를 가지고 객체를 생성하기 위한 특수한 함수
- 반드시 클래스명과 일치해야 한다.
- JVM이 자동 호출한다.
- 사용자가 생성자를 정의하지 않는 경우, 기본 생성자가 추가된다. (기본 생성자 함수)
- 생성자가 오버로딩된 경우, 기본 생성자를 사용하고자 한다면 수동으로 추가해주어야 한다. (오버로딩 시 생략된 기본 생성자를 덮어씌우기 때문!)
- 오버로딩된 다른 생성자를 호출할 때는 this()로 호출하고, 생성자 내의 가장 첫 명령에 사용한다.
- 인스턴스(객체)를 생성할 때 2가지를 결정해야 한다.
- 어떤 클래스를 생성할 것인가?
- 선택한 클래스의 어떤 생성자로 인스턴스를 생성할 것인가?
생성자 함수 오버로딩
public class Student {
	// 기본 생성자
	public Student() {
	}
	// 생성자 오버로딩
	public Student(String hakbun, String name, int kor, int eng, int mat) {
		this.hakbun = hakbun;
		this.name = name;
		this.kor = kor;
		this.eng = eng;
		this.mat = mat;
	}
}

// main
Student st = new Student("1234566", "홍동우", 100, 90, 70);
// 객체생성과 멤버변수 초기화를 한번에 할 수 있다.
생성자 내부에서 또 다른 생성자 호출
- 생성자 내부에서 또 다른 생성자(오버로딩된 생성자)를 호출할 때는 this() 를 사용한다.
// 생성자 오버로딩
public class Car {
String color;
String gearType;
int door;
Car() {
// 생성자 안에서 또 다른 생성자 호출
this("white", "auto", 3);
System.out.println("기본생성자");
// this - 자기자신의 클래스명
}
Car(String color) {
this(color, "stick", 5);
System.out.println("색상값만 지정");
}
Car(String color, String gearType, int door) {
this.color = color;
this.gearType = gearType;
this.door = door;
}
}
// MAIN
public class CarMain {
public static void main(String[] args) {
// TODO Auto-generated method stub
Car c1 = new Car("blue", "auto", 4);
Car c2 = new Car();
Car c3 = new Car("black");
System.out.println(c1.color + c1.gearType + c1.door);
System.out.println(c2.color + c2.gearType + c2.door);
System.out.println(c3.color + c3.gearType + c3.door);
/* 출력 결과
기본생성자
색상값만 지정
c1 blueauto4
c2 whiteauto3
c3 blackstick5
*/
}
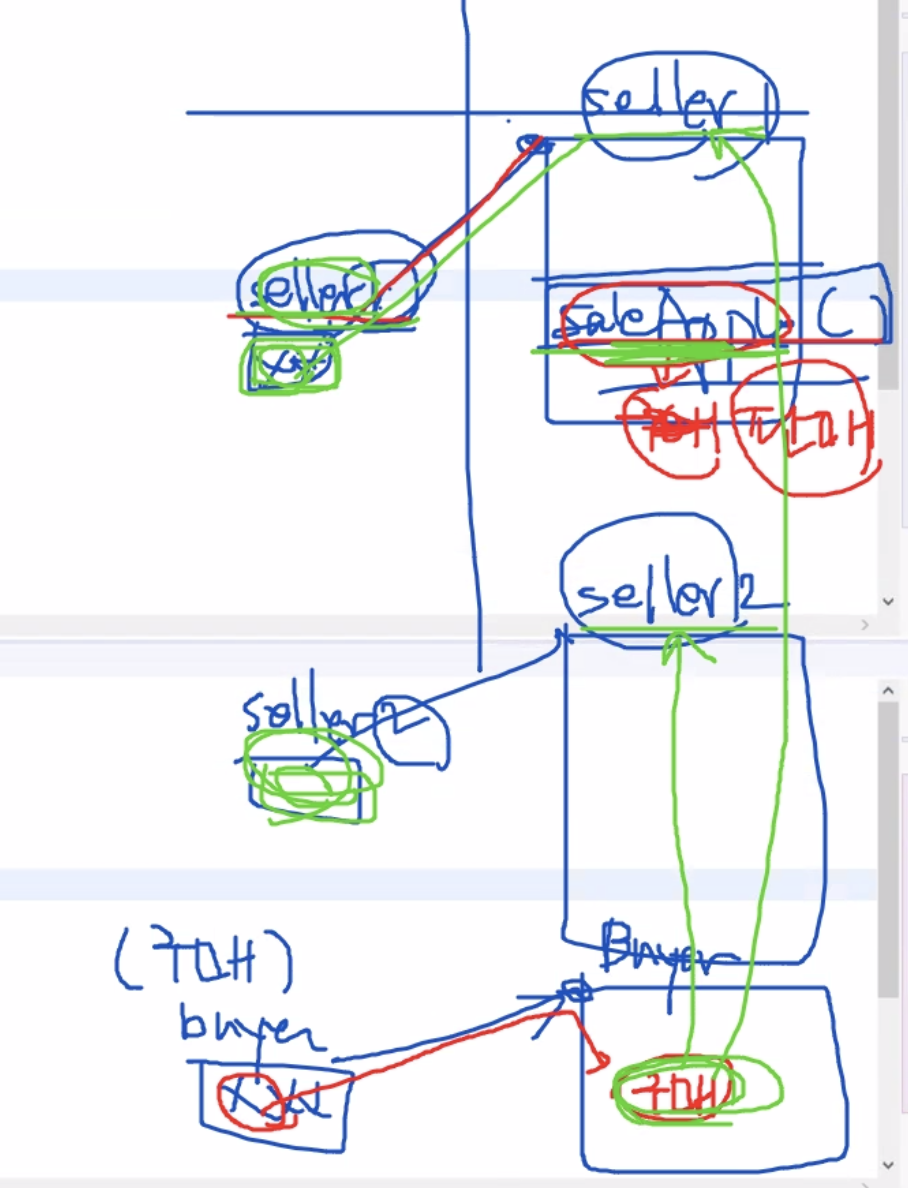
}구매-판매 클래스 만들기
판매자 클래스
// 과일 판매자
public class FruitSeller {
	int numOfApple;
	int myMoney;
	final int APPLE_PRICE; // final - 변경할 수 없는 변수

	public FruitSeller (int money, int appleNumber, int price) {
		this.myMoney = money;
		this.numOfApple = appleNumber;
		this.APPLE_PRICE = price;
	}

	// 판매 메소드
	public int saleApple(int money) {
		int num = money / APPLE_PRICE; // 판매 과일 수
		numOfApple -= num;
		myMoney += money;
		return  num;
	}

	public void showSaleResult () {
		System.out.println("남은 사과: " + numOfApple);
		System.out.println("판매 수익: " + myMoney);
	}
}
구매자 클래스
// 과일 구매자
public class FruitBuyer {
	int numOfApple;
	int myMoney;

	public FruitBuyer(int money) {
		this.myMoney = money;
		this.numOfApple = 0;
	}

	public void showBuyResult () {
		System.out.println("구입한 사과: " + numOfApple);
		System.out.println("현재 잔액: " + myMoney);
	}

	// 구매 메소드 - 특정 판매자(seller)에게서 money 만큼 구매
	public void buyApple(FruitSeller seller, int money) {
		numOfApple += seller.saleApple(money);
		// 파라미터로 넘어온 판매자의 saleApple메소드 호출
		myMoney -= money;
	}

}
메인 클래스
public class FruitSaleMain {

	public static void main(String[] args) {
		// 판매자1 객체 생성, 초기화
		FruitSeller seller1 = new FruitSeller(0, 100, 1500);
		// 판매자2 객체 생성, 초기화
		FruitSeller seller2 = new FruitSeller(0, 300, 2000);
		// 구매자 객체 생성, 초기화
		FruitBuyer buyer = new FruitBuyer(100000);

		// 판매자1에게 5000원어치 구매
		buyer.buyApple(seller1, 5000);
		// 판매자2에게 8000원어치 구매
		buyer.buyApple(seller2, 8000);

		System.out.println("판매자 1 현재상황");
		seller1.showSaleResult();
		System.out.println("판매자 2 현재상황");
		seller2.showSaleResult();
		System.out.println("구매자 현재상황");
		buyer.showBuyResult();

	}

}
상속
- 부모는 자식이다!
- 자식은 부모의 자원을 모두 사용할 수 있다.
- 자식 —/→ 부모
- 자식은 부모타입으로 치환(사용)가능하다! ⭐ → 이것 때문에 상속구조를 사용
- 상속 ⇒ 자식을 부모타입으로 치환하기 위해 사용하는 것 → 유지보수가 편리해진다
- 부모 타입을 여러 개의 자식 타입으로 사용할 수 있는 것 ⇒ 다형성
오버라이딩
- 부모로부터 상속받은 메소드를 자식이 재정의하여 사용하는 것
<A> a, a()

<B> b, b()

A a = new A(); // a.a, a.a()

B b = new B(); // b.b, b.b() b.a, b.a()

A c = new B(); // c.a, c.a() [b의 변수와 메소드는 사용할 수 없음]

→ B는 A를 상속 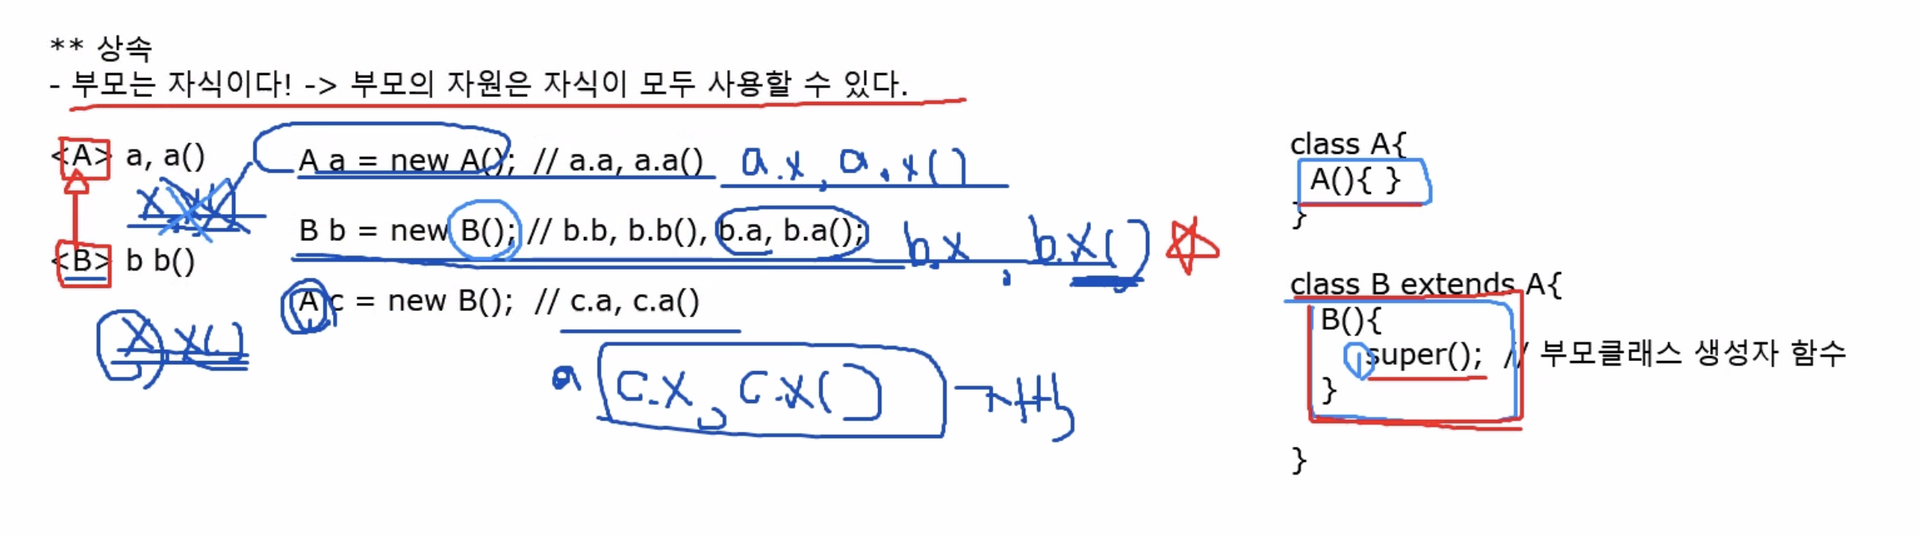
주소록 만들기 실습
상속구조
- HighFriend와 UnivFriend 클래스는 Friend 클래스를 상속한다. 따라서 두 클래스는 Friend 타입으로 치환될 수 있다.
- FriendInfoHandler 클래스는 주소록 기능을 담당한다. 주소록에 친구 추가, 주소록에 저장된 친구 정보를 출력한다. 입력받은 정보로 Friend 객체를 생성해 myFriends 배열에 추가한다.
- Main클래스에서는 FriendInfoHandler 객체를 생성해 친구 추가, 친구정보 출력 등의 메소드를 호출한다.
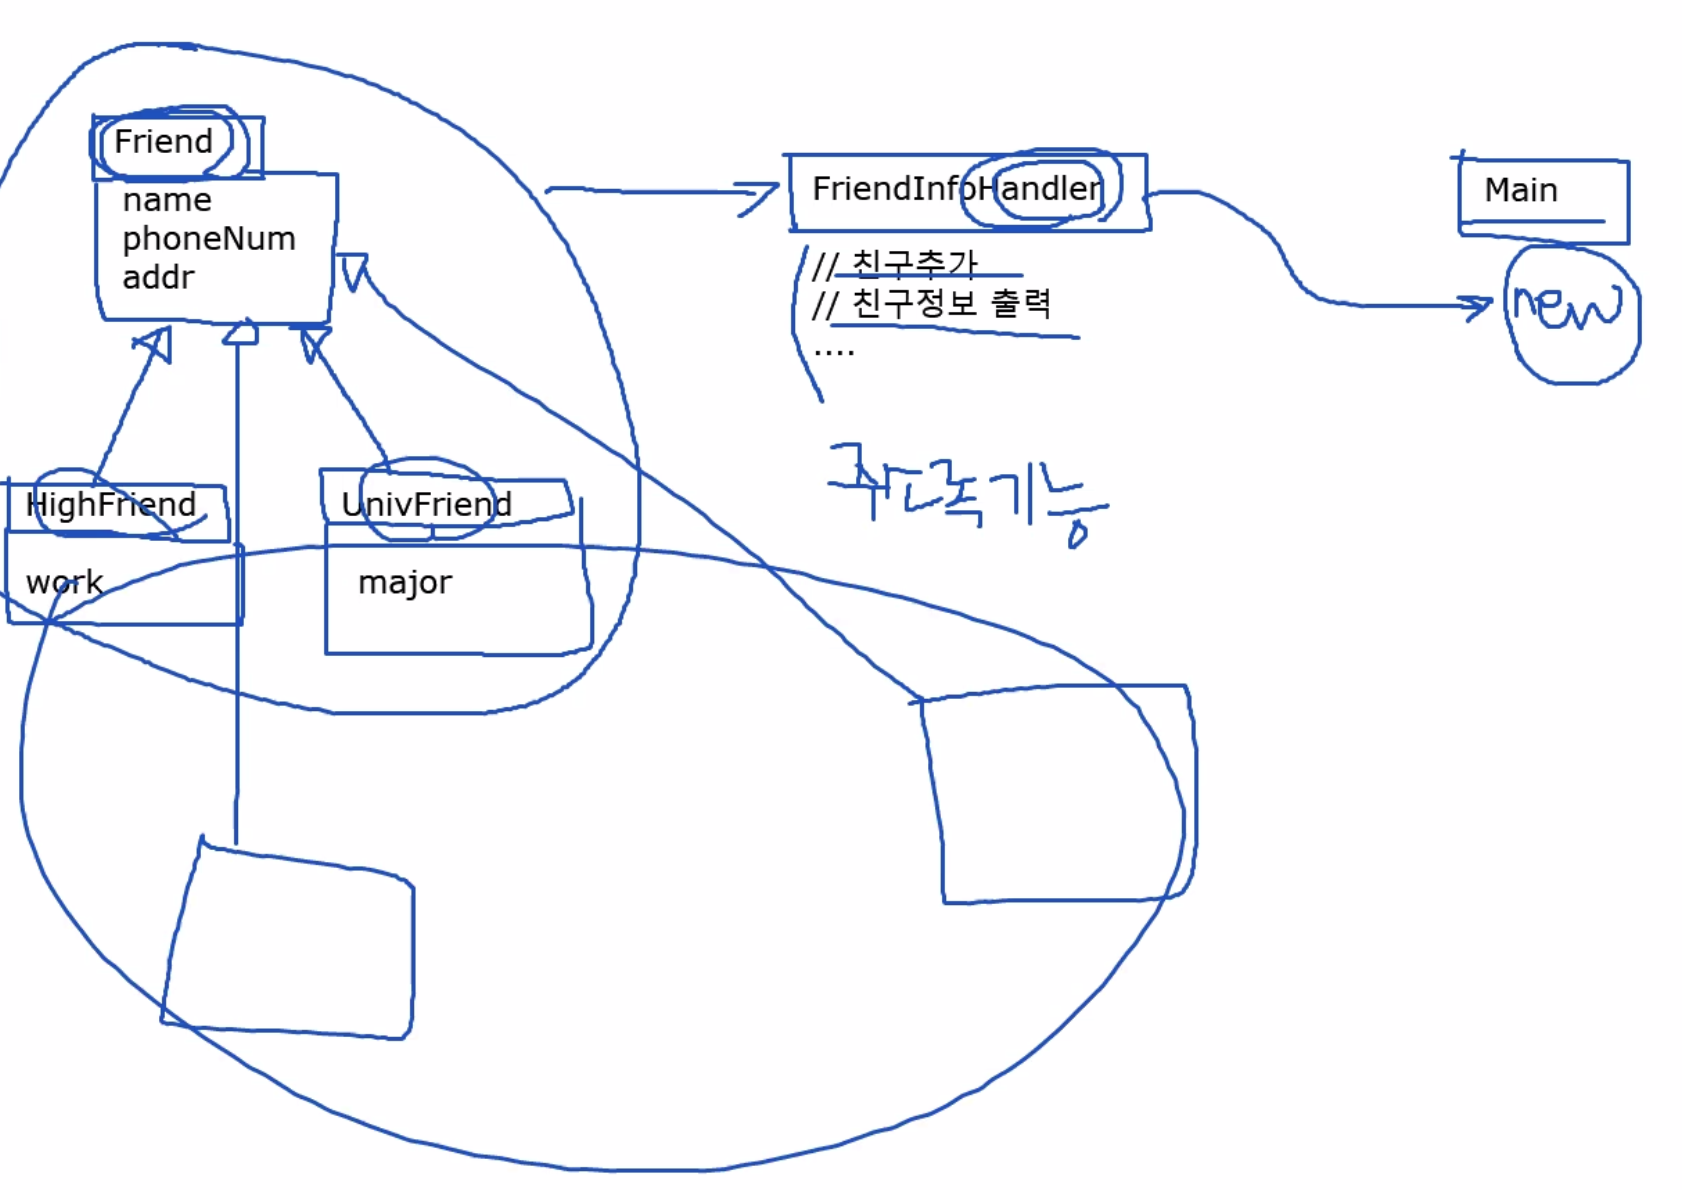
- HighFriend, Uni
Friend 클래스 (부모 클래스)
public class Friend {
	String name;
	String phoneNum;
	String addr;


	public Friend(String name, String phone, String addr) {
		this.name = name;
		this.phoneNum = phone;
		this.addr = addr;
	}

	public void showData() {
		System.out.println("이름: " + name);
		System.out.println("전화: " + phoneNum);
		System.out.println("주소: " + addr);
	}

	public void showBasicInfo() {
		// 자식 클래스에서 구현한다.

	}
}
UnivFriend 클래스
public class UnivFriend extends Friend{
	String major;

	public UnivFriend(String name, String phone, String addr, String major) {
		super(name, phone, addr);
		this.major = major;
	}

	public void showData() {
		super.showData();
		System.out.println("전공: " + major);
	}

	public void showBasicInfo() {
		System.out.println("이름: " + name);
		System.out.println("전화: " + phoneNum);
	}

}
HighFriend 클래스
public class HighFriend extends Friend{
String work;
public HighFriend(String name, String phone, String addr, String job) {
super(name, phone, addr);
this.work = job;
}
public void showData() {
super.showData();
System.out.println("직업: " + work);
}
public void showBasicInfo() {
System.out.println("이름: " + name);
System.out.println("전화: " + phoneNum);
}
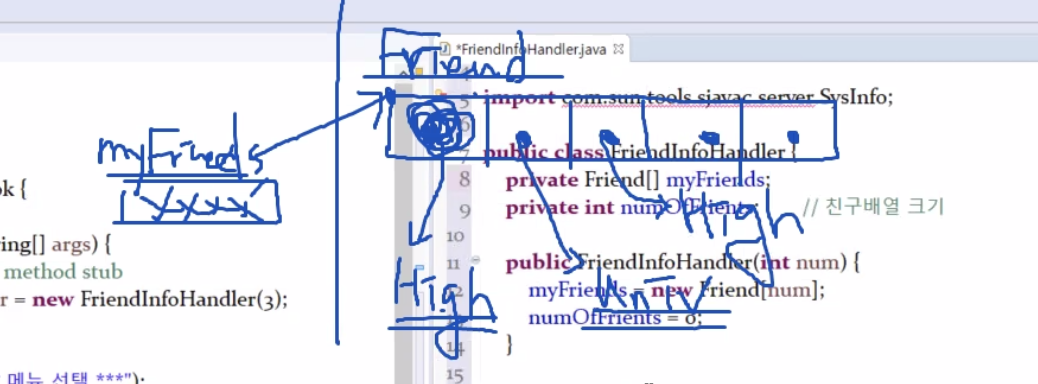
}FriendInfoHandler 클래스
import java.util.Scanner;

public class FriendInfoHandler {
	private Friend[] myFriends;
	// 왜 Friend 인가? - 어떤 타입의 친구일지 모르기 때문(대학친구인지 고등학교친구인지)
	// -> 상속 구조를 사용하는 이유 : 자식은 부모 타입으로 치환가능하기 때문!

	private int numOfFriends; // 친구 배열 크기

	public FriendInfoHandler(int num) {
		myFriends = new Friend[num]; // 배열 크기 초기화
		numOfFriends = 0; // 현재까지 저장한 친구 수 기록
	}

	// 배열에 친구 추가 메소드
	private void addFriendInfo(Friend fren) {
		myFriends[numOfFriends++] = fren;
		// 배열에 친구 추가 후 친구 수 +1
	}

	public void addFriend(int choice) {
		String name, phoneNum, addr, work, major;
		Scanner sc = new Scanner(System.in);

		System.out.print("이름: "); name = sc.nextLine();
		System.out.print("전화: "); phoneNum = sc.nextLine();
		System.out.print("주소: "); addr = sc.nextLine();

		if (choice == 1) {
			System.out.print("직업: "); work = sc.nextLine();
			this.addFriendInfo(new HighFriend(name, phoneNum, addr, work));
		} else {
			System.out.print("전공: "); major = sc.nextLine();
			this.addFriendInfo(new UnivFriend(name, phoneNum, addr, major));
		}
		System.out.println("입력 완료!");

	}

	// 친구 배열의 모든 데이터를 출력하는 메소드
	public void showAllData() {
		// 반복
		for (int i=0; i<numOfFriends; i++) {
			myFriends[i].showData();
		}

	}

	// 친구 배열의 간략정보만 출력하는 메소드
	public void showAllSimpleData() {
		// 반복
		for (int i=0; i<numOfFriends; i++) {
			myFriends[i].showBasicInfo();
		}
	}
}
MyFriendInfoBook 클래스
public class MyFriendInfoBook {

	public static void main(String[] args) {

		FriendInfoHandler handler = new FriendInfoHandler(3);

		while(true) {
			System.out.println("1. 고교 친구 저장");
			System.out.println("2. 대학 친구 저장");
			System.out.println("3. 전체 정보 출력");
			System.out.println("4. 기본 정보 출력");
			System.out.println("5. 프로그램 종료");
			System.out.print("선택 >>");

			Scanner sc = new Scanner(System.in);
			int choice = sc.nextInt();
			switch (choice) {
			case 1: case 2:
				handler.addFriend(choice);
				break;
			case 3:
				handler.showAllData();
				break;
			case 4:
				handler.showAllSimpleData();
				break;
			case 5:
				System.out.println("프로그램을 종료합니다.");
				break;
			}
		}
	}
}
Item 실습
package oop.item;

import java.util.Scanner;

public class MainTest {
    public static void main(String[] args) {
        ItemHandler itemHandler = new ItemHandler(3);

        while (true) {
            System.out.println("1. CD 구매");
            System.out.println("2. DVD 구매");
            System.out.println("3. 책 구매");
            System.out.println("4. 전체 정보 출력");
            System.out.println("5. 프로그램 종료");
            System.out.println("선택 >> ");

            Scanner sc = new Scanner(System.in);
            int choice = sc.nextInt();
            switch (choice) {
                case 1: case 2: case 3:
                    itemHandler.addItem(choice);
                    break;
                case 4:
                    itemHandler.showAllData();
                    break;
                case 5:
                    System.out.println("프로그램을 종료합니다.");
                    return;
            }
        }
    }
}
package oop.item;
import java.util.Scanner;
public class ItemHandler {
private Item[] myItems;
private int numOfItems;
public ItemHandler(int num){
myItems = new Item[num];
numOfItems = 0;
}
private void addItemInfo(Item I) {
myItems[numOfItems++] = I;
}
public void addItem(int choice) {
int itemNo, price, trackNum, runtime, pageNum;
String title, singer, actor, name, outDate;
Scanner sc = new Scanner(System.in);
System.out.println("제품번호: "); itemNo = Integer.parseInt(sc.nextLine());
System.out.println();
System.out.println("이름: "); title = sc.nextLine();
System.out.println();
System.out.println("가격: "); price = Integer.parseInt(sc.nextLine());
if (choice == 1) {
// CD
System.out.println("가수: "); singer = sc.nextLine();
System.out.println("트랙수: "); trackNum = Integer.parseInt(sc.nextLine());
System.out.println("출고일자: "); outDate = sc.nextLine();
this.addItemInfo(new CDItem(itemNo, title, price, singer, trackNum, outDate));
} else if (choice == 2) {
// DVD
System.out.println("주연배우: "); actor = sc.nextLine();
System.out.println("상영시간: "); runtime = Integer.parseInt(sc.nextLine());
System.out.println("출고일자: "); outDate = sc.nextLine();
this.addItemInfo(new DVDItem(itemNo, title, price, actor, runtime, outDate));
} else {
// Book
System.out.println("저자명: "); name = sc.nextLine();
System.out.println("쪽수: "); pageNum = Integer.parseInt(sc.nextLine());
System.out.println("출고일자: "); outDate = sc.nextLine();
this.addItemInfo(new BookItem(itemNo, title, price, name, pageNum, outDate));
}
System.out.println("입력 완료!");
}
public void showAllData() {
for (int i=0; i<numOfItems; i++) {
myItems[i].output();
}
}
}package oop.item;
public class BookItem extends Item{
private String name, outDate;
private int pageNum;
public BookItem(int itemNo, String title, int price, String name, int pageNum, String outDate){
super(itemNo, title, price);
this.name = name;
this.pageNum = pageNum;
this.outDate = outDate;
}
public void output() {
super.output();
System.out.println("저자명: " + name);
System.out.println("쪽수: " + pageNum);
System.out.println("출고일자: " + outDate);
}
}package oop.item;
public class CDItem extends Item {
private String singer;
private int trackNum;
private String outDate;
public CDItem(int itemNo, String title, int price, String singer, int trackNum, String outDate) {
super(itemNo, title, price);
this.singer = singer;
this.outDate = outDate;
this.trackNum = trackNum;
}
public void output() {
super.output();
System.out.println("가수: " + singer);
System.out.println("트랙수: " + trackNum);
System.out.println("출고일자: " + outDate);
}
}package oop.item;
public class DVDItem extends Item {
private String actor, outDate;
private int runtime;
public DVDItem(int itemNo, String title, int price, String actor, int runtime, String outDate) {
super(itemNo, title, price);
this.actor = actor;
this.runtime = runtime;
this.outDate = outDate;
}
public void output() {
super.output();
System.out.println("주연배우: " + actor);
System.out.println("상영시간: " + runtime);
System.out.println("출고일자: " + outDate);
}
}package oop.item;
public class Item {
private int itemNo;
private String title;
private int price;
public Item(int itemNo, String title, int price) {
this.itemNo = itemNo;
this.title = title;
this.price = price;
}
public void output() {
System.out.println("제품번호: " + itemNo);
System.out.println("이름: " + title);
System.out.println("가격: " + price);
}
}추상 클래스
- 객체화해서 사용할 목적이 아니라, 자식클래스들에게 공통된 속성&메소드를 배포해주기위한 목적의 클래스는 추상 클래스로 만든다.
- 부모 클래스에는 메소드 껍데기만 만들어 두고, 자식클래스에 공통된 메소드명을 배포해준다.
- 추상 메소드는 자식 클래스에서 오버라이딩해 사용한다.
- 추상클래스는 이탤릭체로 표현
- 추상클래스에는 abstract 키워드를 추가한다.
- 추상메소드에는 abstract 키워드를 추가하고 구현 블록을 제거한다.
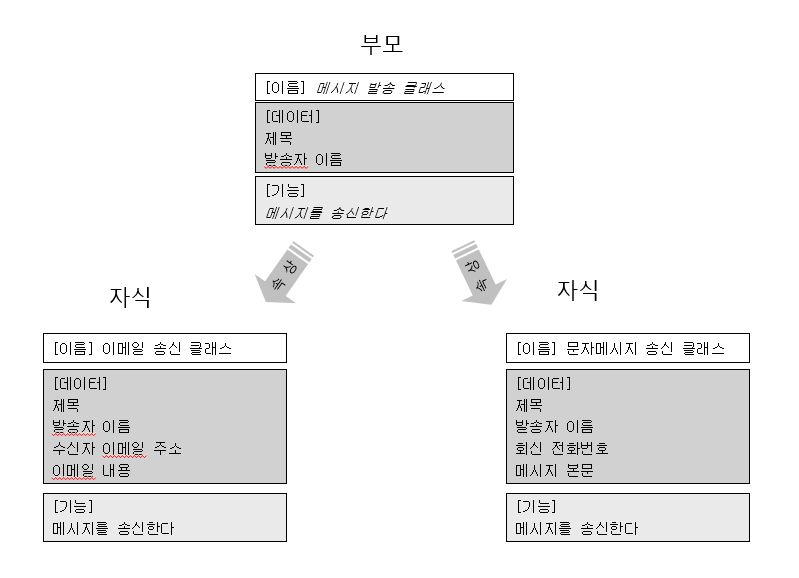
abstract public class MessageSender {
	String title, senderName;

	public MessageSender(String title, String senderName) {
		this.title = title;
		this.senderName = senderName;
	}

	abstract void sendMessage(String rec);

}
추상 클래스 및 메소드 특징
- 자체적으로 객체를 생성할 수 없다.
- 추상 클래스는 추상 메소드, 일반 메소드, 필드(멤버변수), 생성자로 구성된다.
- 추상 클래스를 상속받는 클래스는 추상 메소드를 반드시 오버라이딩 해야 한다. 오버라이딩 시 메소드 시그니쳐가 동일해야 한다.
추상 클래스를 사용하는 이유
- 공통된 필드나 메소드들을 추출해 통일된 내용으로 작성하도록 규격화하기 위해 사용
- 프로젝트가 커질수록 유지보수를 위해 필요
인터페이스
- ~able
구성요소
- 상수형변수, 추상메소드
목적
- 배포 : 전체 시스템의 통일성을 구현할 수 있다.
- 틀 제공
interface A {

}

interface B extends A {
// 인터페이스 B가 A를 상속
}

class C implements A {
// 클래스 C가 인터페이스 A를 구현
// 인터페이스 여러 개 구현 가능 (다중상속 구현)
}

class D extends C implements B {
// 클래스 D가 C를 상속, B를 구현
}

A, B, C, D a = new D();
다형성 구현방법 4가지
- 상속
- 오버라이딩
- 인터페이스
- 객체캐스팅

개발자 헤이린 🔜 프로덕트 매니저로 나아가는 중!