
쉬울 줄 알았는데, 전혀 쉽지 않았던 react-beautiful-dnd 사용법
설치
yarn add @atlaskit/css-reset react-beautiful-dnd @types/react-beautiful-dnd현재 프로젝트에서 타입스크립트를 사용하고 있어 타입도 함께 설치해주었다.
설정
/** @type {import('next').NextConfig} */
const nextConfig = {

  //🔥 reactStrictMode 삭제해주기
  // reactStrictMode: true,

  webpack: config => {
    config.module.rules.push({
      test: /\.svg$/,
      use: ['@svgr/webpack'],
    });
    return config;
  },
};

module.exports = nextConfig;
strictMode로 동작시키는 경우 다음과 같은 에러가 발생하게 된다.
이 에러를 없애기 위해선 strict모드를 해제해주어야 하는데, next에서는 next.config.js 파일에 선언되어 있어 주석처리를 해주니 에러 없이 잘 동작했다.
코드
1. import
import { DragDropContext, Draggable, Droppable } from 'react-beautiful-dnd';
import '@atlaskit/css-reset';
2. 움직일 범위 지정해주기
const DndContainer = ({ post, setPost }: any) => {

  return (
    <DragDropContext>
      <Droppable droppableId="cardlists">
        {provided => (
          <div className="cardlists" {...provided.droppableProps} ref={provided.innerRef}>
           // 여기에 움직일 컴포넌트를 넣어줄 예정
          </div>
        )}
      </Droppable>
    </DragDropContext>
  );
};

export default DndContainer;
DragDropContext 컴포넌트 안에 Droppable 컴포넌트를 넣어준다.
🔥 주의해야할 점
- Droppable의
droppableId와 provided를 리턴하는html element의 className 일치시켜주기- provided를 리턴해주는 element가
컴포넌트가 아니라html element로 작성해주어야 함.<DragDropContext> <Droppable droppableId="cardlists"> {provided => ( ❌❌❌❌❌ // 동작 안함 <anyOtherComponent className="cardlists" {...provided.droppableProps} ref={provided.innerRef}> // 여기에 움직일 컴포넌트를 넣어줄 예정 </anyOtherComponent> ❌❌❌❌❌ )} </Droppable> </DragDropContext>만약 컴포넌트를 사용하고 싶다면 div 태그 안에 작성해주어야 한다.
<DragDropContext>
      <Droppable droppableId="cardlists">
        {provided => (
          ✅✅✅✅✅
          <div className="cardlists" {...provided.droppableProps} ref={provided.innerRef}>
          <anyOtherComponent>
          // 여기에 움직일 컴포넌트를 넣어줄 예정
           </anyOtherComponent>
          </div>
          ✅✅✅✅✅
        )}
      </Droppable>
    </DragDropContext>
3. 드래그 할 컴포넌트 넣어주기
const DndContainer = ({ post, setPost }: any) => {

  return (
    <DragDropContext onDragEnd={handleChange}>
      <Droppable droppableId="cardlists">
        {provided => (
          <div className="cardlists" {...provided.droppableProps} ref={provided.innerRef}>
            ✅
            {post.map((e: any, i: number) => (
              <Draggable draggableId={`test-${e.id}`} index={i} key={`test-${e.id}`}>
                {(provided, snapshot) => {
                  return (
                    <div
                      {...provided.draggableProps}
                      {...provided.dragHandleProps}
                      ref={provided.innerRef}
                    >
                      // 원하는 컴포넌트 넣어주기
                    </div>
                  );
                }}
              </Draggable>
            ))}
          </div>
        )}
      </Droppable>
    </DragDropContext>
  );
};
🔥 주의할 점
- Draggable 의
draggableId와key가 같아야 한다.<Draggable draggableId<={`test-${e.id}`} index={i} key={`test-${e.id}`}>
- Droppable과 마찬가지로
html elemnent를 이용해 프롭스를 넘겨주어야한다.
-> 그렇지 않으면 동작하지 않음.
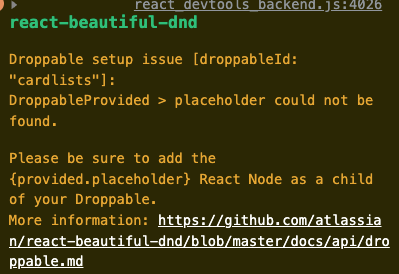
4. provided.placeholder 추가
 return (
    <DragDropContext>
      <Droppable droppableId="cardlists">
        {provided => (
          <div className="cardlists" {...provided.droppableProps} ref={provided.innerRef}>
            {post.map((e: any, i: number) => (
              <Draggable draggableId={`test-${e.id}`} index={i} key={`test-${e.id}`}>
                {(provided, snapshot) => {
                  return (
                    <div
                      {...provided.draggableProps}
                      {...provided.dragHandleProps}
                      ref={provided.innerRef}
                    >
               		// 원하는 컴포넌트 넣기
                    </div>
                  );
                }}
              </Draggable>
            ))}
            ✅ {provided.placeholder}
          </div>
        )}
      </Droppable>
    </DragDropContext>
  );
};
컴포넌트 이동시 자리 배열이 알맞게 위치하도록 placeholder 함수가 필요하다.
만약 넣지 않으면, placeholder가 없다는 에러 메세지가 뜬다.
5. 이동한 배열을 저장하는 함수 추가
const DndContainer = ({ post, setPost }: any) => {
  const handleChange = (result: any) => {
    if (!result.destination) return;
    const items = [...post];
    const [reorderedItem] = items.splice(result.source.index, 1);
    items.splice(result.destination.index, 0, reorderedItem);
    setPost(items);
  };

  return (
    <DragDropContext onDragEnd={handleChange}>
		...
    </DragDropContext>
  );
};

export default DndContainer;
드래그가 끝났을 때의 결과를 저장해주어야 리렌더링시에도 같은 데이터를 유지할 수 있기 때문에 handleChange라는 다음의 함수를 만들어 DragDropContext의 onDragEnd props로 넘겨준다.
전체 코드
import styled from '@emotion/styled';
import { DragDropContext, Draggable, Droppable } from 'react-beautiful-dnd';
import '@atlaskit/css-reset';
import EditorComponent from './EditorComponent';

const DndContainer = ({ post, setPost }: any) => {
  const handleChange = (result: any) => {
    if (!result.destination) return;
    const items = [...post];
    const [reorderedItem] = items.splice(result.source.index, 1);
    items.splice(result.destination.index, 0, reorderedItem);
    setPost(items);
  };

  return (
    <DragDropContext onDragEnd={handleChange}>
      <Droppable droppableId="cardlists">
        {provided => (
          <div className="cardlists" {...provided.droppableProps} ref={provided.innerRef}>
            {post.map((e: any, i: number) => (
              <Draggable draggableId={`test-${e.id}`} index={i} key={`test-${e.id}`}>
                {(provided, snapshot) => {
                  return (
                    <div
                      {...provided.draggableProps}
                      {...provided.dragHandleProps}
                      ref={provided.innerRef}
                    >
                      <h3>{e.id}</h3>
                      <EditorComponent isDragging={snapshot.isDragging} />
                    </div>
                  );
                }}
              </Draggable>
            ))}
            {provided.placeholder}
          </div>
        )}
      </Droppable>
    </DragDropContext>
  );
};

export default DndContainer;
번외 : 드래그 중인 컴포넌트의 스타일을 바꾸고 싶다면
snapshot에 있는 isDragging 속성을 이용해 컴포넌트가 드래깅중일 때를 확인할 수 있다.
<Draggable draggableId={`test-${e.id}`} index={i} key={`test-${e.id}`}>
  {(provided, snapshot) => {
    return (
      <div
        {...provided.draggableProps}
        {...provided.dragHandleProps}
        ref={provided.innerRef}
        >
        <EditorComponent isDragging={snapshot.isDragging} />
      </div>
    );
  }}
</Draggable>
// EditorComponent 컴포넌트 스타일
  background-color: ${props => (props.isDragging ? '#F5FF80' : '#1B2027')};
  padding: 40px 70px 40px 40px;
  border-radius: 10px;
  border: 1px solid #1b2027;
  /* TODO: 롱클릭 시 스타일 적용 */
  border-right: 30px solid #f5ff80;
  color: ${props => (props.isDragging ? '#1B2027' : '#F5FF80')};
PRE-FE에서 PRO-FE로🚀🪐!

오 이거 쓰려고 했다가 포기했던 라이브러리인데 잘 정리해주셨네요ㅜㅜ 감사합니다..