React와 History API 사용하여 SPA Router 기능 구현하기
구현하기에 앞서 React-router의 구현 방식과 window에서 제공하는 history API에 대해 이해하고 있어야한다.
조건
- 해당 주소로 진입했을 때 아래 주소에 맞는 페이지가 렌더링 되어야 한다.
- 버튼을 클릭하면 해당 페이지로, 뒤로 가기 버튼을 눌렀을 때 이전 페이지로 이동해야 한다.
- Router, Route 컴포넌트를 구현해야 하며, 형태는 아래와 같아야 한다.
ReactDOM.createRoot(container).render(
  <Router>
    <Route path="/" component={<Root />} />
    <Route path="/about" component={<About />} />
  </Router>
);- 최소한의 push 기능을 가진 useRouter Hook을 작성한다.
const { push } = useRouter();1. 해당 주소로 진입했을 때 아래 주소에 맞는 페이지가 렌더링 되어야 한다.
react-router는 SPA로 구성되어 있어, 다른 페이지로 이동시 깜박임 없이 path에 따라 화면이 바뀌어야한다. 어떤 방법으로 구현할까하다 useState를 사용해 한 페이지 내에서 path 값이 바뀌었을 때 렌더링되는 컴포넌트가 바뀌도록 해야겠다고 생각했다.
프로젝트 실행 시 기준이 되는 main.tsx의 값이 3번 조건과 같이 제한되어 있어 Router라는 하나의 큰 컴포넌트 안에 Route라는 컴포넌트가 가진 path에 따라 component가 렌더링 되도록 Route 컴포넌트를 다음과 같이 작성했다.
// Router.tsx
interface RouteProps {
  path: string
  component: JSX.Element
}

export const Route = ({ path, component }: RouteProps) => {
  const currentPath = window.location.pathname

  if (currentPath !== path) return
  else return component
}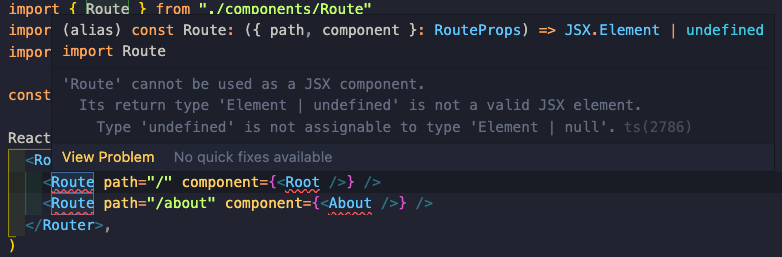
path가 일치하지 않는 경우에는 해당 컴포넌트가 렌더링되면 안되므로 리턴 값 없는 return 을 했더니 타입이 일치하지 않는다는 에러가 발생했다. return에 null을 넣는 방식도 시도했으나, 타입스크립드에서는 JSX.Element를 리턴해주어야 한다는 안내문구가 계속 떠 다음과 같이 JSX.Element로 타입을 지정해주었다.
interface RouteProps {
  path: string
  component: JSX.Element
}

export const Route = ({ path, component }: RouteProps) => {
  const currentPath = window.location.pathname

  if (currentPath !== path) return (<></>) as JSX.Element
  else return component
}
2. 버튼을 클릭하면 해당 페이지로, 뒤로 가기 버튼을 눌렀을 때 이전 페이지로 이동해야 한다.
버튼을 눌러 링크 태그로 이동시킬 때, history API 중 location.href 속성을 사용할 수도 있지만 이런 경우 새로 HTTP 요청을 보내게 되어 SPA라고 할 수 없게 된다. 따라서 URL만 변경해주는 pushState를 사용해주었다.
해당 루트로 처음 진입했을 때는 원하는 대로 동작하나, 컴포넌트 간 이동을 하는데 링크는 이동되는데 화면은 바뀌지 않는 문제가 발생했다.
stackoverflow에서 찾은 해답
→ 페이지 이동시, onPopState 이벤트를 수동으로 동작시켜준다.

onPopState는 history에 변동 사항이 있을 때 발생되는 이벤트인데, pushState()나 replaceState() 사용시에는 동작하지 않기 때문에 pushState로 인한 변화를 감지하기 위해선 수동으로 onPopstate 이벤트를 발생시켜주어야한다. 각각의 컴포넌트에서 라우팅 될 때, 이벤트가 발생하도록 goMain 함수를 만들어 onClick에 연결시켜주었다.
// About.tsx
const About = () => {
  ✳️✳️✳️
  const goMain = () => {
    history.pushState(undefined, "", "/")
    const popStateEvent = new PopStateEvent("popstate", { state: "/" })
    dispatchEvent(popStateEvent)
  }
  ✳️✳️✳️

  return (
    <section>
      <h1>about</h1>
      <button>go main</button>
      <button onClick={goMain}>go main</button>
    </section>
  )
}
// Route.tsx
import { useContext, useEffect, useState } from "react"
import { RouterContext } from "./Router"
interface RouteProps {
path: string
component: JSX.Element
}
export const Route = ({ path, component }: RouteProps) => {
const [path, setPath] = useState('')
✳️✳️✳️
window.onpopstate = (event) => {
setPath(window.location.pathname)
}
✳️✳️✳️
if (currentPath !== path) return (<></>) as JSX.Element
else return component
}3. 이동시 해당 컴포넌트 렌더링
이동까지는 잘 완료되었으나, 컴포넌트가 생각대로 렌더링 되지 않는 문제가 발생했다. 내가 의도했던건 path가 변경됨에 따라 해당 path를 props로 받아 일치하는 경우에만 렌더링이 되는 거였는데, 렌더링 시점과 path를 읽어오는 시점간에 차이가 발생해 렌더링이 의도와 다르게 동작했다.
의도와 다르게 동작하는 부분을 수정하기 위해, 다음의 블로그를 참고해 react-router의 구조에 대해 다시 공부해보았다. 간략하게 설명하자면 전역관리를 사용해 전역에 변경사항을 업데이트 해주는 구조로 이루어져 있어 useContext를 사용하기로 했다.
// Router.tsx
import { string } from "prop-types"
import {
  createContext,
  Dispatch,
  ReactNode,
  SetStateAction,
  useState,
} from "react"

interface RouterProps {
  children: ReactNode
}

export const RouterContext = createContext({
  path: window.location.pathname,
  setPath: (() => null) as Dispatch<SetStateAction<string>>,
})

export const Router = ({ children }: RouterProps) => {
  const [path, setPath] = useState(window.location.pathname)

  return (
    <RouterContext.Provider value={{ path, setPath }}>
      <section>{children}</section>
    </RouterContext.Provider>
  )
}
Router에 다음과 같은 컨텍스트를 생성해주었고, 이를 path로 전달해 내려주었다.
// Route.tsx
import { useContext, useEffect, useState } from "react"
import { RouterContext } from "./Router"

interface RouteProps {
  path: string
  component: JSX.Element
}

export const Route = ({ path, component }: RouteProps) => {
  const { path: currentPath, setPath } = useContext(RouterContext)

  window.onpopstate = (event) => {
    setPath(window.location.pathname)
  }

  if (currentPath !== path) return (<></>) as JSX.Element
  else return component
}
이렇게 했더니 원하는대로 path에 따라 컴포넌트가 렌더링 되었다.
4. 최소한의 push 기능을 가진 useRouter Hook 만들기
앞서 작성했던 goMain함수을 훅으로 만들어 주어진 path에 따라 라우팅이 되도록 만들어주었다.
// useRouter.tsx
export const useRouter = () => {
  const push = (path: string) => {
    history.pushState(undefined, "", path)
    const popStateEvent = new PopStateEvent("popstate", { state: path })
    dispatchEvent(popStateEvent)
  }

  return { push }
}
import { useRouter } from "../hooks/useRouter"

const About = () => {
  // push 함수 꺼내오기
  const { push } = useRouter()

  // '/'으로 이동하는 push 함수 적용
  return (
    <section>
      <h1>about</h1>
      <button onClick={() => push("/")}>go main</button>
    </section>
  )
}

export default About
완성✌️