Using Transformers
Introduction
We'll learn about:
- How to use tokenizers and models to replicate the pipeline API’s behavior
- How to load and save models and tokenizers
- Different tokenization approaches, such as word-based, character-based, and subword-based
- How to handle multiple sentences of varying lengths
This chapter will begin with an end-to-end example where we use a model and a tokenizer together to replicate the pipeline API
Behind the pipeline
이전 글에서 pipeline을 활용한 예시를 보자.
from transformers import pipeline

classifier = pipeline("sentiment-analysis")
classifier([
    "I've been waiting for a HuggingFace course my whole life.",
    "I hate this so much!",
])[{'label': 'POSITIVE', 'score': 0.9598047137260437},
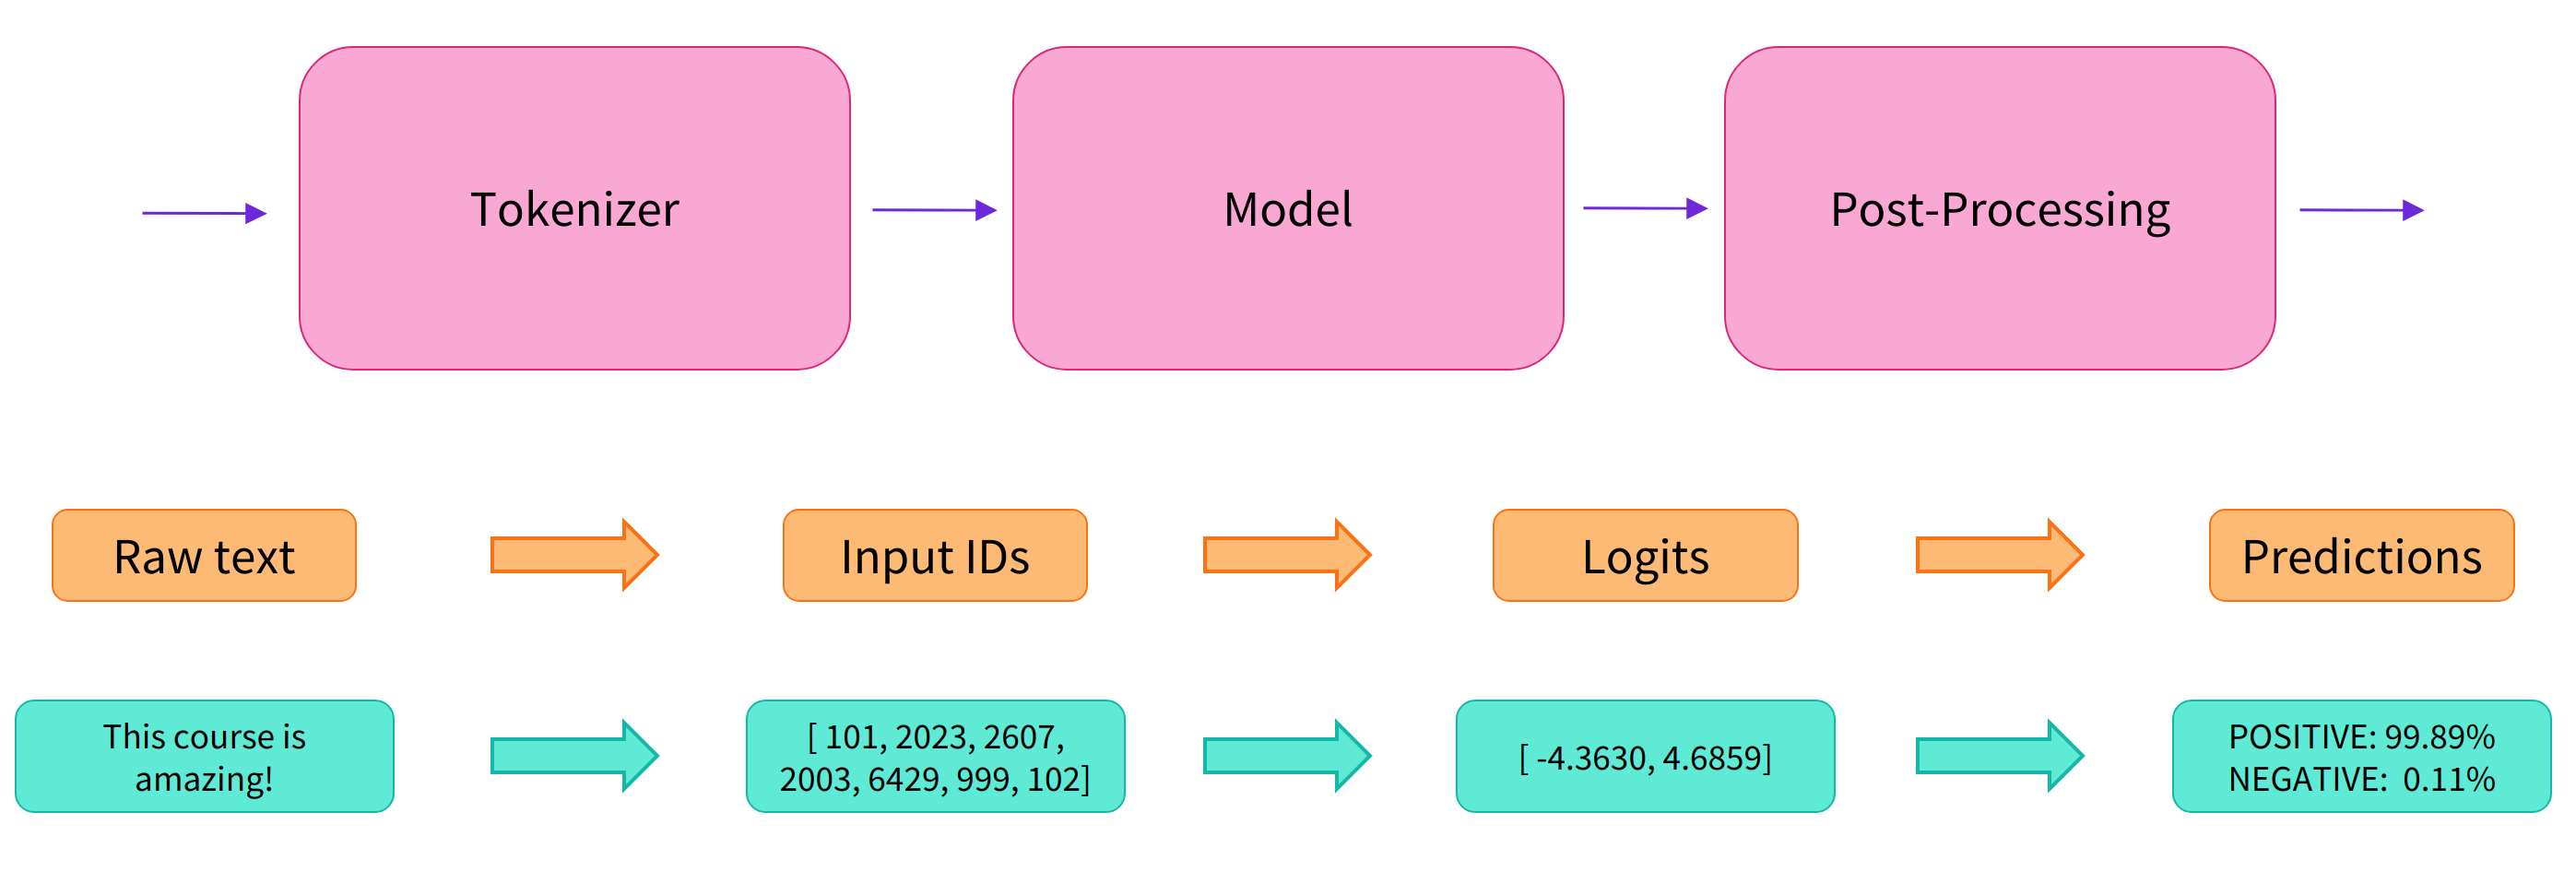
{'label': 'NEGATIVE', 'score': 0.9994558095932007}]위의 코드 내부적으로는 아래와 같은 세 단계를 지나게 된다.

이제 Tokenizer, Model을 각각 불러오는 법을 알아보자.
from transformers import AutoTokenizer

checkpoint = "distilbert-base-uncased-finetuned-sst-2-english"
tokenizer = AutoTokenizer.from_pretrained(checkpoint)
from transformers import AutoModel
checkpoint = "distilbert-base-uncased-finetuned-sst-2-english"
model = AutoModel.from_pretrained(checkpoint)또한 Output으로 나온 결과물은 Namedtuple형태로, 직접 index를 주거나 key값을 넣어서 나타낼 수 있다.
outputs = model(**inputs)
print(outputs.last_hidden_state.shape)
한편, 특정 Task에 tackling하는 architecture 역시 허깅페이스에는 존재한다.
ForCausalLM
ForMaskedLM
ForMultipleChoice
ForQuestionAnswering
ForSequenceClassification
ForTokenClassification
from transformers import AutoModelForSequenceClassification

checkpoint = "distilbert-base-uncased-finetuned-sst-2-english"
model = AutoModelForSequenceClassification.from_pretrained(checkpoint)
outputs = model(**inputs)
Models
모델을 사용하기 위해서는 Configuration object를 사용할 수 있다.
from transformers import BertConfig, BertModel

# Building the config
config = BertConfig()

# Building the model from the config
model = BertModel(config)
그러나 위와 같이 사용하면 Config에 해당하는 Random Variable 을 가진 model을 생성하게 된다. 여기서부터 학습할 수 있지만 엄청난 시간과 데이터 등의 Cost가 필요하므로, Duplicated Effort를 방지하고자 일반적으로 pretrained model을 사용한다. 전자에 해당하는 학습을 scratch라고 부르는 듯 하다.
from transformers import BertModel

model = BertModel.from_pretrained("bert-base-cased")
Saving models
model.save_pretrained("directory_on_my_computer")> ls directory_on_my_computer
config.json pytorch_model.binTokenizers
Tokenizer는 영어의 경우 공백을 기준으로 Tokenizing해도 괜찮을 성능을 보이며 이를 Word based tokenizing이라 부른다. 하지만 "dog", "dogs"는 기계가 인식하기에 다른 단어로 인식될 것이라는 단점이 있다.
한편 우리는 단어 사전에 등재되지 않은 단어가 들어왔을 때 처리하기 위한 Unknown 토큰을 만들어야한다. 보통 [UNK]로 사용하며 이러한 OOV 문제가 많이 일어날 수 있는 것 역시 Word-based 의 문제점이라고 할 수 있다.
Subword Tokenization
그래서 등장한 것이 Subword Tokenization이고, 이는 확실히 다른 Tokenizer의 단점을 보완한 tokenizing방법이라고 할 수 있다.
Tokenizer를 이용해서 Embedding하는 것과 최종 Output을 Decoding하는 코드는 다음과 같다.
# 1. convert_tokens_to_ids
token_ids = tokenizer.convert_tokens_to_ids(tokenized)
print(token_ids)

# 2. encode
token_ids = tokenizer.encode(sentence)
print(token_ids)

# 3. decode
decoded_string = tokenizer.decode(token_ids)
print(decoded_string)
Handling multiple sequences
id로 변환된 단어들을 그대로 모델에 집어넣으면 에러가 난다. 모델의 기본 구조가 multiple sequences를 받도록 설정되어있기 때문에, 모델에 넣을 때는 추가적인 dim을 생성해줘야 한다.
import torch
from transformers import AutoTokenizer, AutoModelForSequenceClassification

checkpoint = "distilbert-base-uncased-finetuned-sst-2-english"
tokenizer = AutoTokenizer.from_pretrained(checkpoint)
model = AutoModelForSequenceClassification.from_pretrained(checkpoint)

sequence = "I've been waiting for a HuggingFace course my whole life."

tokens = tokenizer.tokenize(sequence)
ids = tokenizer.convert_tokens_to_ids(tokens)

input_ids = torch.tensor([ids])
print("Input IDs:", input_ids)

output = model(input_ids)
print("Logits:", output.logits)
Padding the inputs
문장이 여러개라면 한 배치 내에서 문장의 길이가 들쭉날쭉하게 될 것이다. 이 때문에 문장의 길이를 맞춰주는 Padding이 필요하게 된다.
Pad Token의 경우 tokenizer.pad_token_id 로 사용하며, 여기서 Padding된 값들을 완전히 무시할 수 있도록 attention mask 행렬을 추가해야한다.
batched_ids = [
    [200, 200, 200],
    [200, 200, tokenizer.pad_token_id]
]

attention_mask = [
  [1, 1, 1],
  [1, 1, 0]
]

outputs = model(torch.tensor(batched_ids), attention_mask=torch.tensor(attention_mask))
print(outputs.logits)
Putting it all together
이제 위의 내용을 다 같이 활용해보겠다.
tokenizer에서 padding = True, max_length 등을 통해 padding을 해줄 수 있고, 길이를 넘어가는 문장의 경우 내용을 잘라주기 위해 truncation = True 인자를 주기도 한다.
import torch
from transformers import AutoTokenizer, AutoModelForSequenceClassification

checkpoint = "distilbert-base-uncased-finetuned-sst-2-english"
tokenizer = AutoTokenizer.from_pretrained(checkpoint)
model = AutoModelForSequenceClassification.from_pretrained(checkpoint)
sequences = [
  "I've been waiting for a HuggingFace course my whole life.",
  "So have I!"
]

tokens = tokenizer(sequences, padding=True, truncation=True, return_tensors="pt")
output = model(**tokens)
또한, tokenizer 객체의 input_ids key를 대입한 결과를 decode해보면 [CLS], [SEP] 등의 토큰을 볼 수 있는데, 이는 pretraining 시 함께 학습되었던 결과이다. 따라서 fine tuning에서도 같은 방식으로 진행해줘야 한다.
