OAuth2 Client (with Security and Redis)
개요
OAuth2 Client 위주로 설명할 것이고, Security와 Redis는 필요한 부분만 설명할 것이다.
왜 사용했나?
- 간단한 과정: OAuth2 client를 사용하여 OAuth2 코드 발급 -> 이 코드를 가지고 토큰 발급 -> 이 토큰을 가지고 유저 정보 조회 과정을 간단하게 할 수 있다.
- 통일성: 위 과정을 카카오, 네이버, 구글 로그인 등에서 공통적으로 이용할 수 있기 때문이다. 즉, 필요한 데이터들만 설정해주면 하나의 메서드로 통일할 수 있다.
단점은 없었나?
- 레퍼런스를 제대로 확인하지않으면, 설정 방법과 과정을 이해하지못해서 디버깅을 매우 열심히 해야할 것이다.
OAuth2 Client에서 다 처리하다보니 중간에 필요한 로직들을 설정하는게 어려울 수 있다. ex) OAuth2 Client는 인가인데, Security는 인증의 단계이므로 중간에 Filter 설정을 해줘야한다.
=> 너무 어렵게 느껴진다면 대안들을 활용하는게 차라리 마음 편할 수 있다.
대안은?
-
Client
- Client에서도 처리가 가능하나, code는 노출되더라도 accessToken, 유저 정보가 노출되는 것은 민감한 문제다. -
RestTemplate
- 무난하게 사용할 수 있으나, JSON 파싱하는 과정에서 코드가 너무 난잡해진다. -
OpenFeign
- 일반 Controller와 비슷한 느낌이라 RestTemplate보다 간결
- 하지만 이 역시 카카오, 구글, 네이버 따로 설정해줘야한다.
- 내가 사용하고 있는 Springboot 3 버전에서는 에러가 많이 발생했다.
사용한 환경
- 스프링부트 3.0.8
- 자바 17(corretto-17.0.7)
- spring-boot-starter-oauth2-client 3.0.8
- spring-security-oauth2-authorization-server:0.4.1
- spring-security 5.6.3
알아야할 것들
알아야할 사항
- 카카오
- 비즈앱
- kakao의 ID는 String 타입이 아닌 Long 타입이기 때문에 추출할 때, 다른 처리 방식이 필요하다. - 네이버
- 사전검수
- 이메일은 연락처에 있는 이메일 데이터다. - google, facebook과 달리 kakao와 naver에서 받아온 정보는 객체 안에 객체가 있는 형식이라 추출할 때, 다른 처리 방식이 필요하다.
- 유저정보의 고유번호: google의 sub값, kakao와 facebook의 id값, naver의 response의 id 값
=> 변경되지않는 고유번호 - 이미 카카오, 네이버 등에 로그인되어있는 걸 로그아웃시키고 싶다면 개발자센터 가서 로그아웃 하면 된다.
- 대부분 소셜로그인의 Redirect URI는 소셜로그인을 허용하는 페이지에서 등록을 하게끔 되어있다.
=> http://도메인.com/login/oauth2/code/소셜로그인타입 (ex) naver) - 각 Provider마다 에러코드 잘 정리되어있으니, 참고하자
알아야할 용어들
라이브러리는 무조건 단어의 뜻을 잘 알자! 만드신 분들이 다 신경써서 지은 변수명, 클래스명, 메서드명이다.
- Redirect URL: 우리가 OAuth2 로그인을 한뒤에 그 로그인을 바탕으로 최종 인증을 마쳤을때 다시 우리 페이지로 돌아와하는 주소를 알려줘야한다. 즉, 인증 받고 앱으로 돌아올 경로를 알려주는 주소이다
- Authorization Code: 권한 승인 코드
- Authorization Server: 카카오, 구글, 네이버
- Resource Server
- Resource Owner = User, principalName
- principalName: the name of the End-User Principal - (OAuth)Client = Application
- Provider: 서비스 제공자(카카오, 구글, 네이버)
- ProviderId: google의 sub값, kakao와 facebook의 id값, naver의 response의 id 값
- RegisterationId
- ClientId: 개발자센터에서 애플리케이션 등록하고나서 받는 번호
- ClientSecret: 확실히 등록된 애플리케이션에 사용을 보장하기위한 이중 보안 장치
알아야할 과정
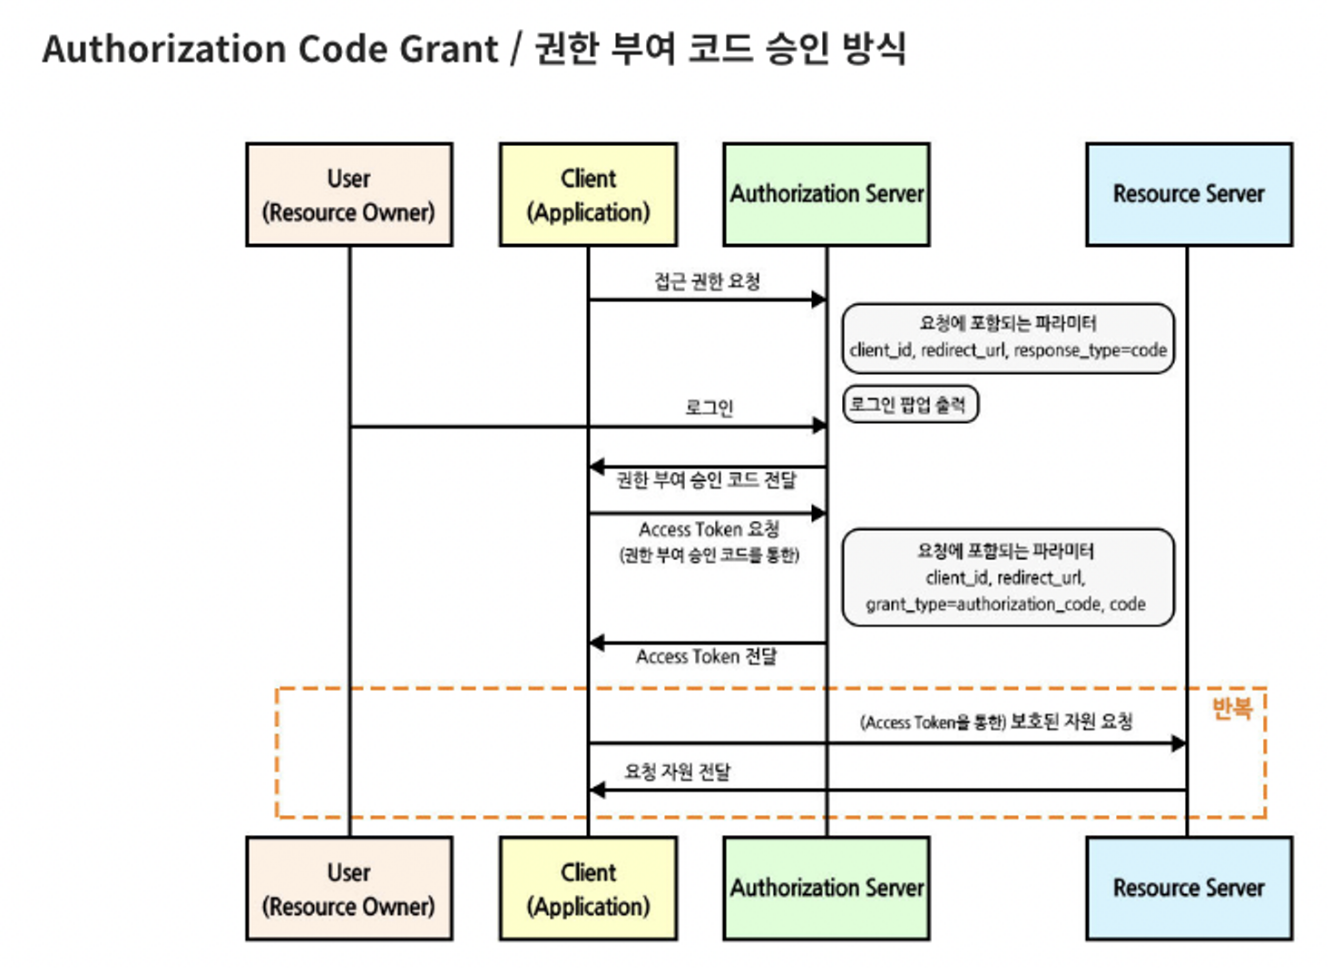
- 위 이미지는 OAuth2에서 가장 기본이 되는 방식이며 간편 로그인에 사용되는
Authorization Code Grant방식이다. - Client로부터 접근 권한 요청을 받은 Authorization Server는 소셜 로그인을 할 수 있는 로그인 창을 띄워준다!
- User가 로그인 후 Authorization Server에서 Access Token을 바로 발급받는 것이 아니라 Authorization Code를 반환하는 과정이 한번 더 들어간 이유는 바로 보안 때문이다.
개발 단계
설정
# 라이브러리
  implementation 'org.springframework.boot:spring-boot-starter-oauth2-client'
  implementation 'org.springframework.security:spring-security-oauth2-authorization-server:0.4.1'

# yml 설정 => 이 설정을 읽어서 OAuth2 Client 과정이 진행된다!
spring:
  security:
    oauth2:
      client:
        registration:
          kakao:
            clientId: @@@@@@
            clientSecret: @@@@@@@
            redirectUri: http://localhost:3001/login/oauth2/code/kakao
            client-authentication-method: client_secret_post
            authorization-grant-type: authorization_code
            #            scope: profile_nickname, account_email #동의 항목
            clientName: Kakao
          naver:
            clientId: @@@@@
            clientSecret: @@@@@
            client-authentication-method: client_secret_post
            authorizationGrantType: authorization_code
            redirectUri: http://localhost:3001/login/oauth2/code/naver
            scope:
              - nickname
              - profile_image
            clientName: Naver
          google:
            clientId: @@@@@
            clientSecret: @@@@@
            redirectUri: http://localhost:3001/login/oauth2/code/google
            scope:
              - email
              - profile
        provider:
          kakao:
            authUri: https://kauth.kakao.com
            authorizationUri: https://kauth.kakao.com/oauth/authorize
            tokenUri: https://kauth.kakao.com/oauth/token
            userInfoUri: https://kapi.kakao.com/v2/user/me
            userNameAttribute: id
          naver:
            authorizationUri: https://nid.naver.com/oauth2.0/authorize
            tokenUri: https://nid.naver.com/oauth2.0/token
            userInfoUri: https://openapi.naver.com/v1/nid/me
            userNameAttribute: response
각각의 사이트에서 받아온 값 정리
# 카카오
{
    "id":123456789,
    "connected_at": "2022-04-11T01:45:28Z",
    "kakao_account": {
        "profile_nickname_needs_agreement": false,
        "profile": {
            "nickname": "홍길동"
        }
    },
    "properties":{
        "${CUSTOM_PROPERTY_KEY}": "${CUSTOM_PROPERTY_VALUE}",
        ...
    }
}

# 네이버
{
  "resultcode": "00",
  "message": "success",
  "response": {
    "email": "openapi@naver.com",
    "nickname": "OpenAPI",
    "profile_image": "https://ssl.pstatic.net/static/pwe/address/nodata_33x33.gif",
    "age": "40-49",
    "gender": "F",
    "id": "32742776",
    "name": "오픈 API",
    "birthday": "10-01",
    "birthyear": "1900",
    "mobile": "010-0000-0000"
  }
}

# 구글
{
   sub=1030@@@@@00@@0,
   name=@@@,
   given_name=@@,
   family_name=@,
   picture=https://lh3.googleusercontent.com/a/AE@@@@TaOLog9sDPN6@@@@C=s96-c, email=@@@@@gmail.com,
   email_verified=true,
   locale=ko
}
통일된 메서드, 객체
- 유저 정보
- 확장성을 고려한 것이지, 반드시 할 필요는 없다.
# 유저 정보를 받아오는 인터페이스
public interface OAuth2UserInfo {
    String getProviderId();
    String getProvider();
    String getEmail();
}

# 위와 같이 각 Provider마다 오버라이딩해서 구현해주면 된다.
@AllArgsConstructor
public class NaverUserInfo implements OAuth2UserInfo {

    private Map<String, Object> attributes;

    // 오버라이딩
}
- 유저 정보를 받아오는 메서드
- 반드시 필요하다
-DefaultOAuth2UserService참고- standard OAuth 2.0 Provider's를 제공하는 OAuth2UserService를 구현
- standard OAuth 2.0 Provider's를 제공하는 OAuth2UserService를 구현
@Service
@Slf4j
@RequiredArgsConstructor
public class PrincipalOAuth2UserService extends DefaultOAuth2UserService {

    private final UserRepository userRepository;


	# 메서드의 역할
	// 1. accessToken으로 서드파티에 요청해서 사용자 정보를 얻어옴
    // 2. 해당 사용자가 이미 회원가입 되어있는 사용자인지 확인 후 처리
    // 3. UserPrincipal 을 return (세션 방식에서는 여기서 return한 객체가 시큐리티 세션에 저장된다)

    @Override
    public OAuth2User loadUser(OAuth2UserRequest userRequest) throws OAuth2AuthenticationException {
        OAuth2User oAuth2User = super.loadUser(userRequest);
        log.info("getAttributes : {}", oAuth2User.getAttributes());

        // 여기서 받아온 사용자 정보를 간단하게 validation해줘도 좋다.

        OAuth2UserInfo oAuth2UserInfo = null;
        String provider = userRequest.getClientRegistration().getRegistrationId();
        LoginType loginType = LoginType.setLoginType(provider);

        if (provider.equals(LoginType.KAKAO.getProvider())) {
            oAuth2UserInfo = new KakaoUserInfo((Map) oAuth2User.getAttributes());
        } else if (provider.equals(LoginType.GOOGLE.getProvider())) {
            oAuth2UserInfo = new GoogleUserInfo((Map) oAuth2User.getAttributes());
        } else if (provider.equals(LoginType.NAVER.getProvider())) {
            oAuth2UserInfo = new NaverUserInfo((Map) oAuth2User.getAttributes().get("response"));
        }

        User user = 유저를 저장 혹은 불러오는 메서드(oAuth2UserInfo, loginType);

        return new PrincipalDetails(user, oAuth2User.getAttributes());
    }
Security 사용
SecurityConfig
@Configuration
@RequiredArgsConstructor
@EnableMethodSecurity
public class SecurityConfig {

    private final PrincipalOAuth2UserService principalOAuth2UserService;

    @Bean
    public PasswordEncoder passwordEncoder() {
        return new BCryptPasswordEncoder();
    }

    @Bean
    public SecurityFilterChain filterChain(HttpSecurity http) throws Exception {
    // 대강이나마 이정도로 적어주면 알아서 잘된다.
        http.csrf().disable()
                .authorizeHttpRequests()
                .anyRequest().permitAll()


                .and()
                .oauth2Login() // loginPage 기본: "/login"
                .successHandler(successHandler())
                .userInfoEndpoint()
                .userService(
                        principalOAuth2UserService);//구글 로그인이 완료된(구글회원) 뒤의 후처리가 필요함 . Tip.코드x, (엑세스 토큰+사용자 프로필 정보를 받아옴)

        return http.build();
    }
UserDetailService, OAuth2User
- UserDetailsService와 UserDetails는 사용자 인증을 처리하는 핵심 컴포넌트
- UserDetailsService와 UserDetails를 사용하면 스프링 시큐리티를 사용하여 사용자 인증을 매우 세밀하게 제어 가능
UserDetailsService
- 사용자의 정보를 가져오는 로직을 정의하는 데 사용
- loadUserByUsername(String username) 메소드를 오버라이드하여 특정 사용자 이름을 기반으로 사용자 세부 정보를 가져오는 로직UserDetails
- 사용자 정보를 담는 인터페이스
OAuth2User(UserDetails와 같은 역할)
- Spring Security 5에서 도입
- OAuth 2.0 로그인 과정에서 서비스 제공자로부터 가져온 사용자 정보 인터페이스
- 사용자의 속성을 Map 형태로 반환
@Service
@RequiredArgsConstructor
public class PrincipalDetailsService implements UserDetailsService {

    private final UserRepository userRepository;

    @Override
    public UserDetails loadUserByUsername(String username) throws UsernameNotFoundException {

        Optional<User> foundUser = userRepository.findByName(username);
        return foundUser.map(PrincipalDetails::new).orElse(null);
    }
}

// UserDetails도 구현한 이유는 일반로그인을 가능하게하기 위함이다.
@Data
public class PrincipalDetails implements UserDetails, OAuth2User {

    private User user;
    private Map<String, Object> attributes;

    // 일반 로그인
    public PrincipalDetails(User user) {
        this.user = user;
    }

    // OAuth 로그인
    public PrincipalDetails(User user, Map<String, Object> attributes) {
        this.user = user;
        this.attributes = attributes;
    }

    .....
}
Redis 사용
- JWT 방식은 앱에서 탈취하기 어려우나, 브라우저에서는 위험이 크며, 강제로 로그아웃 시킬 수도 없다.
- 그래서 세션을 사용하려고 하는데, 로그인 시 Session을 Redis에 저장하므로 세션을 통해 세션저장소에서 User의 권한을 가져오는 필터가 필요
=> 이를 위한 필터인 UserAuthenticationFilter
=> OncePerRequestFilter을 상속받는 UserAuthenticationFilter를 구현하여 Authentication과 관련한 첫 필터인 UsernamePasswordAuthenticationFilter 앞단에 추가
일반 로그인도 사용하고 싶다면?
- 보통은 일반 로그인을 이메일로 진행할 것이다. 그런 경우에는 아래처럼 오버라이딩해주면 된다.
- 일반로그인 폼에서 아이디 부분에 해당하는게
username이다!
@Service
@RequiredArgsConstructor
public class PrincipalDetailsService implements UserDetailsService {

    private final UserRepository userRepository;

    @Override
    public UserDetails loadUserByUsername(String username) throws UsernameNotFoundException {

        Optional<User> foundUser = userRepository.findByEmail(username);
        return foundUser.map(PrincipalDetails::new).orElse(null);
    }
}
잘되었다는 척도
- 시큐리티 설정으로 기본 로그인 페이지
-
구글 로그인

-
네이버 로그인
에러
-
카카오
- This class supports client_secret_basic, client_secret_post, and none by default.
=> client-authentication-method 값을 POST가 아니라 client_secret_post로 변경하면 해결 -
네이버
- 로컬환경에서 "@@앱에 로그인할 수 없습니다."
=> 서비스, 리다이렉트 url을 127.0.0.1 -> localHost -
구글
- "엑세스 차단됨: 이 앱의 요청이 잘못되었습니다."
=> 설정파일에 redirect url이 있는지?
마무리
레퍼런스
https://oauth.net/2/
https://developerbee.tistory.com/245 ⇒ OauthUser attributes 객체 및 inner static 활용
https://chb2005.tistory.com/183 ⇒ 매우 좋은 자료인듯(이걸 중점으로 참고함)
https://co-de.tistory.com/29
https://ttl-blog.tistory.com/249
https://kim-jong-hyun.tistory.com/150
https://velog.io/@kyunghwan1207/22년도-하계-모각코-Springboot-Security와-OAuth2.0을-활용한-소셜로그인구글개발-4st08oc3
https://wildeveloperetrain.tistory.com/248
https://velog.io/@jinmin2216/Spring-Security-Spring-Security-Oauth2-JWT-2.-%EC%8B%A4%EC%8A%B5#securityconfig
https://docs.spring.io/spring-security/site/docs/current/api/org/springframework/security/oauth2/client/OAuth2AuthorizedClient.html
https://lotuus.tistory.com/78
https://ws-pace.tistory.com/102
https://devwithpug.github.io/spring/oauth2-testing-with-mockmvc/
https://gaga-kim.tistory.com/347
https://bcp0109.tistory.com/379
https://king-ja.tistory.com/106
https://velog.io/@ch_kang/Spring-FeignClient로-카카오-로그인-구현
https://velog.io/@ads0070/카카오-로그인-API로-로그인-인증하기
https://velog.io/@park2348190/JWT에서-Session으로의-전환

글이 잘 정리되어 있네요. 감사합니다.