playwright는 디버깅을 위해 Tracing 이라는 것을 제공하고, Trace viewer를 통해 디버깅을 할 수 있습니다.
이번 포스트에서는 1개 이상 브라우저를 조작하는 경우에서 Tracing을 하는 방법을 기재해봅니다.
Tracing and Trace viewer
Tracing
API for collecting and saving Playwright traces. Playwright traces can be opened in Trace Viewer after Playwright script runs.
Start recording a trace before performing actions. At the end, stop tracing and save it to a file.
Trace viewer
Playwright Trace Viewer is a GUI tool that helps you explore recorded Playwright traces after the script has ran. Traces are a great way for debugging your tests when they fail on CI. You can open traces locally or in your browser on trace.playwright.dev.
Playwright에서는 Tracing 이라는 기능을 제공합니다. 이 기능을 이용하게 되면 Playwright를 이용해 브라우저를 조작하는 순간을 매 프레임마다 스크린샷을 찍은 후에, 코드 실행완료 후에 .zip 파일로 결과물이 생성됩니다.
이 .zip 파일을 로컬 혹은 trace.playwright.dev 에 import해서 GUI환경을 통해 확인해볼 수 있습니다.
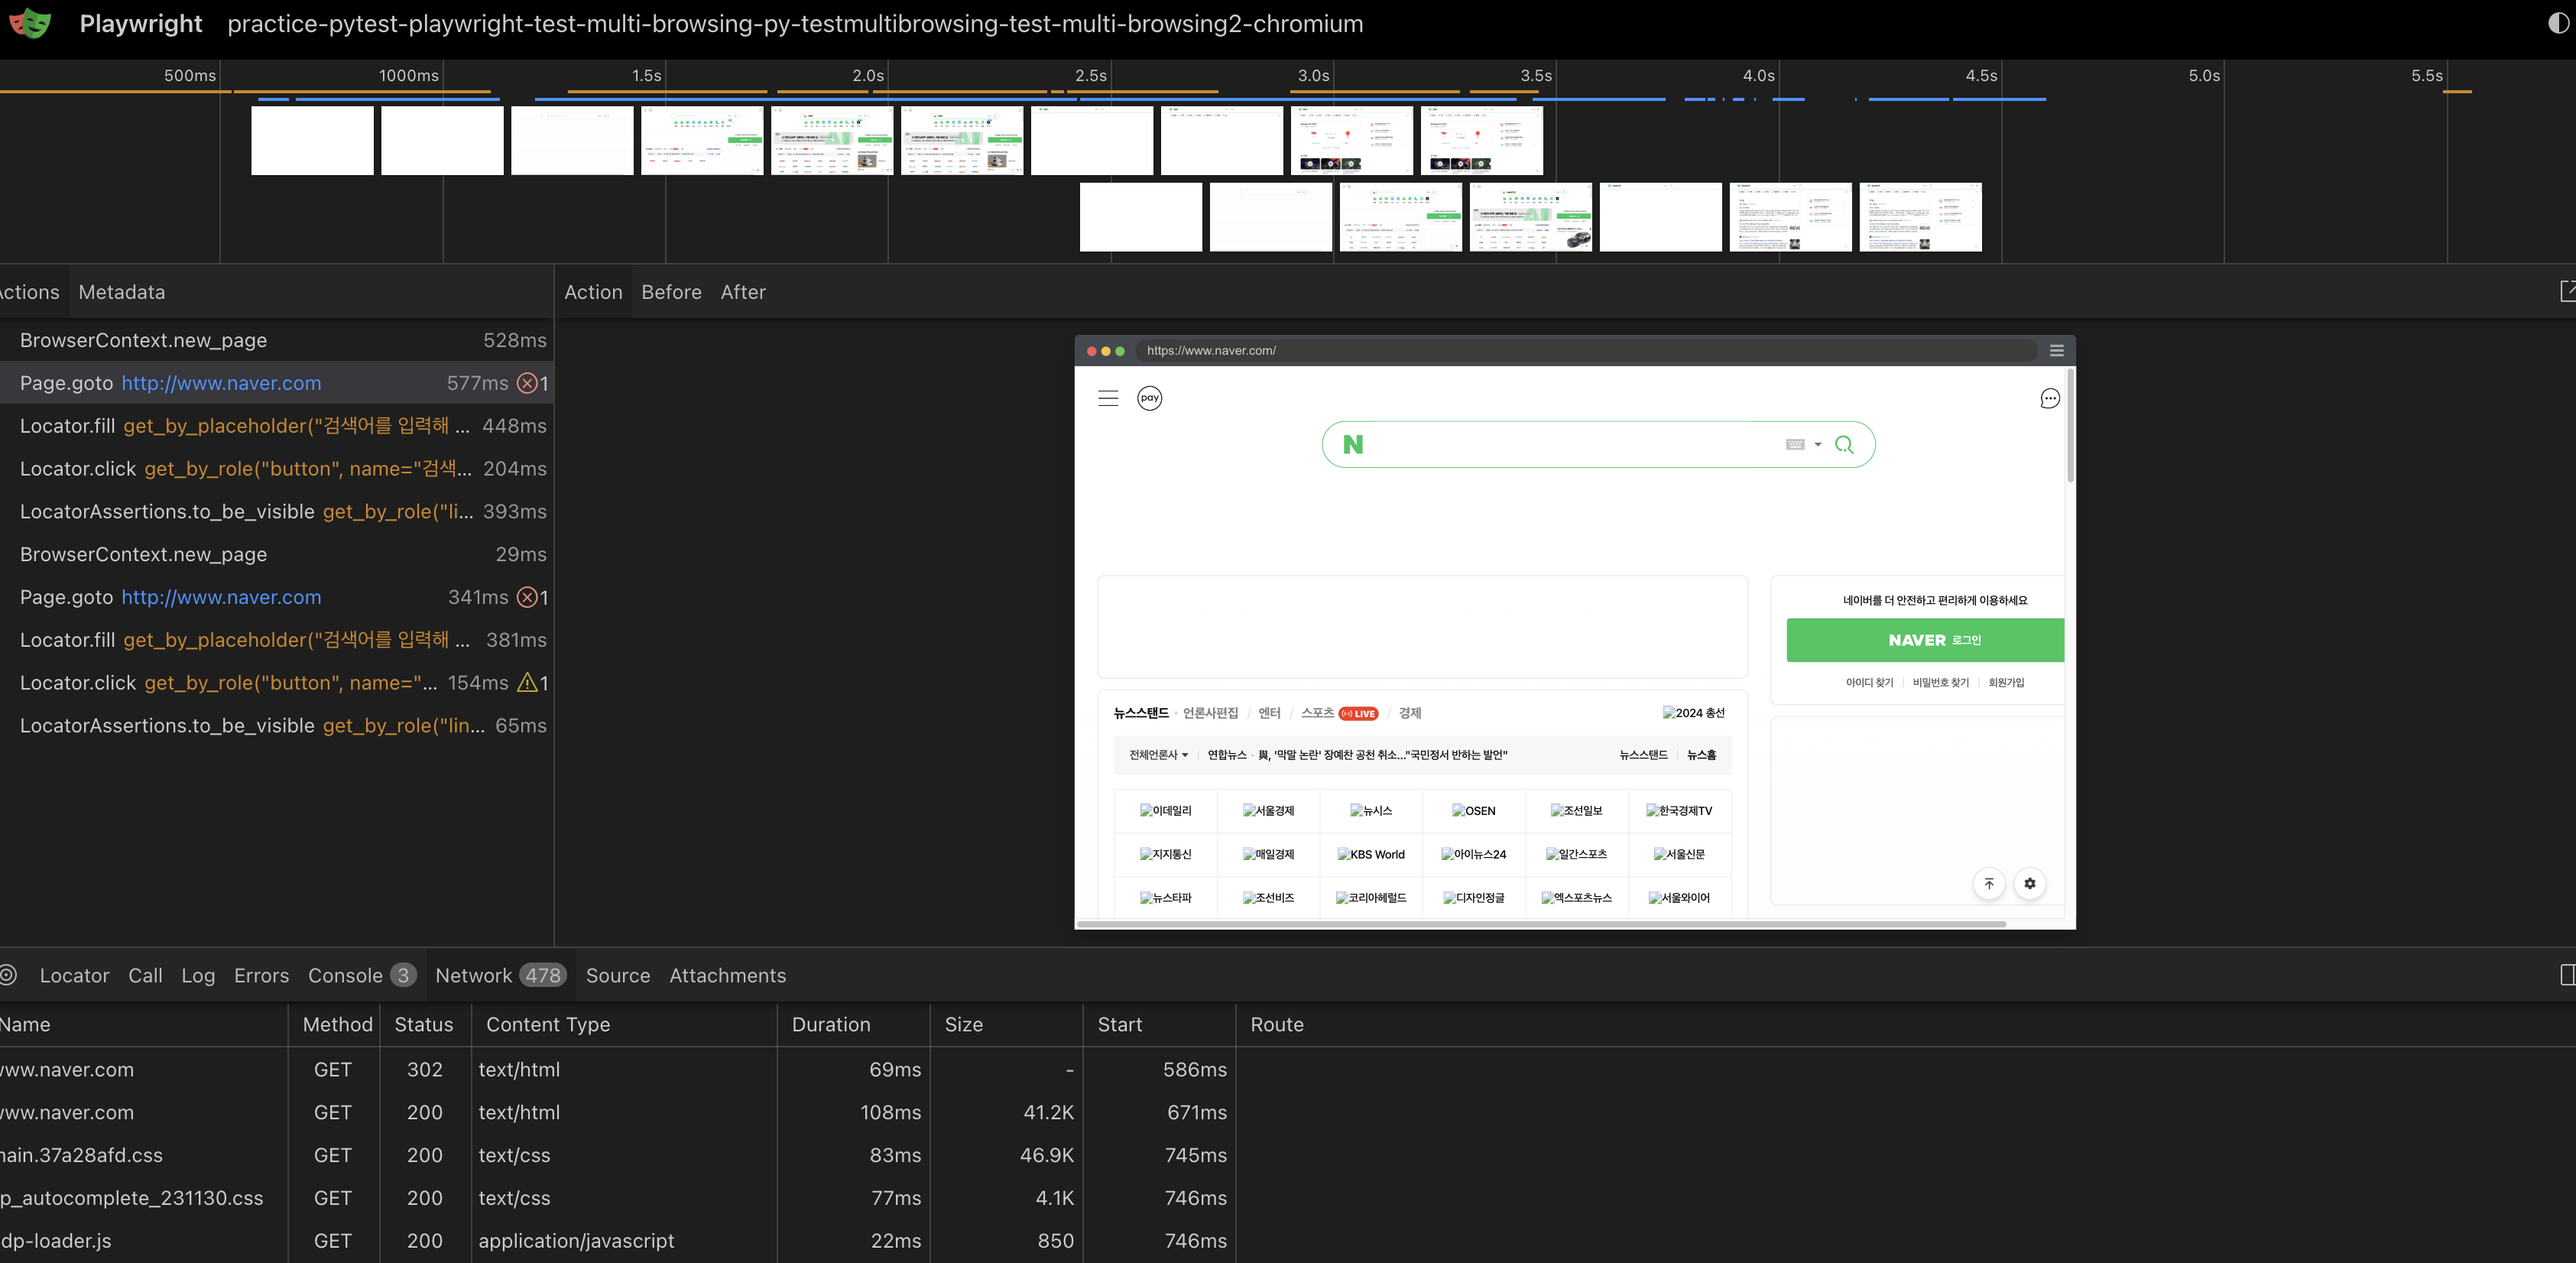
- 실행시간 별 브라우저 상태
- 실행된 playwright 소스코드들
- 해당 액션 수행 시에 console값, network 값
등을 확인할 수 있습니다.

심지어 디버깅용도의 트레이스 파일에서 로케이터를 확인해볼 수도 있습니다. 각종 링크들 정보도 있구요. 매우 좋습니다. 특히 화면을 직접 볼 수 없는 CI환경에서 특히 디버깅이 매우 좋습니다.
Trace viewer에 대한 자세한 설명은 공식 문서를 참고하시면 될 것 같고..
Tracing multi page on single browser context
Trace의 사용 예시 코드를 보면 기본적으로 컨텍스트 기반으로 사용할 수 있습니다.
browser = chromium.launch()
context = browser.new_context()

# Start tracing before creating / navigating a page.
context.tracing.start(screenshots=True, snapshots=True, sources=True)

page = context.new_page()
page.goto("https://playwright.dev")

# Stop tracing and export it into a zip archive.
context.tracing.stop(path = "trace.zip")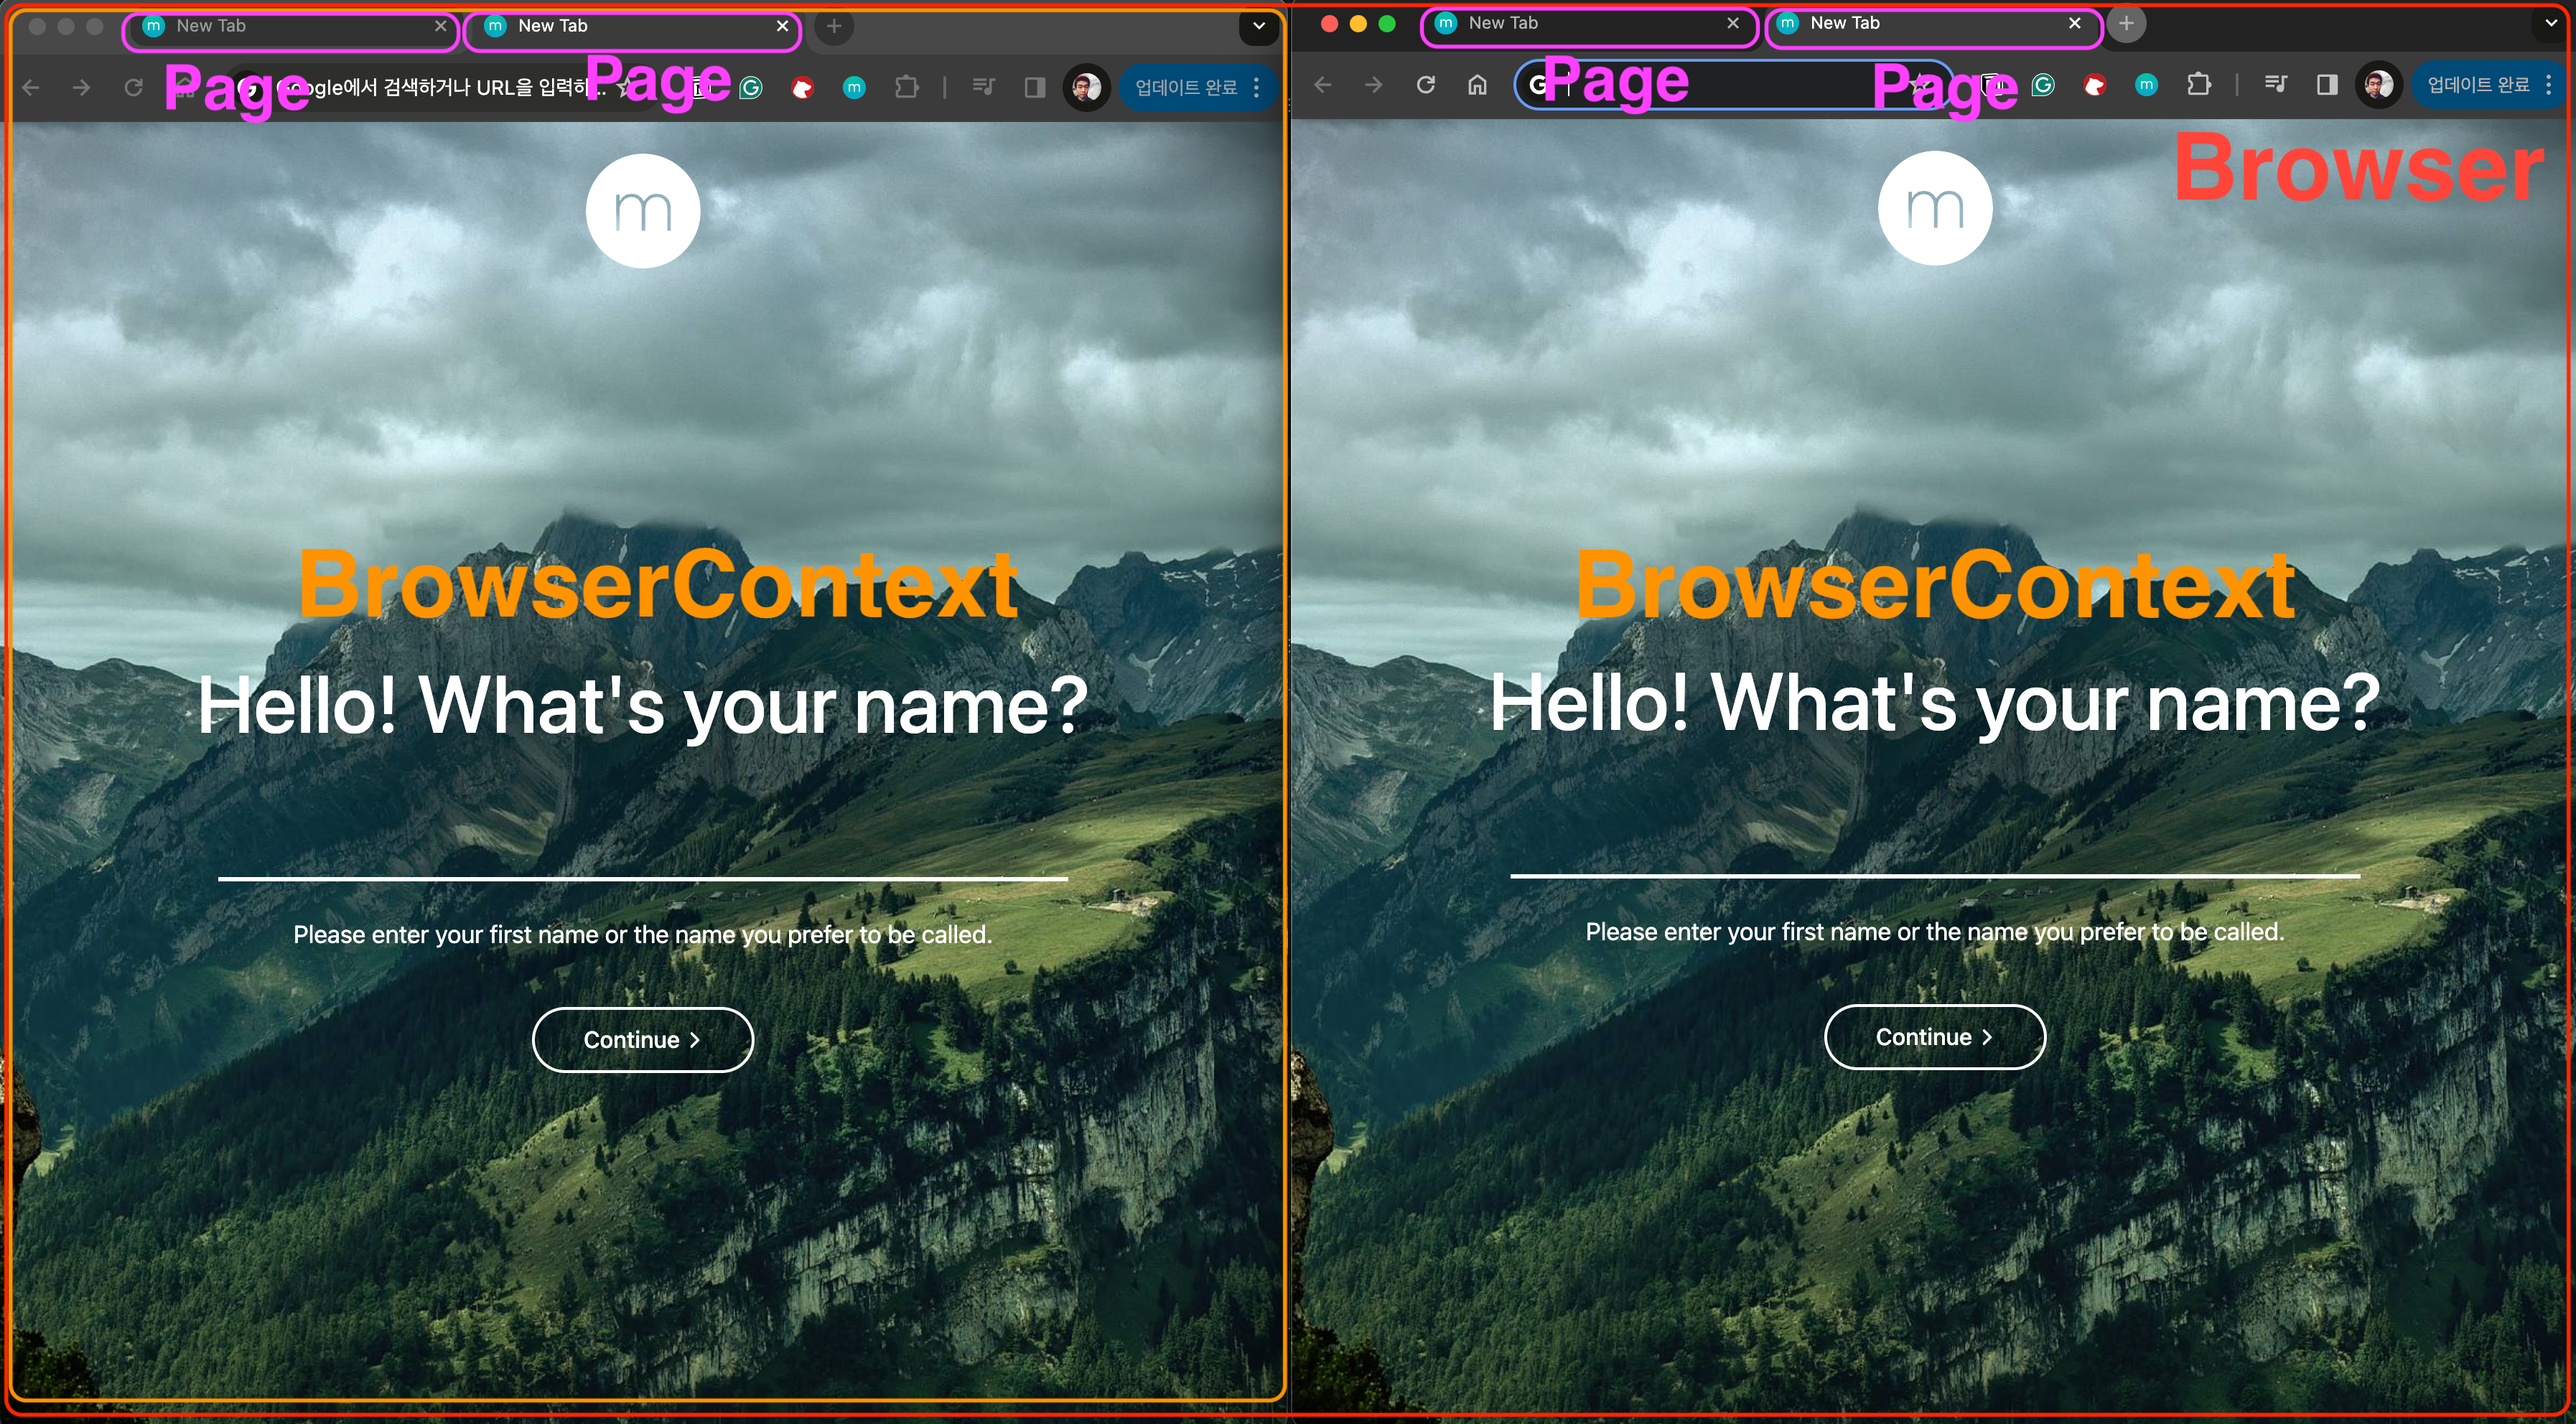
Playwright에서 말하는 브라우저와 브라우저 컨텍스트, 페이지의 개념을 간략하게 캡쳐와 함께 구분지어봤습니다.
- 최초에 실행될 브라우저 엔진이 곧
Browser입니다. - 해당
Browser의 창을 띄우는게BrowserContext입니다.Browser와BrowserContext는 1:N 관계입니다.
BrowserContext는 여러개의Page를 가질 수 있습니다.BrowserContext와Page는 역시 1:N 관계입니다.
다시 실행 코드로 돌아가서, tracing.start() 를 수행하는 단계는 context 라는 것을 알 수 있습니다.
context.tracing.start(screenshots=True, snapshots=True, sources=True)따라서 context 안에 있는 모든 page들은 전부 trace로 기록할 수 있습니다.

위 스크린샷을 보시면, 하나의 브라우저 창에 있는 2개의 페이지가 한 번에 기록된 것을 알 수 있습니다. page 1이 실행되는 도중에 page 2를 생성해서 조작을 하는 모습입니다.
실행 코드는 아래와 같습니다.
    def test_multi_browsing(self, context, page: Page):
        page.goto("http://www.naver.com", wait_until="load")
        page.get_by_placeholder("검색어를 입력해 주세요").fill("Test1")
        page.get_by_role("button", name="검색", exact=True).click()

        expect(page.get_by_role("link", name="NAVER", exact=True)).to_be_visible()

        another_page = context.new_page()

        # try:
        another_page.goto("http://www.naver.com", wait_until="load")
        another_page.get_by_placeholder("검색어를 입력해 주세요").fill("Test5678")
        another_page.get_by_role("button", name="검색", exact=True).click()
        time.sleep(2)
        expect(another_page.get_by_role("link", name="NAVER", exact=True)).to_be_visible()
Tracing multi page on multi browser context
문제는 여러 개의 브라우저를 실행하는 경우입니다. Playwright는 Isolated된 브라우저 환경을 제공하기에, 많은 테스트케이스에서 독립적인 브라우저를 한 개 이상 실행하는 경우가 많을텐데요, 위에 말씀드린 것 처럼 tracing은 하나의 컨텍스트에서 밖에 실행되지 않기 때문에 디버깅, 특히 CI에서 문제가 될 수 있습니다.
Solution
간단하게 말씀드리면, 브라우저를 두 개 띄우면서 컨텍스트에서 각각 tracing.start() 를 해주면 됩니다.
browser = chromium.launch()
context_1 = browser.new_context()
context_2 = browser.new_context()
context_1.tracing.start(screenshots=True, snapshots=True)
context_2.tracing.start(screenshots=True, snapshots=True)

page_on_context_1 = context_1.new_page()
page_on_context_1.goto("https://playwright.dev")

page_on_context_2 = context_2.new_page()
page_on_context_2.goto("https://playwright.dev")

context_1.tracing.stop(path = "trace1.zip")
context_2.tracing.stop(path = "trace2.zip")
tracing 파일이 각각의 컨텍스트 별로 생성되기 때문에, .zip 파일의 이름도 각각 지정을 해주어야하죠. 간단하죠?
using Playwright-pytest
근데 playwright-pyest 를 사용하면, 약간 문제가 복잡해집니다. playwright-pytest 의 플러그인을 통해 기본으로 생성되는 컨텍스트는 이미 기본적으로 tracing 설정이 들어가있어, 하나의 컨텍스트에 여러 개의 page를 띄우는 것은 다 녹화가 됩니다.
별도의 컨텍스트에서 녹화를 하려면 추가로 생성을 해줘야하는데, 이 때 browser fixture 를 이용합니다.
    def test_multi_browsing2(self, browser:Browser, page: Page):
        page.goto("http://www.naver.com", wait_until="load")
        page.get_by_placeholder("검색어를 입력해 주세요").fill("Test1")
        page.get_by_role("button", name="검색", exact=True).click()

        expect(page.get_by_role("link", name="NAVER", exact=True)).to_be_visible()

        """ 새로운 컨텍스트 생성 """
        another_context = browser.new_context()
         """ 신규 컨텍스트에서 tracing 시작 """
        another_context.tracing.start(screenshots=True, snapshots=True, sources=True)
        another_page = another_context.new_page()


        another_page.goto("http://www.naver.com", wait_until="load")
        another_page.get_by_placeholder("검색어를 입력해 주세요").fill("Test5678")
        another_page.get_by_role("button", name="검색", exact=True).click()
        time.sleep(2)
        expect(another_page.get_by_role("link", name="NAVER", exact=True)).to_be_visible()

        another_context.tracing.stop("trace2.zip")

        another_page.close()
        another_context.close()
Problem - 1
근데 여기서 문제가 발생합니다. Playwrigt의 expect()는 hard assertion으로, assertion에 실패하면 그 즉시 테스트 코드는 정지하고 다음 테스트 코드를 실행하게 됩니다. 따라서,
tracing.stop()이 호출되지 않아 추가 생성한 브라우저의 trace 파일이 생성되지 않음- 추가적으로 생성한 브라우저가 닫히지 않고 그대로 존재하게 되는 이슈
expect(another_page.get_by_role("link", name="NAVER", exact=True)).to_be_visible()

""" 위 expect 가 실패하면 아래 코드가 실행되지 않음 """
another_context.tracing.stop("trace2.zip")

another_page.close()
another_context.close()
가 있습니다.
이렇게 추가 브라우저를 생성하는 케이스가 계속해서 실패하게 되면 닫히지않고 남아있는 브라우저가 쌓이게 됩니다. 케이스의 갯수가 많다면 전체적인 실행속도에 영향을 줄 수 밖에 없습니다.
Solution - 1
일단 테스트 코드 내에서 try ~ finally 로 감싸하면 일단은 됩니다.
    def test_multi_browsing2(self, browser:Browser, page: Page):
        page.goto("http://www.naver.com", wait_until="load")
        page.get_by_placeholder("검색어를 입력해 주세요").fill("Test1")
        page.get_by_role("button", name="검색", exact=True).click()

        expect(page.get_by_role("link", name="NAVER", exact=True)).to_be_visible()

        """ 새로운 컨텍스트 생성 """
        another_context = browser.new_context()
         """ 신규 컨텍스트에서 tracing 시작 """
        another_context.tracing.start(screenshots=True, snapshots=True, sources=True)
        another_page = another_context.new_page()

		try:
          another_page.goto("http://www.naver.com", wait_until="load")
          another_page.get_by_placeholder("검색어를 입력해 주세요").fill("Test5678")
          another_page.get_by_role("button", name="검색", exact=True).click()
          time.sleep(2)
          expect(another_page.get_by_role("link", name="NAVER", exact=True)).to_be_visible()

        finally:
          another_context.tracing.stop("trace2.zip")

          another_page.close()
          another_context.close()
Problem - 2
위 방법을 그대로 큰 문제는 안 될 것입니다. 그러나 만약 browser_context_args 라던지 browser_type_args 등으로 추가적인 preference를 설정하고 있다면 그것은 문제가 될 수 있습니다. 왜냐하면 추가로 생성하고 있는 context 에는 그러한 설정을 하고있는 것이 하나도 없기 때문입니다.
최초로 생성한 컨텍스트와 추가로 생성한 컨텍스트 간의 설정 상태가 다를 수도 있다는 것이죠.
Solution - 2
이 경우에는 미리 context에 설정값을 넣어준 후에 객체를 생성해야합니다.
제일 편한 것은 playwright-pytest 플러그인의 소스코드를 보고, context fixture를 하나 그대로 복사해서 사용하는 것 입니다.
https://github.com/microsoft/playwright-pytest/blob/main/pytest_playwright/pytest_playwright.py
@pytest.fixture
def context(
    browser: Browser,
    browser_context_args: Dict,
    pytestconfig: Any,
    request: pytest.FixtureRequest,
) -> Generator[BrowserContext, None, None]:
    pages: List[Page] = []

    browser_context_args = browser_context_args.copy()
    context_args_marker = next(request.node.iter_markers("browser_context_args"), None)
    additional_context_args = context_args_marker.kwargs if context_args_marker else {}
    browser_context_args.update(additional_context_args)

    context = browser.new_context(**browser_context_args)
    context.on("page", lambda page: pages.append(page))

    tracing_option = pytestconfig.getoption("--tracing")
    capture_trace = tracing_option in ["on", "retain-on-failure"]
    if capture_trace:
        context.tracing.start(
            title=slugify(request.node.nodeid),
            screenshots=True,
            snapshots=True,
            sources=True,
        )

    yield context

    .
    .
    .
이 fixture를 새로운 이름으로 만들고 적당히 뜯어 고치는 것입니다. yield 를 통해 context 객체를 테스트 코드로 보낸 후, teardown 로직을 그 이후에 수행할 수도 있습니다.
끝!!!