1. Slide
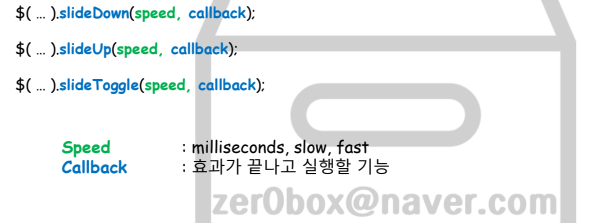
1) slideUp() : 요소가 아래서 위로 크기가 작아지며 사라지는 효과
2) slideDown() : 요소가 위에서 아래로 크기가 커지며 나타나는 효과
3) slideToggle() : 위 두 개의 효과를 토글
슬라이드 예)
<html>
<head>
<meta charset="UTF-8">
<link rel="icon" href="img/icon.png">
<title>J-QUERY</title>
<script src="https://code.jquery.com/jquery-3.7.0.min.js"></script>
<style>
div{
background-color: yellowgreen;
border: 1px solid green;
cursor: pointer;
text-align: center;
padding: 5px;
margin: 2px;
}
.panel{
padding: 50px 0;
display: none;
}
</style>
</head>
<body>
<div id="flip">메뉴 1</div>
<div class="panel" id="p1">서브메뉴</div>
<div id="flip2">메뉴 2</div>
<div class="panel" id="p2">서브메뉴</div>
</body>
<script>
//slideDown(duration,callback) : 아래로 길어지며 나타난다.
//slideUp(duration,callback) : 위로 줄어들면서 사라진다.
//slideToggle(duration,callback) : 위 두 개의 효과를 토글이라고 한다.
$('#flip').hover(function(){
$(this).next().slideDown("slow");
},function(){
$(this).next().slideUp("slow");
});
*/
$('#flip').on('mouseenter',down);
$('#flip').on('mouseleave',function(){
$(this).off('mouseenter');
$(this).next().slideUp("slow",function(){
$('#flip').on('mouseenter',down);
});
function down(){ //함수 down선언
$(this).next().slideDown("slow");/
}
$('#flip2').click(function(){
$(this).next().slideToggle("slow");/
});
</script>
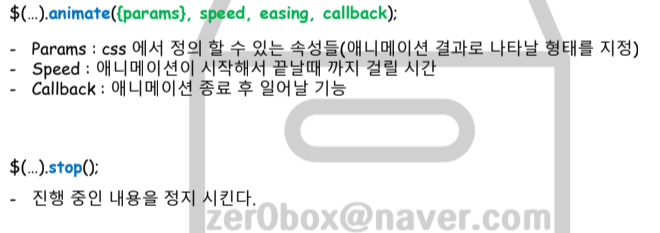
</html>2. Animate
Animate 를 활용 하여 기존에 사용할 수 있는 기능들을 Customize 할 수 있다.
animate 예)
<html>
    <head>
        <meta charset="UTF-8">
        <link rel="icon" href="img/icon.png">
        <title>J-QUERY</title>
        <script src="https://code.jquery.com/jquery-3.7.0.min.js"></script>
        <style>
            div{
                position: absolute;
                background-color: green;
                width: 100px;
                height: 100px;
                left: 5px;
                margin: 5px;
            }
        </style>
    </head>
    <body>
        <button id="left">◀</button>
        <button id="right">▶</button>
        <button id="stop">■</button>
        <button id="special">★</button>
        <button id="step">step</button>
        <div id="obj"></div>
    </body>
    <script>
        $('#step').on('click',function(){
            //method chain : 함수끼리 연결된다
            //하나의 함수로 실행된 결과값으로 다음함수를 실행
            //알고리즘 할때 사용
            $('#obj').animate({'left':'+=500'},'slow')//아읻obj를 가져와서 animate를 넣어준다
            .animate({'top':'+=500'},'slow')
            .animate({'left':'-=500'},'slow')
            .animate({'top':'-=500'},'slow');
        });// 상하좌우로 움직임

        $('#special').on('click',function(){
            $('#obj').animate({'left':'+=100','width':'-=50','height':'-=50','opacity':'-=0.5'},1500,'linear',function(){
                alert('animation 끝'); // 왼쪽으로 멀어지면서 오른쪽으로 가는거임 opacity=투명도를 뜻함
            })
        });

        $('#stop').on('click',function(){
            $('#obj').stop();
        });

            $('#right').on('click',function(){
            //parm,wpeed,easing,callback
            //swing : 멀어질수록 점점 속도가 빨라짐
            //$('#obj').animate({'left' : '100'},'slow','swing'); ({'left' : '100'})
            //100씩 움직여라
            $('#obj').animate({'left' : '-=1000'},5000,'swing');
            });
        $('#left').on('click',function(){

            $('#obj').animate({'left' : '+=1000'},5000,'swing');

        });
    </script>
</html>
3. Method Chaining
각 기능들이 연결 된 것처럼 맞물려서 연속적으로 일어남
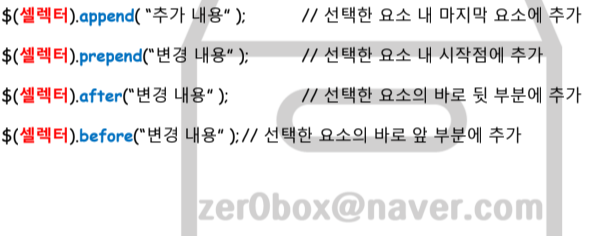
4. 요소 추가(가장 많이 씀)
- 제이쿼리를 사용하면 자바스크립트 보다 쉽게 요소를 추가 할 수 있다.
- 요소추가는 향 후 자주 사용하게 될 기능 이다.
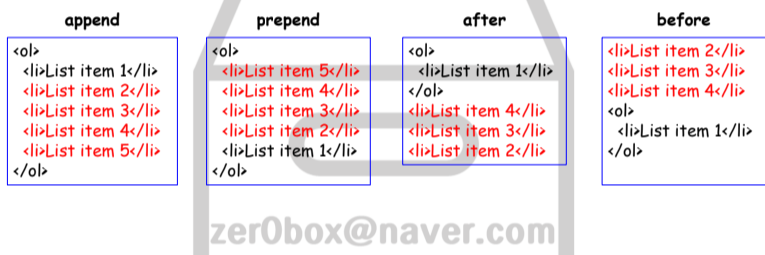
가장 많이 쓰이는 것
- append 자식요소로 붙는다.
- after 형제요소로 붙는다.
요소 추가 예)
<html>
    <head>
        <meta charset="UTF-8">
        <link rel="icon" href="img/icon.png">
        <title>J-QUERY</title>
        <script src="https://code.jquery.com/jquery-3.7.0.min.js"></script>
        <style>

        </style>
    </head>
    <body>
        <ol>
            <li> list item1</li>
        </ol>
        <button id="apnd">append</button>
        <button id="ppdn">prepend</button>
        <button id="aft">after</button>
        <button id="bef">before</button>
    </body>
    <script>
        var i =1;
        $('#ppdn').on('click',function(){
            i++;
            //ol의 자식요소중 가장 처음에 붙인다(prepend)
            $('ol').prepend('<li>list item'+i+'</li');
        });

        $('#apnd').on('click',function(){
            i++;
            //ol의 자식요소중 가장 마지막에 붙인다(append)
            $('ol').append('<li>list item'+i+'</li');
        });

        $('#aft').on('click',function(){
            i++;
            //ol의 형제요소에 next()에 붙인다(after) 밑에 붙는다
            $('ol').after('<li>list item'+i+'</li');
        });

        $('#bef').on('click',function(){
            i++;
            //ol의 형제요소에 prev()에 붙인다(after) 위로 붙는다
            $('ol').before('<li>list item'+i+'</li');
        });

    </script>
</html>
5. 요소 삭제
- Remove() 와 empty() 를 통해서 지정한 하위 요소를 삭제 할 수 있다.
- 두 함수의 차이를 확인 해 보자
- $(...).remove(); // 선택한 요소와 하위 요소도 모두 삭제 =완전히 버리다
- $(...).empty(); // 선택한 요소의 하위 요소만 삭제(비워 냄) =안에 있는것만 버린다
요소 삭제 예)
<html>
<head>
<meta charset="UTF-8">
<link rel="icon" href="img/icon.png">
<title>J-QUERY</title>
<script src="https://code.jquery.com/jquery-3.7.0.min.js"></script>
<style>
div.parent{
width: 400px;
height: 180px;
background-color: yellow;
text-align: center;
}
div.ch{
width: 300px;
height: 50px;
margin: 20px auto;
background-color: blue;
text-align: center;
color: white;
font-weight: 600;
}
</style>
</head>
<body>
<div class="parent">
<p>parent element</p>
<div class="ch">child element 1</div>
<div class="ch">child element 2</div>
</div>
<button id="remove">remove()</button>
<button id="empty">empty()</button>
</body>
<script>
$('#empty').click(function(){
$('div.parent').empty();// 자식 요소만 날리는거다.
})
$('#remove').click(function(){
$('div.parent').remove();//자기자신 까지 다 날리는 거다.
})
</script>
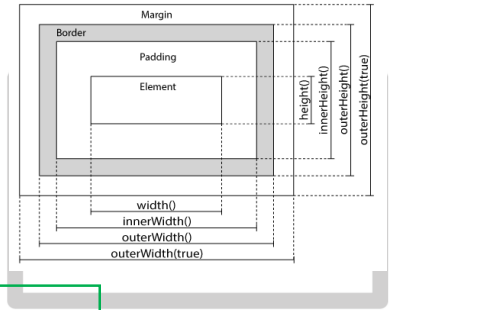
</html>6. 요소 면적
- 각 요소의 면적을 구하는 함수를 알아 보자
- 특정 요소의 면접에 따라 다른 요소를 조정 할 때 유용 하다.

시작