yolo detector를 사용하면 사람 뿐만 아니라 다른 사물들도 실시간으로 정확하고 빠르게 검출할 수 있겠지만, gpu를 사용하지 못하고 컴퓨팅 자원이 제한된 환경에서는 yolo를 효율적으로 사용하는 것이 어렵다.
이러한 환경에서 단순하고 콤팩트한 모델, 알고리즘들을 사용하여 사람 인식과 얼굴 인식을 하는 방법을 정리해 본다.
1. Haar Cascade classifier
Haar Cascade Classifier는 Harr-like 특징을 기반으로 한 분류 모델이다. adaboost (adaptive boosting)을 통해 분류기를 훈련한다.
Cascade는 여러 개의 단순한 분류기(weak classifiers)를 연결한 것으로, 이미지는 여러 단계의 분류기를 거치게 되며, 각 단계에서 얼굴이 아닌 것으로 판단되면 즉시 다음 영역으로 넘어간다. 이렇게 하여 계산 시간을 줄이고, 탐지 정확도를 높인다.
harr cascade의 학습 모델은 opencv에서 제공하고 있다. 아래 url은 haar cascade .xml 학습 파일을 다운로드 할 수 있는 링크이다.
haar cascade .xml download URL
full body(사람 검출)
import cv2

body_cascade = cv2.CascadeClassifier('./data/haarcascade_fullbody.xml')

cap = cv2.VideoCapture('./data/walking.avi')

while True:
    ret, frame = cap.read()
    if not ret:
        break

    gray = cv2.cvtColor(frame, cv2.COLOR_BGR2GRAY)
    bodies = body_cascade.detectMultiScale(gray, 1.1, 3)

    for (x, y, w, h) in bodies:
        cv2.rectangle(frame, (x, y), (x+w, y+h), (255, 0, 0), 2)

    cv2.imshow('Frame', frame)

    if cv2.waitKey(1) & 0xFF == ord('q'):
        break

cap.release()
cv2.destroyAllWindows()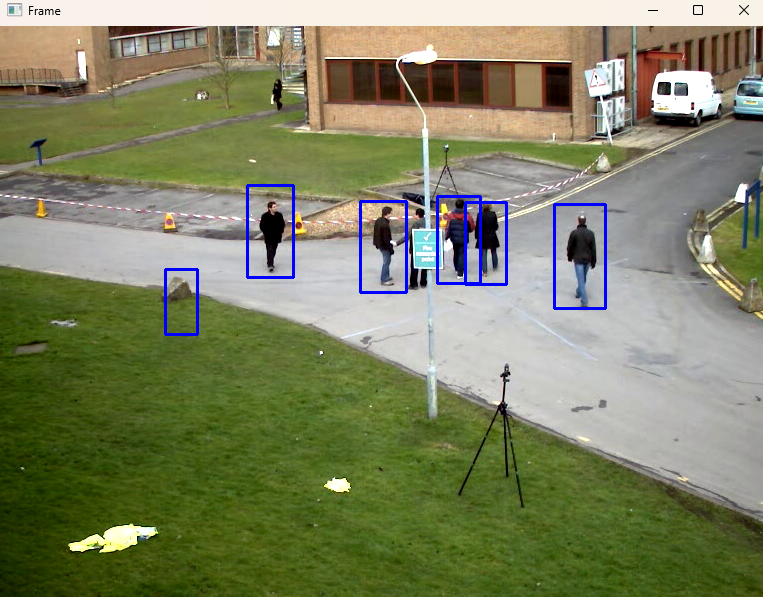
사용해 보면 알겠지만 성능이.. practical 하지는 않다.
Face 검출
import matplotlib.pyplot as plt
face_cascade = cv2.CascadeClassifier('./data/haarcascade_frontalface_default.xml')

img = cv2.imread("./data/faker.jpg")

gray = cv2.cvtColor(img, cv2.COLOR_BGR2GRAY)
faces = face_cascade.detectMultiScale(gray, 1.5, 5)

for (x, y, w, h) in faces:
    cv2.rectangle(img, (x, y), (x+w, y+h), (255, 0, 0), 2)

plt.imshow(cv2.cvtColor(img, cv2.COLOR_BGR2RGB))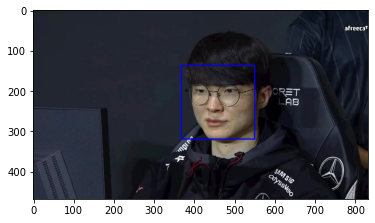
eye 검출
eyes_cascade = cv2.CascadeClassifier('./data/haarcascade_eye.xml')

img = cv2.imread("./data/faker.jpg")

gray = cv2.cvtColor(img, cv2.COLOR_BGR2GRAY)
eyes = eyes_cascade.detectMultiScale(gray, 1.1, 5)

for (x, y, w, h) in eyes:
    cv2.rectangle(img, (x, y), (x+w, y+h), (255, 0, 0), 2)

plt.imshow(cv2.cvtColor(img, cv2.COLOR_BGR2RGB))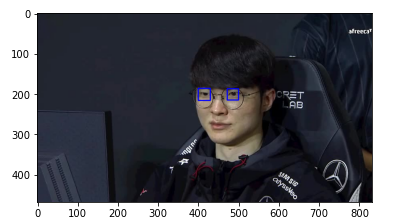
정면 얼굴, eye 검출은 fullbody 보다 비교적 검출이 잘 된다.
2. Mediapipe
구글에서 제공하는 그래프 기반 프레임워크다.
얼굴 인식, 얼굴 메쉬, 눈동자 추적, 손 추적, 포즈 추적, 홀리스틱 모델, 헤어 세그멘테이션, 객체 감지, 상자 추적, 즉각적인 모션 추적, Objectron, KNIFT 등 다양한 ML 솔루션을 제공하고 있다.
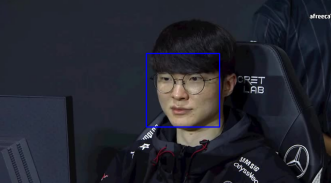
face detection
mp_face_detection = mp.solutions.face_detection
mp_drawing = mp.solutions.drawing_utils

image = cv2.imread("./ssh.jpg")

with mp_face_detection.FaceDetection(
    model_selection=0, min_detection_confidence=0.5) as face_detection:

    image = cv2.cvtColor(image, cv2.COLOR_BGR2RGB)
    results = face_detection.process(image)
    image = cv2.cvtColor(image, cv2.COLOR_RGB2BGR)

    if results.detections:
            for detection in results.detections:
                mp_drawing.draw_detection(image, detection)


    cv2.imshow('Face Detection', image)

cv2.waitKey(0)
cv2.destroyAllWindows()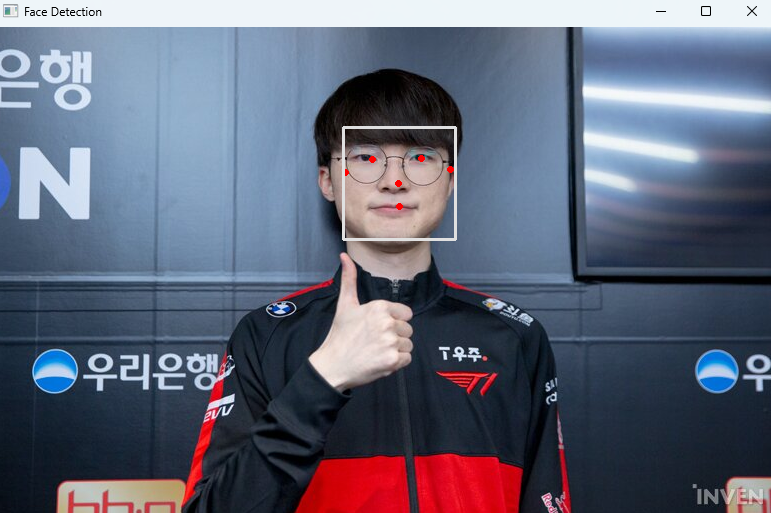
Mediapipe는 얼굴 뿐만 아니라 얼굴 내 랜드마크도 검출이 된다.
포즈 추정(pose estimation)
mp_pose = mp.solutions.pose
mp_drawing = mp.solutions.drawing_utils

image = cv2.imread("./ssh.jpg")


with mp_pose.Pose(
    min_detection_confidence=0.5, min_tracking_confidence=0.5) as pose:

    image = cv2.cvtColor(image, cv2.COLOR_BGR2RGB)
    results = pose.process(image)

    image = cv2.cvtColor(image, cv2.COLOR_RGB2BGR)

    if results.pose_landmarks:
        mp_drawing.draw_landmarks(image, results.pose_landmarks,
                                  mp_pose.POSE_CONNECTIONS)

    cv2.imshow('Pose Estimation', image)

cv2.waitKey(0)
cv2.destroyAllWindows()
3. HOG Descriptor
HOG란
Histogram of Oriented Gradients의 약자로, 이미지 내의 지역적인 그라디언트 방향과 크기의 분포를 분석하여 히스토그램을 계산하고, 이를 정규화한 후 HOG 특징 벡터를 생성한다. 사람 검출을 위해서 검출된 특징 벡터를 사전 훈련된 SVM 분류기에 입력하고, 해당 벡터가 사람인지 아닌지 판별하게 한다.
사람 검출
import cv2

hog = cv2.HOGDescriptor()
hog.setSVMDetector(cv2.HOGDescriptor_getDefaultPeopleDetector())

cap = cv2.VideoCapture('./data/walking.avi')

while True:
    ret, frame = cap.read()
    if not ret:
        break

    boxes, weights = hog.detectMultiScale(frame, winStride=(8, 8))

    for (x, y, w, h) in boxes:
        cv2.rectangle(frame, (x, y), (x + w, y + h), (0, 255, 0), 2)

    cv2.imshow('Frame', frame)

    if cv2.waitKey(1) & 0xFF == ord('q'):
        break

cap.release()
cv2.destroyAllWindows()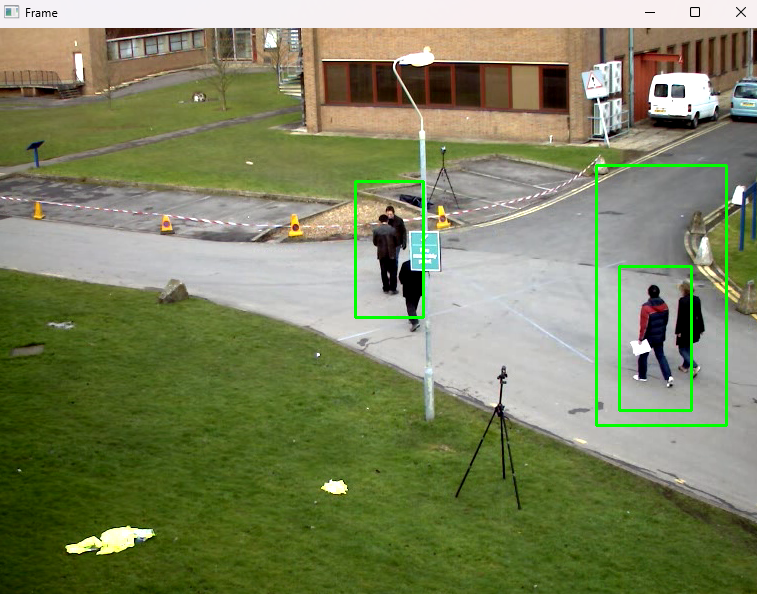
cascade 방법과 유사하게 성능이 그렇게 우수하진 못한 것으로 보인다.
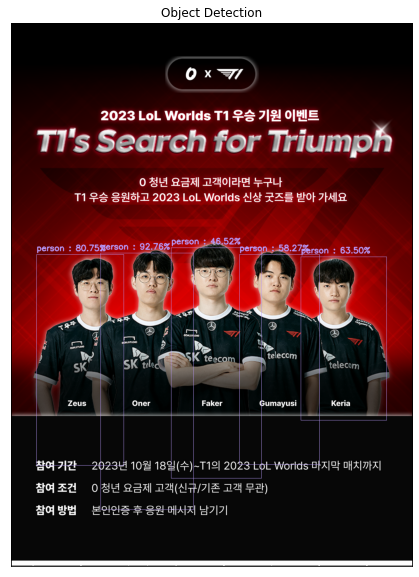
4. MobileNet+SSD
MobileNet과 SSD(Single Shot MultiBox Detector)를 활용한 효율적인 객체 인식 방법이다. MobileNet은 모바일, 임베디드 환경을 위한 DL 네트워크 구조이고, SSD는 다양한 크기의 feature map에서 객체를 효율적으로 감지하는 객체 인식 방법이다.
MobileNet과 SSD를 함께 사용하면 리소스가 제한된 환경에서도 빠르고 정확한 객체 감지가 가능하다.
사람 검출
import numpy as np
import cv2
import matplotlib.pyplot as plt

def img_show(title='image', img=None, figsize=(8 ,5)):
    plt.figure(figsize=figsize)

    if type(img) == list:
        if type(title) == list:
            titles = title
        else:
            titles = []

            for i in range(len(img)):
                titles.append(title)

        for i in range(len(img)):
            if len(img[i].shape) <= 2:
                rgbImg = cv2.cvtColor(img[i], cv2.COLOR_GRAY2RGB)
            else:
                rgbImg = cv2.cvtColor(img[i], cv2.COLOR_BGR2RGB)

            plt.subplot(1, len(img), i + 1), plt.imshow(rgbImg)
            plt.title(titles[i])
            plt.xticks([]), plt.yticks([])

        plt.show()
    else:
        if len(img.shape) < 3:
            rgbImg = cv2.cvtColor(img, cv2.COLOR_GRAY2RGB)
        else:
            rgbImg = cv2.cvtColor(img, cv2.COLOR_BGR2RGB)

        plt.imshow(rgbImg)
        plt.title(title)
        plt.xticks([]), plt.yticks([])
        plt.show()


prototxt_path = './data/model/MobileNetSSD_deploy.prototxt.txt'
model_path = './data/model/MobileNetSSD_deploy.caffemodel'

net = cv2.dnn.readNetFromCaffe(prototxt_path, model_path)


CLASSES = ["background", "aeroplane", "bicycle", "bird", "boat",
           "bottle", "bus", "car", "cat", "chair", "cow", "diningtable",
           "dog", "horse", "motorbike", "person", "pottedplant", "sheep",
           "sofa", "train", "tvmonitor"]

LABEL_COLORS = np.random.uniform(0, 255, size=(len(CLASSES), 3))
img = cv2.imread("t1.png")
(h, w) = img.shape[:2]
resized = cv2.resize(img, (300, 300))
blob = cv2.dnn.blobFromImage(resized, 0.007843, (300, 300), 127.5)
net.setInput(blob)
detections = net.forward()
vis = img.copy()
conf = 0.2
for i in np.arange(0, detections.shape[2]):
confidence = detections[0, 0, i, 2]
if confidence > conf:
idx = int(detections[0, 0, i, 1])
box = detections[0, 0, i, 3:7] * np.array([w, h, w, h])
(startX, startY, endX, endY) = box.astype("int")
print("[INFO] {} : [ {:.2f} % ]".format(CLASSES[idx], confidence * 100))
cv2.rectangle(vis, (startX, startY), (endX, endY), LABEL_COLORS[idx], 1)
y = startY - 10 if startY - 10 > 10 else startY + 10
cv2.putText(vis, "{} : {:.2f}%".format(CLASSES[idx], confidence * 100), (startX, y), cv2.FONT_HERSHEY_SIMPLEX, 0.7, LABEL_COLORS[idx], 2)
img_show('Object Detection', vis, figsize=(16,10))