이 글은 노마드 코더 - Flutter 로 웹툰 앱 만들기를 참고하여 작성하였습니다.
작성자 : 조미서
개발 환경 : Mac OS, Android Studio, Visual Studio Code
🧑🏻💻#4 STATEFUL WIDGETS
#4.0 State
Stateless Widget - build 메서드를 통해서 단지 UI를 출력 (데이터를 가지고 있지 않음)
Stateful Widget - 상태를 가지고 있음 즉 상태에 따라 변하게 될 데이터를 생각할 수 있음 데이터가 변경될 때 이 변화를 UI에 반영하여 실시간으로 볼 수 있음 (결국, 위젯에 데이터를 저장하고 싶고, 실시간으로 데이터의 변화를 보고 싶으면 Stateful!)
Stateful Widget은 두 개의 부분으로 나누어진다.
- 상태가 없는 위젯 그 자체
- 위젯의 state - 위젯에 들어갈 데이터와 UI를 넣는 곳 (데이터가 변경되면 해당 위젯의 UI도 변경됨)
Stateful Widget을 만드는 법
1. Flutter Stateful Widget 옵션 선택
2. Stateless Widget에서 code action을 사용하여 Stateful Widget으로 변경하기
Stateful Widget의 첫 번째 부분 - 위젯 그 자체 (상태를 가지고 있다)
class App extends StatefulWidget {
State<App> createState() => _AppState(); //단지 State라고 불리는 것을 하나 가지고 있을 뿐
}Stateful Widget의 두 번째 부분 - State (데이터를 가지고 있다)
*State는 우리가 UI를 구축하는 곳이고 이 상태는 우리가 State의 데이터를 바꿀 때, 우리의 UI는 새로고침되면서 최신 데이터를 보여준다.
class _AppState extends State<App> {
int counter = 0; // 데이터 (단순 클래스 프로퍼티), 이 값을 변경하고 덮어쓸 것이므로 final이 아님
void onClicked() {
counter = counter + 1;
}
Widget build(BuildContext context) {
return MaterialApp(
home: Scaffold(
backgroundColor: const Color(0xFFF4EDDB),
body: Center(
child: Column(
mainAxisAlignment: MainAxisAlignment.center,
children: [
const Text(
'Click Count',
style: TextStyle(fontSize: 30),
),
Text(
'$counter',
style: const TextStyle(fontSize: 30),
),
IconButton(
iconSize: 40,
onPressed: onClicked,
icon: const Icon(Icons.add_box_rounded),
),
],
),
),
),
);
}
}State가 가지는 데이터는 단지, Dart의 클래스 프로퍼티이다.
State 클래스는 위젯의 UI도 가지고 있다. 그러므로 State의 데이터가 바뀔 때, 위젯의 UI도 새로운 데이터와 함께 새로고침된다.
전체코드
import 'package:flutter/material.dart';
void main() {
runApp(const App());
}
class App extends StatefulWidget {
const App({super.key});
State<App> createState() => _AppState();
}
class _AppState extends State<App> {
int counter = 0; // 클래스 프로퍼티, 이 값을 변경하고 덮어쓸 것이므로 final이 아님
void onClicked() {
counter = counter + 1;
}
Widget build(BuildContext context) {
return MaterialApp(
home: Scaffold(
backgroundColor: const Color(0xFFF4EDDB),
body: Center(
child: Column(
mainAxisAlignment: MainAxisAlignment.center,
children: [
const Text(
'Click Count',
style: TextStyle(fontSize: 30),
),
Text(
'$counter',
style: const TextStyle(fontSize: 30),
),
IconButton(
iconSize: 40,
onPressed: onClicked,
icon: const Icon(Icons.add_box_rounded),
),
],
),
),
),
);
}
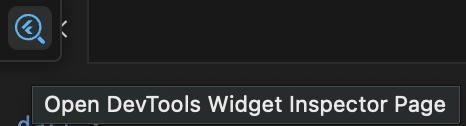
}그러하여 완성한 코드를 실행해보면
이러한 화면이 나오고 '+' 버튼을 누르면 숫자가 +1씩 증가하기를 원했지만 아무런 변화가 일어나지 않았다. 그럼 왜 아무런 변화가 일어나지 않았을까?
#4.1 setState
그 전 챕터에서 왜 '+' 버튼을 눌렀을 때 아무런 변화가 일어나지 않았나 => setState 함수의 부재
setState - State클래스에게 데이터가 변경되었다고 알리는 함수 (그러므로 setState 함수 안에서 데이터를 변경하는 구문을 넣는다!!)
  void onClicked() {
    setState(() {
      counter = counter + 1;
    });
  }
이렇게 onClicked함수 내에 setState함수를 넣고, 그 안에 데이터 변경부분을 넣어주게 되니
이처럼 잘 동작하는 것을 볼 수 있었다.
만약 setState함수를 호출하지 않는다면, build 메서드는 다시 실행되지 않는다.
setState는 기본적으로 새로운 데이터와 함께 메서드를 다시 한 번 더 호출해준다.
하지만 데이터의 변화를 무조건 setState안에 넣어야 하는가? -> 'No'
  void onClicked() {
  	counter = counter + 1;
    setState(() {});
  }
이렇게 코드를 작성하여도 counter가 잘 실행된다. 그렇지만 함수 안에 데이터 변경부분을 넣어주어야 가독성이 높아진다는 점이 있으므로 되도록이면 setState 내부에 넣어주자.
이렇게 스크린을 인터랙티브로 만들기 위해 모든 것을 알아보았다.
1. stateful widget을 만든다.
2. 위젯의 UI 관련 코드를 State에 넣어준다
3. 위젯에 데이터(Dart 클래스 프로퍼티)를 넣는다.
4. 데이터를 변경하는 함수를 만든다.
5. 데이터가 변경되면 Dart에게 UI를 새로고침 하도록 알려준다 (setState함수)
#4.2 Recap
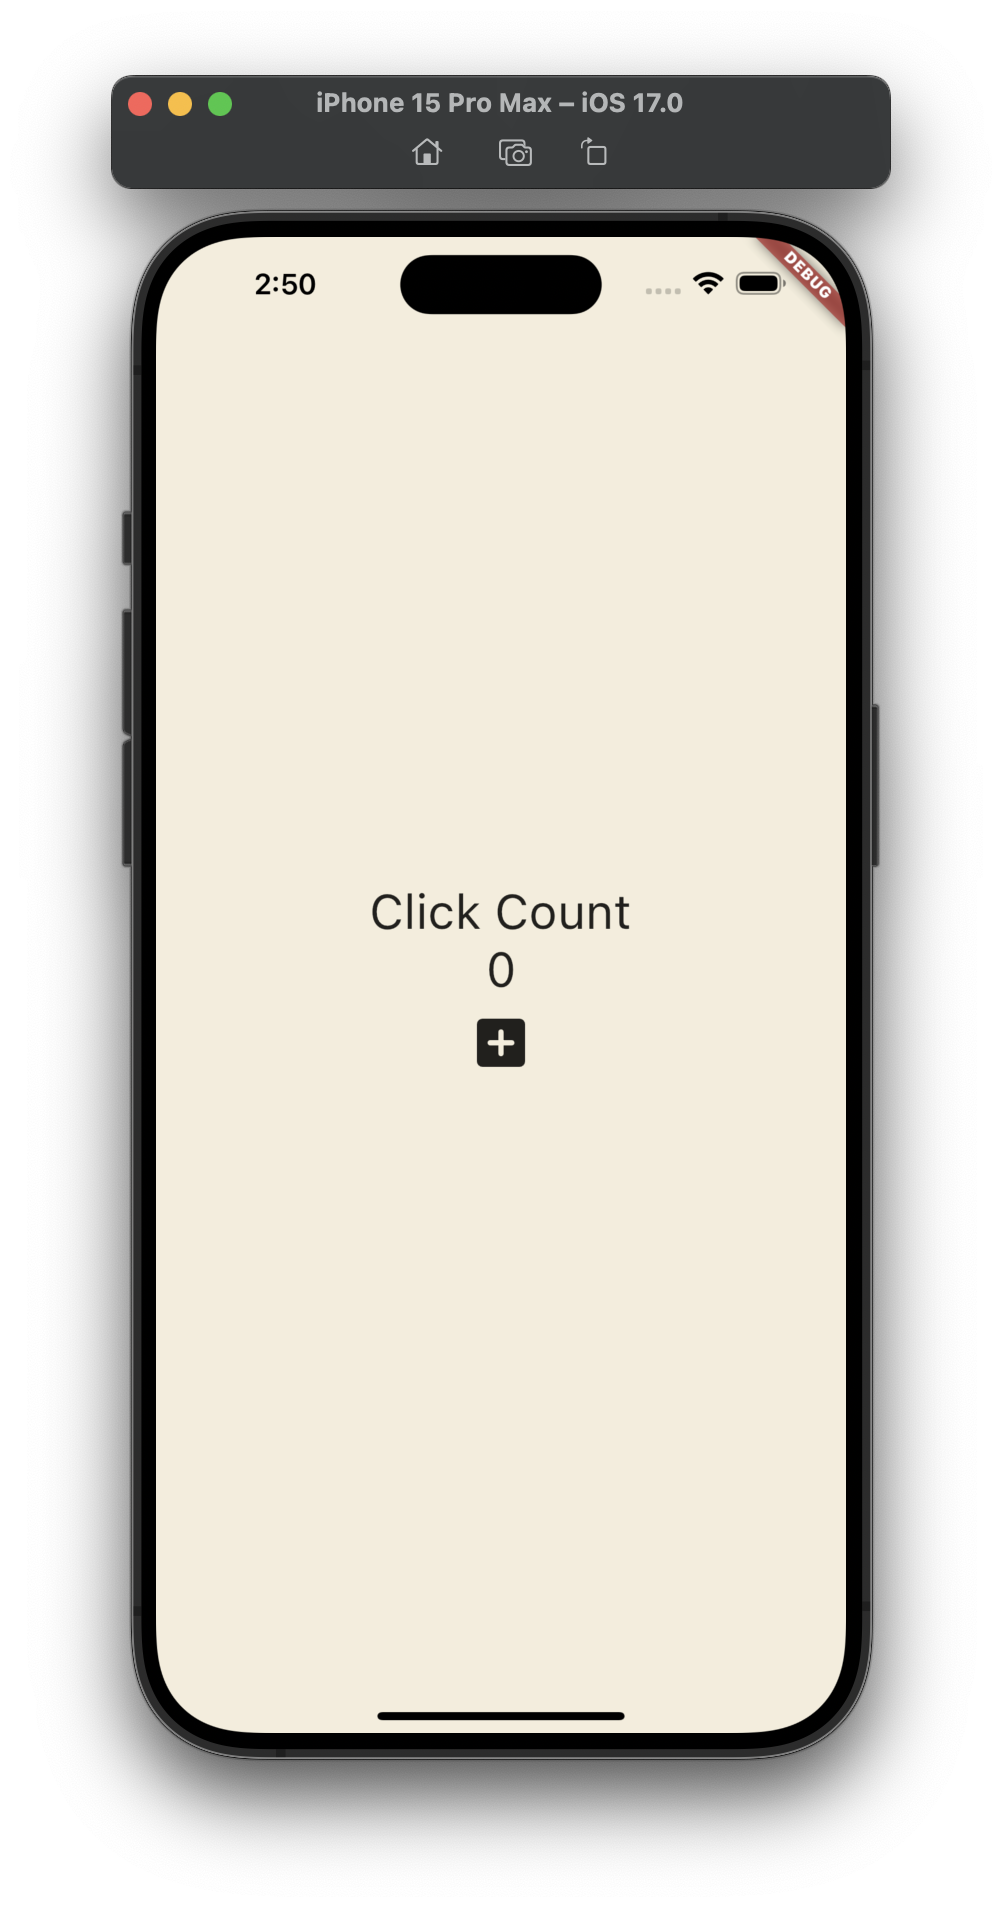
State에는 클래스, 클래스 목록, 부울, 정수 목록 등 뭐든지 저장할 수 있다.
클래스 프로퍼티를 정수 목록으로 변환, collection for을 이용하여 배열이 커질수록 화면에 표시되는 숫자가 증가하도록 기능을 바꿔보았다.
import 'package:flutter/material.dart';
void main() {
runApp(const App());
}
class App extends StatefulWidget {
const App({super.key});
State<App> createState() => _AppState();
}
class _AppState extends State<App> {
List<int> numbers = [];
void onClicked() {
setState(() {
numbers.add(numbers.length);
});
}
Widget build(BuildContext context) {
return MaterialApp(
home: Scaffold(
backgroundColor: const Color(0xFFF4EDDB),
body: Center(
child: Column(
mainAxisAlignment: MainAxisAlignment.center,
children: [
const Text(
'Click Count',
style: TextStyle(fontSize: 30),
),
for (var n in numbers) Text('$n'), //collection for 구문 사용
IconButton(
iconSize: 40,
onPressed: onClicked,
icon: const Icon(Icons.add_box_rounded),
),
],
),
),
),
);
}
}실행결과

#4.3 BuildContext
flutter는 앱의 모든 스타일(색상, 크기, 글자 굵기 등)을 한 곳에서 지정할 수 있는 기능을 제공한다. 모든 곳에 복사 붙여넣기 할 필요 없이 한 곳에 복사하고 그 색상 변수를 사용하여 일일이 복붙하거나 값을 기억하는 등을 전혀 할 필요가 없다.
theme은 기본 시각적 속성(colors fonts and shapes..)이 있다. 그 중에 ThemeData 속성은 매우 많은 옵션을 가지고 있는데, 그 중 우리가 설정해두고 싶은 것이 텍스트이므로 textTheme을 사용해 텍스트에 대한 스타일을 정의하는데, 아래 코드에서는 titleLarge라는 특정 텍스트의 스타일을 설정하고 있다.
그렇게 theme만을 만들게 되면 아무런 변화가 일어나지 않는다. -> BuildContext에 대해 이야기 해보자
theme는 애플리케이션 위젯의 state에 있다. 그리고 이 애플리케이션 위젯의 state는 MyLargeTitle이라는 자식을 가지고 있다.(현재 MyLargeTitle은 별도의 위젯으로 StatelessWidget으로 분리되어 있음) 그러하여 StatelessWidget인 MyLargeTitle에서 theme의 값에 접근하도록 해야한다 -> 부모 요소와의 대화가 필요하다 (여기에서 부모 요소는 _AppState)
이러한 접근을 위해서 BuildContext를 이용해야 함
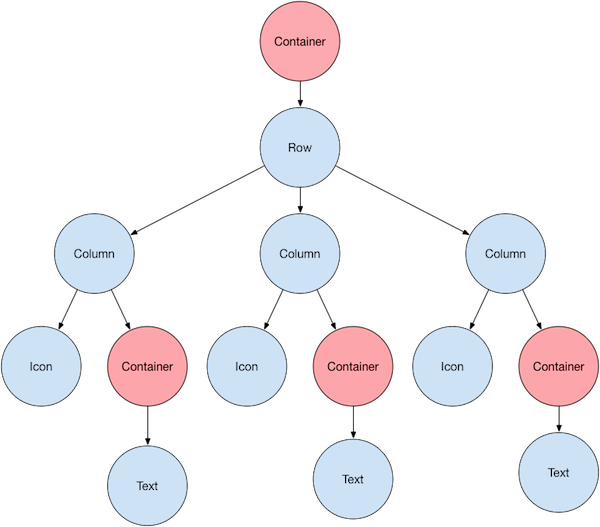
이것은 flutter가 애플리케이션을 어떻게 렌더링하는지 보여주는 그림이다.
Root(그림에서 Container)는 우리 경우에 App class를 의미한다. 이것은 절대 루트이고, 사진에서 보다시피 수많은 자식 요소를 가지고 그 아이들은 또 자식 요소들을 가진다. 마치 App class는 MaterialApp을 가지고 ThemeData, Scaffold, Center, Column를 지나 MyLargeTitle을 가지는 것과 같이.
Widget Inspector를 통하여 코드의 위젯 트리를 볼 수 있다.

root, App을 지나 끝을 보게 되면 우리는 Text: "MyLargeTitle"를 가진다. 이 MyLargeTitle이 부모 요소 정보에 접근하길 원할 때, context를 사용한다.
context란 Text 이전에 있는 모든 상위 요소들에 대한 정보이다.
그러므로 MyLargeTitle 클래스 안의 context는 MyLargeTitle Text의 부모 요소들의 모든 정보들을 담고 있다.
다시 말해 context에는 위젯 트리에 대한 정보가 담겨져 있고, 매우 먼 요소의 데이터를 가져올 수 있기 때문에 유용하다. (애플리케이션 안에서 내 위젯의 위치에 대한 정보를 알려주고, BuildContext를 사용해서 우리가 어떤 위젯이고 누가 우리의 부모 요소인지 알 수 있고, 맨 위 부모 요소에도 접근할 수 있다.)
color: Theme.of(context).textTheme.titleLarge!.color
코드 중 이 부분에서 context를 사용하여 부모 요소에 접근한 것을 볼 수 있다.
** 또한 추가적으로 color속성이 null이 될 수 있으므로 오류가 생기는 것을 볼 수 있는데, 이를 해결하기 위해서는 titleLarge, color가 존재한다는 것을 명확히 알려주어야 하므로 !를 붙여주었다. (?를 붙여서 그것이 있는 경우에 사용하라고 해도 문제가 없다)
import 'package:flutter/material.dart';
void main() {
runApp(const App());
}
class App extends StatefulWidget {
const App({super.key});
State<App> createState() => _AppState();
}
class _AppState extends State<App> {
Widget build(BuildContext context) {
return MaterialApp(
theme: ThemeData(
textTheme: const TextTheme(
titleLarge: TextStyle(
color: Colors.red,
),
),
),
home: const Scaffold(
backgroundColor: Color(0xFFF4EDDB),
body: Center(
child: Column(
mainAxisAlignment: MainAxisAlignment.center,
children: [
MyLargeTitle(), //AppState 위젯에서 별도의 위젯을 분리함
],
),
),
),
);
}
}
class MyLargeTitle extends StatelessWidget {
const MyLargeTitle({
super.key,
});
Widget build(BuildContext context) {
return Text(
'My Large Title',
style: TextStyle(
fontSize: 30,
color: Theme.of(context).textTheme.titleLarge!.color,
),
);
}
}실행결과
#4.4 Widget Lifecycle
StatefulWidget은 그들에게 일어나는 생명 주기(life cycle)을 가진다! -> 이것들은 이벤트에 반응한다.
이 말의 의미를 알기 위하여 먼저 MyLargeTitle의 위젯을 StatefulWidget으로 변경(code action 사용)해준다.
그럼 StatefulWidget은 build메서드 이외의 무엇을 가지고 있을까?
먼저, initState 메서드를 가진다.
initState는 상태를 초기화 하기 위한 메서드이다.
이 메서드를 꼭 사용하지 않고 초기화를 할 수 있는 방법도 있는데 왜 굳이 이 메서드를 사용해야 할까? -> 부모 요소에 의존하는 데이터를 초기화해야 하는 경우가 있을 때 (ex.API에서 업데이트를 구독할 때)
주의할 점: initState 메서드가 항상 build 메서드보다 먼저 호출되어야 한다. / initState 메서드는 오직 단 한 번만 호출된다. / initState 메서드를 사용할 때는 super.initState()를 호출해야 한다.
두번째로, dispose 메서드가 있다.
dispose는 위젯이 스크린에서 제거될 때 호출되는 메서드이다.
API 업데이트나 이벤트 리스너로부터 구독을 취소하거나 form의 리스너로부터 벗어나고 싶을 때 사용한다.
즉, dispose 메서드는 무언가를 취소하는 곳이라고 생각하면 됨.
import 'package:flutter/material.dart';
void main() {
runApp(const App());
}
class App extends StatefulWidget {
const App({super.key});
State<App> createState() => _AppState();
}
class _AppState extends State<App> {
bool showTitle = true;
void toggleTitle() {
setState(() {
showTitle = !showTitle;
});
}
Widget build(BuildContext context) {
return MaterialApp(
theme: ThemeData(
textTheme: const TextTheme(
titleLarge: TextStyle(
color: Colors.red,
),
),
),
home: Scaffold(
backgroundColor: const Color(0xFFF4EDDB),
body: Center(
child: Column(
mainAxisAlignment: MainAxisAlignment.center,
children: [
showTitle ? const MyLargeTitle() : const Text('nothing'),
IconButton(
onPressed: toggleTitle,
icon: const Icon(Icons.remove_red_eye),
),
],
),
),
),
);
}
}
class MyLargeTitle extends StatefulWidget {
const MyLargeTitle({
super.key,
});
State<MyLargeTitle> createState() => _MyLargeTitleState();
}
class _MyLargeTitleState extends State<MyLargeTitle> {
void initState() {
super.initState();
print('initState!');
}
void dispose() {
super.dispose();
print('dispose!');
}
Widget build(BuildContext context) {
print('build!');
return Text(
'My Large Title',
style: TextStyle(
fontSize: 30,
color: Theme.of(context).textTheme.titleLarge!.color,
),
);
}
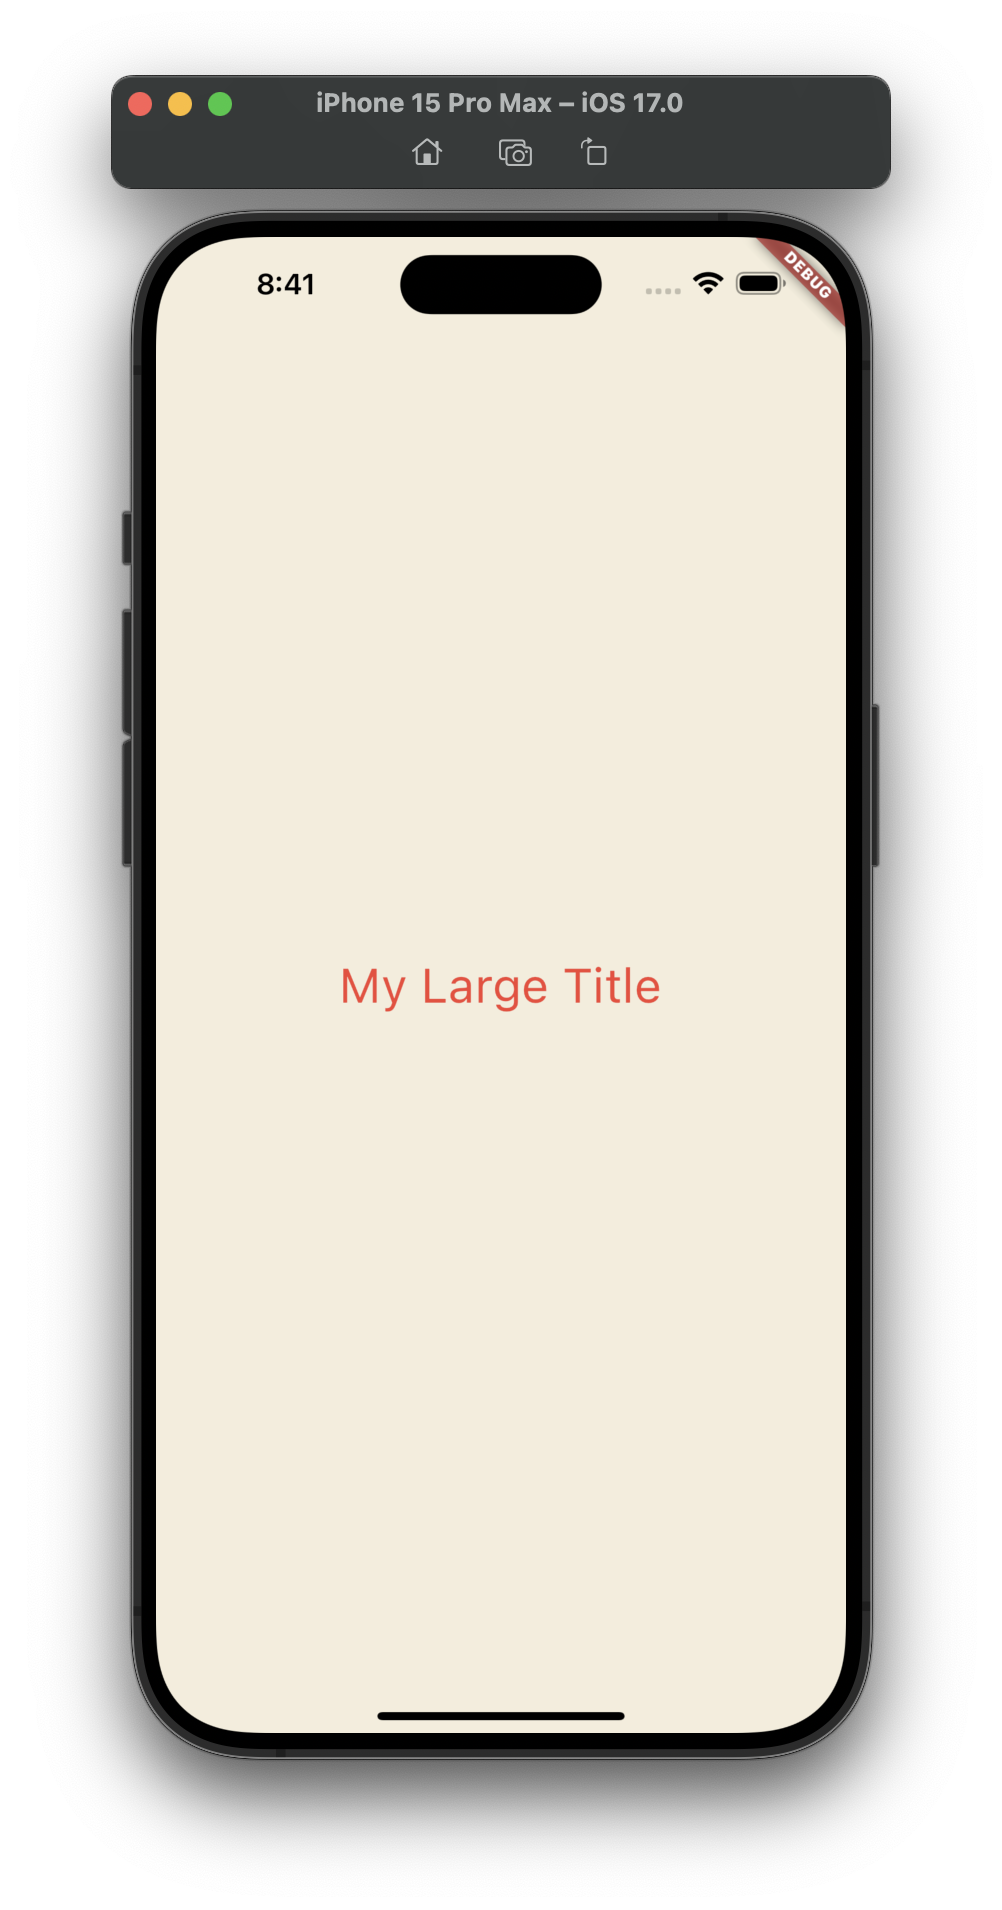
} 코드를 실행하게 되면 initState와 build가 먼저 실행되는 것을 알 수 있고, showTitle이 false가 되면, dispose가 실행되는 것을 볼 수 있었다. (title을 숨기면 initstate와 build가 위젯 트리에서 제거됨을 알 수 있음)
정리
- StatefulWidget은 life cycle을 가지고 있다.
- 그 중 중요한 메서드는 initState, dispose, build이다.
- build는 내 위젯에서 UI를 만든다.
- initState는 build 이전에 호출되는 메서드로, initState에서 우리는 변수를 초기화하고, API 업데이트를 구독할 수 있게 해준다.
- 우리의 위젯이 위젯 트리에서 제거될 때는 dispose 메서드가 실행된다. dispose 메서드 안에서 이벤트 리스너 같은 것들을 구독 취소할 수 있다.
🧑🏻💻#5 POMODORO APP
#5.0 User Interface
Pomodoro는 생산성 기술인데, 25분 동안 일한 후 5분 쉬는 것을 말한다.
main 코드
import 'package:flutter/material.dart';
import 'package:pomodoro_app/screens/home_screen.dart';
void main() {
runApp(const App());
}
class App extends StatelessWidget {
const App({super.key});
Widget build(BuildContext context) {
return MaterialApp(
theme: ThemeData(
colorScheme: ColorScheme.fromSwatch(
backgroundColor: const Color(0xFFE7626C),
),
textTheme: const TextTheme(
displayLarge: TextStyle(
color: Color(0xFF232B55),
),
),
cardColor: const Color(0xFFF4EDDB),
),
home: const HomeScreen(),
);
}
}home_screen 코드
import 'package:flutter/material.dart';
class HomeScreen extends StatefulWidget {
const HomeScreen({super.key});
State<HomeScreen> createState() => _HomeScreenState();
}
class _HomeScreenState extends State<HomeScreen> {
Widget build(BuildContext context) {
return Scaffold(
body: Column(
children: [
Flexible(
flex: 1,
child: Container(
decoration: const BoxDecoration(
color: Colors.red,
),
),
),
Flexible(
flex: 2,
child: Container(
decoration: const BoxDecoration(
color: Colors.green,
),
),
),
Flexible(
flex: 1,
child: Container(
decoration: const BoxDecoration(
color: Colors.blue,
),
),
),
],
),
);
}
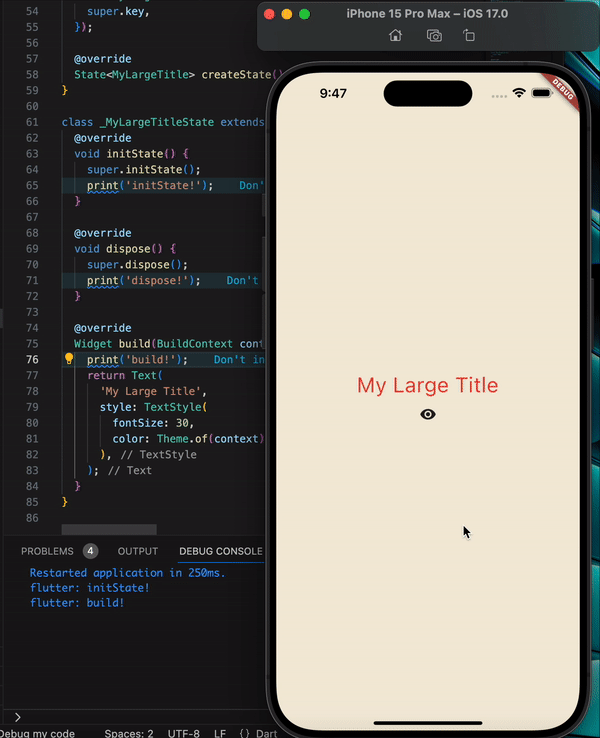
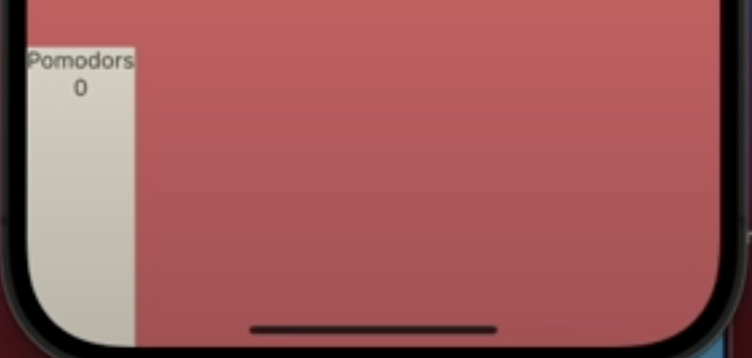
} 위 실행화면을 통해 Flexible로 어플리케이션 만들기 이해를 위한 과정을 알 수 있다.
Expanded 위젯을 통하여 container가
이랬던 모습을
 이렇게 옆으로 확장시킬 수 있다는 점도 알게 되었다.
main 코드는 그 전과 동일하고,
home_screen 코드
import 'package:flutter/material.dart';
class HomeScreen extends StatefulWidget {
const HomeScreen({super.key});
State<HomeScreen> createState() => _HomeScreenState();
}
class _HomeScreenState extends State<HomeScreen> {
Widget build(BuildContext context) {
return Scaffold(
backgroundColor: Theme.of(context).colorScheme.background,
body: Column(
children: [
Flexible(
flex: 1,
child: Container(
alignment: Alignment.bottomCenter,
child: Text(
'25:00',
style: TextStyle(
color: Theme.of(context).cardColor,
fontSize: 89,
fontWeight: FontWeight.w600,
),
),
),
),
Flexible(
flex: 3,
child: Center(
child: IconButton(
iconSize: 120,
color: Theme.of(context).cardColor,
onPressed: () {},
icon: const Icon(Icons.play_circle_outline_outlined),
),
),
),
Flexible(
flex: 1,
child: Row(
children: [
Expanded(
child: Container(
decoration: BoxDecoration(
color: Theme.of(context).cardColor,
),
child: Column(
mainAxisAlignment: MainAxisAlignment.center,
children: [
Text(
'Pomodoros',
style: TextStyle(
fontSize: 20,
fontWeight: FontWeight.w600,
color:
Theme.of(context).textTheme.displayLarge!.color,
),
),
Text(
'0',
style: TextStyle(
fontSize: 58,
fontWeight: FontWeight.w600,
color:
Theme.of(context).textTheme.displayLarge!.color,
),
),
],
),
),
),
],
),
),
],
),
);
}
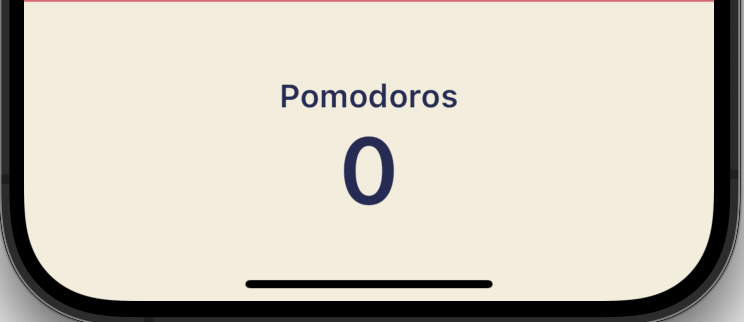
}최종 실행화면
#5.1 Timer
5.0에서 만들었던 UI에서 카운터를 거꾸로 세어보는 timer기능을 추가할 것이다. -> State를 카운트 할 시간(초)로 초기화 해야 된다.
Timer는 Dart의 표준 라이브러리에 포함되어 있다. Timer를 통해 정해진 간격에 한번씩 함수를 실행하게 한다.
우리는 타이머를 사용자가 버튼을 누를때만 타이머가 생성되게 할 것이므로 late라는 variable modifier를 사용하여 이 프로퍼티를 당장 초기화하지 않아도 되게끔 생성한다. 하지만 이것은 프로퍼티를 사용하기 전에 반드시 초기화한다고 약속하는 것과 같음.
main 코드는 그 전과 동일하고,
home_screen 코드
import 'package:flutter/material.dart';
import 'dart:async';
class HomeScreen extends StatefulWidget {
const HomeScreen({super.key});
State<HomeScreen> createState() => _HomeScreenState();
}
class _HomeScreenState extends State<HomeScreen> {
int totalSeconds = 1500;
late Timer timer;
void onTick(Timer timer) {
setState(() {
totalSeconds = totalSeconds - 1; //state 변경 (totalSeconds를 1초 줄임)
});
}
void onStartPressed() {
timer = Timer.periodic(
const Duration(seconds: 1), onTick,
// Timer가 매 초마다 onTick이라는 함수를 실행
);
}
Widget build(BuildContext context) {
return Scaffold(
backgroundColor: Theme.of(context).colorScheme.background,
body: Column(
children: [
Flexible(
flex: 1,
child: Container(
alignment: Alignment.bottomCenter,
child: Text(
'$totalSeconds',
style: TextStyle(
color: Theme.of(context).cardColor,
fontSize: 89,
fontWeight: FontWeight.w600,
),
),
),
),
Flexible(
flex: 3,
child: Center(
child: IconButton(
iconSize: 120,
color: Theme.of(context).cardColor,
onPressed: onStartPressed,
icon: const Icon(Icons.play_circle_outline_outlined),
),
),
),
Flexible(
flex: 1,
child: Row(
children: [
Expanded(
child: Container(
decoration: BoxDecoration(
color: Theme.of(context).cardColor,
borderRadius: BorderRadius.circular(50),
),
child: Column(
mainAxisAlignment: MainAxisAlignment.center,
children: [
Text(
'Pomodoros',
style: TextStyle(
fontSize: 20,
fontWeight: FontWeight.w600,
color:
Theme.of(context).textTheme.displayLarge!.color,
),
),
Text(
'0',
style: TextStyle(
fontSize: 58,
fontWeight: FontWeight.w600,
color:
Theme.of(context).textTheme.displayLarge!.color,
),
),
],
),
),
),
],
),
),
],
),
);
}
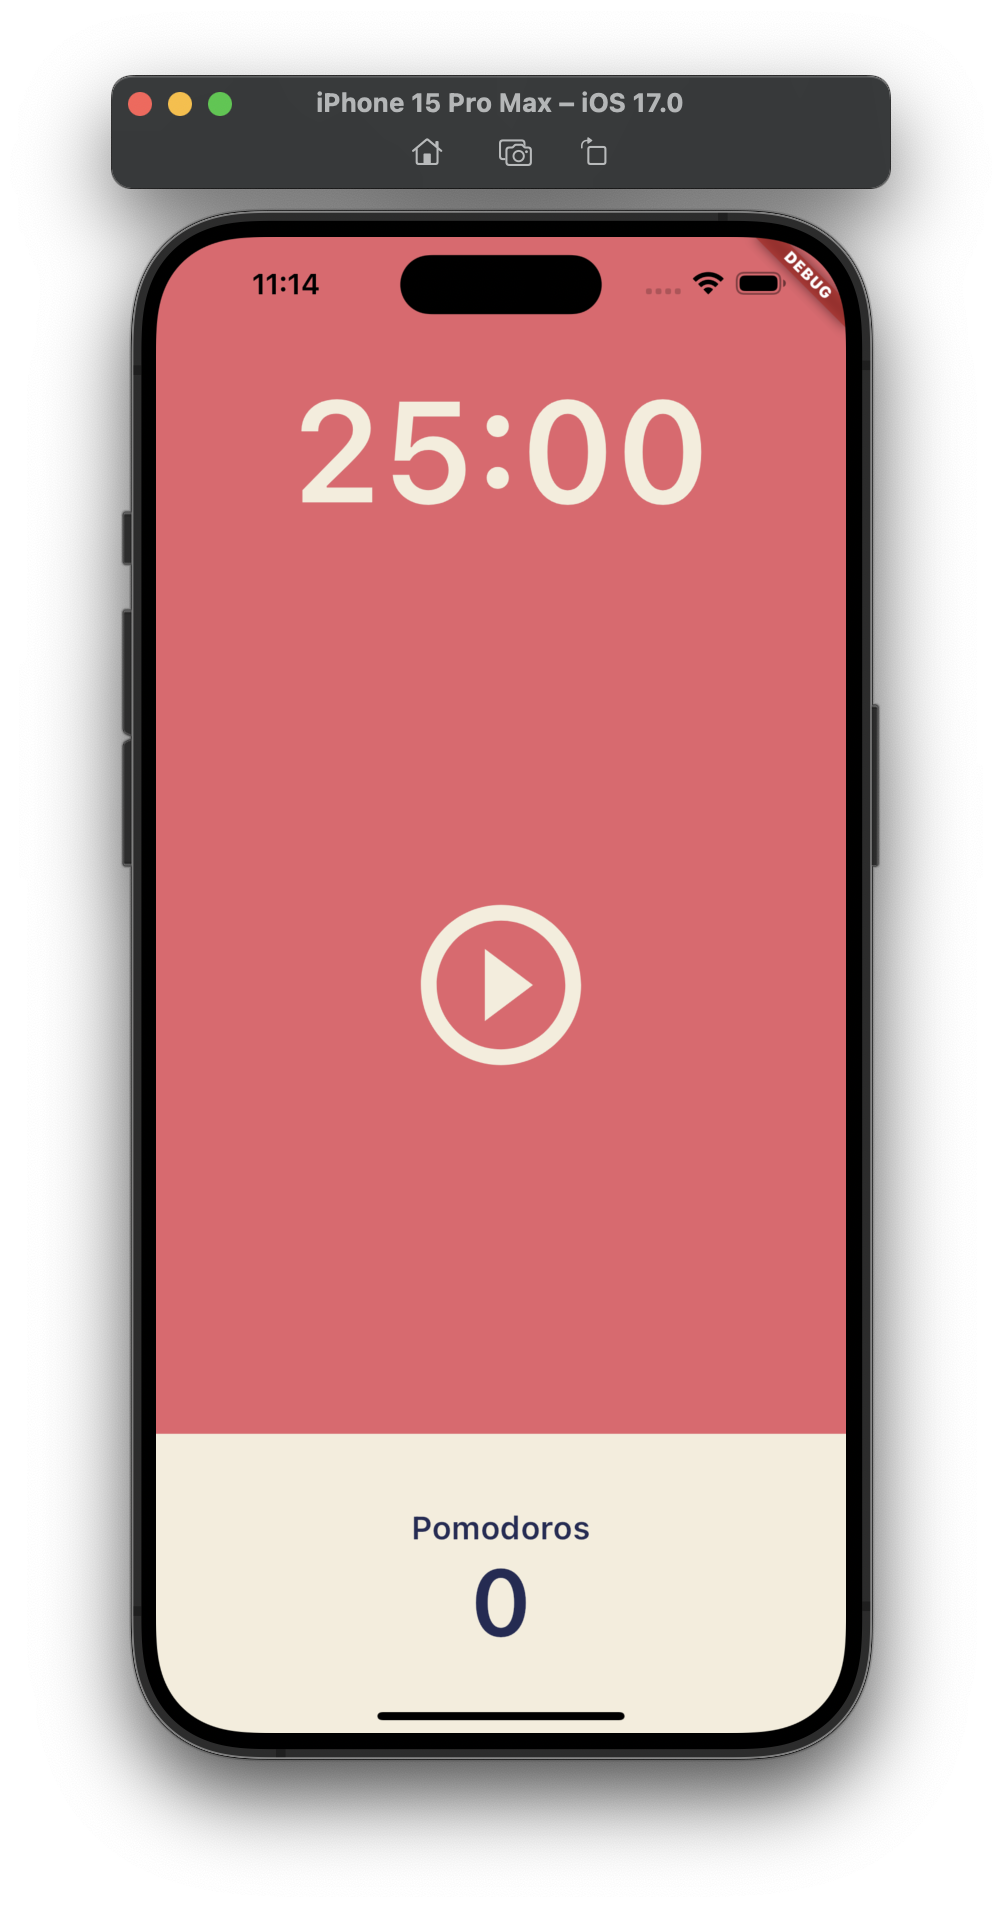
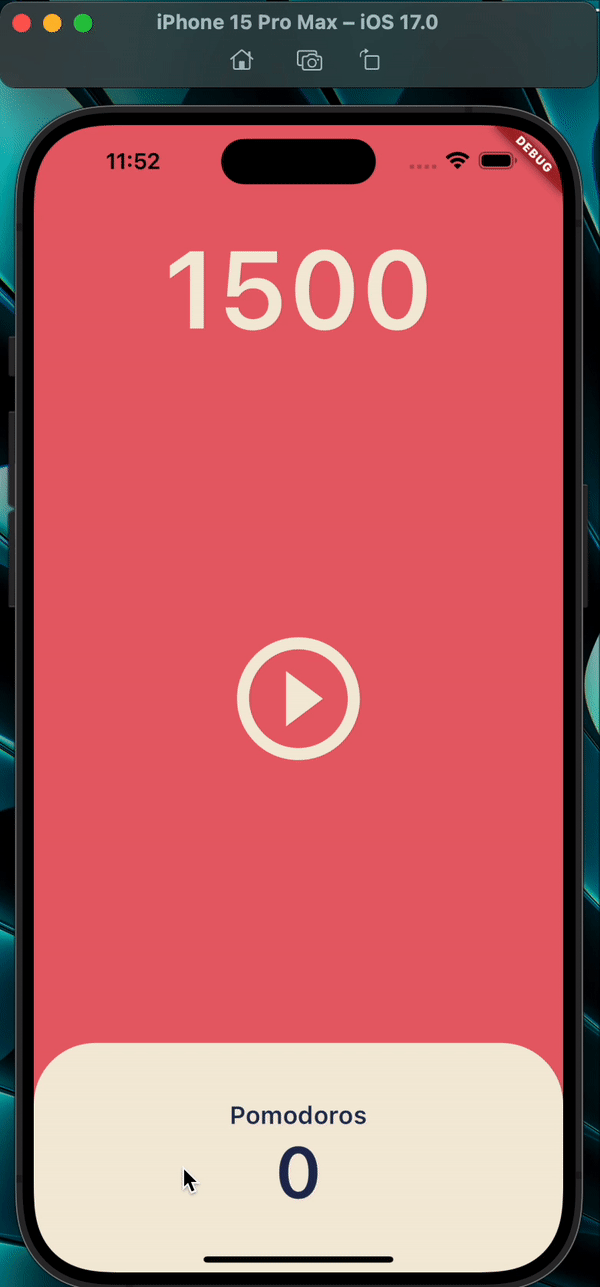
}실행화면
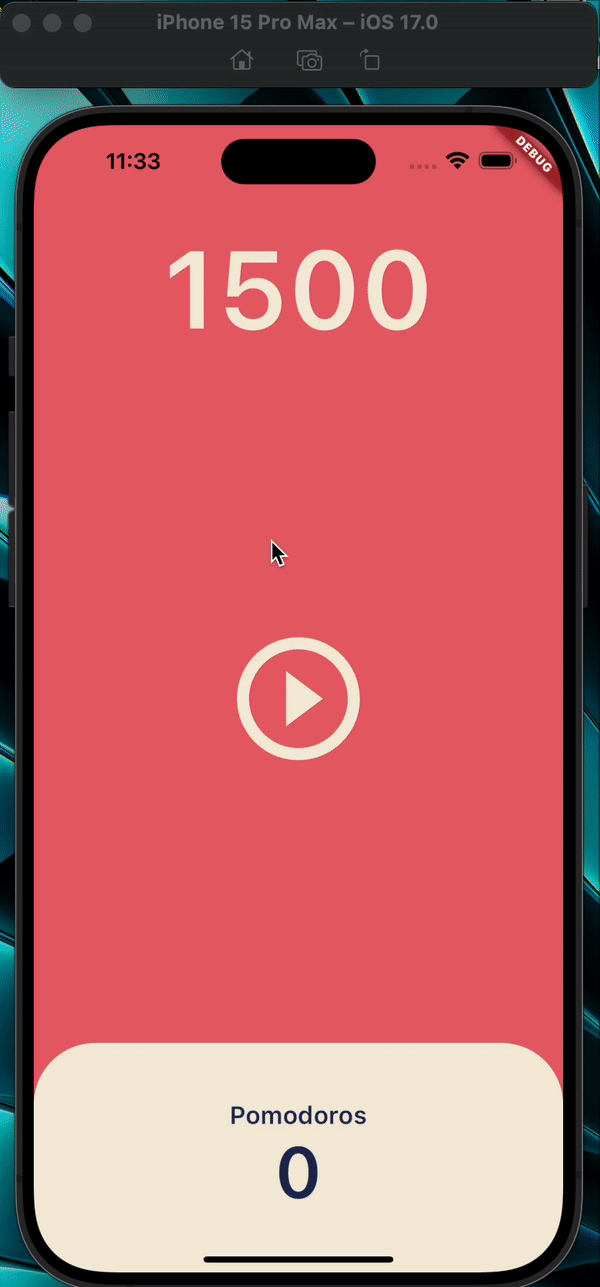
코드를 실행하면 매 초 타이머가 작동될 때마다 1초씩 시간이 줄어들고 있는 모습을 볼 수 있다.
#5.2 Pause Play
이제 타이머를 일시정지하는 버튼을 만들어 보자.
- 먼저 isRunning이란 boolean 프로퍼티를 만든다. (값은 false로)
- 다음 아이콘 버튼에서 isRunning이 false일 때와 true일 때 바뀌는 아이콘이 뭔지 지정한다.
- onStartPressed함수에서 setState와 그 내부에 isRunning 값을 true로 바꿔주도록 작성해준다.
또한 onPressed 부분을 변경해야한다. (카운트를 작동시키는 메소드 onStartPressed는 존재하지만, 카운트가 작동 중일때 버튼을 누르면 일시정지하는 메소드는 없으므로) - onPausepressed()메소드를 생성한다.
- onPausepressed()메소드는 타이머를 cancel하고, setState와 그 내부에 isRunning 값을 false로 바꿔주도록 작성해준다.
- 그 후에 onPressed 부분을 isRunning이 false일 때와 true일 때 동작하는 메소드를 지정한다.
main 코드는 그 전과 동일하고,
home_screen 코드
import 'package:flutter/material.dart';
import 'dart:async';
class HomeScreen extends StatefulWidget {
const HomeScreen({super.key});
State<HomeScreen> createState() => _HomeScreenState();
}
class _HomeScreenState extends State<HomeScreen> {
int totalSeconds = 1500;
bool isRunning = false;
late Timer timer;
void onTick(Timer timer) {
setState(() {
totalSeconds = totalSeconds - 1; //state 변경 (totalSeconds를 1초 줄임)
});
}
void onStartPressed() {
timer = Timer.periodic(
const Duration(seconds: 1), onTick,
// Timer가 매 초마다 onTick이라는 함수를 실행
);
setState(() {
isRunning = true;
});
}
void onPausePressed() {
timer.cancel();
setState(() {
isRunning = false;
});
}
Widget build(BuildContext context) {
return Scaffold(
backgroundColor: Theme.of(context).colorScheme.background,
body: Column(
children: [
Flexible(
flex: 1,
child: Container(
alignment: Alignment.bottomCenter,
child: Text(
'$totalSeconds',
style: TextStyle(
color: Theme.of(context).cardColor,
fontSize: 89,
fontWeight: FontWeight.w600,
),
),
),
),
Flexible(
flex: 3,
child: Center(
child: IconButton(
iconSize: 120,
color: Theme.of(context).cardColor,
onPressed: isRunning ? onPausePressed : onStartPressed,
icon: Icon(isRunning
? Icons.pause_circle_outlined
: Icons.play_circle_outline_outlined),
),
),
),
Flexible(
flex: 1,
child: Row(
children: [
Expanded(
child: Container(
decoration: BoxDecoration(
color: Theme.of(context).cardColor,
borderRadius: BorderRadius.circular(50),
),
child: Column(
mainAxisAlignment: MainAxisAlignment.center,
children: [
Text(
'Pomodoros',
style: TextStyle(
fontSize: 20,
fontWeight: FontWeight.w600,
color:
Theme.of(context).textTheme.displayLarge!.color,
),
),
Text(
'0',
style: TextStyle(
fontSize: 58,
fontWeight: FontWeight.w600,
color:
Theme.of(context).textTheme.displayLarge!.color,
),
),
],
),
),
),
],
),
),
],
),
);
}
} 보다시피 버튼을 누르면 타이머의 시간이 흐르면서 버튼모양이 바뀌고, 다시 버튼을 누르면 원래 버튼모양으로 바뀌고 시간이 멈추는 것이 잘 실행되는 것을 볼 수 있다.
#5.3 Date Format
이제 Pomodoros를 몇 번 완료했는지 세어 줄 새로운 프로퍼티를 class에 추가할 것이다.
(onTick함수의 if-else문 참조)
또한 초 단위를 분 단위로 바꿔주기 위해 format이라는 새로운 method를 생성한다.
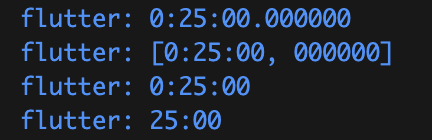
원래 duration을 디버그 콘솔에 출력하면
flutter: 0:25:00.000000
이러한 형태로 나타나는데 우리가 원하는 값은 25:00한 형태이므로 이를 표현하기 위해
duration.toString().split(".").first.substring(2, 7)
위와 같이 toString()을 사용하여 문자열로 변경 후 split(".")으로 뒤 소수점 부분을 나누어 first로 앞부분을 가져오고, substring(2,7)으로 index 2번째 값부터 index 7번째 값까지 가지고 와서 25:00 부분만을 가져올 수 있었다.
이 과정을 좀 더 자세히 보자면,
  String format(int seconds) {
    var duration = Duration(seconds: seconds);
    print(duration.toString());
    print(duration.toString().split("."));
    print(duration.toString().split(".").first);
    print(duration.toString().split(".").first.substring(2, 7));
    return duration.toString().split(".").first.substring(2, 7);
  }
위 코드를 실행하면 디버그 콘솔 출력창에 밑의 사진과 같이 나오는 것을 확인할 수 있었다.
main 코드는 그 전과 동일하고,
home_screen 코드
import 'package:flutter/material.dart';
import 'dart:async';
class HomeScreen extends StatefulWidget {
const HomeScreen({super.key});
State<HomeScreen> createState() => _HomeScreenState();
}
class _HomeScreenState extends State<HomeScreen> {
static const twentyFiveMinutes = 1500;
int totalSeconds = twentyFiveMinutes;
bool isRunning = false;
int totalPomodoros = 0;
late Timer timer;
void onTick(Timer timer) {
if (totalSeconds == 0) {
setState(() {
totalPomodoros = totalPomodoros + 1;
isRunning = false;
totalSeconds = twentyFiveMinutes;
});
timer.cancel();
} else {
setState(() {
totalSeconds = totalSeconds - 1;
});
}
}
void onStartPressed() {
timer = Timer.periodic(
const Duration(seconds: 1), onTick,
// Timer가 매 초마다 onTick이라는 함수를 실행
);
setState(() {
isRunning = true;
});
}
void onPausePressed() {
timer.cancel();
setState(() {
isRunning = false;
});
}
String format(int seconds) {
var duration = Duration(seconds: seconds);
print(duration.toString());
print(duration.toString().split("."));
print(duration.toString().split(".").first);
print(duration.toString().split(".").first.substring(2, 7));
return duration.toString().split(".").first.substring(2, 7);
}
Widget build(BuildContext context) {
return Scaffold(
backgroundColor: Theme.of(context).colorScheme.background,
body: Column(
children: [
Flexible(
flex: 1,
child: Container(
alignment: Alignment.bottomCenter,
child: Text(
format(totalSeconds),
style: TextStyle(
color: Theme.of(context).cardColor,
fontSize: 89,
fontWeight: FontWeight.w600,
),
),
),
),
Flexible(
flex: 3,
child: Center(
child: IconButton(
iconSize: 120,
color: Theme.of(context).cardColor,
onPressed: isRunning ? onPausePressed : onStartPressed,
icon: Icon(isRunning
? Icons.pause_circle_outlined
: Icons.play_circle_outline_outlined),
),
),
),
Flexible(
flex: 1,
child: Row(
children: [
Expanded(
child: Container(
decoration: BoxDecoration(
color: Theme.of(context).cardColor,
borderRadius: BorderRadius.circular(50),
),
child: Column(
mainAxisAlignment: MainAxisAlignment.center,
children: [
Text(
'Pomodoros',
style: TextStyle(
fontSize: 20,
fontWeight: FontWeight.w600,
color:
Theme.of(context).textTheme.displayLarge!.color,
),
),
Text(
'$totalPomodoros',
style: TextStyle(
fontSize: 58,
fontWeight: FontWeight.w600,
color:
Theme.of(context).textTheme.displayLarge!.color,
),
),
],
),
),
),
],
),
),
],
),
);
}
}실행화면
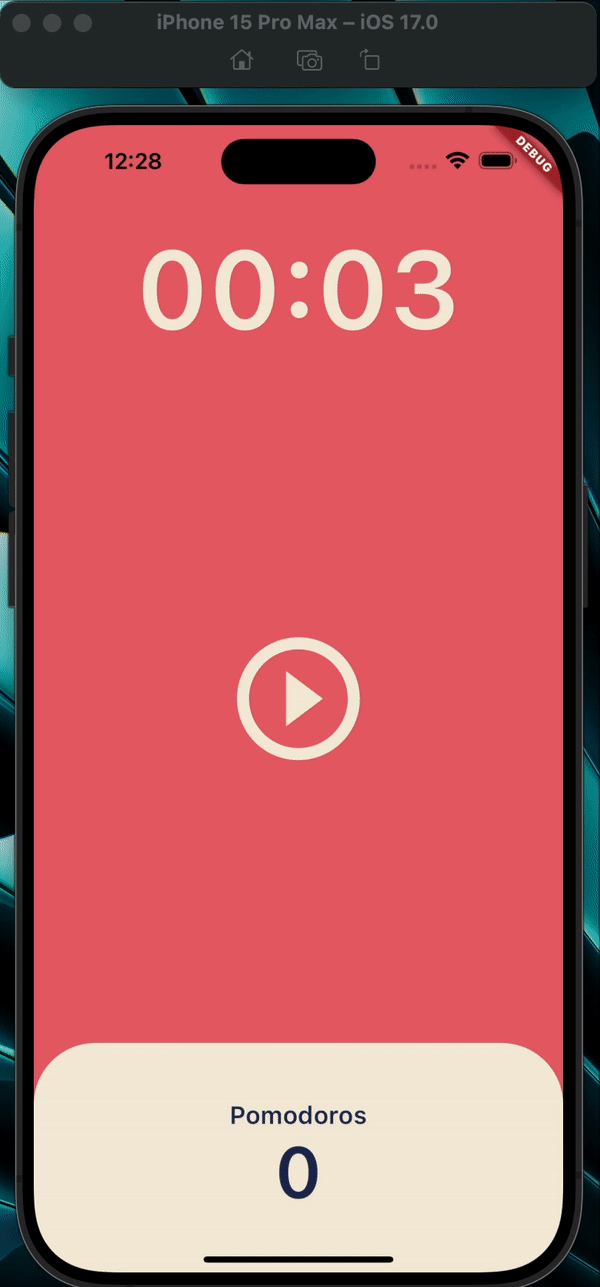
보다시피 분 단위로 형태가 잘 바뀌어 있는 것을 볼 수 있고 시간이 끝나면 Pomodoros 숫자가 1로 증가하는 것을 볼 수 있다. (현재는 Pomodoros의 숫자가 잘 변화하는 지 보기 위해서 const 변수를 3으로 조정해 놓은 상태이다.)
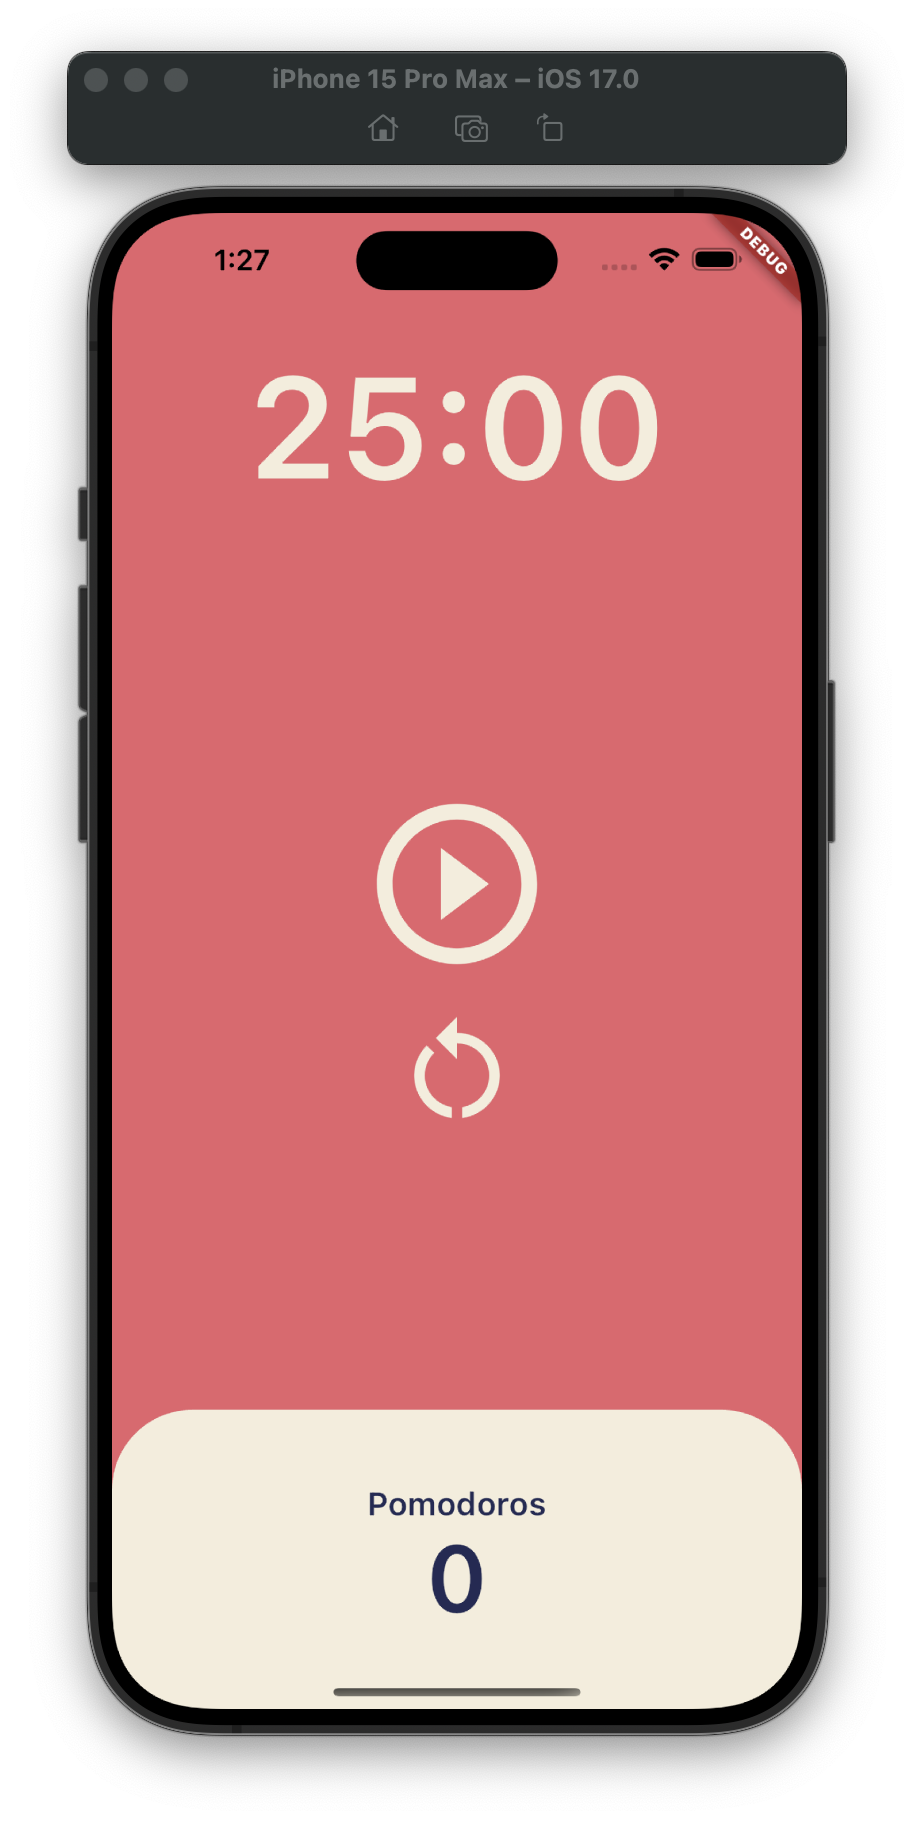
#5.4 Code Challenge
재시작 버튼 (중간에 다시 타이머를 25로 되돌리기)을 만들어라!
시작버튼 밑에 작게 카운트 리셋 버튼으로 리셋하고 재시작할수 있도록 하여라.
main 코드는 그 전과 동일하고,
home_screen 코드
import 'package:flutter/material.dart';
import 'dart:async';
class HomeScreen extends StatefulWidget {
const HomeScreen({super.key});
State<HomeScreen> createState() => _HomeScreenState();
}
class _HomeScreenState extends State<HomeScreen> {
static const twentyFiveMinutes = 1500;
int totalSeconds = twentyFiveMinutes;
bool isRunning = false;
int totalPomodoros = 0;
late Timer timer;
void onTick(Timer timer) {
if (totalSeconds == 0) {
setState(() {
totalPomodoros = totalPomodoros + 1;
isRunning = false;
totalSeconds = twentyFiveMinutes;
});
timer.cancel();
} else {
setState(() {
totalSeconds = totalSeconds - 1;
});
}
}
void onStartPressed() {
timer = Timer.periodic(
const Duration(seconds: 1), onTick,
// Timer가 매 초마다 onTick이라는 함수를 실행
);
setState(() {
isRunning = true;
});
}
void onPausePressed() {
timer.cancel();
setState(() {
isRunning = false;
});
}
void onRestartPressed() {
setState(() {
totalSeconds = twentyFiveMinutes;
});
}
String format(int seconds) {
var duration = Duration(seconds: seconds);
// print(duration.toString());
// print(duration.toString().split("."));
// print(duration.toString().split(".").first);
// print(duration.toString().split(".").first.substring(2, 7));
return duration.toString().split(".").first.substring(2, 7);
}
Widget build(BuildContext context) {
return Scaffold(
backgroundColor: Theme.of(context).colorScheme.background,
body: Column(
children: [
Flexible(
flex: 1,
child: Container(
alignment: Alignment.bottomCenter,
child: Text(
format(totalSeconds),
style: TextStyle(
color: Theme.of(context).cardColor,
fontSize: 89,
fontWeight: FontWeight.w600,
),
),
),
),
Flexible(
flex: 3,
child: Column(
mainAxisAlignment: MainAxisAlignment.center,
children: [
Center(
child: IconButton(
iconSize: 120,
color: Theme.of(context).cardColor,
onPressed: isRunning ? onPausePressed : onStartPressed,
icon: Icon(isRunning
? Icons.pause_circle_outlined
: Icons.play_circle_outline_outlined),
),
),
Center(
child: IconButton(
iconSize: 80,
color: Theme.of(context).cardColor,
onPressed: onRestartPressed,
icon: const Icon(Icons.restart_alt)),
),
],
),
),
Flexible(
flex: 1,
child: Row(
children: [
Expanded(
child: Container(
decoration: BoxDecoration(
color: Theme.of(context).cardColor,
borderRadius: BorderRadius.circular(50),
),
child: Column(
mainAxisAlignment: MainAxisAlignment.center,
children: [
Text(
'Pomodoros',
style: TextStyle(
fontSize: 20,
fontWeight: FontWeight.w600,
color:
Theme.of(context).textTheme.displayLarge!.color,
),
),
Text(
'$totalPomodoros',
style: TextStyle(
fontSize: 58,
fontWeight: FontWeight.w600,
color:
Theme.of(context).textTheme.displayLarge!.color,
),
),
],
),
),
),
],
),
),
],
),
);
}
}나는 먼저 가운데 IconButton 밑에 또 하나의 IconButton을 넣고 두 버튼들을 가운데로 정렬해주기 위해서 원래 있던 Center 위젯을 Column으로 묶고 children 속성을 사용하여 두개의 Center 위젯(아이콘 버튼을 포함한)을 만들었다. 그렇게 하면 중앙에 위치하지 않고 가운데 위 쪽에 버튼이 배치되어서 mainAxisAlignment: MainAxisAlignment.center로 이를 중앙으로 다시 배치할 수 있었다. 그리고 새 버튼을 만들 때, 새로운 함수 onRestartPressed를 만들어 적용해주었다. onRestartPressed는 정말 간단하게 setState((){totalSeconds = twentyFiveMinutes;});처럼 작성하였다.
실행화면