
이 글은 노마드 코더 - Flutter 로 웹툰 앱 만들기를 참고하여 작성하였습니다.
작성자 : 조미서
개발 환경 : Mac OS, Android Studio, Visual Studio Code
🧑🏻💻#3 UI CHALLENGE
#3.0 Header
먼저 우리가 만들 UI에는 appBar가 존재하지 않기 때문에 appBar 속성을 지움
(appBar는 required가 아니므로 속성을 지우더라도 오류가 나지 않음)
Scaffold 위젯에 사용할 수 있는 속성 중 backgroundColor를 사용하여 배경색을 바꾼다.
backgroundColor는 type으로 Color를 가진다
backgroundColor: Colors.red(색상).shade900(색조) //색상과 색조를 조절 가능
custom 색상을 사용하고 싶을 때는 Colors.red 부분을 지우고 Color() 안에 hex 값(0xFF353535)을 넣어주면 된다.
또한 다른 방법으로 Color.fromARGB()를 사용할 수도 있다.
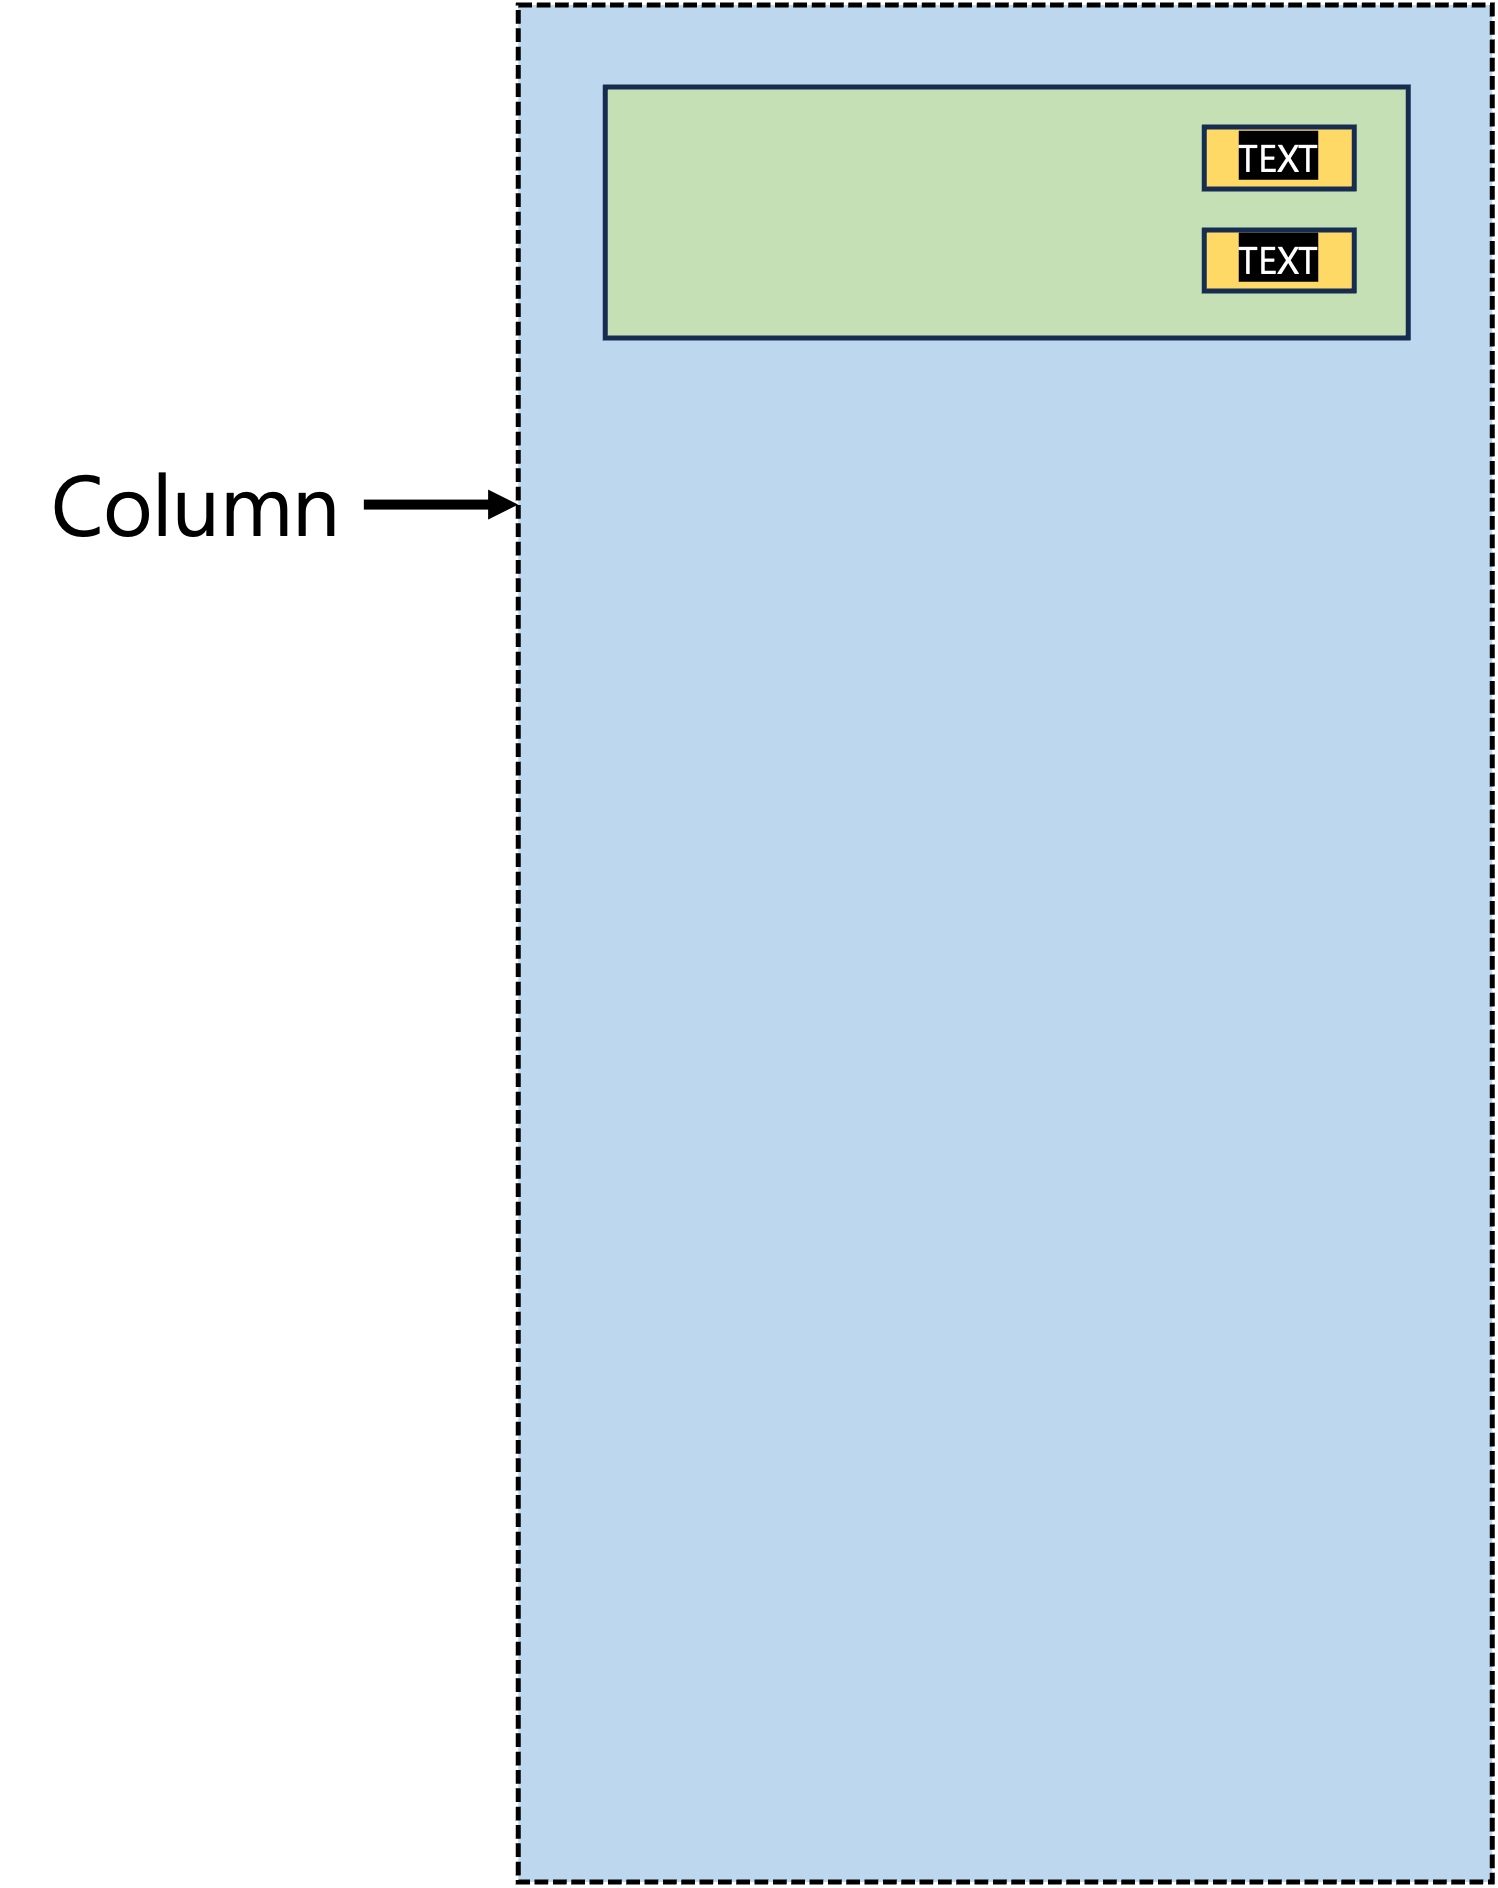
Scaffold의 body 속성 중 Column을 사용하여 세로 방향으로 여러 위젯을 나란히 배치하는 컨테이너를 만든다.
Column은 하나의 child만을 가지지 않고 children이라는 List를 가진다
Column(children: <Widget>[ ])
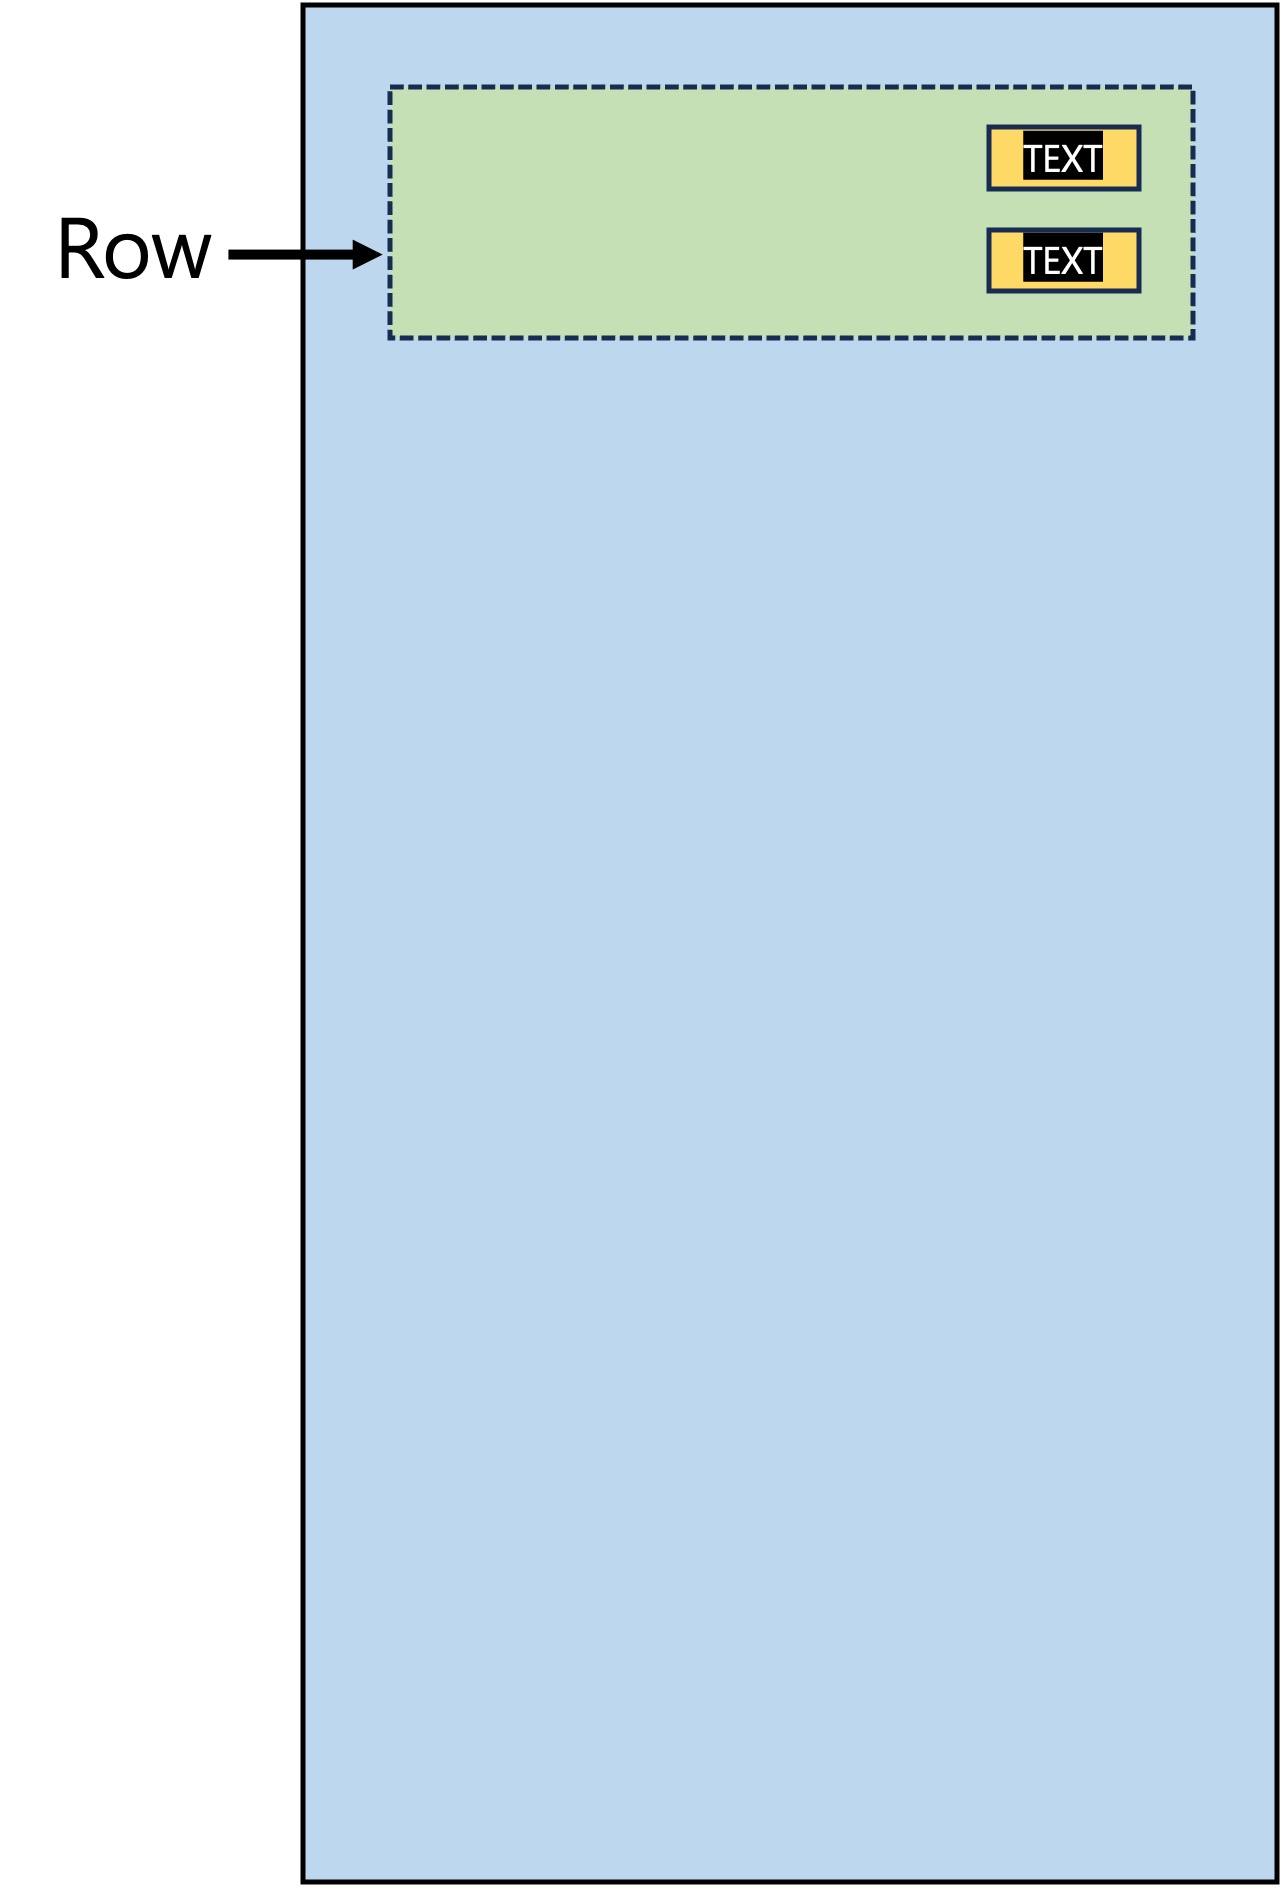
Scaffold의 body 속성 중 Row를 사용하여 가로 방향으로 여러 위젯을 나란히 배치하는 컨테이너를 만든다. (Column 안에 Row 위젯을 넣을 것이다)
Row는 하나의 child만을 가지지 않고 children이라는 List를 가진다
Column(children: <Widget>[ ])
Row와 Column의 사용이 어떻게 되는지 시각화해보면, 만약 우리가 이러한 상태의 UI를 만들 것이라고 가정하자
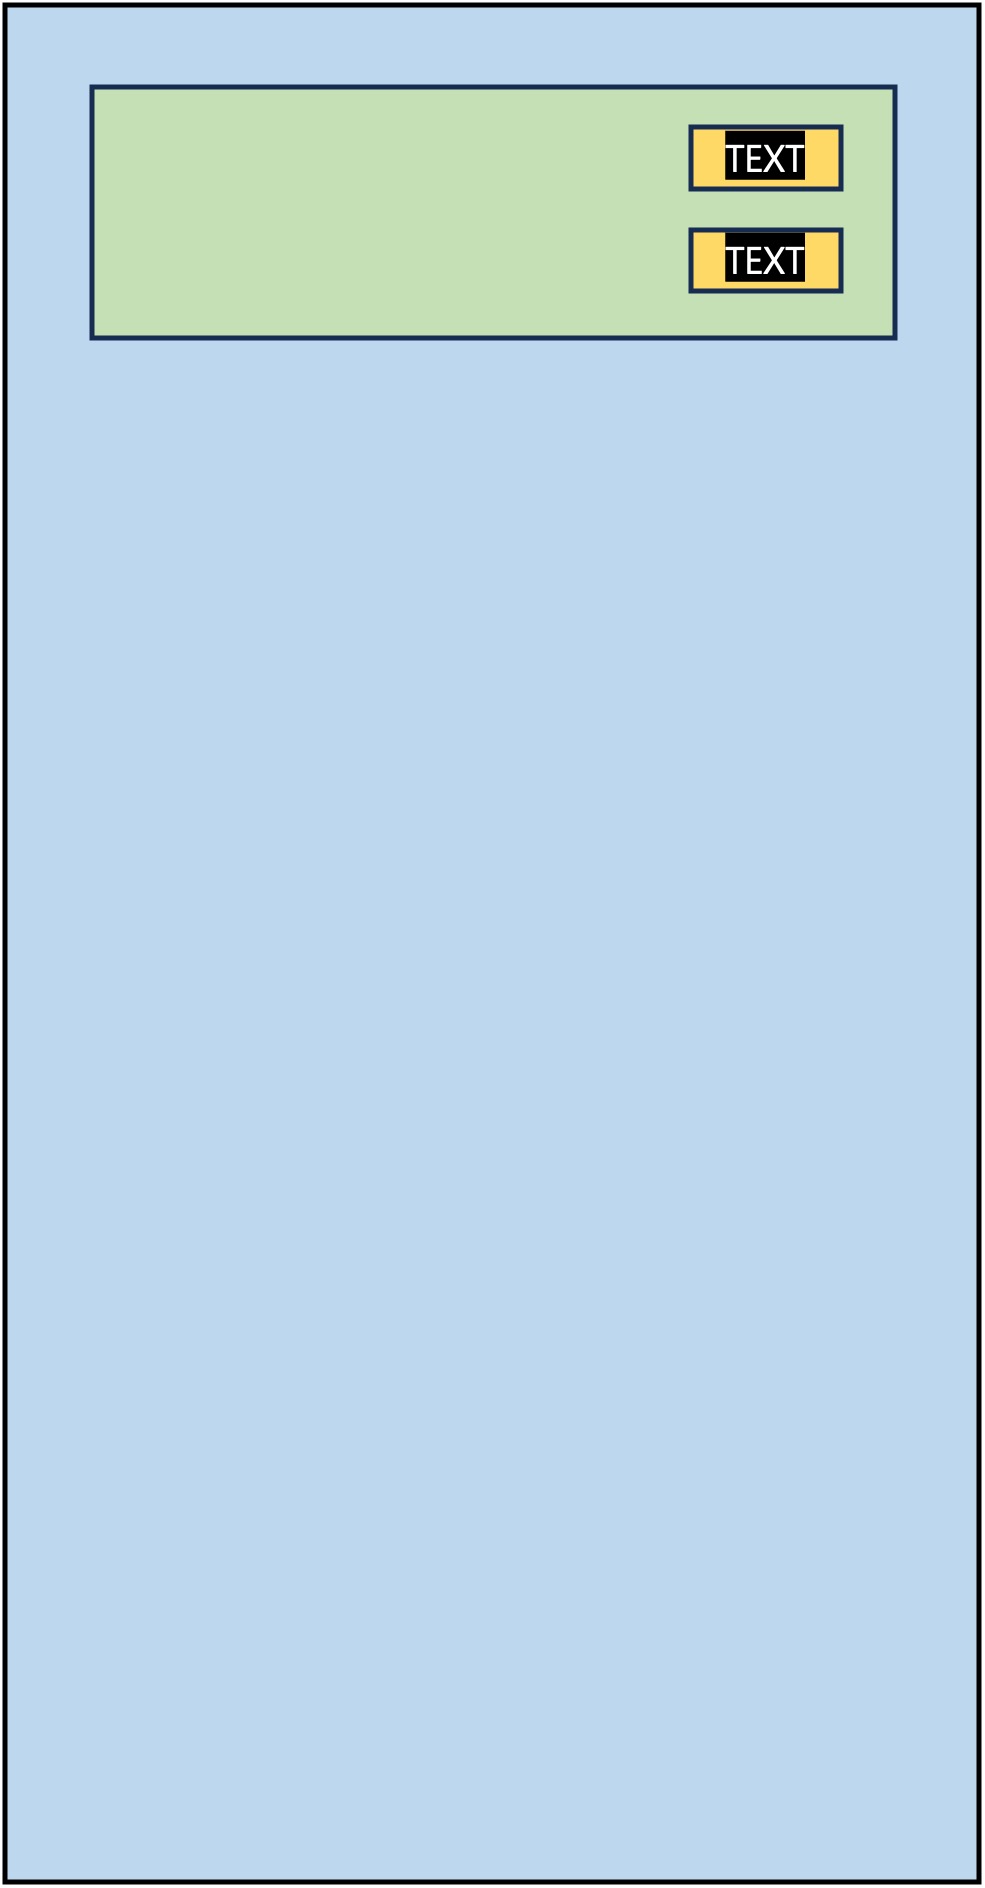
여기에서 전체 세로로 큰 컨테이너는 Column이 된다.
다음으로 내부 위쪽에 가로로 되어있는 컨테이너는 Row가 된다.
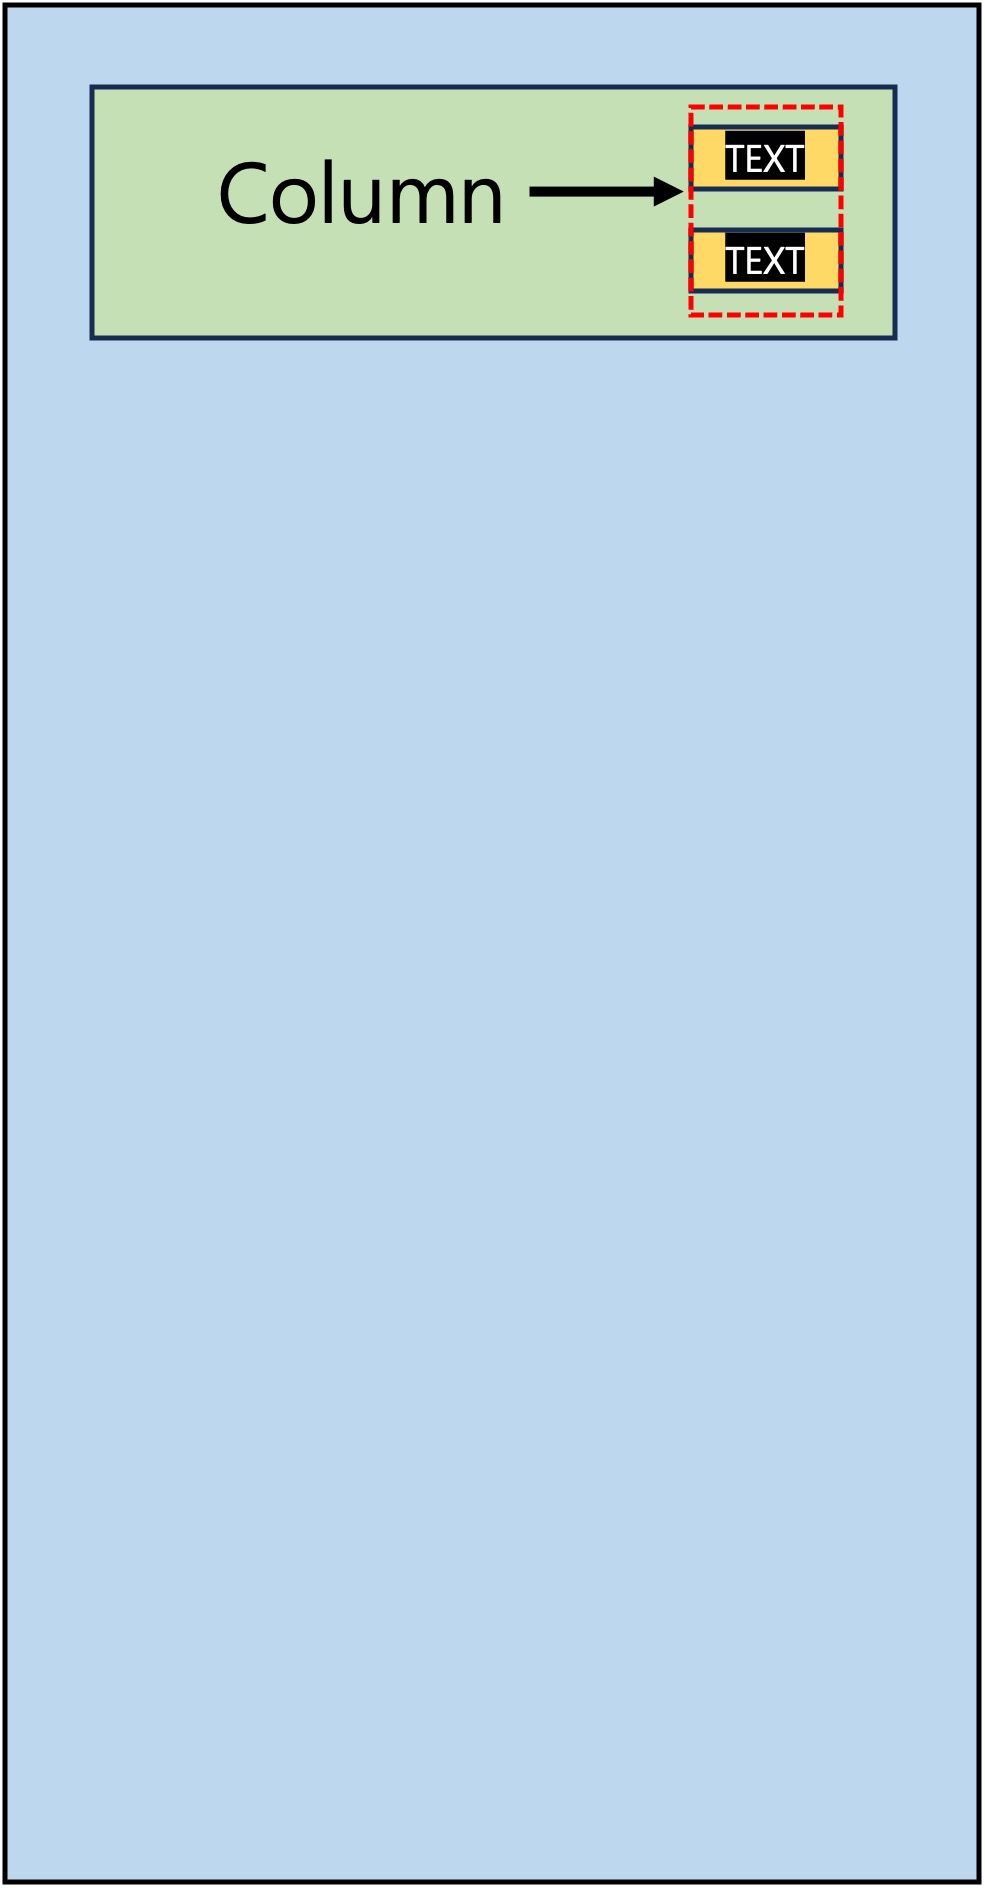
다음으로는 Text 부분이 두 개 나란히 되어있는 모습을 볼 수 있다.
여기에서 주의할 점은 두 Text 부분은 가로 컨테이너이지만 세로로 나란히 위치한 것을 볼 수 있다.
그러므로 여기에서 보이지 않는 Column이 또 존재한다는 점을 알아야 한다.
Text 두 개를 갖는 Column 위젯
이와 같은 UI의 코드를 작성한다고 하면 (색상과 위치 일단 무시)
class App extends StatelessWidget {
Widget build(BuildContext context) {
return MaterialApp(
home: Scaffold(
backgroundColor: Colors.blue.shade200,
body: Column(
children: [
Row(
children: [
Column(
children: [
Text("text"),
Text("text")
],),
],),
],),
),
);
}
}위 코드와 같이 나타날 것이다.
다음으로 Text 위젯에 사용할 수 있는 속성 중 style을 사용하여 텍스트의 색상, 크기, 폰트 등을 설정할 수 있다.
style은 type으로 TextStyle을 가진다.
style: TextStyle(fontSize: ~, color: Colors.blue)
TextStyle의 주요 속성
- fontSize : 텍스트 크기 지정
- color : 텍스트 색상 지정
- fontWeight : 텍스트 굵기 지정 (type가 FontWeight임)
그냥 빈 공간은 SizedBox를 통하여 공간을 만들어 낼 수 있다.
SizedBox는 width, height, child 등의 속성을 가지고 있다.
SizedBox(width: 100, height: 50)
Row의 속성 중 하나인 mainAxisAlignment를 사용하여 주 방향(main axis)으로 정렬할 때 사용하는 속성이다.
이와 비슷하게 crossAxisAlignment를 사용하여 자식 위젯들을 교차하는 방향(cross axis)으로 정렬할 때 사용하는 속성도 있다.
mainAxisAlignment는 type으로 MainAxisAlignment를 가진다.
mainAxisAlignment: MainAxisAlignment.end(옵션)
Color가 가지는 속성 중 withOpacity라는 메서드가 있다. 이는 색상의 투명도를 조절하는 데 사용한다.
color : Colors.white.withOpacity(0.8)
Padding 위젯은 자식 위젯 주의에 여백(공간)을 추가할 때 사용한다.
Padding은 type으로 EdgeInsetsGeometry를 가진다.
padding은 EdgeInsets 객체와 하나의 자식 위젯이 있어야 된다는 조건에 충족해야 한다.
Padding(padding: EdgeInsets.all(16), child: Text('Hello, World!'),)
EdgeInsets의 옵션
- EdgeInsets.all(value): 모든 방향에 동일한 값을 적용한다.
- EdgeInsets.only({left, top, right, bottom}): 지정된 방향에만 값을 적용한다.
- EdgeInsets.symmetric({vertical, horizontal}): 상하 또는 좌우 방향으로만 값을 적용한다.
- EdgeInsets.fromLTRB(left, top, right, bottom): 좌측, 상단, 우측, 하단의 값을 각각 설정한다.
#3.1 Developer Tools
Layout이 헷갈릴 경우
 이 개발자 도구(Widget Inspector)를 사용하여 앱이 어떻게 구성되어 있는지를 확인하기 편리하다.
Widget Tree를 탐색할 수 있고, 다른 정렬을 미리 보기 할 수도 있고, 수정 후 어떻게 보이는 지도 확인이 가능하다.
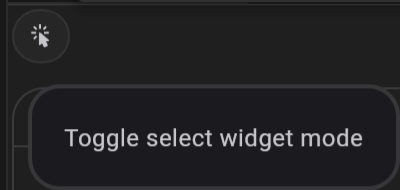
이 모드를 활성화한 후 시뮬레이터로 가면 Widget을 선택하는 게 가능하다.
한쪽에서는 이것들의 수치와 크기를 보고, 정렬을 수정할 수도 있다. (Layout Explorer 탭)
또한 Widget Details Tree 탭은 적용된 모든 속성들을 볼 수 있다.

이 기능은 모든 것의 가이드라인을 보여주도록 한다.
#3.2 Buttons Section
Container는 child를 가지고 다양한 속성과 스타일을 가진 박스 모양의 위젯이다.
Container가 갖는 속성
- color: 컨테이너의 배경색을 지정합니다.
- child: 컨테이너 안에 포함될 자식 위젯을 설정한다.
- width: 컨테이너의 너비를 지정한다.
- height: 컨테이너의 높이를 지정한다.
- padding: 컨테이너 안에 있는 자식 위젯과 컨테이너 경계 사이의 여백을 지정한다.
- margin: 컨테이너와 주변 요소 사이의 여백을 지정한다.
- alignment: 컨테이너 안에 있는 자식 위젯의 정렬을 지정한다.
- decoration: 컨테이너의 장식을 추가합니다. 예를 들어, 그림자나 테두리를 추가할 수 있다. (BoxDecoration Widget 필요)
BoxDecoration 안에 borderRadius라는 옵션을 사용하여 컨테이너의 모서리를 둥글게 만들어줄 수 있다.
borderRaduis: BorderRaduis.all(Radius.circular(10.0))
#3.3 VSCode Settings
코드의 파란 줄들을 없애는 방법을 알아보자
먼저 경고 문구를 보게 되면
Prefer const with constant constructors.
라고 되어있는데 이는 수정하지 않을 것들(ex. 배경색)과 compile 전에 그 value를 이미 아는 것들 앞에 const를 붙여 파란 줄을 없앨 수 있다.
그렇지만 문제는 어떤 것은 상수가 될 수 있고, 어떤 건 될 수 없는지 기억하기가 쉽지 않고 실수할 수 있다.
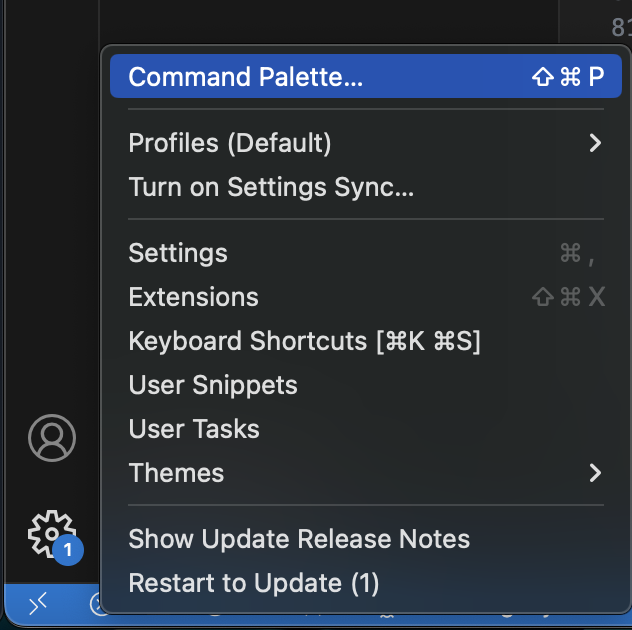
이때 vscode 왼쪽 하단에 톱니바퀴 모양을 눌러 Command Palette를 열어준다.
입력 창에 open user settings 입력
-> settings.json 파일을 열게 된다.
json 파일에
"editor.codeActionsOnSave": {
        "source.fixAll": true
    },
위와 같은 코드를 입력 후 파일을 저장하고 다시 main 코드로 돌아오게 된다면 파란 줄이 모두 사라지는 것을 볼 수 있다.
또한 json 파일에
"dart.previewFlutterUiGuides": true,를 추가하고 vscode를 다시 실행하면 자신의 부모가 무엇인지 알려주는 가이드 라인이 생기게 된다.
#3.4 Code Actions
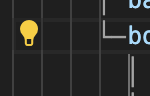
이 전구 모양의 기능은 클릭할 시 일종의 리팩토링 actions인 Code Actions을 보여준다.
code action의 종류는 아주 다양한데 위젯을 내보내는 action과 자주 쓰이는 것은 Wrap with~~과 Move widget down, up 그리고 Remove this widget 등이 있다.
이 code action을 여는 단축키는 command + .이다.
#3.5 Reusable Widgets
시작하기 전
settings.json 파일에서
"editor.formatOnSave": true, // 저장할 때마다 코드를 포맷하고 정렬함확인하기 없으면 추가!!
또한 extension에서 Error Lens 설치 (Error가 실제로 어떤 곳에 왜 났는지 더 빠르고 한눈에 알 수 있음)
* 재사용할 수 있는 별도의 위젯으로 추출하는 방법
- 먼저 재사용할 위젯을 선택하여 code action 클릭
- Extract Widget 선택
- 내보낼 위젯의 이름을 설정하기
* 직접 재사용할 위젯을 추출하는 방법
- lib에서 새 폴더를 만든다. (widgets)
- 폴더 안에 새 파일을 만든다. (button.dart)
- Stateless 위젯을 만든다.
class Button extends StatelessWidget{
Widget build(BuildContext context) {
// TODO: implement build
throw UnimplementedError();
}
}- build 위젯 내부에 다시 사용할 위젯 부분을 가져와 return 한다.
- 버튼이 가지는 프로퍼티들을 설정한다.
final String text;
final Color bgColor;
final Color textColor;- 이러한 프로퍼티들을 설정할 때는 항상 생성자 함수 (constructors)를 만들어 주어야 한다.
Button({required this.text,
	required this.bgColor,
	required this.textColor
});- 하드코딩된 값(설정해놓은 값)들을 클래스 프로퍼티 값으로 바꾸어준다.
- 이때 오류가 생긴다면 부모 위젯에 const가 들어가서 이제 고정된 값이 아니기에 const를 지워주면 오류가 사라진다.
- main.dart에서 원래 다 작성했던 하나의 Container를 지운다.
- 그리고 만들었던 Button을 사용한다.
Button(
	text: 'Transfer',
    bgColor: Color(0xFFF1B33B),
   	textColor: Colors.black),
    Button(
    	text: 'Request',
        bgColor: Color(0xFF1F2123),
        textColor: Colors.white),
위와 같은 방식으로 길었던 Container의 코드들을 클래스를 직접 만들어 위젯을 추출할 수 있다.
Button.dart 파일 코드
import 'package:flutter/material.dart';
class Button extends StatelessWidget {
final String text;
final Color bgColor;
final Color textColor;
const Button(
{super.key,
required this.text,
required this.bgColor,
required this.textColor});
Widget build(BuildContext context) {
return Container(
decoration: BoxDecoration(
color: bgColor,
borderRadius: BorderRadius.circular(45),
),
child: Padding(
padding: const EdgeInsets.symmetric(
vertical: 20,
horizontal: 50,
),
child: Text(
text,
style: TextStyle(
color: textColor,
fontSize: 20,
),
),
),
);
}
}#3.6 Cards
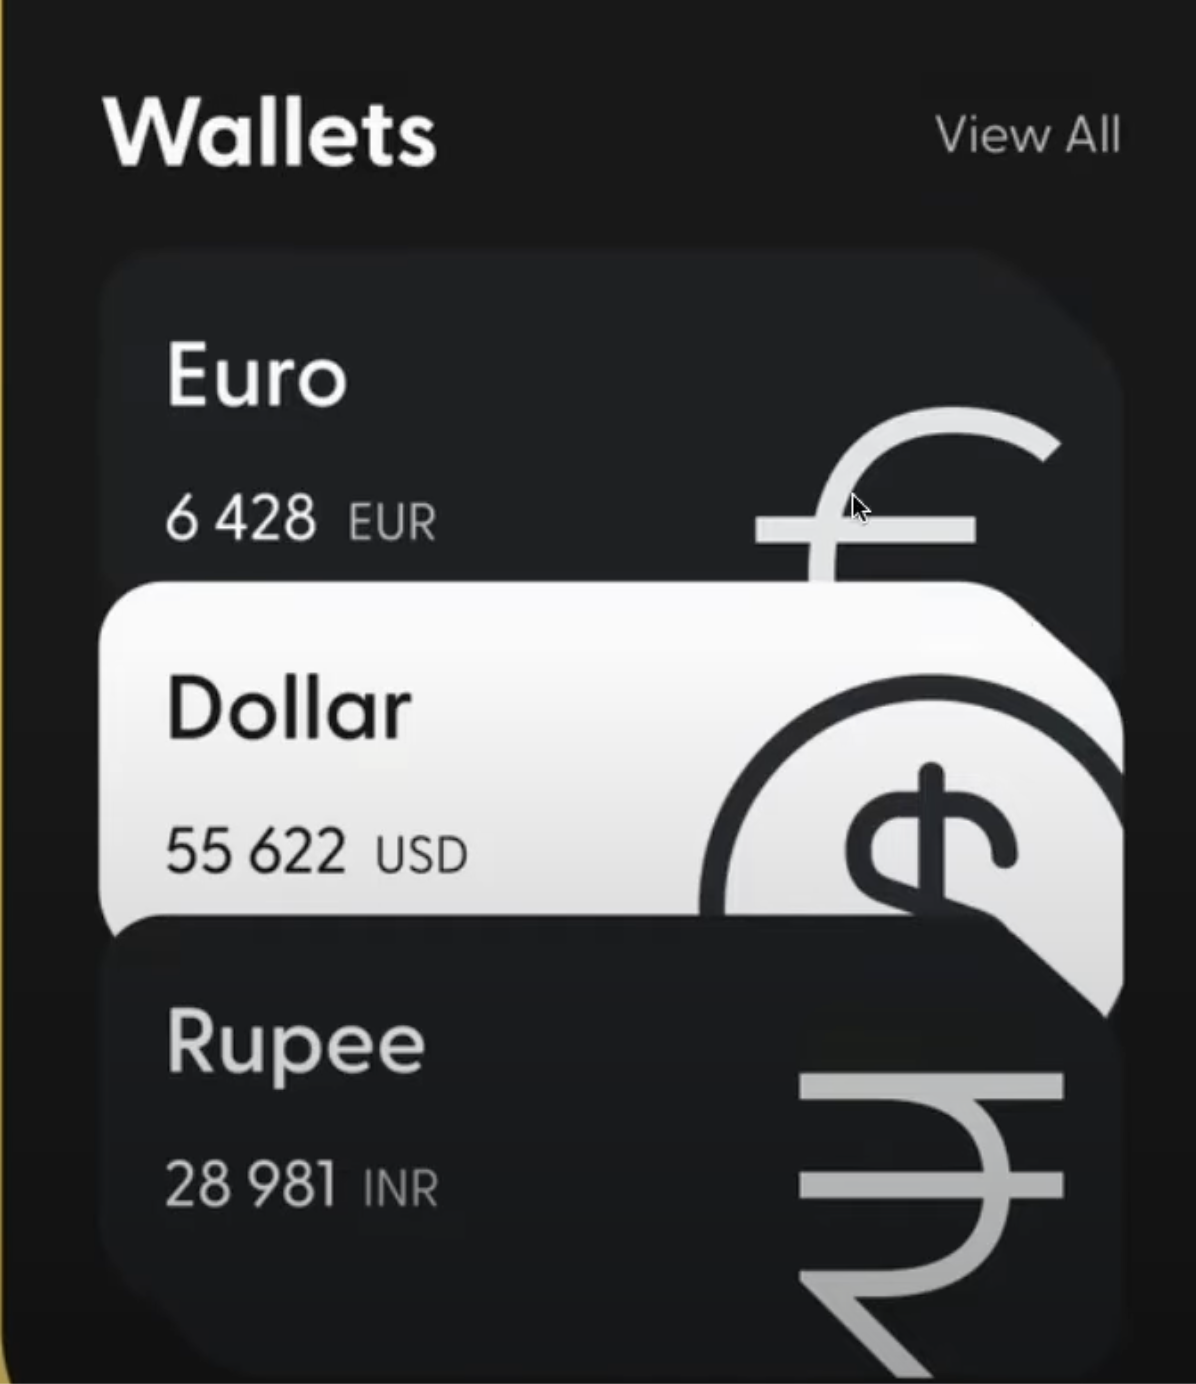
이번에는 Wallets와 View All 부분, 그리고 밑에 아이콘이 있는 환율 카드를 만들어 볼 것이다.
이 부분까지 작성하여

코드는
              const SizedBox(
                height: 100,
              ),
              Row(
                crossAxisAlignment: CrossAxisAlignment.end,
                mainAxisAlignment: MainAxisAlignment.spaceBetween,
                children: [
                  const Text(
                    'Wallets',
                    style: TextStyle(
                      color: Colors.white,
                      fontSize: 36,
                      fontWeight: FontWeight.w600,
                    ),
                  ),
                  Text(
                    'View All',
                    style: TextStyle(
                      color: Colors.white.withOpacity(0.8),
                      fontSize: 18,
                    ),
                  ),
                ],
              ),
              const SizedBox(
                height: 20,
              ),
              Container(
                decoration: BoxDecoration(
                  color: const Color(0xFF1F2123),
                  borderRadius: BorderRadius.circular(25),
                ),
                child: Padding(
                  padding: const EdgeInsets.all(30),
                  child: Row(
                    children: [
                      Column(
                        crossAxisAlignment: CrossAxisAlignment.start,
                        children: [
                          const Text(
                            'Euro',
                            style: TextStyle(
                              color: Colors.white,
                              fontSize: 32,
                              fontWeight: FontWeight.w600,
                            ),
                          ),
                          const SizedBox(
                            height: 10,
                          ),
                          Row(
                            children: [
                              const Text(
                                '6 428',
                                style: TextStyle(
                                  color: Colors.white,
                                  fontSize: 20,
                                ),
                              ),
                              const SizedBox(width: 5),
                              Text(
                                'EUR',
                                style: TextStyle(
                                  color: Colors.white.withOpacity(0.8),
                                ),
                              ),
                            ],
                          )
                        ],
                      ),
                    ],
                  ),
                ),
              ),
위처럼 작성된다.
#3.7 Icons and Transforms
Icon 위젯은 아이콘을 만들기 위해 사용된다.
Icon 갖는 속성
- IconData: 표시할 아이콘의 데이터를 설정한다. (Icons.star)
- color: 아이콘의 색상을 지정한다.
- size: 아이콘의 크기를 지정한다.
- semanticLabel: 아이콘의 시각적 설명을 지정한다. (접근성을 위한 정보로 사용)
- textDirection: 아이콘의 텍스트 방향을 지정한다.
아이콘을 overflow 시키는 방법
- 아이콘 위젯을 TransformationWidget을 사용
- Transform.scale() 내부에 child로 아이콘 위젯을 넣어준다.
- 또한 내부에 scale도 값을 지정하여 넣어준다.
아이콘의 크기만 변경하면 아이콘 주위에 모든 것들도 동시에 커지게 되지만 위와 같은 방법을 사용하면 그럴 일 없이 아이콘의 크기만 변경된다.
Transform.translate()는 위젯을 주어진 양만큼 이동시키는데 사용된다.
offset 속성을 required로 갖는다
Transform.translate(
offset: Offset(10.0, 10.0), // x와 y 축으로 이동할 양을 설정
child: // 이동될 자식 위젯
)
clipBehavior는 어떤 아이템이 overflow가 되었을 때 나머지 부분을 어떻게 처리할지 설정할 수 있다.
Clip 클래스 중 Clip.hardEdge는 overflow된 나머지 부분을 사라지게 만든다.
#3.8 Reusable Cards
재사용할 수 있는 카드 위젯을 만들어보자!
- 만들어 두었던 widgets 폴더 안에 파일을 만든다. (currency_card.dart)
- Stateless 위젯 만들고 build 메서드 작성
- main.dart로 돌아와 원하는 위젯 복사
- build 메서드 내부에 return + 위젯 붙여넣기
- 커스터마이징 할 수 있는 프로퍼티를 생각 후 작성 (ex. 통화 이름, 통화 코드, 통화량, 통화 아이콘)
- 작성한 프로퍼티 final 필드에 대한 생성자 만들기
- 하드코딩된 값(설정해놓은 값)들을 클래스 프로퍼티 값으로 바꾸어준다. (이때 오류가 생긴다면 부모 위젯에 const가 들어가서 이제 고정된 값이 아니기에 const를 지워주면 오류가 사라진다.)
- main.dart에서 만들었던 currency_card위젯을 사용한다.
isInverted속성은 위젯의 변환을 반전 시키는 데 사용한다.
SingleChildScrollView는 화면을 스크롤링 할 수 있게 하는데 사용한다.
currency_card.dart 파일 코드
import 'package:flutter/material.dart';
class CurrencyCard extends StatelessWidget {
final String name, code, amount;
final IconData icon;
final bool isInverted;
final _blackColor = const Color(0xFF1F2123);
const CurrencyCard({
super.key,
required this.name,
required this.code,
required this.amount,
required this.icon,
required this.isInverted,
});
Widget build(BuildContext context) {
return Container(
clipBehavior: Clip.hardEdge,
decoration: BoxDecoration(
color: isInverted ? Colors.white : _blackColor,
borderRadius: BorderRadius.circular(25),
),
child: Padding(
padding: const EdgeInsets.all(30),
child: Row(
mainAxisAlignment: MainAxisAlignment.spaceBetween,
children: [
Column(
crossAxisAlignment: CrossAxisAlignment.start,
children: [
Text(
name,
style: TextStyle(
color: isInverted ? _blackColor : Colors.white,
fontSize: 32,
fontWeight: FontWeight.w600,
),
),
const SizedBox(
height: 10,
),
Row(
children: [
Text(
amount,
style: TextStyle(
color: isInverted ? _blackColor : Colors.white,
fontSize: 20,
),
),
const SizedBox(width: 5),
Text(
code,
style: TextStyle(
color: isInverted
? _blackColor
: Colors.white.withOpacity(0.8),
),
),
],
)
],
),
Transform.scale(
scale: 2.2,
child: Transform.translate(
offset: const Offset(-5, 12),
child: Icon(
icon,
color: isInverted ? _blackColor : Colors.white,
size: 88,
),
),
),
],
),
),
);
}
}#3.9 Code Challenge
Transform.translate를 currency_cart.dart에 넣고, offset에서도 -20, -40과 같이 값을 집어넣을 수 있도록 한다.
또는 order라는 새로운 프로퍼티를 만들어서 만약 order가 1일 경우, offset은 아무 것도 없게 된다. order가 2라면 offset은 -20이 되고, order가 3이라면 offset은 -40이 되는 방식으로 구현한다.
그렇다면 currency_card.dart와 main.dart 파일을 수정하면 된다.
currency_card.dart 파일 코드
import 'package:flutter/material.dart';
class CurrencyCard extends StatelessWidget {
final String name, code, amount;
final IconData icon;
final bool isInverted;
final double order; // order 프로퍼티 추가
final _blackColor = const Color(0xFF1F2123);
const CurrencyCard({
super.key,
required this.name,
required this.code,
required this.amount,
required this.icon,
required this.isInverted,
required this.order, // 생성자에도 추가
});
Widget build(BuildContext context) {
return Transform.translate(
offset: order == 1 ? const Offset(0, 0) : Offset(0, (order - 1) * -20),
// order가 1일 경우에는 (0,0)이동, 그 외는 order가 2일 경우는 (0, -20), order가 3일 경우는 (0,-40)으로 이동
child: Container(
clipBehavior: Clip.hardEdge,
decoration: BoxDecoration(
color: isInverted ? Colors.white : _blackColor,
borderRadius: BorderRadius.circular(25),
),
child: Padding(
padding: const EdgeInsets.all(30),
child: Row(
mainAxisAlignment: MainAxisAlignment.spaceBetween,
children: [
Column(
crossAxisAlignment: CrossAxisAlignment.start,
children: [
Text(
name,
style: TextStyle(
color: isInverted ? _blackColor : Colors.white,
fontSize: 32,
fontWeight: FontWeight.w600,
),
),
const SizedBox(
height: 10,
),
Row(
children: [
Text(
amount,
style: TextStyle(
color: isInverted ? _blackColor : Colors.white,
fontSize: 20,
),
),
const SizedBox(width: 5),
Text(
code,
style: TextStyle(
color: isInverted
? _blackColor
: Colors.white.withOpacity(0.8),
),
),
],
)
],
),
Transform.scale(
scale: 2.2,
child: Transform.translate(
offset: const Offset(-5, 12),
child: Icon(
icon,
color: isInverted ? _blackColor : Colors.white,
size: 88,
),
),
),
],
),
),
),
);
}
}main.dart 파일 코드
import 'package:flutter/material.dart';
import 'package:toonflix/widgets/Button.dart';
import 'package:toonflix/widgets/currency_card.dart';
void main() {
runApp(const App());
}
class App extends StatelessWidget {
const App({super.key});
Widget build(BuildContext context) {
return MaterialApp(
home: Scaffold(
backgroundColor: const Color(0xFF181818),
body: SingleChildScrollView(
child: Padding(
padding: const EdgeInsets.symmetric(horizontal: 20),
child: Column(
crossAxisAlignment: CrossAxisAlignment.start,
children: [
const SizedBox(
height: 80,
),
Row(
mainAxisAlignment: MainAxisAlignment.end,
children: [
Column(
crossAxisAlignment: CrossAxisAlignment.end,
children: [
const Text(
'Hey, Selena',
style: TextStyle(
color: Colors.white,
fontSize: 28,
fontWeight: FontWeight.w800,
),
),
Text(
'Welcome back',
style: TextStyle(
color: Colors.white.withOpacity(0.8),
fontSize: 18),
),
],
)
],
),
const SizedBox(
height: 70,
),
Text('Total Balance',
style: TextStyle(
fontSize: 22,
color: Colors.white.withOpacity(0.8),
)),
const SizedBox(
height: 5,
),
Text('\$5 194 482',
style: TextStyle(
fontSize: 48,
fontWeight: FontWeight.w600,
color: Colors.white.withOpacity(0.8),
)),
const SizedBox(
height: 30,
),
const Row(
mainAxisAlignment: MainAxisAlignment.spaceBetween,
children: [
Button(
text: 'Transfer',
bgColor: Color(0xFFF1B33B),
textColor: Colors.black),
Button(
text: 'Request',
bgColor: Color(0xFF1F2123),
textColor: Colors.white),
],
),
const SizedBox(
height: 100,
),
Row(
crossAxisAlignment: CrossAxisAlignment.end,
mainAxisAlignment: MainAxisAlignment.spaceBetween,
children: [
const Text(
'Wallets',
style: TextStyle(
color: Colors.white,
fontSize: 36,
fontWeight: FontWeight.w600,
),
),
Text(
'View All',
style: TextStyle(
color: Colors.white.withOpacity(0.8),
fontSize: 18,
),
),
],
),
const SizedBox(
height: 20,
),
const CurrencyCard(
name: 'Euro',
code: 'EUR',
amount: '6 428',
icon: Icons.euro_rounded,
isInverted: false,
order: 1,
// order 프로퍼티 값 넣어주기
),
const CurrencyCard(
name: 'Bitcoin',
code: 'BTC',
amount: '9 785',
icon: Icons.currency_bitcoin,
isInverted: true,
order: 2,
// order 프로퍼티 값 넣어주기
),
const CurrencyCard(
name: 'Dollar',
code: 'USD',
amount: '428',
icon: Icons.attach_money_outlined,
isInverted: false,
order: 3,
// order 프로퍼티 값 넣어주기
),
],
),
),
),
),
);
}
}이렇게 하면 최종적으로
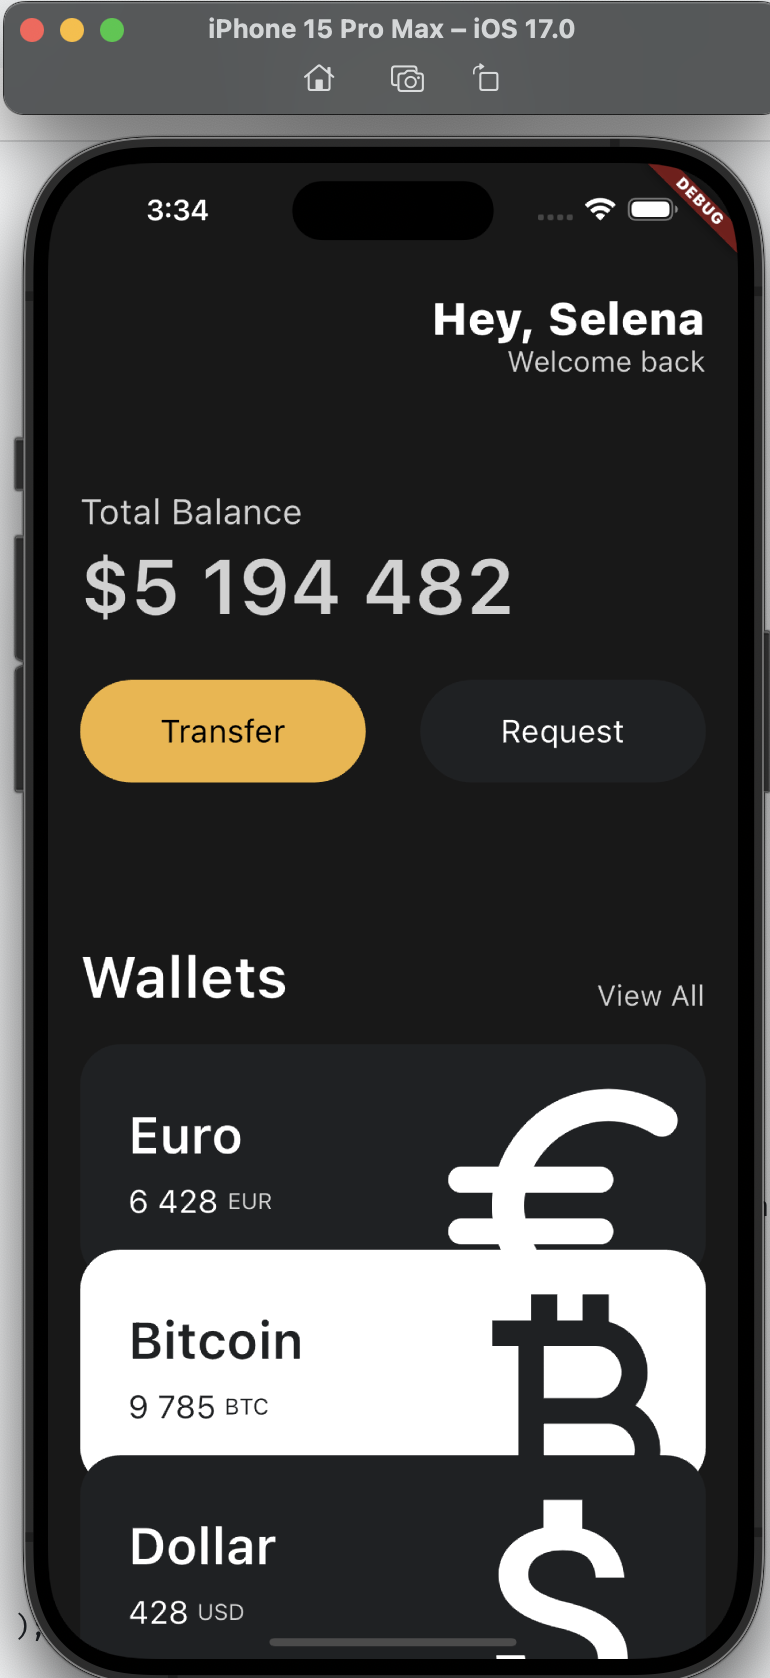
이러한 UI를 구현할 수 있다!