
🛠️ 라이브러리 설치하기
npm install --save @react-native-firebase/appcd ios
pod installFirebase 프로젝트 생성하기
파이어베이스에서 로그인한 후 프로젝트 추가를 클릭한다.

프로젝트 이름을 적고 계속을 클릭한다.

(* 구글 애널리틱스를 사용하지 않으면 토글 버튼을 클릭해준다!)

안드로이드 또는 iOS 앱을 연동하려면 위 버튼들을 클릭하면 된다.
iOS 앱 연동하기
1. 앱 등록
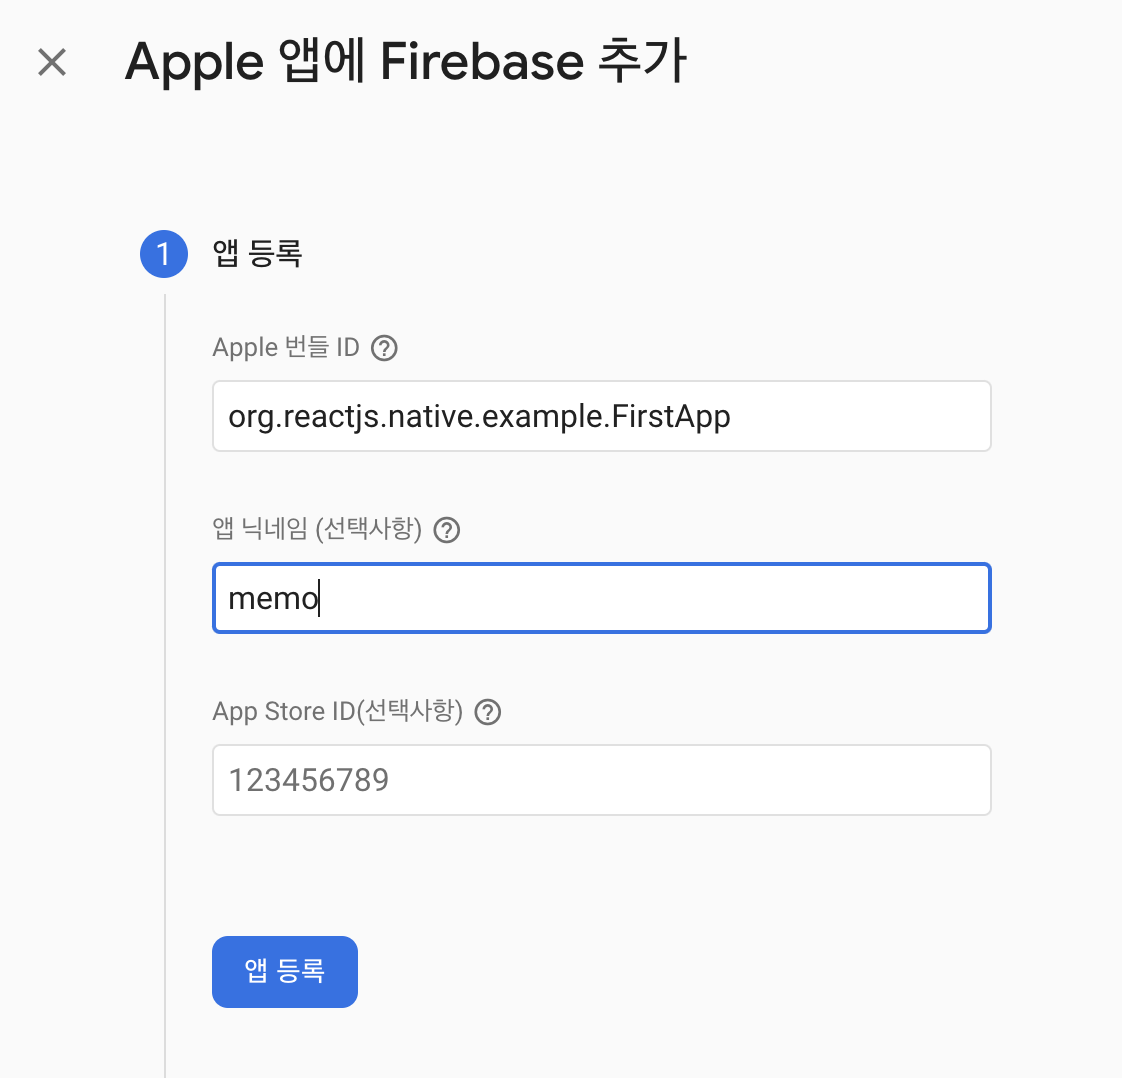
Apple 번들 ID는 xcode로 프로젝트를 열고 Bundle identifier에서 가져온다.

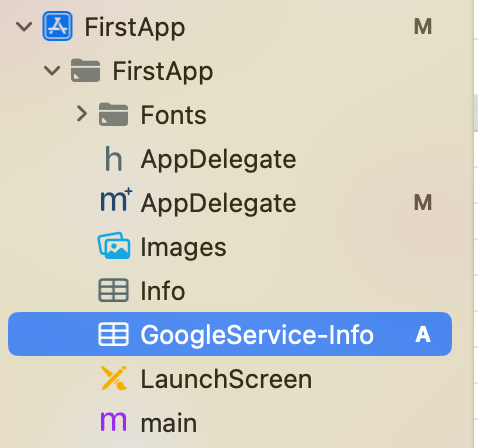
2. 구성 파일 다운로드하기

GoogleService-info.plist를 다운로드하고 info.plist과 같은 경로에 파일을 이동한다.
❗️xcode로 프로젝트를 열고 프로젝트에 Add Files to ...를 통해서 파일을 추가해줘야한다.
3. Firebase SDK 추가하기
CocoaPods를 통해서 추가해주기 위해서 CocoaPods를 클릭하고 아래 명령어를 입력한다.

ios/Podfile파일에 아래 코드를 추가해준다.
$RNFirebaseAsStaticFramework = true

config = use_native_modules!

  pod 'FirebaseAuth'
  pod 'FirebaseFirestore'

  use_frameworks! :linkage => :static
잊지말고 pod install 실행해주기!
pod install
pod install후 아래와 같은 에러가 발생할 수 있다.
이럴땐ios/Podfile파일에 아래 코드를 추가해준다!pod 'GoogleUtilities', :modular_headers => true

최종적으로 다음과 같이 작성하면 된다.
$RNFirebaseAsStaticFramework = true

  config = use_native_modules!
  pod 'GoogleUtilities', :modular_headers => true
  pod 'FirebaseAuth'
  pod 'FirebaseFirestore'
  use_frameworks! :linkage => :static
4. 초기화 코드 추가

AppDelegate.mm에 다음과 같이 코드를 추가해준다.
#import <Firebase.h> // 추가

- (BOOL)application:(UIApplication *)application didFinishLaunchingWithOptions:(NSDictionary *)launchOptions
{

    // 추가 - 상단에 작성 필요!
    [FIRApp configure];

    // 앱 실행 코드

  return YES;
}
Linking & Rebuilding
pod update
pod repo update
연동하는 과정에서 발생한 에러
1. 'FlipperKit/FlipperClient.h' file not found
ios/Podfile에서flipper_configuration으로 시작하는 부분 주석처리해준다. (주석에도 나와있듯이use_frameworks!를 사용하기 때문에Flipper작동하지 않는다. )use_react_native!( :path => config[:reactNativePath], # Hermes is now enabled by default. Disable by setting this flag to false. :hermes_enabled => flags[:hermes_enabled], :fabric_enabled => flags[:fabric_enabled], # Enables Flipper. # # Note that if you have use_frameworks! enabled, Flipper will not work and # you should disable the next line. # :flipper_configuration => flipper_config, 📌이 부분 주석처리하기 # An absolute path to your application root. :app_path => "#{Pod::Config.instance.installation_root}/.." )2. 초기화 관련 에러
No Firebase App '[DEFAULT]' has been created - call Firebase.initializeApp() in Flutter and Firebase
AppDelegate.mm에 다음과 같이 코드를 추가해준다. 제일 중요한 부분! 초기화하는 아래 코드가 다른 앱실행 코드보다 상단에 위치해야한다. (공식문서대로 작성했는데 계속해서 위와 같은 에러가 발생해서 초기화 코드를 상단으로 수정했더니 에러가 해결됐다..!)#import <Firebase.h> // 추가 - (BOOL)application:(UIApplication *)application didFinishLaunchingWithOptions:(NSDictionary *)launchOptions { // ↓ 상단에 추가해야함! [FIRApp configure]; // 다른 앱실행에 필요한 코드는 아래에 작성하도록 한다. return YES; }
Android 연동하기
1. 앱 등록
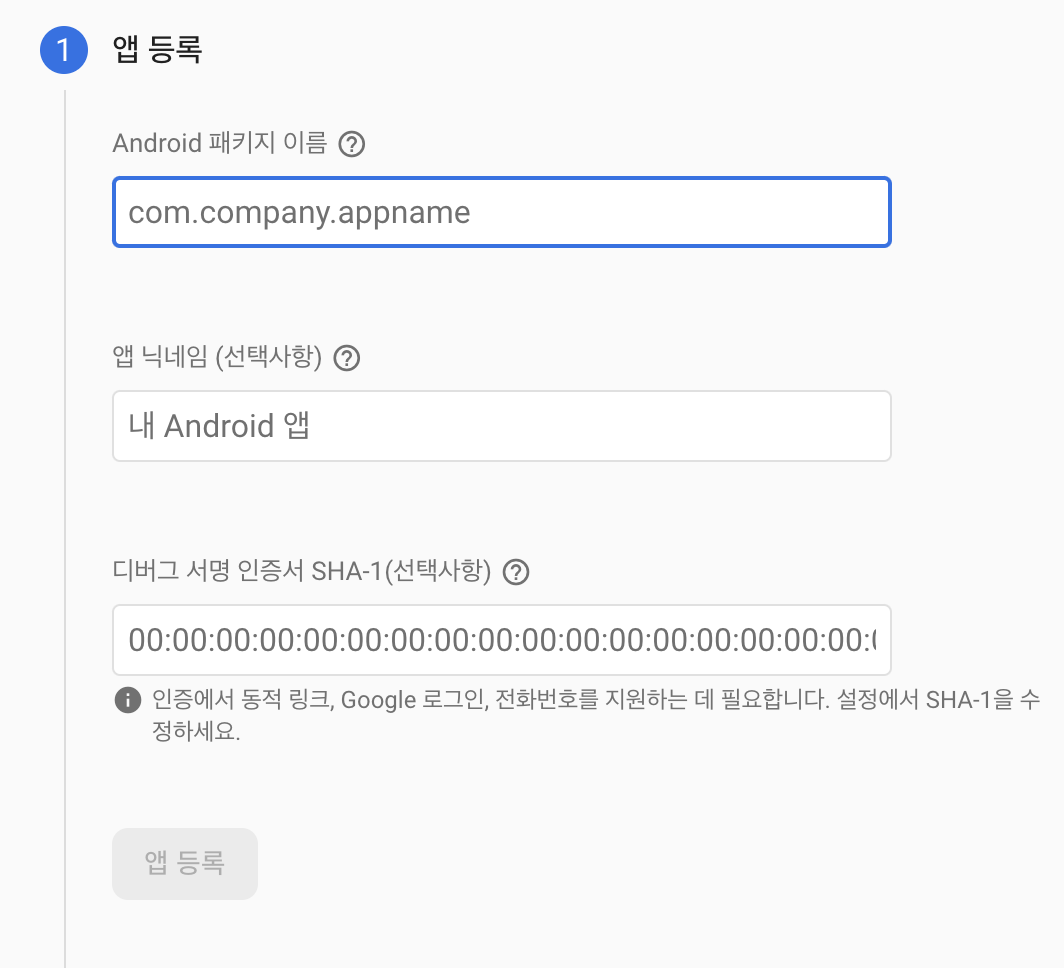
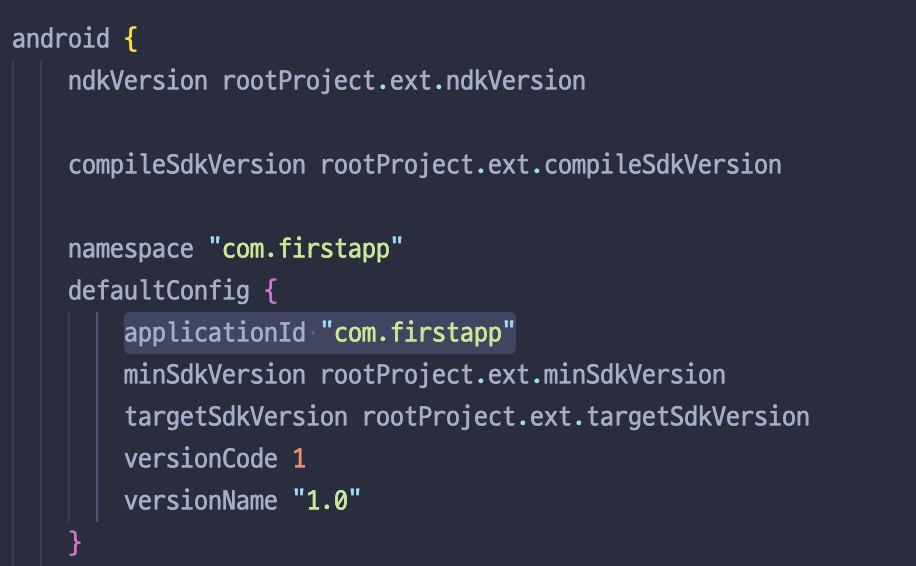
- Android 패키지 이름: [프로젝트 이름]/android/app/build.gradle 파일에 applicationId 입력
- 디버그 서명 인증서: SHA-1 -> 리액트 네이티브에 Firebase를 연동할 수 있도록 인증을 하는 암호값
cd 프로젝트명

keytool -J-Duser.language=en -list -v -alias androiddebugkey -keystore ./android/app/debug.keystore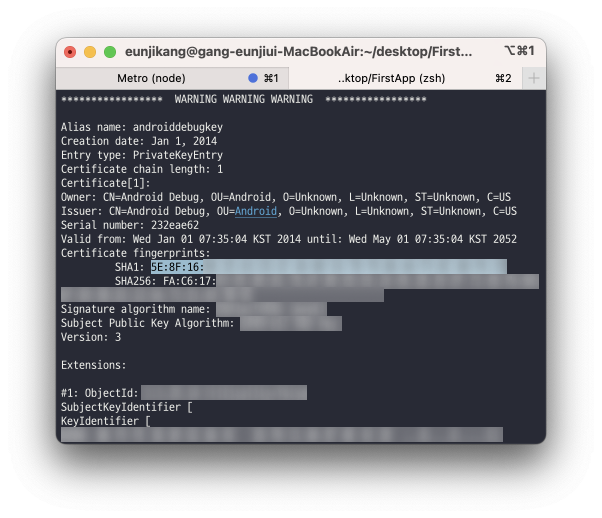
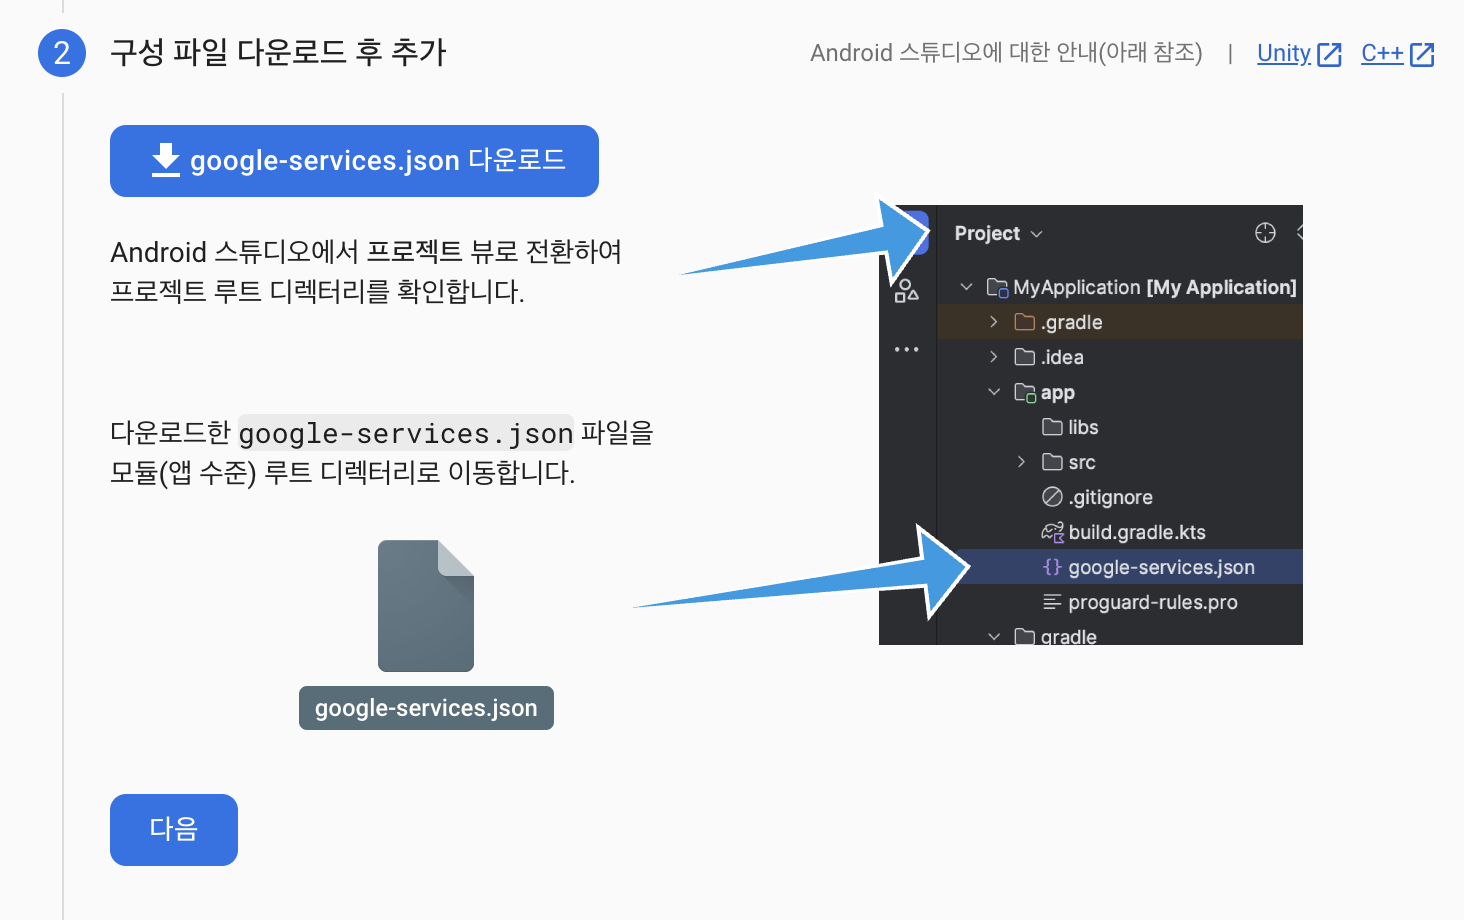
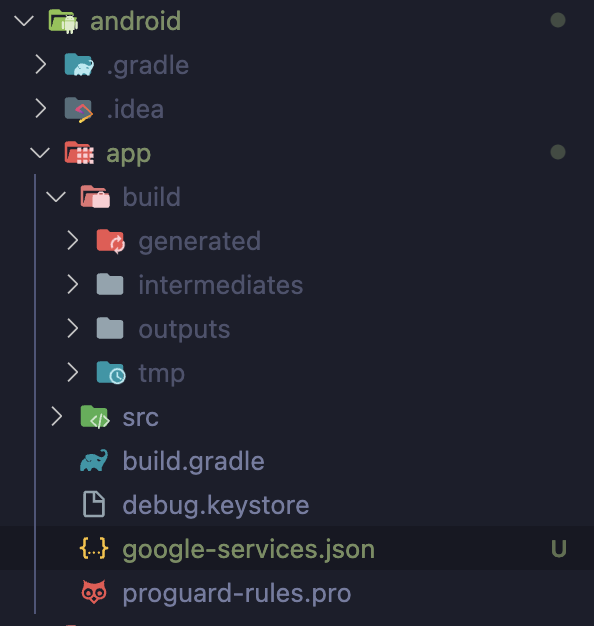
2. 구성 파일 다운로드 후 추가
3. Firebase SDK 추가하기
android/build.gradle에 다음과 같은 코드를 추가한다.
buildscript {
  dependencies {
    // ... other dependencies
    classpath 'com.google.gms:google-services:4.3.15'
    // Add me --- /\
  }
}android/app/build.gradle에 다음과 같은 코드를 추가한다.
apply plugin: 'com.android.application'
apply plugin: 'com.google.gms.google-services' // <- Add this line


}

dependencies {
  // Import the Firebase BoM
  implementation platform('com.google.firebase:firebase-bom:32.2.2')


  // TODO: Add the dependencies for Firebase products you want to use
  // When using the BoM, don't specify versions in Firebase dependencies
  // https://firebase.google.com/docs/android/setup#available-libraries
}
Firebase 라이브러리
@react-native-firebase/app: Firebase를 적용할 때 반드시 필요한 라이브러리@react-native-firebase/auth: Firebase를 통한 회원 인증을 위한 라이브러리@react-native-firebase/firestore: Firebase 실시간 데이터베이스 사용을 위한 라이브러리@react-native-firebase/storage: 이미지를 업로드 하기 위한 라이브러리
References

Frontend Developer
안녕하세요 처음으로 블로그 글에 댓글을 써 봅니다..
저를 살리셨습니다 ...
항상 행복하세요... 🥹🥹🥹🥹