Intro
UI 요소 중 Toast란 요소가 있는데 마치 토스트기에서 식빵이 튀어오르는 것 같아서 토스트란 이름이 지어졌다. (스낵바랑 토스트랑 비슷한 용도라서 구분없이 사용되기도 하는데, 정확히는 클릭버튼(닫기)가 있냐 없냐에 따라 구분하는 것 같다.)
사용자의 반응을 즉각적으로 피드백하기 좋은 요소라서 사용자경험을 향상시키기 위해서 자주 사용된다.
리액트 네이티브 프로젝트에서 RN에서 제공하는 Animation API를 사용했지만 애니메이션 중복, 언마운트 이슈 등 시간을 많이 허비하면서 실패의 실패를 경험했다. 그래서 몇가지 내가 시도해본 방법을 공유해보려고 한다.
1. React-native Animated API 적용
가장 먼저 시도해본 방법으로 Animated API를 사용해서 fade-in & fade-out 되는 토스트 컴포넌트를 직접 만들어서 사용했다.
import React, {useEffect, useRef, useState} from 'react';
import styled from 'styled-components/native';
import {Animated} from 'react-native';

interface IToastProps {
  text: string;
  bottom: number;
  onClose: () => void;
  isWrapped: boolean;
}

const Toast = ({text, onClose, bottom, isWrapped}: IToastProps) => {
  const [isToastVisible, setIsToastVisible] = useState(true);
  const fadeAnim = useRef(new Animated.Value(0)).current;

  useEffect(() => {
    const timer = setTimeout(() => {
      setIsToastVisible(false);
      onClose();
    }, 2100);

    Animated.sequence([
      Animated.timing(fadeAnim, {
        toValue: 1,
        duration: 1000,
        useNativeDriver: true,
      }),
      Animated.timing(fadeAnim, {
        toValue: 0,
        duration: 1000,
        useNativeDriver: true,
      }),
    ]).start();

    return () => clearTimeout(timer);
  }, []);

  return (
    <SToastContainer bottom={bottom} isWrapped={isWrapped}>
      {isToastVisible && (
        <SToastWrapper style={{opacity: fadeAnim}}>
          <SToastCopy>{text}</SToastCopy>
        </SToastWrapper>
      )}
    </SToastContainer>
  );
};
const timer = setTimeout(() => { setIsToastVisible(false); onClose(); }, 2100); // 시간차를 위해서 2.1초 Animated.sequence([ Animated.timing(fadeAnim, { toValue: 1, duration: 1000, useNativeDriver: true, }), Animated.timing(fadeAnim, { toValue: 0, duration: 1000, useNativeDriver: true, }), ]).start();
- 언마운트 시 false가 되면 애니메이션이 적용이 되지 않기 때문에 시간차를 두었다.
fade-in (1s)->fade-out(1s)->false(0.1s)=>total 2.1s
➡ fade로 애니메이션을 적용한 이유는 Animated value를 style에 적용하려면 무조건 opacity, transform 등을 사용해야하는데 transform을 사용하기엔 기존 레이아웃을 다 엎어야했기 때문
➡ bottom, top, left, right 속성은 Animated value 사용할 수 없다.

➡ 결과적으로 Toast를 띄우긴 했지만 문제가 발생했다. 토스트를 띄우는 스크린을 벗어나면 토스트로 함께 언마운트가 된다.
➡ 뿐만 아니라 북마크 스크린에서는 이벤트 중복이 발생해서 이벤트 하나가 끝날때까지 기다려야 다음 이벤트를 발생시킬 수 있다. (이벤트 중복을 위해서 일부러 천천히 삭제해야하는 문제가...)
2. Custom Modal 사용하기
두번째로 시도해본 방법이 RN 내장 컴포넌트인 <Modal/>을 사용
import React, {useState} from 'react';
import {Modal, View} from 'react-native';

const CustomModal = ({children, setIsToastVisible}: any) => {
  const [isVisible, setIsVisible] = useState(true);

  return (
    <Modal
      presentationStyle="formSheet"
      animationType="slide"
      // transparent={true}
      visible={isVisible}
      onRequestClose={() =>
        setTimeout(() => {
          setIsToastVisible(false);
          setIsVisible(false);
        }, 2100)
      }>
      {children}
    </Modal>
  );
};

export default CustomModal;
➡ children으로 Toast컴포넌트를 넣어서 모달 형태로 사용해봤더니 모달 특성상 백그라운드 터치가 전혀 안되기 때문에 뒤로 가기도 할 수 없다는 점. 애초에 토스트를 사용하기로 목적과 전혀 일치하지 않기 때문에 커스텀 모달은 진작에 포기했다.
3. ToastAndroid (only for Android)
iOS는 제쳐두고 안드로이드만이라도 구현하자 싶어서 RN에서 내장 컴포넌트를 사용해봤다.
import React from 'react';
import {View, StyleSheet, ToastAndroid, Button, StatusBar} from 'react-native';

const App = () => {
  const showToast = () => {
    ToastAndroid.show('A pikachu appeared nearby !', ToastAndroid.SHORT);
  };

  const showToastWithGravity = () => {
    ToastAndroid.showWithGravity(
      'All Your Base Are Belong To Us',
      ToastAndroid.SHORT,
      ToastAndroid.CENTER,
    );
  };

  const showToastWithGravityAndOffset = () => {
    ToastAndroid.showWithGravityAndOffset(
      'A wild toast appeared!',
      ToastAndroid.LONG,
      ToastAndroid.BOTTOM,
      25,
      50,
    );
  };

  return (
    <View style={styles.container}>
      <Button title="Toggle Toast" onPress={() => showToast()} />
      <Button
        title="Toggle Toast With Gravity"
        onPress={() => showToastWithGravity()}
      />
      <Button
        title="Toggle Toast With Gravity & Offset"
        onPress={() => showToastWithGravityAndOffset()}
      />
    </View>
  );
};
➡ 사용방법은 아주 간단해서 이대로 사용해봤다. 안드로이드는 이대로 사용하더라도 iOS에서 어떻게 구현하나 고민하다가 결국엔 라이브러리를 사용해보기로 했다.
4. react-native-toast-message
토스트 관련 라이브러리가 2-3개 더 있지만 가장 많은 다운로드 수를 보유하고 있어서 선택했다.
react-native-toast-message 설치하기
npm i react-native-toast-messagereact-native-toast-message 사용
// App.jsx
import Toast from 'react-native-toast-message';

export function App(props) {
  return (
    <>
      {/* ... */}
      <Toast />
    </>
  );
}
App.tsx에 가장 하단의 child에 작성해줘야한다.
Render the Toast component in your app's entry file, as the LAST CHILD in the View hierarchy (along with any other components that might be rendered there)
import Toast from 'react-native-toast-message'
import { NavigationContainer } from '@react-navigation/native';

export function App() {
  return (
    <>
      <NavigationContainer>
        {...}
      </NavigationContainer>
      <Toast />
    </>
  );
}
➡ react-native-navigation을 사용한다면 NavigationContainer 바로 하단에 작성
// Foo.jsx
import Toast from 'react-native-toast-message';
import { Button } from 'react-native'

export function Foo(props) {
  const showToast = () => {
    Toast.show({
      type: 'success',
      text1: 'Hello',
      text2: 'This is some something 👋'
    });
  }

  return (
    <Button
      title='Show toast'
      onPress={showToast}
    />
  )
}
➡ Toast를 import해서 show 메소드를 사용하면 된다.
토스트 커스텀하기
아주 중요한 토스트 커스텀하기. 커스텀이 아주 자유로운 편이다.
// App.jsx
import Toast, { BaseToast, ErrorToast } from 'react-native-toast-message';

/*
  1. Create the config
*/
const toastConfig = {
  /*
    Overwrite 'success' type,
    by modifying the existing `BaseToast` component
  */
  success: (props) => (
    <BaseToast
      {...props}
      style={{ borderLeftColor: 'pink' }}
      contentContainerStyle={{ paddingHorizontal: 15 }}
      text1Style={{
        fontSize: 15,
        fontWeight: '400'
      }}
    />
  ),
  /*
    Overwrite 'error' type,
    by modifying the existing `ErrorToast` component
  */
  error: (props) => (
    <ErrorToast
      {...props}
      text1Style={{
        fontSize: 17
      }}
      text2Style={{
        fontSize: 15
      }}
    />
  ),
  /*
    Or create a completely new type - `tomatoToast`,
    building the layout from scratch.

    I can consume any custom `props` I want.
    They will be passed when calling the `show` method (see below)
  */
  tomatoToast: ({ text1, props }) => (
    <View style={{ height: 60, width: '100%', backgroundColor: 'tomato' }}>
      <Text>{text1}</Text>
      <Text>{props.uuid}</Text>
    </View>
  )
};

/*
  2. Pass the config as prop to the Toast component instance
*/
export function App(props) {
  return (
    <>
      {...}
      <Toast config={toastConfig} />
    </>
  );
}
➡ 위 예시처럼 <BaseToast/>에 덮어쓰면서 수정하는 방법과 tomatoToast처럼 아예 새로운 key를 만들어서 새 토스트를 만들 수도 있다.
🍞 두번째 방법처럼 나만의 토스트를 만들기
 const toastConfig: ToastConfig = {
    selectedToast: ({text1}) => (
      <View
        style={{
          flex: 1,
          flexDirection: 'row',
          alignItems: 'center',
          height: 60,
          width: windowWidth - 30,
          backgroundColor: theme.colors.toast,
          padding: 10,
          borderRadius: 18,
        }}>
        <Text
          style={{
            color: theme.colors.toastText,
            fontFamily: 'Poppins-Regular',
          }}>
          {text1}
        </Text>
      </View>
    ),
  };


(...)

   return (
    <>
      <NavigationContainer theme={scheme === 'dark' ? DarkTheme : DefaultTheme}>
        <DrawerNavi />
      </NavigationContainer>
      <Toast config={toastConfig} />
    </>
  );


(...)
// utils/showToast.ts
import Toast from 'react-native-toast-message';
export const showToast = (text: string) => {
Toast.show({
type: 'selectedToast',
text1: text,
position: 'bottom',
visibilityTime: 2000,
});
};
➡ 재사용할 수 있도록 showToast를 유틸함수로 분리했다.
사용하기
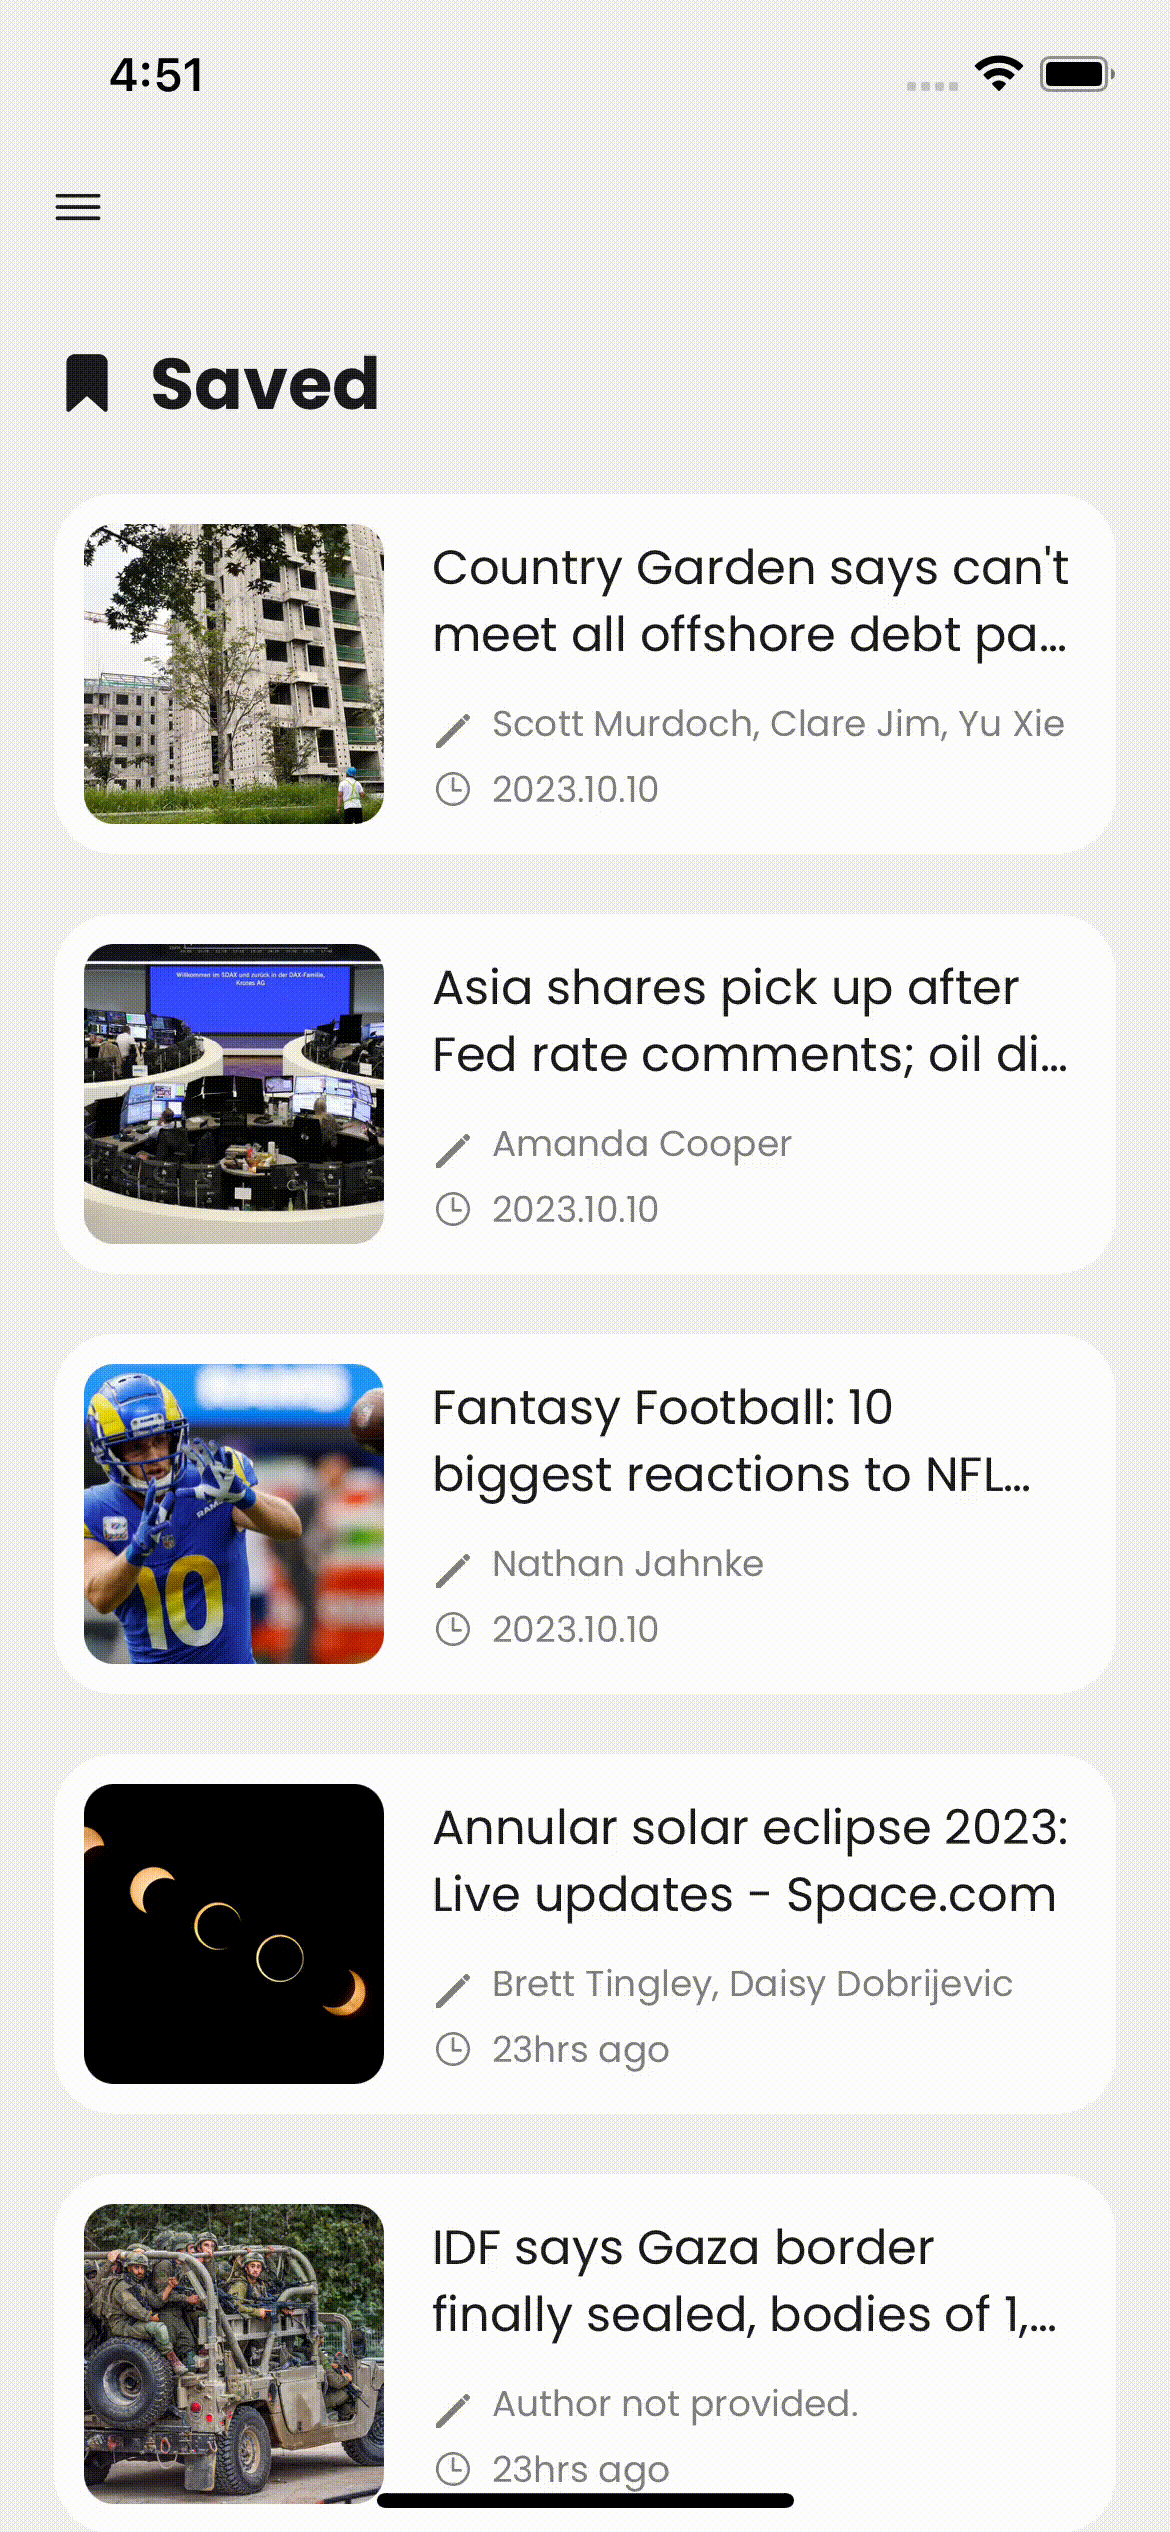
  const handleBookmark = async () => {
    if (!isArticleSaved) {
      await onSaveArticle.mutate({...addedArticle, isSaved: true});
      showToast('Saved to bookmark list.');
    } else {
      showAlert('Alert', 'This article was already in your bookmark list');
    }
  };
결과

➡ 토스트를 띄운 스크린에서 벗어나도 Portal을 적용한거처럼 unmount 되지 않는다!
References

좋은 정보 정말 감사합니다!
궁금한게 있어서 한가지 질문 남겨봅니다
혹시 저장된 글의 목록을 옆으로 슬라이드할때 delete라는 option이 나타났는데 이런거는 어떻게 구현하는지 알 수 있을까요..?