구현하려는 작업
카테고리 버튼을 만들고 버튼을 눌렀을 때 카테고리별로 보여주게 한다
전체를 누르면 전체 항목들이 나온다
원래는 고차함수 써서 진행해야 하지만 그 부분은 더 공부해봐야 하기 때문에
지금 진행하는 미니 프로젝트에 간단하게나마 구현해보려고 한다
사용한 태그
querySelector, getElementById, addEventListener, style.display,
구현한 작업 결과 완성 이미지
예제 설명
- index.html
<section id="recommend-box">
    <div class="category-btns">
      <div class="box-btn">
        <button class="all-btn">All🔍</button>
        <button class="shoes-btn">러닝화👟</button>
        <button class="diet-btn">다이어트🍗</button>
      </div>
      <a class="post-link" href="/recommend/post">추천하기</a>
    </div>
전체 박스를 만들어 주고 카테고리별 버튼 3개 만들어준다
<div id="products-box-shoes"> // shoes box
  <div class="shoes-box">
    <img src="이미지url주소" alt="run">
    <div class="text-box">
      <h5>😁 닉네임 name</h5>
      <p>🖊 추천이유 추천이유 추천이유 추천이유 추천이유 추천이유 추천이유 추천이유 추천이유 Lorem ipsum 추천이유추천이유추천이유추천이유dolor sit amet, consectetur adipisicing elit. Molestiae, obcaecati, ratione. Ab animi architecto autem dignissimos est ex fugiat laborum officia quidem quod quos saepe, similique sit velit, voluptate. Facere!</p>
    </div>
  </div>
  <div class="shoes-box">
    <img src="이미지url주소" alt="run">
    <div class="text-box">
      <h5>😁 닉네임 name</h5>
      <p>🖊 추천이유</p>
    </div>
  </div>
</div>

<div id="products-box-diet"> // diet box
  <div class="shoes-box">
    <img src="이미지url주소" alt="diet">
    <div class="text-box">
      <h5>😁 닉네임 name</h5>
      <p>🖊 추천이유 </p>
    </div>
  </div>
  <div class="shoes-box">
    <img src="이미지url주소" alt="diet">
    <div class="text-box">
      <h5>😁 닉네임 name</h5>
      <p>🖊 추천이유 </p>
    </div>
  </div>
</div>
현재는 filter구문으로 사용하지 않고 버튼에 event를 지정하여 style을 숨겼다가 보여졌다할 것이므로
products-box-shoes, products-box-diet 로 섹션을 나눠서 지정해준다
그리고 박스 안에 shoes, diet 카테고리별로 카드를 저장한다
text-box에 한군데만 추천이유를 길게 적어준 이유는 카드 height를 지정해주고
comment가 길어지면 overflow: scroll 을 적용해서 스크롤해서 읽을 수 있게 한다
- JavaScript
const allBtn = document.querySelector('.all-btn')
const shoesBtn = document.querySelector('.shoes-btn')
const dietBtn = document.querySelector('.diet-btn')
const productsBoxShoes = document.getElementById('products-box-shoes')
const productsBoxDiet = document.getElementById('products-box-diet')
세가지 버튼과 숨기거나 나타나게 할 두가지 박스를 가져온다
all버튼을 눌렀을 때는 전체가 나타나게 할 것이고
shoes버튼은 러닝화, diet버튼은 다이어트 추천 상품을 보여줄 것이다
allBtn.addEventListener('click', () => {
  productsBoxShoes.style.display = 'flex'
  productsBoxDiet.style.display = 'flex'
})
shoesBtn.addEventListener('click', () => {
  productsBoxShoes.style.display = 'flex'
  productsBoxDiet.style.display = 'none'
})
dietBtn.addEventListener('click', () => {
  productsBoxShoes.style.display = 'none'
  productsBoxDiet.style.display = 'flex'
})
각각의 버튼에 따로 지정해주었다
이제 style.display는 이만큼 연습했으니 classList 작업이랑
이렇게 작업할 때 filter할 수 있는 함수로 새로 적용 해봐야겠다.
전체 코드
미니프로젝트 하면서 페이지 작업을 하면서 새로 알게 된 것이 있다
전에 사전프로젝트에서는 한 페이지에서 작업을 해서 GET, POST를 한 곳에서 작성하면 되었는데
지금 미니프로젝트는 페이지가 2페이지로 나뉘어 져서 새로고침했을 때 문제와 GET은 1페이지에 적용,
POST는 2페이지에 적용으로 나눠야 했다
이럴때는 머리를 굴리며 왜 안되는지 코드 흐름을 생각을 해야한다
- JQuery작업 할 때 window.location.reload()를 사용해서 새로고침을 해줬는데
나는 글 작성하는 페이지에서 다 작성 후 완료가 되면
새로고침이 아니고 목록이 있는 페이지로 돌아가고 싶었다
그래서 진행해본 방식은
console.dir(window)를 콘솔에 쳐보니 location 영역이 나왔다
- 이미지 예시
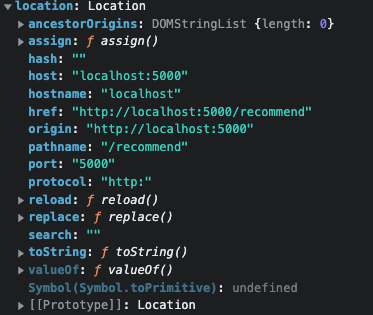
여기서 href에 연결하는 주소가 있어서 위에 assign에 포함되어 있는 요소인줄 알고
window.location.assian.href = "주소"했는데 안나오길래 다시 확인하니 href까지만이었다....하하하하하.ㅎㅎ...핳
필요한 페이지로 주소를 이동하니 등록하고 원하는 페이지로 새로고침되었다
- GET, POST를 두 페이지로 나눴을 경우에는 쉽게 생각해서 GET, POST도 나눠서 쓰면 된다
GET이 필요한 페이지에는 GET, POST가 필요한 페이지는 POST를 넣어주면 된다
처음에 고민할 때 한 곳에 넣는데 2페이지에 있는 구문들을 어떻게 1페이지에 연결해주지?
라고 생각했는데 의외로 쉽게 생각하면 되는 이슈였다
이상
filter 공부하러 가봐야겠다
: 이렇게 구현하면 카드 순서대로 붙여넣어지지 않고 shoes는 무조건 위쪽에 있고 diet는 아래쪽,
결국 섞여서 정렬이 안되기 때문에 filter로 적용하는 방법 공부해야 한다
커뮤니티 게시판처럼 적용해야 한다
입력한 순서대로 카드들이 붙여지고 필터링해서 카테고리별로 나누기
도전!