시작하기 전 간단한 프로젝트 소개
메타버스 안에서 중고 물품을 경매에 올려 실시간으로 판매하고 구매할 수 있는 프로젝트입니다.
왜 메타버스인가 ?
경매의 입찰 방식 중 공개 입찰 방식의 특징은 대면하고 실시간으로 진행된다는 점이 있습니다. 이러한 대면과 실시간은 3D 가상공간을 제작하여 나의 아바타를 이용하면 비슷한 환경을 조성할 수 있다고 생각했습니다.
유사 게임엔진(?) 만들기
사실 Cannon js를 굳이 넣어야 하나 라는 고민이 많았습니다. 처음 써보는 라이브러리이기에 개발 시간도 느려질 뿐더러 퍼포먼스도 떨어질 것이 분명했기 때문입니다. 하지만 실 서비스 보다도 공부 목적이 강한 프로젝트이기도 하고 사용자가 여러 Object 들과 상호작용 하는 재미를 넣고 싶은 마음에 그냥 도입해버렸습니다..
Three.js 간단한 세팅부터
세팅하기 전 간단한 기술스택부터 분석해보겠습니다.
- Typescript - 이제는 없어서는 안 될 소중한 친구입니다. 자동완성부터 코드 유지보수 등등 장점이 너무 많은 친구입니다.
- Three.js - 3D 그래픽을 구현하기 위해선 WebGL 이라는 라이브러리를 사용하여 개발하게 되는데 이 WebGL 이라는 라이브러리는 너무 Low Level 하기에 WebGL을 더욱 쉽게 사용할 수 있게 만들어 둔 Three.js를 사용했습니다.
- Cannon.js - 3D 물리엔진 라이브러리입니다. 직접 3D 물리엔진을 개발하기엔 수학 지식도 얕고 시간도 없는 터라 Cannon.js 라는 라이브러리를 사용하게 되었습니다.
- Parcel - 셋팅없이 사용할 수 있는 번들러라는 장점 때문에 사용하였습니다. 많은 사람들이 사용하는 Webpack 같은 번들러도 있지만 번들러 설정에 시간을 사용하고 싶지 않은 마음에 셋팅없이 쉽게 사용할 수 있는 Parcel 번들러를 사용하게 되었습니다.
다시 세팅부터 해보자
ES6 Class를 주로 사용하여 개발할 것입니다. 또한 여태 프로젝트와는 달리 코드 유지보수를 위하여 모듈화를 중요시하여 코드 설계를 하며 개발할 것입니다.
우선 Three.js에 기본적인 설정인 Renderer, Scene, Camera 설정을 해줄 것입니다.
/src/index.ts

import * as THREE from 'three';

class Main {
	renderer: THREE.WebGLRenderer;
    camera: THREE.PerspectiveCamera;
    scene: THREE.Scene;

    constructor() {
    	this.renderer = new THREE.WebGLRenderer();
        this.renderer.setSize(window.innerWidth, window.innerHeight);
        document.body.appendChild(this.renderer.domElement);

        this.camera = new THREE.PerspectiveCamera(
            75,
            window.innerWidth / window.innerHeight,
            0.1,
            1000
        );
        this.camera.position.z = 10;
        this.camera.position.y = 5;
        this.camera.lookAt(new THREE.Vector3(0, 0, 0));

        this.scene = new THREE.Scene();

    	this.init();
    }

    init() {
    	this.animate();
    }

    animate() {
    	this.renderer.render(this.scene, this.camera);

        requestAnimationFrame(this.animate.bind(this));
    }
}

//@ts-ignore
window.m = new Main();
기본적인 Three.js 세팅이 끝났으니 Cannon.js도 셋팅해보겠습니다.
/src/physicsManager.ts

import * as CANNON from 'cannon-es';

export class PhysicsManager {
    world: CANNON.World;

    constructor() {
        this.world = new CANNON.World();

        this.init();
    }

    init() {
        this.world.gravity.set(0, -9, 0);
    }

    animate(delta: number) {
        this.world.step(1 / 60, delta, 5);
    }
}
Main Class에 인스턴스를 만들어두겠습니다.
/src/index.ts

import { PhysicsManager } from './physcisManager';

class Main {
    physicsManager: PhysicsManager;
    clock: THREE.Clock;
    lastTime: number;

    constructor() {
        this.clock = new THREE.Clock();
        this.lastTime = 0;

        this.physicsManager = new PhysicsManager();
    }

    animate() {
        const currentTime = this.clock.getElapsedTime();
        const delta = currentTime - this.lastTime;
        this.lastTime = currentTime;

    	this.physicsManager.animate(delta);
    }
}

...
Three.js와 Cannon.js를 합쳐보자
Three.js와 Cannon.js는 별개의 라이브러리입니다. 때문에 Cannon.js를 활용하여 계산되는 Entity들의 정보들과 Three.js 정보들이 종속되어야 저희가 생각하는 게임엔진이 만들어 질 수 있는 것 입니다. 저는 이 종속 관리를 Entity 라는 클래스에서 할 것 입니다.
/src/entityManager/Entity.ts

import * as CANNON from 'cannon-es';
import * as THREE from 'three';
import { Utils } from "../utils";

interface Option {
    type?: CannonShapeType;
    mass?: number;
}

export class Entity {
    three: THREE.Object3D;
    cannon: CANNON.Body;
    sizeVector?: THREE.Vector3;

    constructor(three: Object3D, cannon: CANNON.Body) {
        this.three = three,
        this.cannon = cannon;

        this.init();
    }

    init() {
        this.three.traverse(child => {
            child.castShadow = true;
            child.receiveShadow = true;
        });
    }

    animate() {
        this.three.position.copy(Utils.cToT().vector3(this.cannon.position));
        this.three.quaternion.copy(Utils.cToT().quaternion(this.cannon.quaternion));
    }
}
또한 이 Entity 인스턴스 들을 EntityManager Class에서 관리할 것 입니다.
/src/entityManager/index.ts

import * as CANNON from 'cannon-es';
import * as THREE from 'three';
import { threeToCannon, ShapeType as CannonShapeType } from 'three-to-cannon';
import { Entity } from "./entity";
import { Utils } from "../utils";

interface Option {
    type?: CannonShapeType;
    mass?: number;
}

export class EntityManager {
    world: CANNON.World;
    scene: THREE.Scene;
    entities: Entity[];

    constructor(scene: THREE.Scene, world: CANNON.World) {
        this.world = world;
        this.scene = scene;
        this.entities = [];
    }

    addObject3D(object: THREE.Object3D, option?: Option) {
        const result = threeToCannon(object as any, { type: option?.type });
        const body = new CANNON.Body({
            mass: option?.mass ?? 1,
            position: result?.offset,
            shape: result?.shape,
        });
        this.world.addBody(body);

        const entity = new Entity(object, body);
        this.scene.add(object);

        this.entities.push(entity);

        return entity;
    }

    animate() {
        this.entities.forEach(e => e.animate());
    }
}
Main Class에서 인스턴스를 생성해보겠습니다.
/src/index.ts
import { EntityManager } from './entityManager';
class Main {
entityManager: EntityManager;
constructor() {
this.entityManager = new EntityManager(this.scene, this.physicsManager.world);
}
animate() {
this.entityManager.animate();
}
}
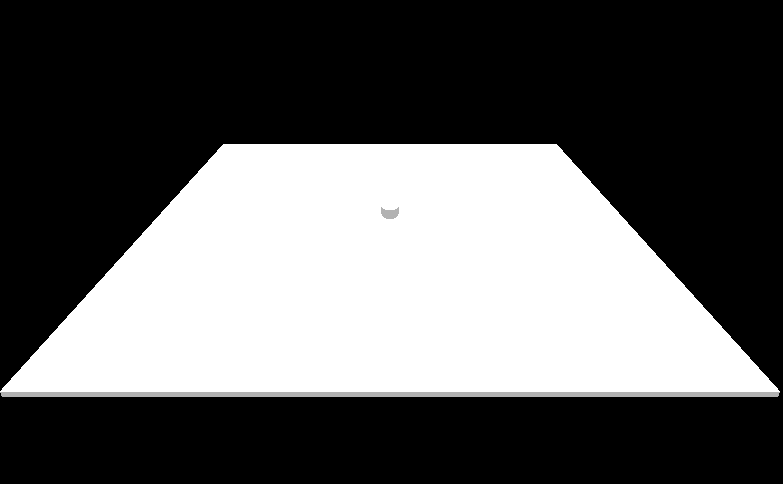
...작동 확인을 할 수 있게 DirectionalLight를 추가하고, EntityManager 인스턴스를 이용해 간단한 구와 직육면체를 추가해보겠습니다.
/src/index.ts

import { ShapeType } from 'three-to-cannon';

class Main {
    constructor() {
    	this.scene.add(new THREE.DirectionalLight(0xffffff));

        this.entityManager.addObject3D(
        	new THREE.Mesh(
            	new THREE.SphereGeometry(.2),
                new THREE.MeshToonMaterial()
            ),
            {
            	mass: .5,
                type: ShapeType.SPHERE
            }
        ).cannon.position.y = 5;

        this.entityManager.addObject3D(
        	new THREE.Mesh(
            	new THREE.BoxGeometry(10, .1, 10),
                new THREE.MeshToonMaterial()
            ),
            {
            	mass: 0,
                type: ShapeType.BOX
            }
        );
    }
}

...
CodeSandbox: https://codesandbox.io/s/runtime-resonance-znjb4h?file=/src/index.ts
Project Github: https://github.com/syi0808/MetaAuction
다음 개발 에피소드는 필요하신 분들이 있으시다면 적어보겠습니다. 아마도 모델 물리엔진 관련 이슈와 모델을 만드는 내용이 담길 것 같습니다.
궁금하신 점 있으시면 댓글 남겨주시면 감사하겠습니다.
프론트엔드 개발자 성예인입니다.
Intro: https://career.castle-yein.site
Github: https://github.com/syi0808
Contact: syi9397@naver.com


엄청나요..!