리팩토링을 하는 과정에서 redux보다 가볍고 편리한 사용이 가능한 redux-toolkit에 대한 사용이 결정됐다.
RTK의 사용을 권장하기도 하기 때문에 RTK에 대해 알아보고 프로젝트에 적용해보자
RTK란?
Redux-Toolkit 인 만큼 redux처럼 대형 MVC 애플리케이션에서 나타날 수 있는 의존성, 연쇄 props로 인한 데이터 흐름 문제를 해결하기 위해 사용됩니다.
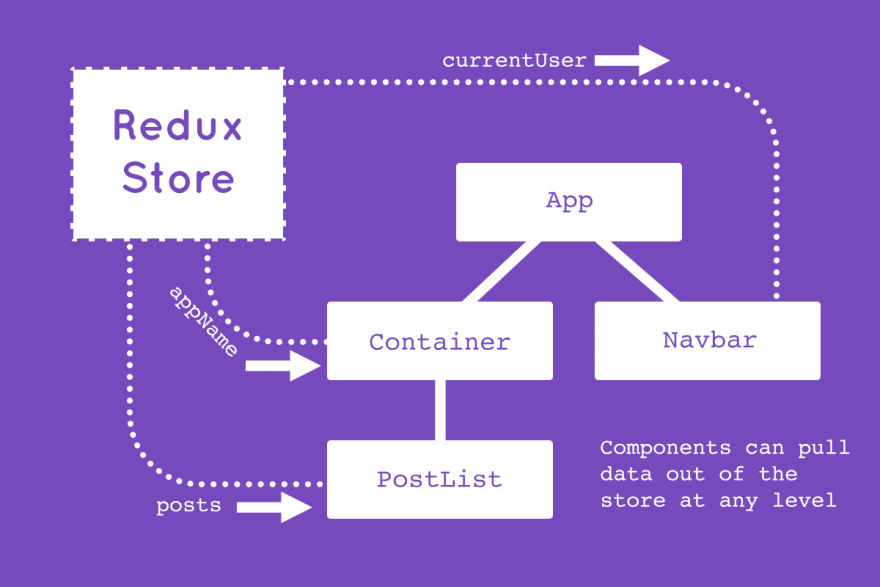 (출처) https://dev.to/chrisachard/redux-crash-course-with-hooks-a54
이미지 처럼 어느 컴포넌트든 스토어에서 데이터를 꺼내서 사용할 수 있는거죠!
리덕스는 전역 상태를 하나의 저장소 안에 있는 객체 트리에 저장하고, 상태를 변경하는 것은 어떤 일이 일어날지를 서술하는 action을 dispatch하는 것 입니다. 그리고 어떻게 변경될 것인지 명시하는 reducer가 있습니다. 이러한 설계의 가장 큰 이유는 데이터가 단방향으로 흐른다는 전제로 데이터의 일관성을 향상시키고 버그 발생 원인을 쉽게 파악하려는 의도에 있습니다.

(출처)https://labs.tadigital.com/index.php/2020/04/20/getting-started-with-redux/
이점 밖에 없는 redux를 무조건 프로젝트에 써야겠다! 하고 지금도 사용중인데...! 쓰다보니 불편한 점을 발견할 수 있었다.
- 리덕스 스토어 환경 설정의 복잡성
- 리덕스를 제대로 사용하기 위해 붙는 여러개의 미들웨어
- 보일러플레이트, 즉 어떤 일을 하기 위해 꼭 작성해야 하는 (상용구)코드가 많이 요구된다.
- 설계 철학에 요구되는 코딩 방식을 꼭 추구해야해서 오히려 코드가 복잡해질수 있다.
라는 단점이 있고 일부 redux의 장점만을 필요로 한다면 context나 react-query, swr등으로 대체를 권한다는 이야기도 볼 수 있었다.
그래서 이러한 문제를 해결하기 위해 RTK가 등장했다. 복잡성을 낮추고 사용성을 높였다.
https://redux-toolkit.js.org/usage/usage-with-typescript
http://blog.hwahae.co.kr/all/tech/tech-tech/6946/?popular=6946 를 참고해서 순서대로 toolkit에 필요한 함수들을 소개하겠습니다.
1. configureStore
import { combineReducers } from '@reduxjs/toolkit'
const rootReducer = combineReducers({})
export type RootState = ReturnType<typeof rootReducer>
이렇게 간단하게 3줄로 쓸 수 있다.
rootReducer를 만들지 않고 slice reducer를 바로 넣어줄수도 있다.
import { configureStore } from '@reduxjs/toolkit'
// 이렇게
const store = configureStore({
  reducer: {
    one: oneSlice.reducer,
    two: twoSlice.reducer,
  },
})
export type RootState = ReturnType<typeof store.getState>

export default store
미들웨어 또한 createStore를 사용하면
createStore(reducer, undefined, applyMiddleware(ReduxThunk, logger, ... ));이렇게 사용되던게
const store = configureStore({
  reducer,
  middleware: (getDefaultMiddleware) => getDefaultMiddleware().concat(logger),
  devTools: process.env.NODE_ENV !== 'production',
  preloadedState,
  enhancers: [reduxBatch],
})
이렇게 바뀐다.
- reducer : root reducer를 넣을수있고, slice로 만든 객체를 전달한다. combineReducers함수를 사용해서 자동적으로 병합하여 루트 리듀서를 생성한다.
// rootreducer를 만들거나 따로 객체로 만들어서 사용
reducer: {
        counter: counteredReducer
},- middleware : 미들웨어를 담는 배열, 모든 미들웨어를 배열에 담아 작성한다.
// 공식 문서에 사용된 형태..!
 middleware: getDefaultMiddleware =>
        getDefaultMiddleware({
            serializableCheck: {
                ignoredActions: [FLUSH, REHYDRATE, PAUSE, PERSIST, PURGE, REGISTER]
            }
})- devTools : 개발자 도구를 true, false로 끄고 킨다.
- preloadedState : 스토어의 초기값을 설정할 수 있다.
- enhancer : 기본적으로 배열이지만 callback함수로 정의하기도 한다.
const store = configureStore({
  ...
  enhancers: (defaultEnhancers) => [reduxBatch, ...defaultEnhancers],
})

// [reduxBatch, applyMiddleware, devToolsExtension]
2. useAppDispatch, useAppSelector
여전히 dispatch,selector는 사용되어야하고 좀 더 쉽게 사용하기 위해 따로 hooks를 만들어서 선언해준다.
//hooks.ts

import { TypedUseSelectorHook, useDispatch, useSelector } from "react-redux";
import type { AppDispatch, RootState } from "./store";

export const useAppDispatch = () => useDispatch<AppDispatch>();
export const useAppSelector: TypedUseSelectorHook<RootState> = useSelector;

//index.ts
import { useAppDispatch, useAppSelector } from "../store/hooks";
// 선언해서 사용
 const dispatch = useAppDispatch();
 const count = useAppSelector(~~~);
// 이전에 사용하던 dispatch와 같다.
 <button onClick={() => dispatch(decrement())}>Decrement by 1</button>
3. createAction
기존에 액션 타입, 생성자 함수를 분리하여 선언하던 과정을 하나로 결합하여 추상화했다.
// BEFORE
// 액션 타입을 선언하고
const INCREMENT = 'counter/increment'

function increment(amount: number) {
 return {
   type: INCREMENT,
   payload: amount,
 }
}

const action = increment(3)
// { type: 'counter/increment', payload: 3 }
// AFTER
import { createAction } from '@reduxjs/toolkit'
const increment = createAction('counter/increment')
const action = increment(3)
// { type: 'counter/increment', payload: 3 }
예시를 따라하던 중 Slice의 괜찮은 형태가 있어 따로 저장해두었다.
import { createAction } from "@reduxjs/toolkit";
import { createReducer } from "@reduxjs/toolkit";


const increment = createAction<number, 'increment'>("increment");
const decrement = createAction<number, 'decrement'>("decrement");


type CounterState = {
   value: number;
};

const initialState: CounterState = {
   value: 0
};

export const counterReducer = createReducer(initialState, builder => {
   builder
       .addCase(increment, state => {
           state.value++;
       })
       .addCase(decrement, state => {
           state.value--;
       })
       .addCase(incrementByAmount, (state, action) => {
           state.value += action.payload;
       });
});
4. createReducer
- builder callback, map object 표기법이 있다.
- builder를 권장한다는 이야기가 있으니 builder를 자세히 알아보자.
createReducer의 콜백 함수 인자로 주어지는 builder객체에는 addCase, addMatcher, addDefaultCase 메서드를 제공한다.
const counterReducer = createReducer(initialState, builder => {
    builder
        .addCase(increment, state => {
            state.value++;
        })
        .addCase(decrement, state => {
            state.value--;
        })
        .addCase(incrementByAmount, (state, action) => {
            state.value += action.payload;
        });
});
- .addCase(actionCreator, reducer) : 액션 타입과 케이스 리듀서를 추가하여 액션을 처리함. addMatch, addDefaultCase 메서드 보다 먼저 작성되어야한다.
- .addMatcher(match, reducer) : 새로 들어오는 모든 액션에 대해서 주어진 패턴과 일치하는지 확인하고 리듀서를 실행한다.
- .addDefaultCase(reducer) : 기본 케이스 리듀서가 실행된다.
const increment = createAction('increment')
const decrement = createAction('decrement')

function isActionWithNumberPayload(
  action: AnyAction
): action is PayloadAction {
  return typeof action.payload === 'number'
}

const initialState = {
  counter: 0,
  sumOfNumberPayloads: 0,
  unhandledActions: 0,
};

const counterReducer = createReducer(initialState, (builder) => {
  builder
    .addCase(increment, (state, action) => {
      state.counter += action.payload
    })
    .addCase(decrement, (state, action) => {
      state.counter -= action.payload
    })
    .addMatcher(isActionWithNumberPayload, (state, action) => {})
    .addDefaultCase((state, action) => {})
})
5. createSlice
기존의 action, reducer를 하나로 합친 것이라고 생각하면된다. createAction, createReducer를 작성하지 않아도 된다. 좀 더 코드를 간결하게 작성 할 수 있다.
// features/counter/counterSlice.ts

import { createSlice, PayloadAction } from "@reduxjs/toolkit";
import type { RootState } from "../../store";

// declaring the types for our state
export type CounterState = {
    value: number;
};

const initialState: CounterState = {
    value: 0
};

export const counterSlice = createSlice({
    name: "counter",
    initialState,
    // The `reducers` field lets us define reducers and generate associated actions.
    // In this example, 'increment', 'decrement' and 'incrementByAmount' are actions. They can be triggered from outside this slice, anywhere in the app.
    // So for example, if we make a dispatch to the 'increment' action here from the index page, it will get triggered and change the value of the state from 0 to 1.
    reducers: {
        increment: state => {
            // Redux Toolkit allows us to write "mutating" logic in reducers.
            // It doesn't actually mutate the state because it uses the Immer library, which detects changes to a "draft state" and produces a brand new immutable state based off those changes
            state.value++;
        },
        decrement: state => {
            state.value--;
        },
        // 'The increment by amount' action here, has one job and that is to take whatever value is passed to it and add that to state.value.
        // The PayloadAction type here is used to declare the contents of `action.payload`
        incrementByAmount: (state, action: PayloadAction<number>) => {
            state.value += action.payload;
        }
    }
});
// Here we are just exporting the actions from this slice, so that we can call them anywhere in our app.
export const { increment, decrement, incrementByAmount } = counterSlice.actions;

// calling the above actions would be useless if we could not access the data in the state. So, we use something called a selector which allows us to select a value from the state.
export const selectCount = (state: RootState) => state.counter.value;

// exporting the reducer here, as we need to add this to the store
export default counterSlice.reducer;
6. createAsyncThunk
비동기 로직을 구현할 때에 응용할 수 있다.
interface MyData {
  // ...
}

const fetchUserById = createAsyncThunk(
  'users/fetchById',
  // Declare the type your function argument here:
  async (userId: number) => {
    const response = await fetch(`https://reqres.in/api/users/${userId}`)
    // Inferred return type: Promise<MyData>
    return (await response.json()) as MyData
  }
)

// the parameter of `fetchUserById` is automatically inferred to `number` here
// and dispatching the resulting thunkAction will return a Promise of a correctly
// typed "fulfilled" or "rejected" action.
const lastReturnedAction = await store.dispatch(fetchUserById(3))
// reject
interface MyKnownError {
errorMessage: string
// ...
}
interface UserAttributes {
id: string
first_name: string
last_name: string
email: string
}
const updateUser = createAsyncThunk<
// Return type of the payload creator
MyData,
// First argument to the payload creator
UserAttributes,
// Types for ThunkAPI
{
extra: {
jwt: string
}
rejectValue: MyKnownError
}
>('users/update', async (user, thunkApi) => {
const { id, ...userData } = user
const response = await fetch(`https://reqres.in/api/users/${id}`, {
method: 'PUT',
headers: {
Authorization: `Bearer ${thunkApi.extra.jwt}`,
},
body: JSON.stringify(userData),
})
if (response.status === 400) {
// Return the known error for future handling
return thunkApi.rejectWithValue((await response.json()) as MyKnownError)
}
return (await response.json()) as MyData
})
import { createAsyncThunk, createSlice } from '@reduxjs/toolkit'
import { userAPI } from './userAPI'

const fetchUserById = createAsyncThunk(
  'users/fetchByIdStatus',
  async (userId, thunkAPI) => {
    const response = await userAPI.fetchById(userId)

    return response.data
  }
)

const usersSlice = createSlice({
  name: 'users',
  initialState: { entities: [], loading: 'idle' },
  reducers: {},
  // extraReducers에 케이스 리듀서를 추가하면
  // 프로미스의 진행 상태에 따라서 리듀서를 실행할 수 있습니다.
  extraReducers: (builder) => {
    builder
      .addCase(fetchUserById.pending, (state) => {})
      .addCase(fetchUserById.fulfilled, (state, action) => {
	      state.entities.push(action.payload)
      })
      .addCase(fetchUserById.rejected, (state) => {})
  },
})

// 위에서 fetchUserById, 즉 thunk를 작성해두고
// 앱에서 필요한 시점에 디스패치 하여 사용합니다.

// ...

dispatch(fetchUserById(123))
서버와 통신뿐 아니라 비동기 구현에도 사용가능하다.
const ReactComponent = () => {
 const { openDialog } = useDialog();

 // (아래 GIF처럼 버튼의 onClick 액션을 핸들링하는 함수입니다.)
 const handleSubmit = async (): Promise => {

   // 화면에 띄울 다이얼로그를 선언하고, 프로미스 결과를 기다립니다.
   // 사용자가 '동의' 버튼을 누르면 true로 평가됩니다.
   const hasConfirmed = await openDialog({
     title: '데이터 전송',
     contents: '입력한 데이터를 전송할까요?',
   });

   if (hasConfirmed) {
     // 이후 비즈니스 로직 실행
   }
 };
}


const useDialog = () => {
 const dispatch = useAppDispatch();

 // 리액트 컴포넌트에서 훅을 사용해서 openDialog 함수를 호출했다면
 // 썽크(thunk) 액션 생성자 함수를 통해서 액션을 디스패치하게 됩니다.
 const openDialog = async (state: DialogContents): Promise => {
   const { payload } = await dispatch(confirmationThunkActions.open(state));

   return payload
 };

 // ...

 return {
   openDialog,
   ...
 }
};

 const confirmationThunkActions = {
 open: createAsyncThunk<
   boolean,
   DialogContents,
   { extra: ThunkExtraArguments }
 >('dialog', async (payload, { extra: { store }, dispatch }) => {
   // thunk 액션이 실행되고, 실제로 다이얼로그가 열리는 부분입니다.
   dispatch(openDialog(payload));

   return new Promise<boolean>((resolve) => {

     // 스토어를 구독하고 상태 변경을 감지하면
     // 사용자의 '동의', '거절' 액션에 맞추어 resolve 처리합니다.
     const unsubscribe = store.subscribe(() => {
       const { dialog } = store.getState() as RootState;

       if (dialog.isConfirmed) {
         unsubscribe();
         resolve(true);
       }

       if (dialog.isDeclined) {
         unsubscribe();
         resolve(false);
       }
     });
   });
 }),
};

export default confirmationThunkActions;
7. createEntityAdapter
정규화된 상태 구조, 즉 중복을 취소화하기 위해서 데이터가 구조화되고, 일관성이 보장된 구조에서 효율적인 CRUD를 수행하기 위해 미리 빌드된 리듀서 및 셀렉터를 생성하는 함수입니다. CRUD 함수를 따로 제공하고 있습니다.
interface Book {
  bookId: number
  title: string
  // ...
}

const booksAdapter = createEntityAdapter<Book>({
  selectId: (book) => book.bookId,
  sortComparer: (a, b) => a.title.localeCompare(b.title),
})

const booksSlice = createSlice({
  name: 'books',
  initialState: booksAdapter.getInitialState(),
  reducers: {
    bookAdded: booksAdapter.addOne,
    booksReceived(state, action: PayloadAction<{ books: Book[] }>) {
      booksAdapter.setAll(state, action.payload.books)
    },
  },
})


// ex2
type Author = { id: number; name: string }
type Article = { id: number; title: string }
type Comment = { id: number; commenter: number }

export const fetchArticle = createAsyncThunk(
  'articles/fetchArticle',
  async (id: number) => {
    const data = await fakeAPI.articles.show(id)
    // Normalize the data so reducers can responded to a predictable payload.
    // Note: at the time of writing, normalizr does not automatically infer the result,
    // so we explicitly declare the shape of the returned normalized data as a generic arg.
    const normalized = normalize<
      any,
      {
        articles: { [key: string]: Article }
        users: { [key: string]: Author }
        comments: { [key: string]: Comment }
      }
    >(data, articleEntity)
    return normalized.entities
  }
)

export const slice = createSlice({
  name: 'articles',
  initialState: articlesAdapter.getInitialState(),
  reducers: {},
  extraReducers: (builder) => {
    builder.addCase(fetchArticle.fulfilled, (state, action) => {
      // The type signature on action.payload matches what we passed into the generic for `normalize`, allowing us to access specific properties on `payload.articles` if desired
      articlesAdapter.upsertMany(state, action.payload.articles)
    })
  },
})
8. createSelector
useSelector 대신 사용
import { createSelector } from "@reduxjs/toolkit";
import { RootState } from "../../store";

export const selectCount = (state: RootState) => state.counter.value;

export const countSelector = createSelector(selectCount, state => state);
끝
지금 당장은 튜토리얼만 따라해본 상태이기 때문에 로직에 맞는 패턴을 작성하기 위해 고민해보고 직접 리팩토링에 사용하면서 기존과 달리 정말 간단하고 좋은 사용성을 갖추었는지 느껴보고싶다!
추가로 persist gate 적용법도 작성할 예정.
참고
https://redux-toolkit.js.org/tutorials/typescript
https://redux-toolkit.js.org/usage/usage-with-typescript
http://blog.hwahae.co.kr/all/tech/tech-tech/6946/?popular=6946
https://www.merixstudio.com/blog/introduction-using-redux-toolkit-nextjs-and-typescript/